


Quick Answer: Lightroom can slow down because of limited system resources, catalog or cache issues, GPU problems, or demanding tasks like AI Denoise and Super Resolution. To speed it up, optimize your cache and previews, check GPU settings, and reduce background workloads. If AI enhancement is the main bottleneck, process selected photos with Aiarty Image Enhancer, then import them back into Lightroom for further editing.
Lightroom is supposed to make photo editing easier, not leave you waiting for previews to load, adjustments to respond, or AI Denoise to finish processing. If Lightroom feels sluggish even on a capable computer, the problem may be more than a lack of hardware power. Catalog settings, cache performance, GPU configuration, and demanding AI tasks can all slow down your workflow.
The good news is that you may not need a hardware upgrade to get Lightroom running smoothly again. This guide explains why Lightroom and Lightroom Classic can be slow, walks you through practical fixes, and shows how to use Aiarty Image Enhancer for demanding image enhancement tasks while keeping Lightroom at the center of your editing workflow.
Why Is Lightroom So Slow?
Lightroom can slow down for different reasons depending on the task. Photos may take too long to load, adjustments may lag, or AI Denoise may take much longer than expected. Identifying when the slowdown occurs helps you focus on the right fix instead of changing settings unnecessarily.
1. Hardware limitations: Lightroom relies on your CPU, RAM, GPU, and storage to import photos, render previews, and process edits. Limited memory, an incompatible GPU, or a slow hard drive can cause delays, especially with large RAW files. Check system resource usage to see whether your CPU, memory, GPU, or disk is reaching its limit.
2. Cache, previews, and catalog issues: Lightroom uses the Camera Raw cache, previews, and catalog data to keep browsing and editing responsive. If photos load slowly or switching between images takes too long, check your cache settings, preview generation, and catalog storage location.
3. Background tasks and complex edits: Imports, preview generation, syncing, exports, and complex masks can compete for system resources. If Lightroom becomes slow during these operations but runs normally afterward, allow background tasks to finish and avoid running several demanding processes at once.
4. Resource-intensive AI processing: Lightroom AI Denoise and Super Resolution require more processing power than routine adjustments. If Lightroom is responsive during ordinary editing but slows down significantly during these tasks, check your GPU and available memory. If AI enhancement remains the main bottleneck, a dedicated tool such as Aiarty Image Enhancer may provide an alternative for selected denoising, deblurring, and upscaling tasks.
How to Speed Up Lightroom: 8 Fixes to Try
If Lightroom is running slowly, start with the simplest checks before changing preferences or upgrading your computer. The right fix depends on the symptom: slow photo browsing may point to storage or previews, while lag during AI Denoise may indicate a processing bottleneck.
The following steps focus mainly on Lightroom Classic where menu paths differ between versions. If you use the cloud-based Lightroom desktop app, some settings may be located elsewhere.
1. Check CPU, RAM, GPU, and Disk Usage
Before changing Lightroom settings, check which system resource is under the most pressure. This helps you determine whether the slowdown comes from limited hardware, background tasks, or a particular editing operation.
- On Windows: Press Ctrl + Shift + Esc to open Task Manager, then check the CPU, Memory, GPU, and Disk columns under Processes or Performance.
- On macOS: Open Activity Monitor and review CPU, Memory, and Disk activity. Check the Memory Pressure graph to see whether available memory is becoming a problem.
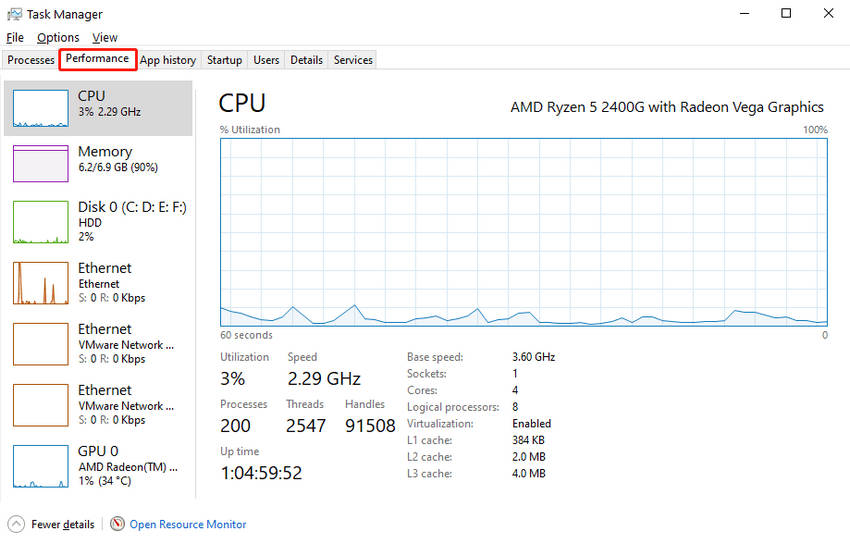
Observe these metrics while reproducing the slowdown. If memory usage is high, close unnecessary applications. If disk activity stays high while you switch photos, investigate your storage and preview settings. If CPU or GPU usage spikes mainly during AI Denoise or other demanding operations, the processing workload may be the limiting factor.
Do not assume that high usage alone means something is wrong. The goal is to identify which resource is limiting the task you are trying to complete.
2. Move Your Catalog and Cache to a Fast SSD
If Lightroom takes a long time to open photos, switch between images, or load previews, storage speed may be contributing to the problem.
For Lightroom Classic, keeping the catalog, preview files, and Camera Raw cache on a fast SSD can improve responsiveness compared with a slower hard drive. Adobe also recommends using an SSD for the catalog and previews. Adobe's performance guidelines provide further storage recommendations.
Check the following:
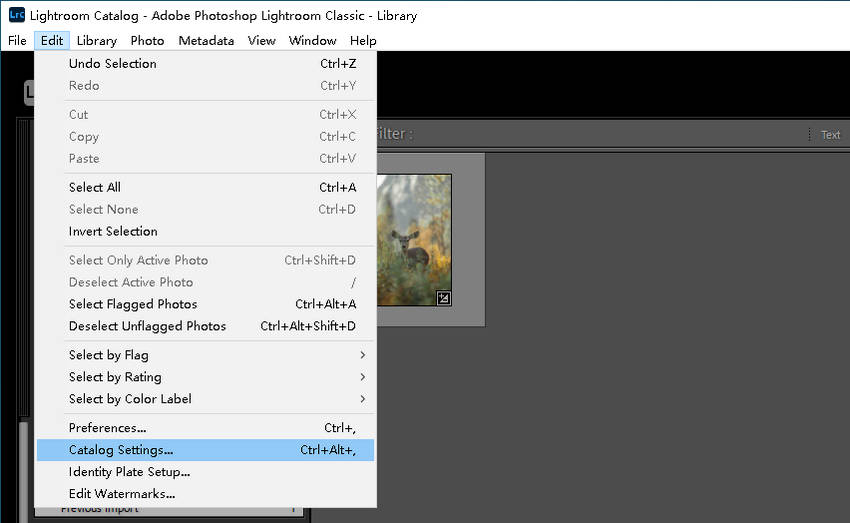
- Catalog location: If your catalog is on a traditional hard drive or slow external drive, consider moving it to an internal SSD.
- Cache location: Keep the Camera Raw cache on a fast drive with sufficient free space.
- Available storage: Avoid filling the system or working drive to capacity. Adobe recommends keeping at least 20% of the drive free for Lightroom Classic's working files and other operations.
You do not necessarily need to move your entire photo library to the fastest drive. If your storage budget is limited, prioritize the catalog, previews, and cache, then test whether the change improves the operations that feel slow.
3. Clear or Increase the Lightroom Camera Raw Cache
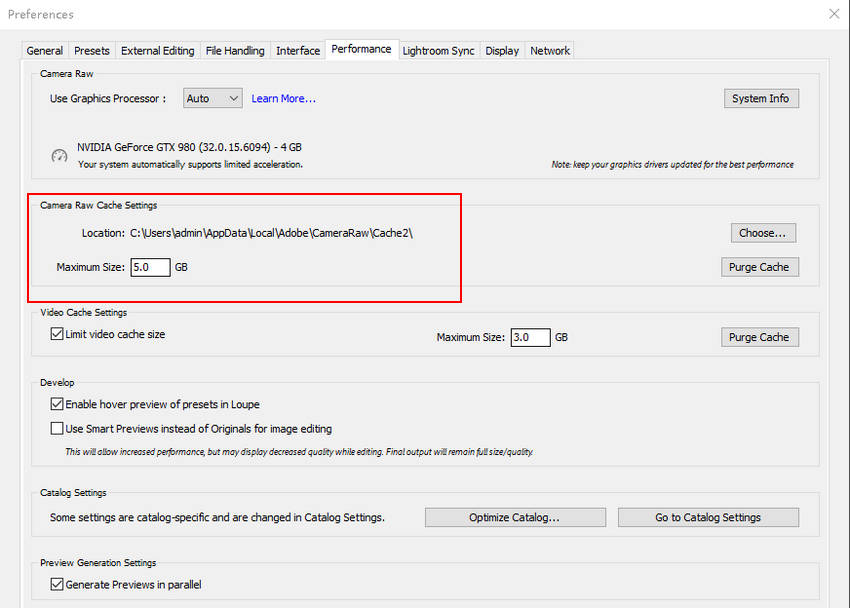
The Camera Raw cache stores image data that Lightroom Classic can reuse when rendering RAW photos in the Develop module. If you frequently edit large RAW files, increasing the cache size may reduce the need to repeatedly process data that has already been cached.
To adjust it in Lightroom Classic:
- Open Edit > Preferences on Windows or Lightroom Classic > Preferences on macOS.
- Select Performance.
- Find Camera Raw Cache Settings.
- Increase the maximum cache size if you regularly work with many RAW files and have enough disk space.
Adobe notes that some users benefit from increasing the cache to 20 GB or more, although the ideal size depends on the workflow.
Clearing the cache is a different step. It may be useful when troubleshooting suspected cache problems, but it is not a routine speed boost. After clearing it, Lightroom may need to regenerate cached data, so the next few edits can actually take longer.
Which should you do? Increase the cache if Develop performance is slow and you frequently work with RAW files. Clear it only when troubleshooting a specific issue or when there is a reason to rebuild cached data.
4. Optimize the Catalog and Manage Previews
If Lightroom Classic is slow when browsing folders, switching between photos, or opening images in the Develop module, review your catalog and preview settings.
Optimize the catalog
- Back up your catalog before performing maintenance.
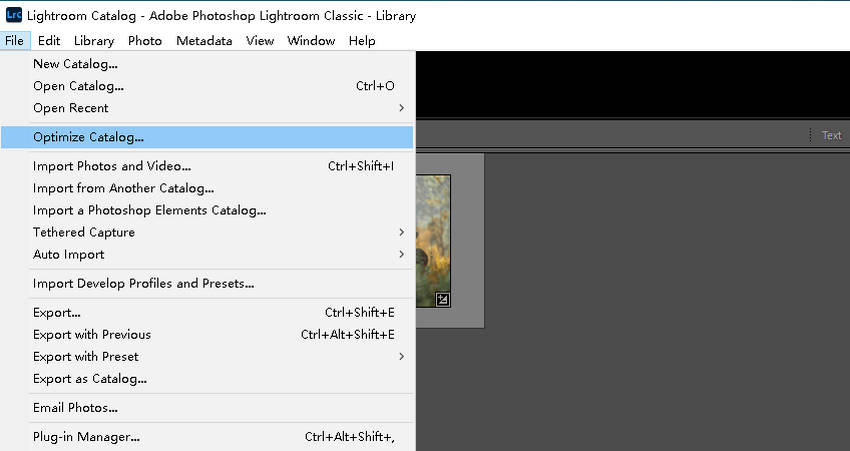
- In Lightroom Classic, choose File > Optimize Catalog.
- Follow the on-screen instructions and test whether browsing or editing becomes more responsive.
Catalog optimization can help maintain efficient catalog operation, but it will not resolve hardware limitations or every type of lag.
Choose the right previews
- Standard Previews: Useful for everyday browsing in the Library module.
- 1:1 Previews: Helpful when you frequently inspect photos at full resolution, but they take more time and storage to generate.
- Smart Previews: Smaller proxy files that can help you edit when originals are stored on a disconnected or slower drive. They are not a universal fix for a slow catalog or sluggish interface.
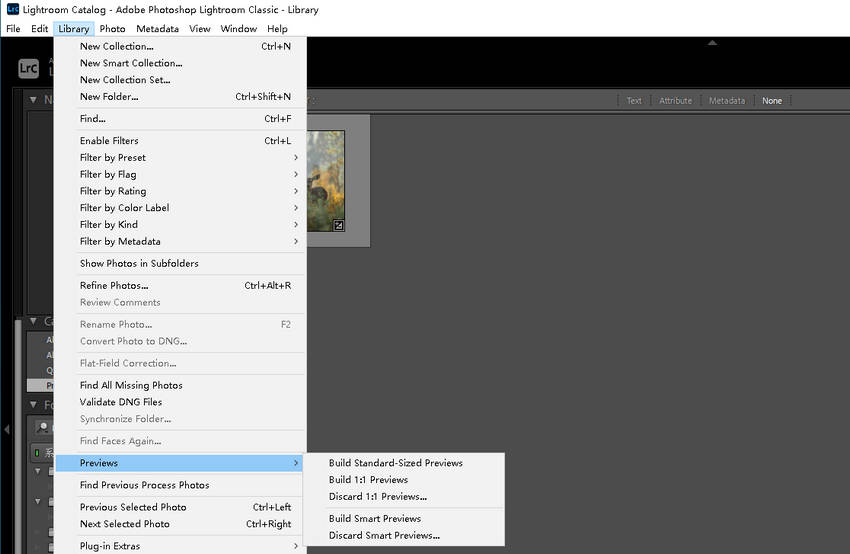
If you import hundreds or thousands of photos, avoid generating every high-resolution preview at once unless you need them immediately. You can allow Lightroom to finish essential background processing or generate the previews you need before a culling session.
Note: Do not routinely delete all preview files as a performance fix. Lightroom will have to rebuild missing previews, which can make browsing slower until the process is complete.
5. Check GPU Acceleration and Update Graphics Drivers
A compatible GPU can accelerate supported Lightroom operations, including image display and adjustments in the Develop module. However, an outdated driver, incompatible graphics card, or graphics-related issue can also cause lag.
In Lightroom Classic:
- Open Edit > Preferences > Performance on Windows, or Lightroom Classic > Preferences > Performance on macOS.
- Check whether Lightroom recognizes your graphics processor.
- Review the Use Graphics Processor setting. If Lightroom is working normally, leave it on Auto initially.
- Update your graphics driver from the GPU manufacturer's official website, or install the appropriate macOS updates.
- If you suspect a GPU-related problem, temporarily set GPU acceleration to Off and compare performance using the same photo and editing actions.
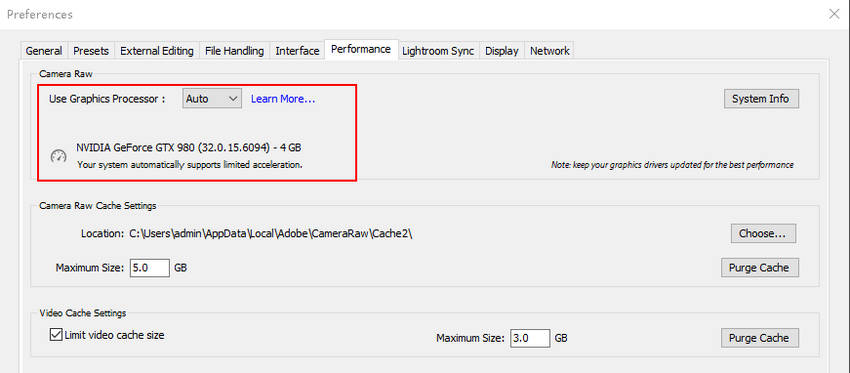
If disabling GPU acceleration makes Lightroom noticeably smoother, investigate driver compatibility and GPU settings rather than assuming you need a more powerful graphics card. If performance becomes worse, restore the previous setting.
GPU behavior varies by Lightroom version and task. Turning acceleration off is a diagnostic test, not a universal recommendation. Refer to Adobe's Lightroom Classic GPU FAQ for supported features and troubleshooting guidance.
6. Reduce Background Tasks and Unnecessary Processing
Lightroom can become less responsive when several resource-intensive tasks run simultaneously. Imports, preview generation, syncing, exports, and complex edits may compete for CPU time, memory, GPU resources, and disk bandwidth.
Try these adjustments:
- Let large imports and preview-generation jobs finish before starting another demanding task.
- Avoid running multiple heavy applications alongside Lightroom when memory or GPU resources are limited.
- If Develop adjustments are slow, test a less complex edit on the same image to determine whether masks or other demanding operations are contributing to the delay.
- If syncing is active, allow it to finish and check whether responsiveness improves.
If Lightroom runs smoothly after background work finishes, you may not need to change your hardware or reset your preferences. Scheduling demanding operations separately can make your workflow more responsive.
7. Update Lightroom and Troubleshoot Plugins or Preferences
If Lightroom remains slow after checking hardware, storage, cache, and GPU settings, investigate software-related issues.
Update Lightroom. Open the Creative Cloud desktop app and check for an available Lightroom update. Install a stable, compatible release rather than assuming that every slowdown requires a hardware change.
Check plugins and recent changes. If the problem started after installing a plugin, changing preferences, or updating a driver, temporarily disable the suspected component and retest. This can help identify whether a recent change is responsible. >>Best Lightroom Plugins for Professional Photographers
Reset preferences only when needed. A corrupted or problematic preference file can sometimes cause unexpected behavior, but resetting preferences should be a later troubleshooting step. Record your custom settings first, and follow Adobe's instructions for your version of Lightroom.
If the problem persists, note your Lightroom version, operating system, and the exact action that triggers the lag. These details make it easier to narrow down a version-specific issue.
8. Upgrade Hardware Only When Necessary
If Lightroom remains slow after software and storage troubleshooting, compare your computer with Adobe's Lightroom Classic system requirements. Upgrade based on the bottleneck you identify, rather than replacing your computer unnecessarily.
The Minimum vs. Recommended Hardware Specs for Lightroom
The table summarizes key requirements for Lightroom Classic 15.0 and later. Recommended specifications are practical targets for smoother editing, not guarantees of performance.
For macOS, Adobe lists an Apple Silicon GPU (M1 or later) and 16 GB of unified memory for full GPU acceleration and AI features. Requirements vary by operating system and version, so check Adobe's current specifications before upgrading.
Match the upgrade to the bottleneck:
- RAM: Increase memory if usage is consistently high during editing.
- CPU: Consider a faster processor if CPU usage remains high during imports, exports, or routine processing.
- GPU: Upgrade if your graphics hardware does not support the features you need or limits GPU-intensive tasks.
- SSD: Move your catalog, previews, and cache to a faster drive if storage is slowing down your workflow.
Meeting minimum requirements does not guarantee smooth performance, especially for high-resolution images and AI tasks. Test the same workload after making changes to confirm that an upgrade addresses the actual problem.
If Lightroom is still slow mainly during AI Denoise or Super Resolution, hardware upgrades may not be your only option. Consider using a dedicated tool such as Aiarty Image Enhancer for selected enhancement tasks.
A Faster Lightroom Workflow with Aiarty Image Enhancer
Lightroom remains useful for RAW editing, color correction, and photo management. However, if AI Denoise or Super Resolution takes too long, you can use Aiarty Image Enhancer for selected photos that need denoising, deblurring, upscaling, or detail enhancement, while keeping Lightroom at the center of your workflow.
Speed Up AI Enhancement with Aiarty Image Enhancer
Depending on your hardware, source images, and settings, Aiarty Image Enhancer may process certain enhancement tasks faster than Lightroom's native AI tools. It also offers a smoother way to handle selected images without changing your entire editing setup.
- Spend less time waiting for AI enhancement: Use Aiarty for selected photos needing intensive denoising, upscaling, or detail recovery. It may be faster than Lightroom's AI tools, depending on your hardware and task.
- Move between Lightroom and Aiarty more smoothly: Aiarty can configure itself as an external editor for Lightroom Classic, simplifying setup. A fixed output path helps Lightroom locate processed files.
- Keep working while images are processing: Import additional photos while other images are being processed or exported, so you can prepare the next batch without waiting.
- Maintain control over image quality and files: Choose suitable AI models and adjust enhancement strength for natural-looking results. Check textures and fine details, track progress with export status labels, and use overwrite confirmation to protect existing files.
For the best results, use Lightroom for your initial RAW adjustments, send only the photos that need additional enhancement to Aiarty, and import the processed files back into Lightroom for final edits and organization. This hybrid workflow lets you keep your familiar editing environment while using a dedicated tool for demanding AI enhancement tasks.
How to Integrate Aiarty into Your Lightroom Workflow for Faster AI Processing
Keep Lightroom Classic for RAW editing, color correction, and photo management, and use Aiarty Image Enhancer for demanding tasks such as AI denoising, deblurring, and upscaling. This hybrid workflow lets you enhance selected photos without replacing your existing editing setup.
Step 1. Make Basic RAW Adjustments in Lightroom
Import your RAW files and adjust exposure, white balance, and tones. Identify images that need additional noise reduction, detail enhancement, or upscaling, while keeping the original files intact.
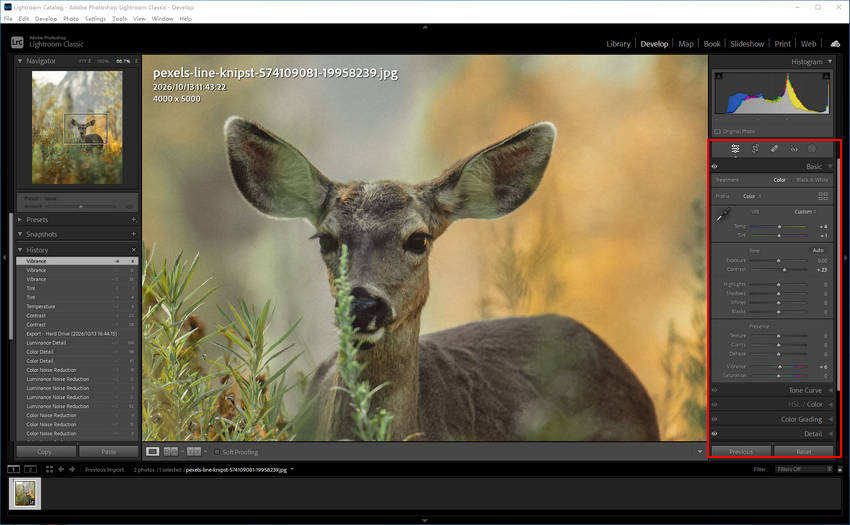
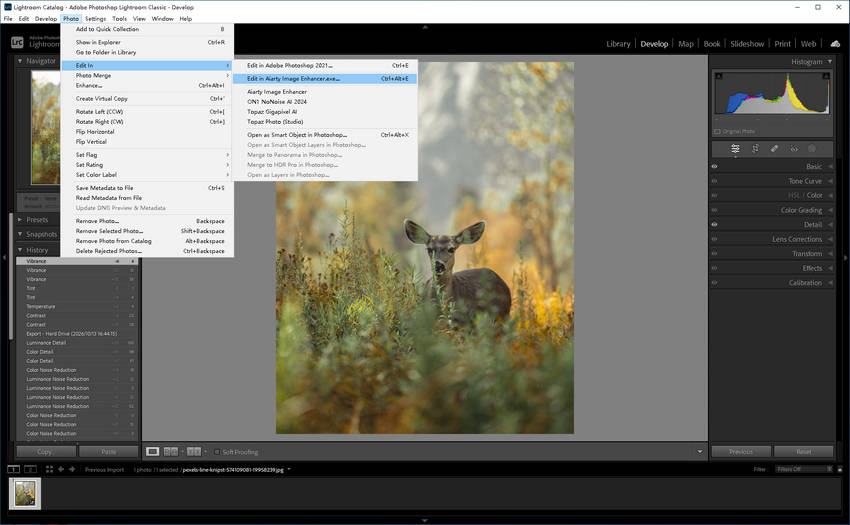
Step 2. Send Selected Photos to Aiarty
Select the images that need enhancement and open them in Aiarty through Lightroom Classic's external editing workflow. Aiarty can automatically configure itself as an external editor, simplifying setup and file handoff.
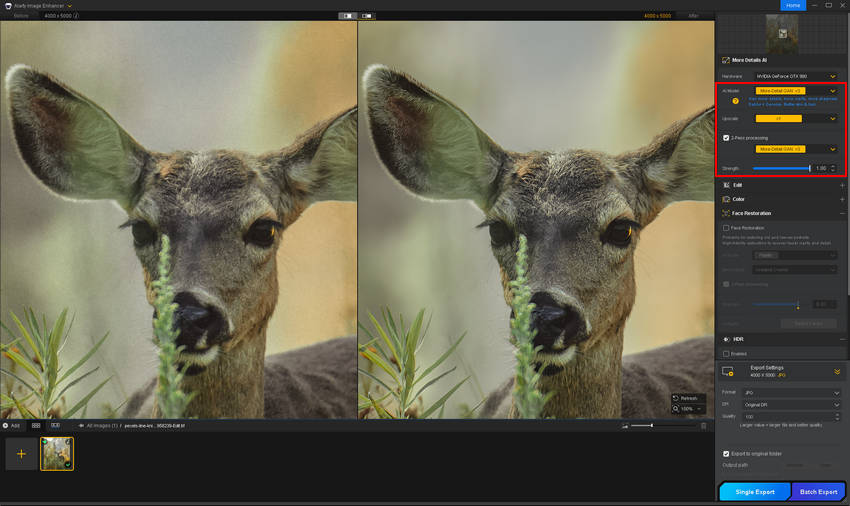
Step 3. Enhance Images in Aiarty Image Enhancer
Choose a suitable AI model like More-Detail GAN v3, adjust the enhancement strength for natural-looking results, and select an upscaling factor if needed. Preview images at 100% zoom to check noise reduction, textures, and fine details. You can also import the next batch while current images are processing or exporting, keeping your workflow moving.
Step 4. Return Enhanced Images and Finish Editing
After Aiarty finishes processing and exporting, the enhanced images replace the existing Lightroom edited copies and appear in Lightroom's bottom filmstrip. Review the results, then continue with color grading, local adjustments, cropping, and final export. Your original photos remain available in Lightroom.
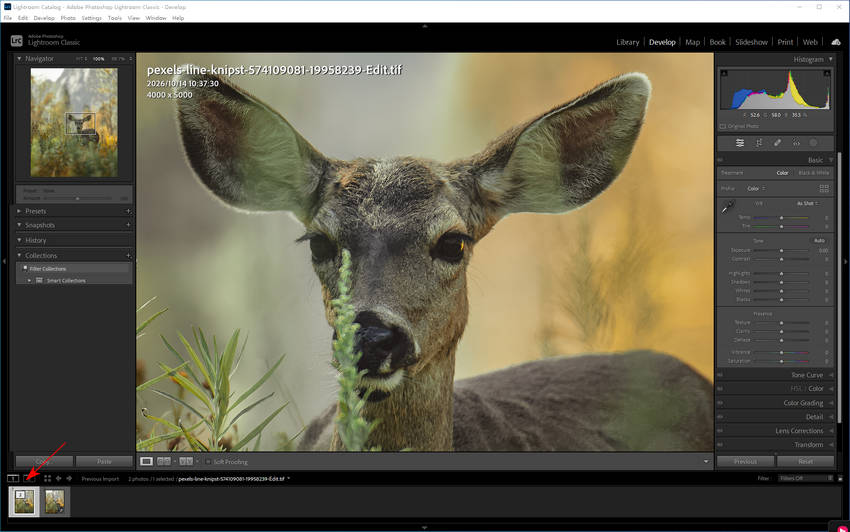
This workflow keeps Lightroom at the center of your photo library while Aiarty handles selected AI enhancement tasks, reducing manual file handling and keeping editing sessions moving.
How to Keep Lightroom Running Smoothly
Once Lightroom is running more smoothly, a few ongoing habits can help maintain its performance:
- Keep enough free disk space: Leave sufficient space on the drives storing your Lightroom catalog, previews, and Camera Raw cache to avoid storage-related slowdowns.
- Manage previews sensibly: Generate previews when needed and remove outdated or unnecessary previews if they take up too much disk space.
- Space out demanding tasks: Avoid running large imports, exports, preview generation, and other resource-intensive applications simultaneously when possible.
- Keep software up to date: Install compatible Lightroom updates and graphics drivers to benefit from performance improvements and bug fixes.
Check Lightroom's responsiveness periodically, especially as your photo library grows. Maintaining enough storage space and avoiding unnecessary background workloads can help keep your editing workflow consistent over time.
Conclusion
When Lightroom is slow, start by identifying the specific bottleneck rather than changing settings or upgrading hardware at random. Catalog and cache maintenance, GPU configuration, storage performance, and background workloads can all affect responsiveness, while AI Denoise and Super Resolution may require a different approach.
If image enhancement accounts for much of your waiting time, evaluate Aiarty Image Enhancer on your own photos and hardware to see whether it can deliver faster processing and suitable image quality. You can keep Lightroom for RAW editing, color correction, and photo management while using Aiarty for selected enhancement tasks, creating a workflow that balances efficiency with the results you need.
 FAQs About Lightroom Running Slow
Adobe lists 8 GB of RAM as the minimum for Lightroom Classic, with 16 GB or more recommended for smoother performance. Large RAW files, complex edits, and AI features can require additional memory. If RAM usage stays high during editing, upgrading memory may help reduce slowdowns, especially when multitasking.
The best upgrade depends on your bottleneck. An SSD can improve catalog and preview access, more RAM can help when memory is limited, and a stronger GPU can benefit supported GPU-accelerated and AI tasks. Check system resource usage during the tasks that feel slow before deciding which component to upgrade.
Smart Previews let you edit using smaller proxy files, which can make browsing and adjustments more responsive on some systems, especially when originals are stored on a slow or disconnected drive. Lightroom applies your edits to the original files when they are available for full-resolution output. For detailed work or AI processing, use the original files when required by the feature.
No. Clearing the Camera Raw cache removes temporary cached data, not your original photos or Lightroom catalog. Lightroom can rebuild the cache as you work, although some images may take longer to load the next time they are opened.
Slow photo switching can result from previews that have not finished generating, limited RAM, a slow drive, or a large catalog. Background imports and syncing can also contribute. Try generating suitable previews in advance, storing the catalog and previews on an SSD, and allowing resource-intensive tasks to finish.
AI Denoise requires substantial processing resources. Its speed depends on GPU capability, available memory, image resolution, and system conditions. Check that your GPU is supported and recognized by Lightroom. If AI Denoise remains a bottleneck, compare its processing time with a dedicated enhancement tool such as Aiarty Image Enhancer using the same source images.
Yes. Use Lightroom for RAW adjustments, color correction, and photo management, then process selected images with Aiarty Image Enhancer for denoising, deblurring, upscaling, and detail enhancement. Aiarty supports an external editor workflow with Lightroom Classic, allowing you to bring enhanced files back into your existing editing process. Processing speed and image quality depend on the source images, hardware, and settings.
You May Also Like


This post was written by Brenda Peng who is a seasoned editor at Digiarty Software who loves turning ordinary photos into extraordinary works of art. With AI assistance for brainstorming and drafting, the post is reviewed for accuracy by our expert Abby Poole for her expertise in this field.
