4 Best Ways to Remove Grain from Your Photos
Digital noise, commonly known as grain, is a frequent issue that affects photos. It appears as unwanted texture, obscuring fine details and reducing overall image clarity. If you're looking to remove grain for photos and restore a clean look, this guide is for you.
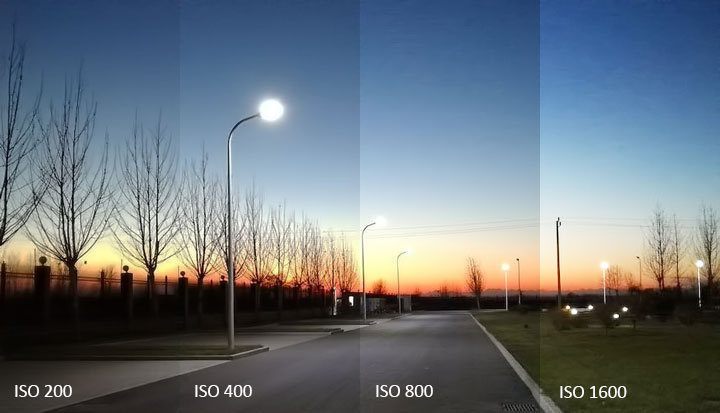
Grain frequently appears when shooting in challenging conditions like low light or at high ISO settings, and can also be a characteristic of certain camera sensors.
However, digital noise is not a problem you have to live with. Removing grain from your photos is achievable, and often, it's more straightforward than photographers might initially believe.
In this post, we will share 4 effective methods to remove grain from photos, so you can restore clarity to your images.
Why Grain Happens: Understanding Image Grain
Before we get to the fixes, let's quickly touch on why grain happens in the first place. Grain, or digital noise, is that speckled look that can ruin photos. It takes away from smooth areas and clear lines. But where does it come from? Knowing the reasons helps you understand how to remove grain from photos better. So, let's take a quick look at the common causes.
High ISO: Light Sensitivity Boost, Noise Boost Too. ISO is basically your camera's sensitivity to light. If it's dark, you might boost the ISO to see more. But that boost comes with a price: noise. Think of it like turning up the volume – you get more sound, but also more of that background hiss.
Low Light: Not Enough Light, More Noise. Cameras need light to see. When it's dark, they have to work harder, and sometimes they end up "guessing" at details. That guessing? That's often noise. Night photos or indoor shots without good lighting are prime examples.
Small Sensors: Less Light, More Noise. Sensor size matters. Bigger sensors (like in DSLRs) are better at gathering light than smaller ones (like in smartphones). Less light gathered can mean more noise in the image.
Pushing Edits Too Far: Shadow Recovery and Noise. When you edit a photo, especially trying to brighten shadows, you can sometimes bring out the noise that was hidden in the dark areas. It's a balancing act.
Method 1. Remove Grain from Photo with AI in One Click
If you want to remove grain from photos without a ton of effort or technical know-how, Aiarty Image Enhancer is worth checking out. Many traditional noise reduction tools can just blur away the noise, but they blur away details too.
Aiarty Image Enhancer is different. It uses AI trained on a massive number of images, which allows it to differentiate between actual image details, like skin texture or tree leaves, and unwanted grainy. This means it can effectively remove the graininess without compromising the finer elements of your photos.
Better yet? This AI-powered photo noise reduction software is not just for grainy photos.


Core features Aiarty has to make your image denoising experience better:
- Ultra-High Upscaling: Upscale images to 4K, 8K, or even 32K for stunning prints and digital displays. You can fully customize the magnification scale or specific resolution.
- Precision Control: Easily adjust the Denoise Strength to find the perfect balance between crystal-clear clarity and natural photographic texture.
- 5 Specialized AI Models: Tailored algorithms for different image types to ensure the most authentic restoration results.
- Total Artifact Removal: Eliminate grain, JPEG compression artifacts, and digital noise while faithfully preserving intricate details like skin texture and hair.
- Efficiency at Scale: Bulk process entire folders with one click. Optimized to run smoothly even on mid-range computers without crashing.
- Professional Color Correction: Fine-tune your visuals with built-in controls for Temperature, Tint, Exposure, Contrast, Saturation, and more.
- AI Object Eraser: Effortlessly remove distracting photobombers, background clutter, watermarks, or unwanted text to keep your composition clean.
Free download Aiarty Image Enhancer to remove grain from photos now!
Step 1. Import Your Grainy Photos
Launch Aiarty Image Enhancer. Its lightweight architecture ensures high performance without needing high-end workstation hardware.
Drag and drop a single image, multiple files, or an entire folder into the workspace. Aiarty supports all popular formats, such as JPG, PNG, HEIC, and various Professional RAW formats.

Step 2. Select the Optimal AI Model
Choose from 5 cutting-edge AI models based on your specific image type and restoration needs. Each model is trained to handle different levels of noise and detail complexity.
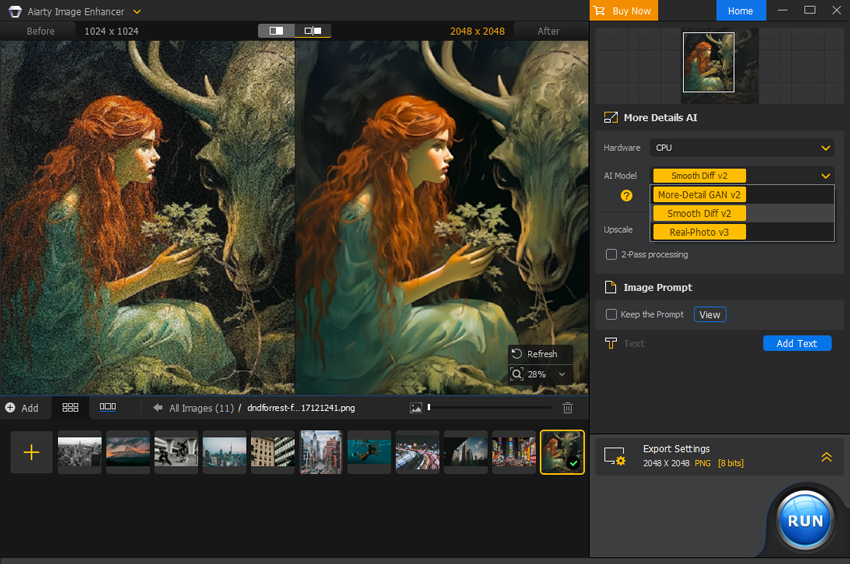
Step 3. Set Your Resolution (Upscale or Original)
Click the Upscale dropdown. If you only want to remove grain without changing the image dimensions, select x1. Otherwise, choose from 2x, 4x, or 8x to enhance the resolution simultaneously.

Step 4. Generate Details and Preview
Click Start in the "Generate More Image Details" window to begin the AI inference. Note: The first use requires a one-time model download, which may take a moment. Subsequent uses will be significantly faster.
Once finished, preview the result. For further refinement, you can adjust the Strength slider, enable 2-Pass Processing for stubborn noise, or use the Color Correction panel to perfect the look.
Step 5. Export Your Cleaned-Up Photo
Once you are satisfied with the preview, click Single Export or Batch Export in the bottom right corner to save your noise-free, high-quality images.
Method 2. Remove Grain from Photos with Photoshop
Photoshop remains the gold standard for professionals seeking meticulous image manipulation. It offers unparalleled control for transforming grainy, low-quality images into refined visuals. However, achieving perfect results requires a delicate touch—over-editing can quickly strip away natural textures and lead to a "plastic" look.
- Industry-leading precision for complex, localized edits.
- Non-destructive workflow using Smart Objects and Layers.
- Comprehensive toolset beyond just noise reduction.
- Time-Consuming: Requires manual tweaking for every single image.
- Subscription Cost: Starts at $22.99/month.
- Steep Learning Curve: Can be overwhelming for beginners.
- Detail Loss: Traditional filters often blur fine textures like hair or skin.
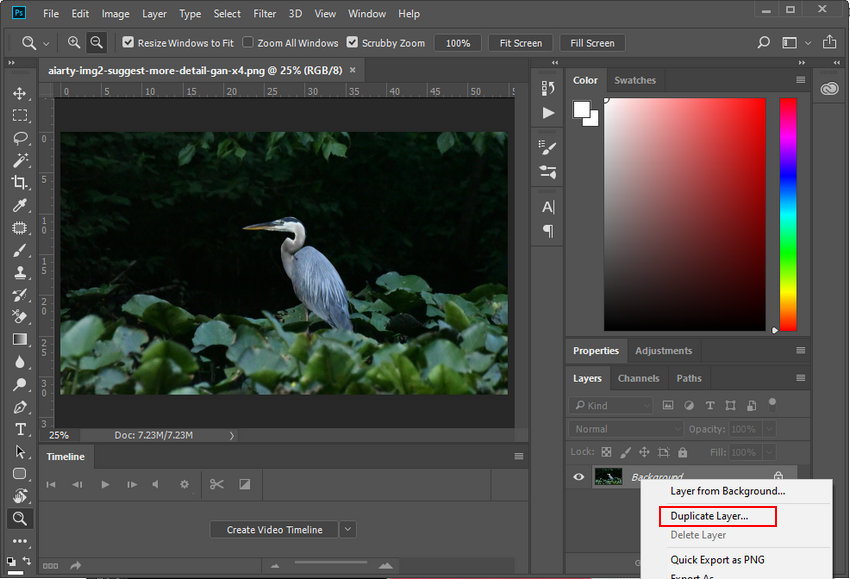
Step 1. Open Your Photo and Prepare Layers
Launch Photoshop and open your image. To ensure non-destructive editing, right-click your Background layer and select Duplicate Layer (or press Ctrl+J).
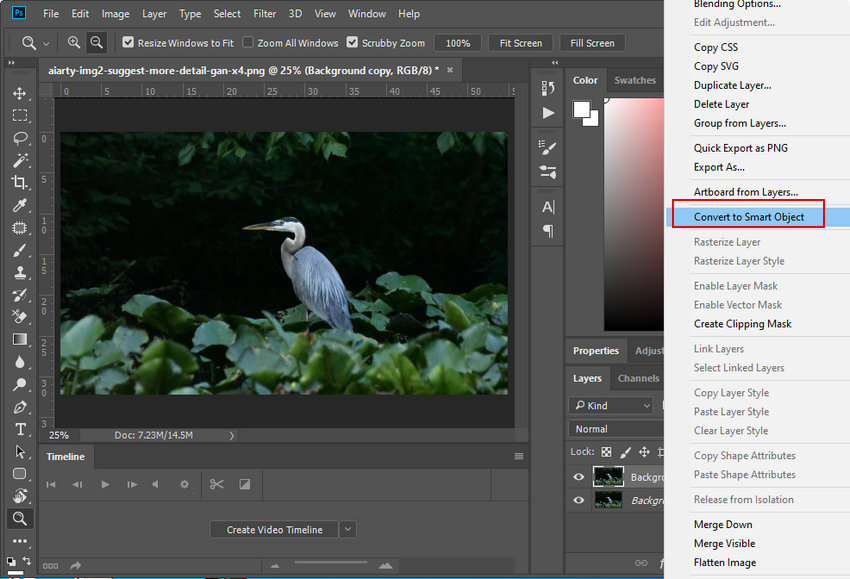
For the best results, convert this new layer into a Smart Object so you can adjust filters later.
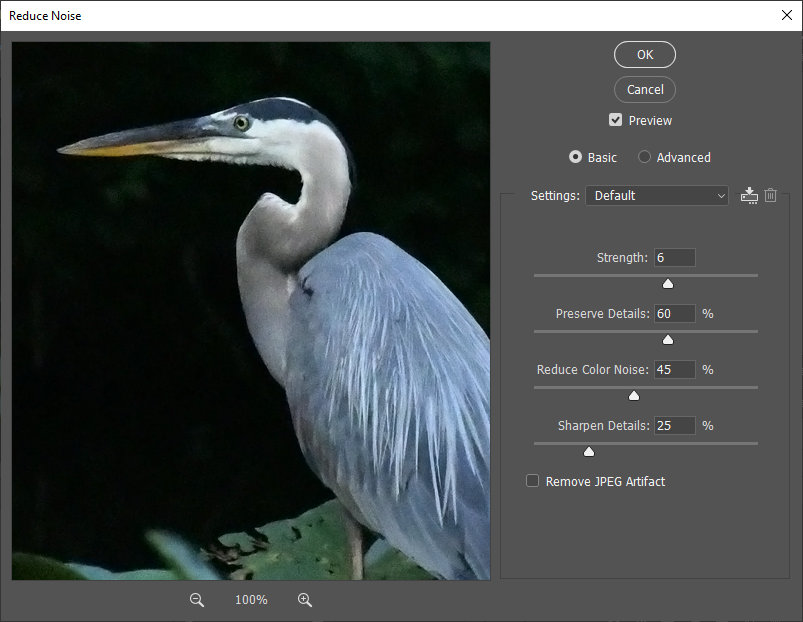
Step 2. Use the "Reduce Noise" Filter
Go to the top menu and select Filter > Noise > Reduce Noise.

In the dialog box, you'll find several sliders:
- Strength: Balance grain removal with detail preservation.
- Preserve Details: Higher values keep textures but may leave some noise.
- Reduce Color Noise: Effectively removes distracting color speckles (chroma noise).
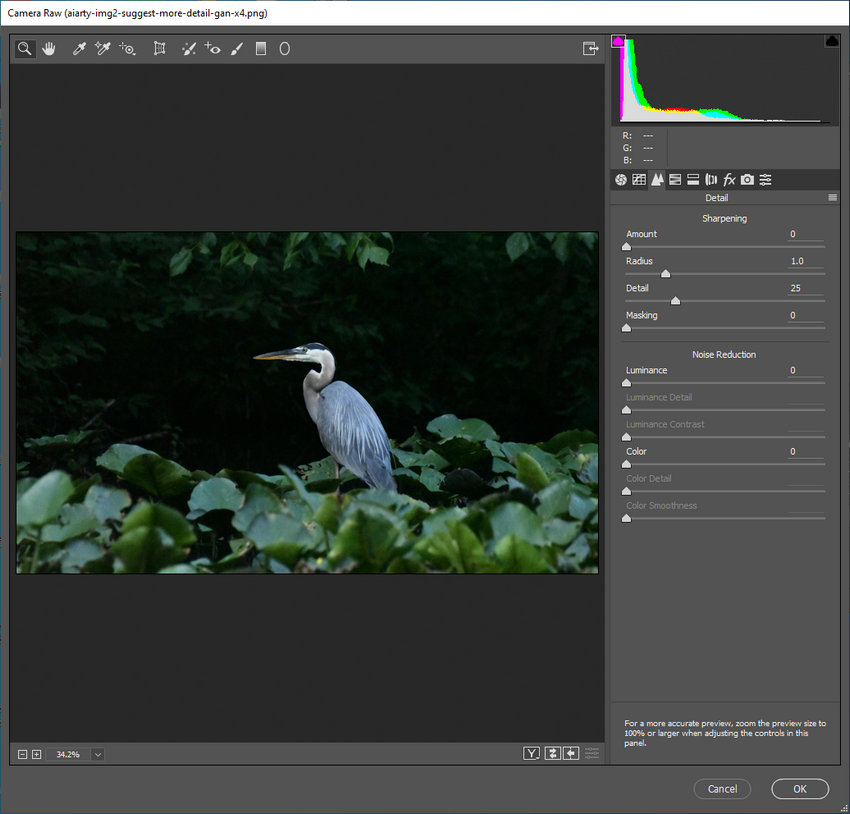
Step 3. Advanced Method: Camera Raw Filter (Recommended)
For more professional results, go to Filter > Camera Raw Filter and open the Detail tab. The Denoise engine here is more advanced than the standard noise filter, offering better separation between noise and natural image grain.
Step 4. Fine-tune and Mask
If the effect is too strong on important areas like eyes or lips, add a Layer Mask. Use a soft black brush to paint over those areas, bringing back the original sharpness while keeping the rest of the image smooth.
Method 3. Remove Grain from Photos with Lightroom
For many professional photographers, Adobe Lightroom is the go-to command center for managing and editing large photo libraries. Its noise reduction capabilities are built directly into its non-destructive workflow, making it an incredibly convenient first stop for cleaning up grain.
In the Detail Panel, Lightroom offers two primary ways to tackle noise:
- Manual Noise Reduction: Using the Luminance and Color sliders, you can precisely target grainy textures and color speckles. It excels at smoothing out images while giving you granular control over detail and contrast retention.
- AI Denoise (Newer Versions): Adobe has recently integrated an "AI Denoise" feature specifically for RAW files, which uses machine learning to intelligently distinguish between fine textures and unwanted artifacts.
The strength of Lightroom lies in its Masking tools, allowing you to apply noise reduction only to specific areas (like a noisy sky) while leaving your subject sharp.
Quick Steps to Denoise in Lightroom:
Step 1. Import Your Grainy Photos to Lightroom
Open Adobe Lightroom on your computer. Click the "Import" button or drag and drop the grainy photos you want to fix into the Library. Once added, select the image and switch to the Develop module.
Step 2. Locate the Detail Panel
On the right-hand sidebar of the Develop module, scroll down to find the Detail panel. This section contains all the tools for Sharpening and Noise Reduction.
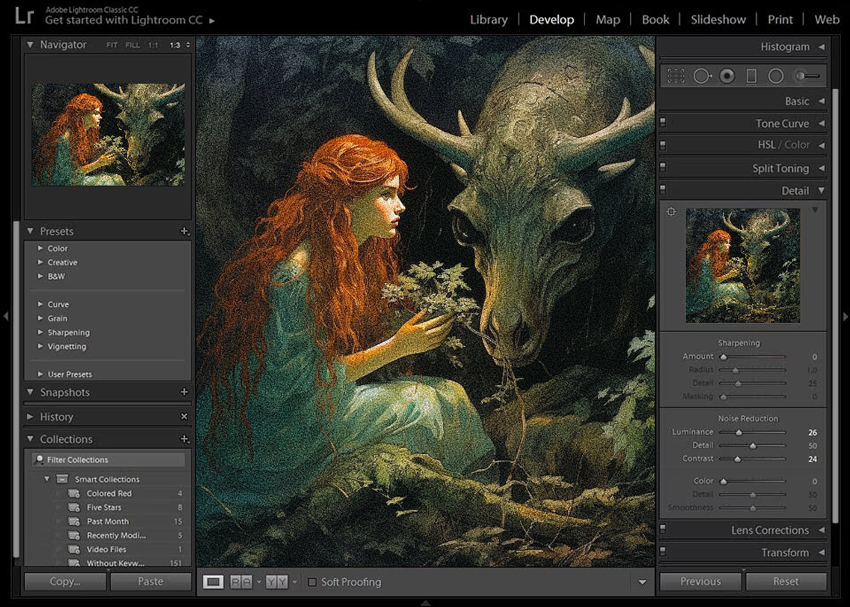
Step 3. Apply Manual Noise Reduction
Under the "Noise Reduction" section, move the Luminance slider to the right to smooth out the grain. You can also adjust the Detail and Contrast sliders below it to ensure the image doesn't look too "plastic" or soft.
Step 4. Use AI Denoise (For RAW Files)
If you are working with a RAW file, you can click the Denoise button for an automated, AI-powered fix. Lightroom will create a new "Enhanced" DNG file that significantly reduces noise while trying to preserve as much detail as possible.
Step 5. Fine-tune with Masking
To ensure the noise reduction is only affecting the grainy areas (like the background) and not your subject, hold the Alt key (Windows) or Option key (Mac) while moving the Masking slider under Sharpening to protect the edges.
Step 6. Export the Cleaned Image
Once you are satisfied with the balance between clarity and smoothness, go to File > Export to save your final, noise-free photo.
Method 4. Remove Grain from Photos Online
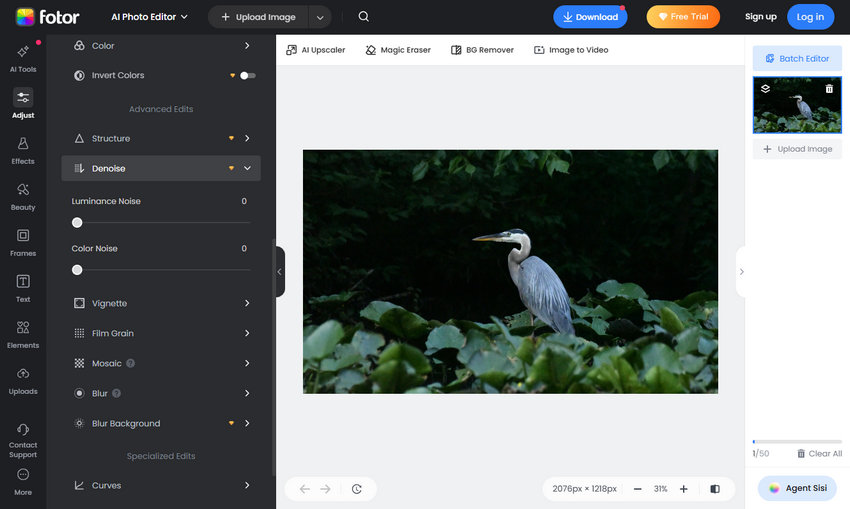
Fotor is a user-friendly and versatile online platform offering both photo editing and graphic design, enhanced by convenient AI-powered features like grainy noise reduction. This AI effectively helps improve image quality and reduce grain, resulting in cleaner and more visually appealing photos, making it a quick and accessible solution for many users.
However, because Fotor is web-based, it's worth keeping in mind a couple of things. For instance, how fast it runs can depend a bit on your internet connection, and it's generally set up for editing photos one at a time rather than processing huge batches all at once. If you're someone who likes to fine-tune things, you'll find Fotor offers less control compared to professional-grade photo editors.
- Does not require installation; works on any device.
- Beginner-friendly interface.
- Free downloads include a Fotor logo.
- Erases fine details like hair or fabric.
- Struggles with severe grain or low-light shots.
Step 1. Go to Fotor AI Photo Enhancer
Visit the Fotor website. Choose AI Photo Enhancer from the AI Tools menu. Click Enhance Photo Now. Upload your grainy photo.

Step 2. Adjust Noise Reduction Level
Fotor will automatically analyze your photo and apply noise reduction to minimize grain. Use the slider to adjust the amount of noise reduction. Drag right for more, left for less. Check the preview to get it right.
Step 3. Download Denoised Image
Once you're happy with the noise reduction, click Download. Your denoised image will be saved to your device. Free downloads may have a watermark.
How to Avoid Grainy Photos While Shooting
While AI and professional software can work wonders in post-processing, the best way to handle grain is to minimize it during the shoot. Here are a few essential tips to help you capture cleaner, sharper images from the start:
- Keep Your ISO Low: ISO measures your camera sensor's sensitivity to light. The higher the ISO, the more digital noise is introduced. Whenever possible, stick to your camera's base ISO (usually 100 or 200).
- Use a Faster Lens: Lenses with wider apertures (like f/1.8 or f/2.8) allow more light to hit the sensor. This enables you to use a lower ISO even in dim environments, significantly reducing the chance of grain.
- Expose to the Right (ETTR): This is a common pro technique. By slightly overexposing your image (without blowing out the highlights), you capture more data in the shadow areas. You can then darken the image in post-processing, which results in much less noise than trying to brighten a dark, underexposed photo.
- Always Shoot in RAW: Unlike JPEGs, RAW files contain all the data captured by the sensor. This gives you much more "headroom" to remove grain and recover details in software like Lightroom or Aiarty without destroying the image quality.
- Stable Your Camera: In low light, use a tripod so you can use a slower shutter speed instead of cranking up the ISO. Long exposures at low ISO will always be cleaner than fast exposures at high ISO.
Conclusion
Dealing with image grain is a common challenge in photography, but it no longer has to compromise your vision. As we've explored, the best approach depends entirely on your workflow and the final result you desire.
If you are a professional who enjoys spending time on granular, localized edits, Adobe Photoshop and Lightroom remain the gold standards for precision.
For a quick, casual fix for social media, online tools offer unmatched convenience.
However, for those who need a balance of professional-grade quality and automated efficiency, especially when handling high-ISO shots or large batches, Aiarty Image Enhancer stands out as the most modern solution. Its ability to reconstruct lost details rather than just blurring away noise marks a new era in photo restoration.
Ultimately, we recommend experimenting with these methods to see which fits your style. Whether through careful shooting techniques or the power of Generative AI, you now have the tools to ensure your photos are always crisp, clean, and professional.
You May Also Like
This post was written by Brenda Peng who is a seasoned editor at Digiarty Software who loves turning ordinary photos into extraordinary works of art. With AI assistance for brainstorming and drafting, the post is reviewed for accuracy by our expert Abby Poole for her expertise in this field.