How to Unblur an Image: 6 Best Apps to Fix Blurry Photos
Updated on
Can we fix a blurry photo caused by motion blur, out-of-focus, or compression? Yes, absolutely.
While unblurring was once nearly impossible, today's AI-powered image enhancers and professional editing software can reconstruct lost details with stunning precision. Whether you need a quick mobile app, an online fixer, or powerful desktop software to unblur an image, this guide covers the most effective solutions to restore your photos in seconds.
Let's dive into the 6 best tools to make your blurry pictures clear again.
Depending on your device and the severity of the blur, here are the top-rated solutions to fix blurry photos:
Aiarty Image Enhancer uses deep learning models to reconstruct lost details and provide a one-click fix for blurry pictures.
Ideal for photographers who need granular control. Photoshop offers professional manual tools like Shake Reduction and Smart Sharpen to fix complex blur issues on Desktop.
Ideal for quick "on-the-go" restoration on iOS and Android. Snapseed offers granular manual control through its Details tool, while Remini provides an AI-powered auto-fix to instantly recover clarity for free.
No installation required. These browser-based tools offer intuitive sliders for sharpening and clarity, making them the best choice for enhancing casual social media photos instantly.
Method 1. Unblur Images Automatically with AI
For non-techies, the most effective way to unblur a photo is by using AI-powered tools. While traditional sharpening filters merely enhance edges (often adding unwanted noise), modern AI tools can actually reconstruct lost details by "guessing" what the original scene looked like based on deep learning.
Among the top solutions, tools like Aiarty Image Enhancer, Topaz Photo AI, and Adobe’s AI features are the industry standards for restoring clarity. However, for those seeking the best budget-friendly yet professional-grade option, Aiarty Image Enhancer is the clear winner.
Aiarty features multiple specialized AI models to handle blur, noise, artifacts, and low resolution。
More-Detail GAN model is the most powerful deblurring model. It goes beyond simple sharpening to reconstruct intricate textures and sharp lines.
Face Restoration is a dedicated feature for low-res and blurry faces. It provides high-fidelity reconstruction, making it ideal for enhancing old family photos or out-of-focus portraits.
- AI-powered with advanced models for one-click automatic blur removal.
- Supports batch processing and a wide variety of image formats.
- Works fully offline, ensuring maximum photo privacy.
- Compatible with both Windows and Mac.
- Best performance requires a GPU; CPU processing is much slower.
- Color correction is manual, not a one-click auto fix.
How to Unblur Images with Aiarty Image Enhancer
Step 1. Download and install Aiarty Image Enhancer on your computer.
Step 2. Open Aiarty Image Enhancer and import the blurry image you want to fix by drag-and-drop or clicking + button.
Tips:
- You can import multiple images or add a file folder for batch processing.
- The supported image formats include.jpg, .jpeg, .jp2, .j2k, .jpf, .jpm, .jpg2, .j2c, .jpc, .jpx, .mj2, .png, png (16bit), .tif, .tiff, webp, bmp, heic, and various raw formats.
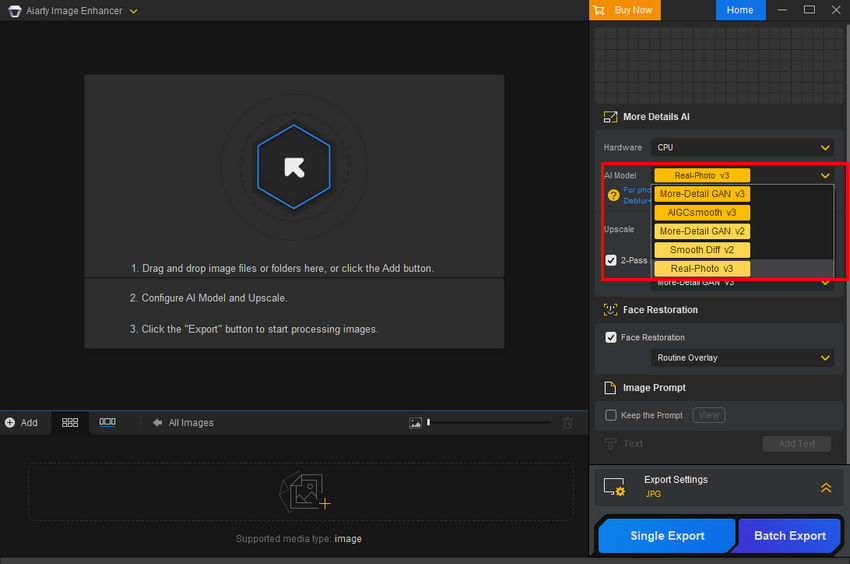
Step 3. Select the AI model that best suits your image's characteristics.
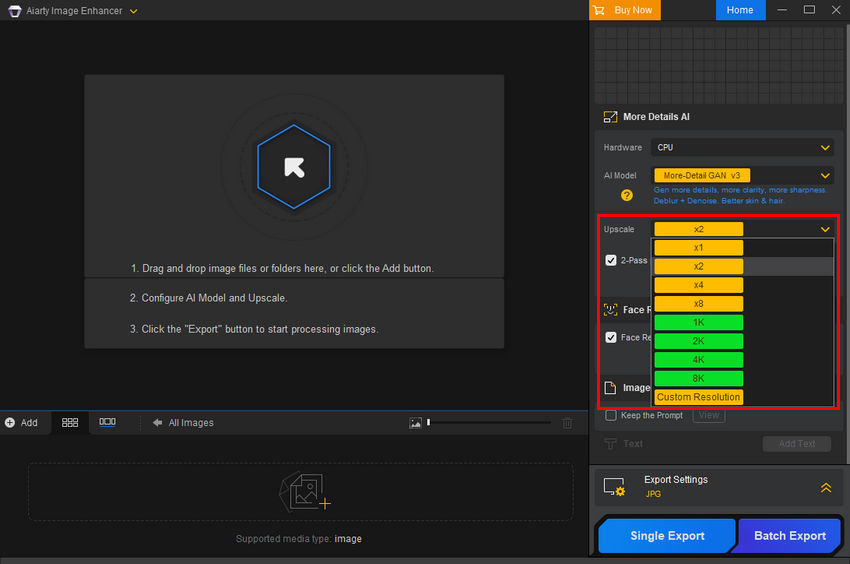
Step 4. Click the Upscale dropdown menu and choose the magnification level (x1, x2, x4, or x8) or the resolution you want to upscale to (1k, 2k, 4k, 8k, or a custom resolution). If you don't want to change image size, simply select x1.
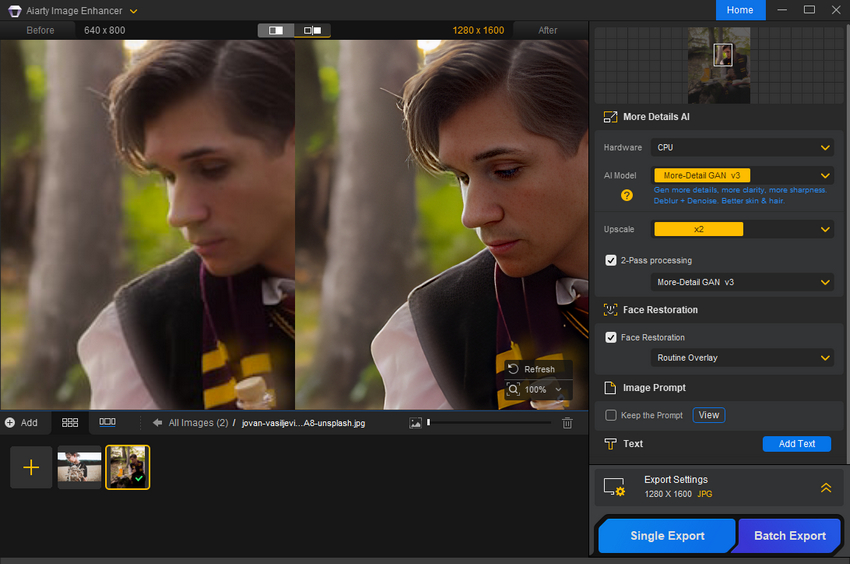
Step 5. Click the Start button to load AI model for inferencing. Once done, preview the result. If you're not satisfied with the result, you can try another model. Explore the best practices for using Aiarty Image Enhancer >>
I've tried a blurry image. As you can see from the screenshot below, the blur is gone.
Step 6. Click Single Export or Batch Export to save your unblurred image(s).
That's it. It's really easy to remove blur from images with Aiarty Image Enhancer.
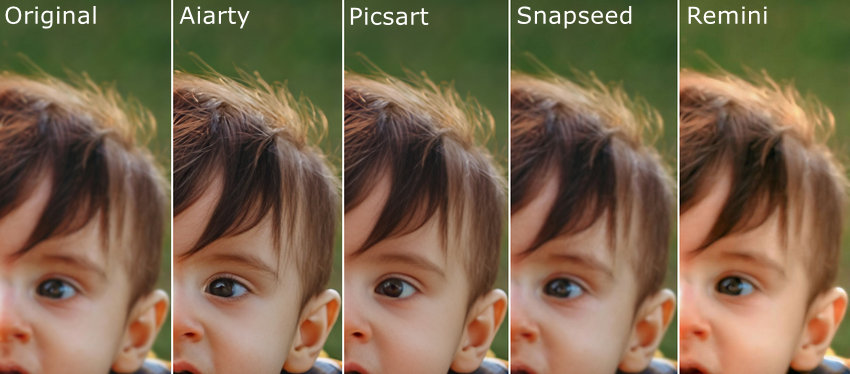
I tested several images using Aiarty Image Enhancer, and the results were surprisingly good. Take a look at the before-and-after comparisons below.
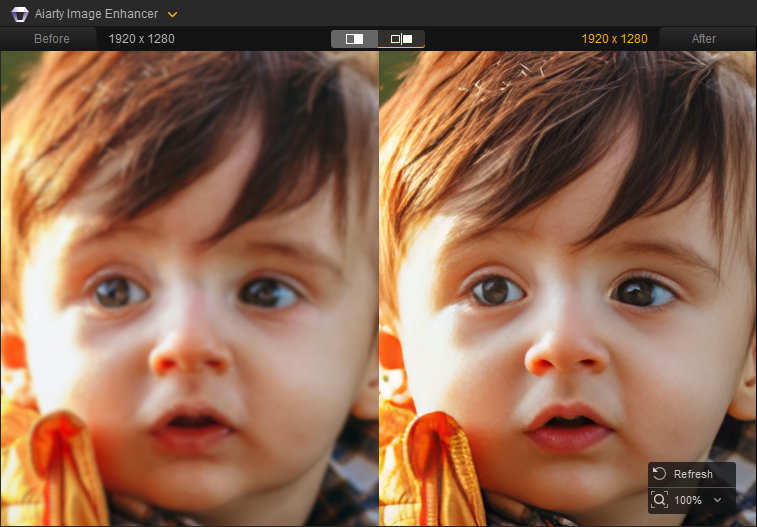
Test 1: Clear up blurry face
Using the More-Detail GAN V3 with Face Restoration (Fidelity mode), the AI flawlessly reconstructed this blurry portrait. Notice the stunning recovery of realistic skin textures, crisp eyebrows, fine eyelashes, and individual hair strands without looking artificial.
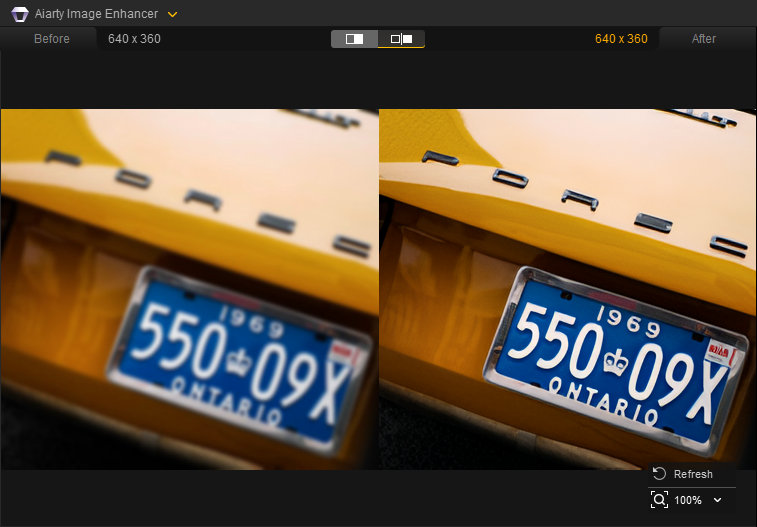
Test 2: Unblur text for better readability
Using More-Detail GAN V3, Aiarty expertly restores the blurry license plate ('550 09X', '1969', 'ONTARIO') and the 'PORSCHE' emblem. Notice how crisp chrome letters and sharp numbers replace the previously blurry blobs, making every detail crystal clear.
Method 2. Remove Blur from Images with Adobe Photoshop
Adobe Photoshop is a very popular image editing software. It covers a wide range of tools to fix blurry images. No matter you want to remove all blur on your image or just want to remove blur from specific parts of the image, such as the text on the image, Photoshop can help you.
- Multiple professional deblurring methods (High Pass, Unsharp Mask, Shake Reduction).
- Allows for extremely precise and granular manual edits.
- Industry-standard tool for high-end photo restoration.
- Expensive subscription model.
- Steep learning curve for beginners.
- Requires a powerful computer for smooth performance.
Below are four common methods: High Pass Filter, Unsharp Mask, Shake Reduction, and Smart Sharpen.
1. Sharpen blurry images with High Pass Filter
The High Pass Filter is a popular method for enhancing edge details. Instead of trying to reconstruct missing parts of the photo, it highlights the edges and blends them back into the image, which gives the appearance of greater sharpness. This method is especially useful for portraits, product shots, or any photo where you want to bring out texture and definition.
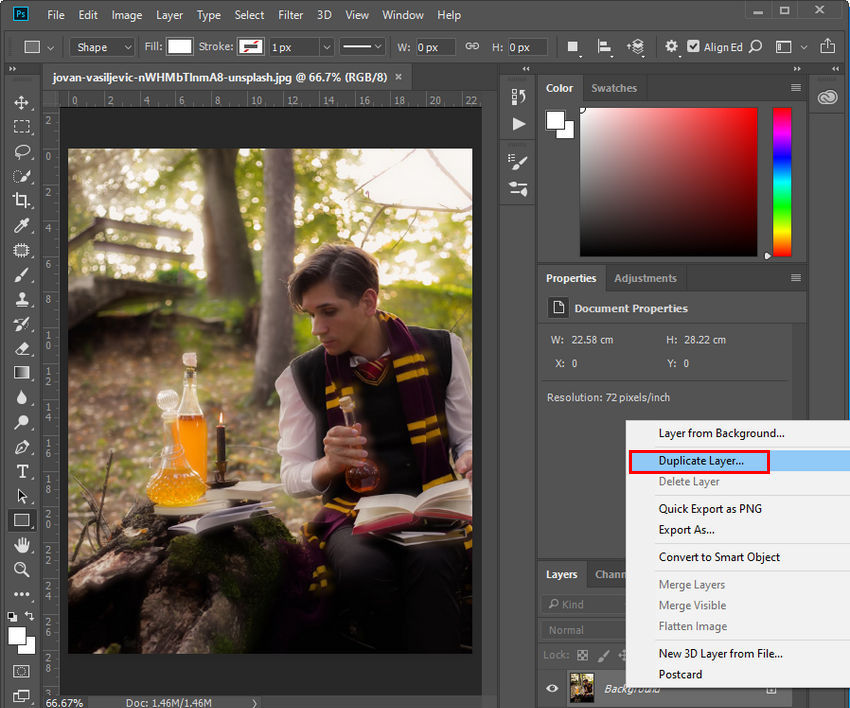
Step 1. Right-click on the "Background" layer in the Layers panel and choose "Duplicate Layer." This creates a copy to work on without affecting the original image.
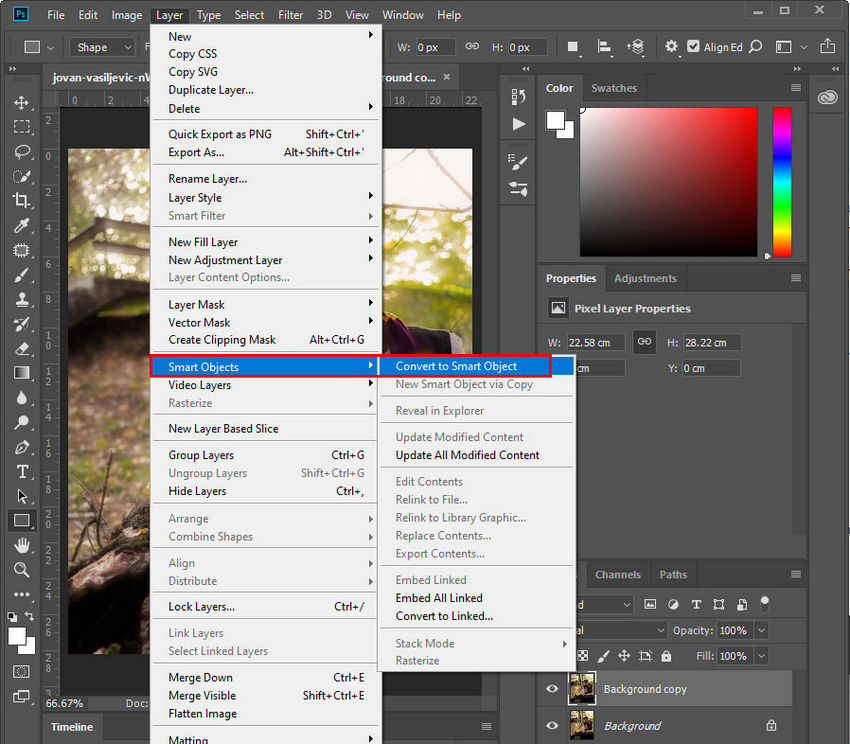
Step 2. Go to Layer > Smart Objects > Convert to Smart Object. This allows for non-destructive editing, meaning you can adjust the filter later.
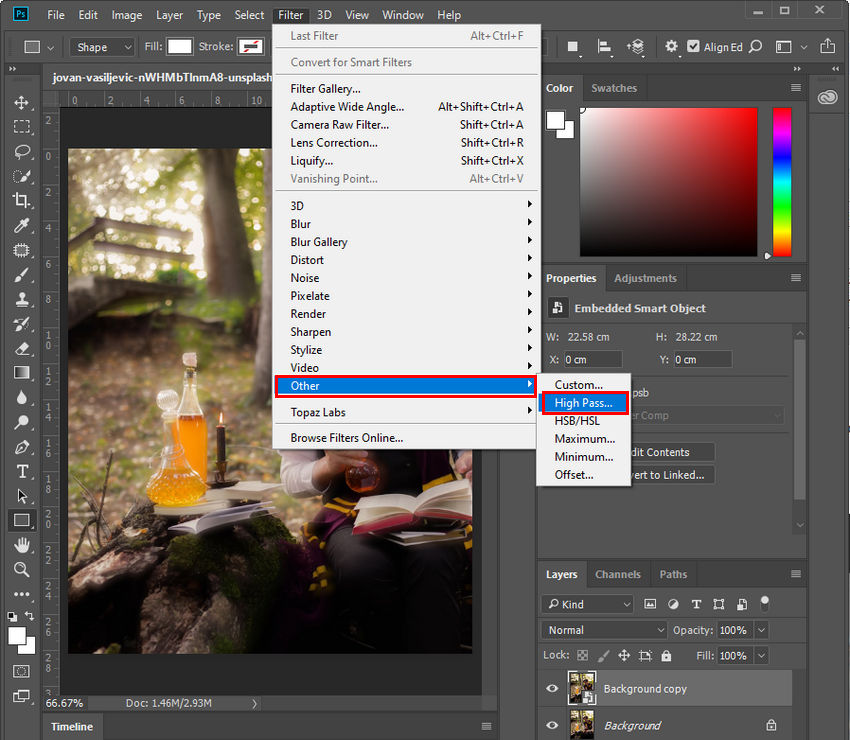
Step 3. Go to Filter > Other > High Pass.
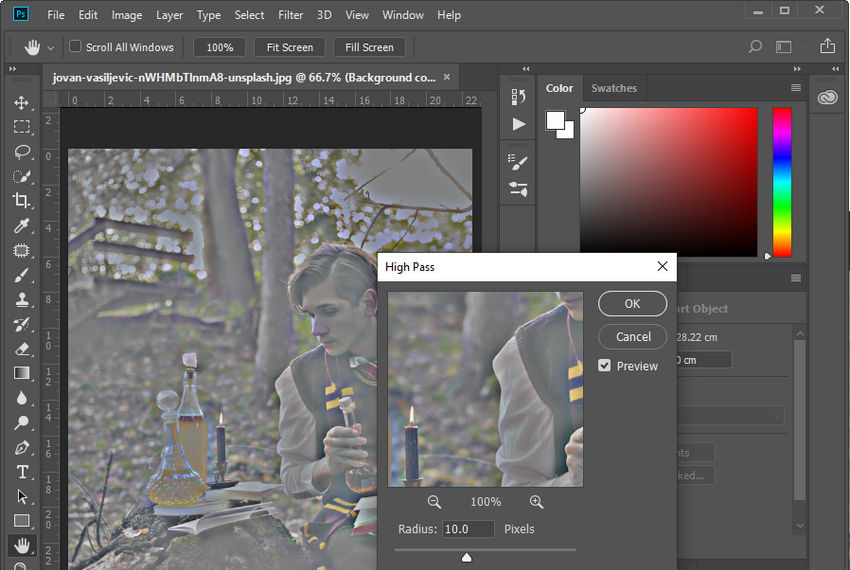
Step 4. Drag the "Radius" slider to see a black and white preview. The higher the radius, the more prominent the edges will be (appearing as white lines). Aim for a good definition of your subject's edges without creating unwanted halos (bright edges).
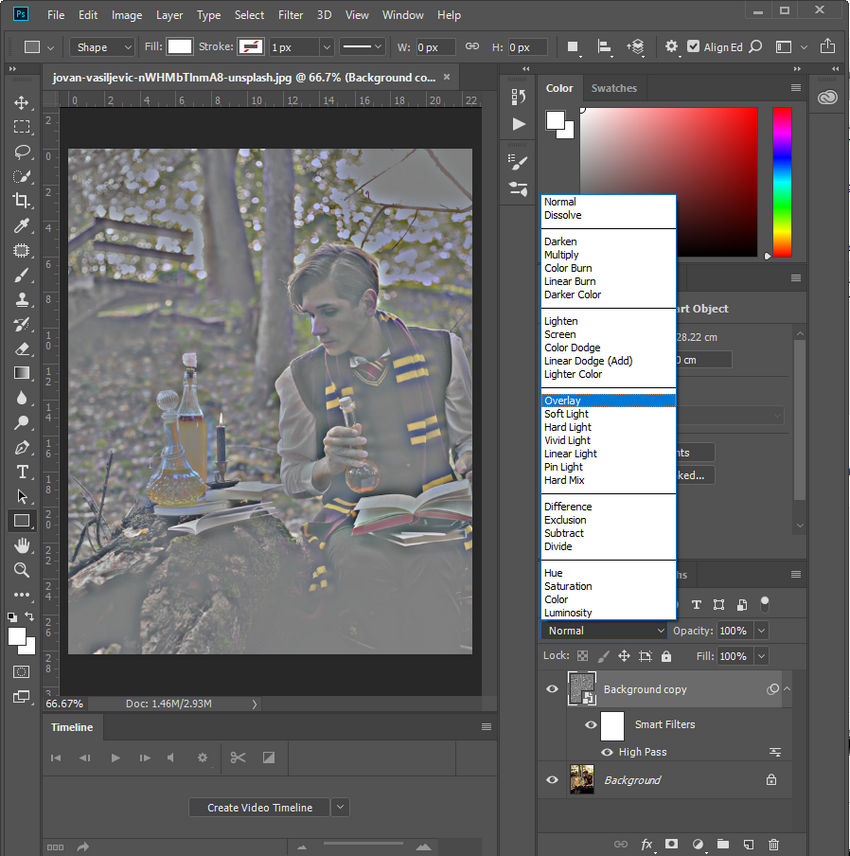
Step 5. Click the dropdown menu next to "Normal" in the Layers panel and choose "Overlay." This blends the sharpened details back into the image, removing the grayness.
Step 6. Double-click the "High Pass" filter in the Layers panel to re-edit the radius if needed.
Step 7. Lower the layer's "Opacity" value (0-100%) to reduce the sharpening effect's intensity.
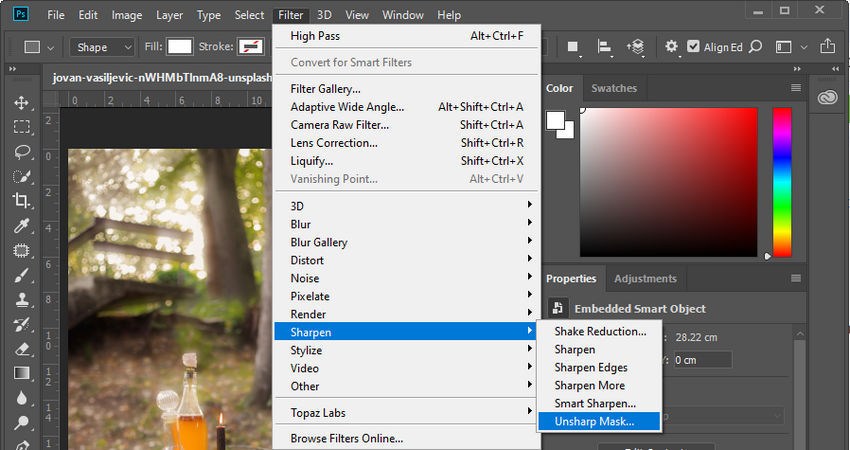
2. Sharpen blurry images with Unsharp Mask
The Unsharp Mask is one of Photoshop’s oldest and most reliable sharpening tools. It works by increasing the contrast along the edges of objects, which tricks the eye into perceiving more detail. It’s highly effective for everyday photos but needs careful adjustment to avoid noise or halo effects.
Step 1. Right-click on your image layer and choose "Duplicate Layer."
Step 2. Similar to the High Pass method, you can convert the layer to a Smart Object for non-destructive editing.
Step 3. Go to Filter > Sharpen > Unsharp Mask.
Step 4. Adjust sharpening settings:
- Amount: Controls the strength of the sharpening effect. Higher values increase sharpening but can introduce noise.
- Radius: Defines how many pixels around the edges will be affected by the sharpening.
- Threshold: Sets the sensitivity for detecting edges. Lower values sharpen even subtle details, while higher values focus on more prominent edges.
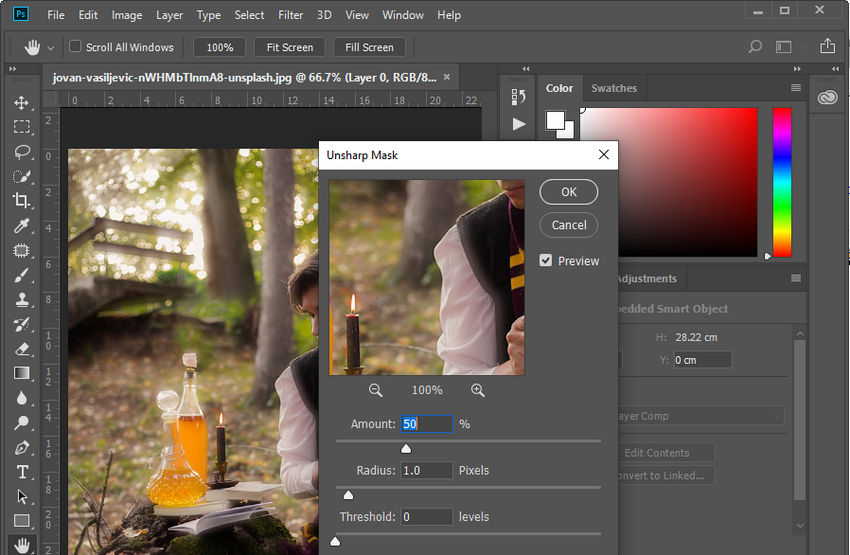
Play with these sliders to find the optimal balance between sharpening your image and introducing artifacts (noise or halos).
3. Reduce Blur with Shake Reduction
The Shake Reduction filter is designed to specifically address blurriness caused by camera shake. It analyzes the image, detects the trajectory of the shake, and attempts to reverse it. This method works best for images where the blur is caused by small, consistent movements while taking the shot.
Step 1. Open your photo in Photoshop.
Step 2. Go to Filter > Sharpen > Shake Reduction.
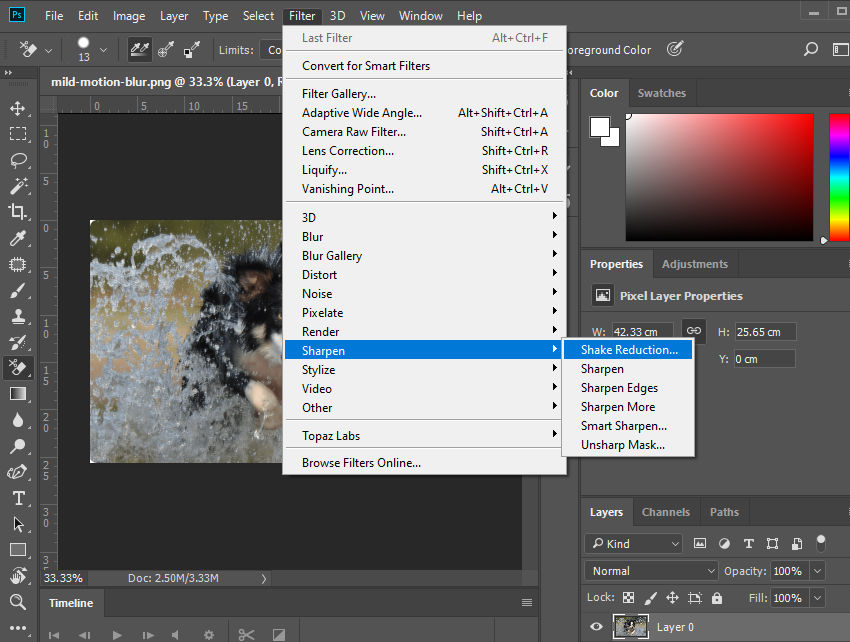
Step 3. Photoshop will automatically detect the blur trace and apply correction.
Step 4. Adjust Blur Trace Bounds and Smoothing for better results.
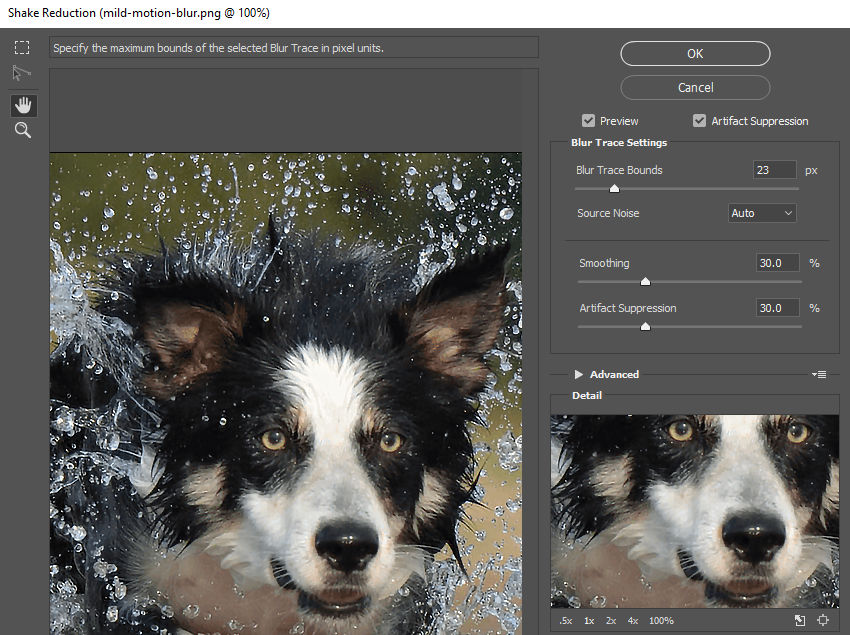
Step 5. Click OK to apply changes.
4. Sharpen Blurry Images with Smart Sharpen
The Smart Sharpen filter offers more advanced control than Unsharp Mask, allowing you to reduce blur while minimizing noise and halos. Smart Sharpen is particularly effective when you want more precise control over sharpening while keeping noise levels low.
Step 1. Duplicate your image layer.
Step 2. Convert the duplicate to a Smart Object.
Step 3. Go to Filter > Sharpen > Smart Sharpen.
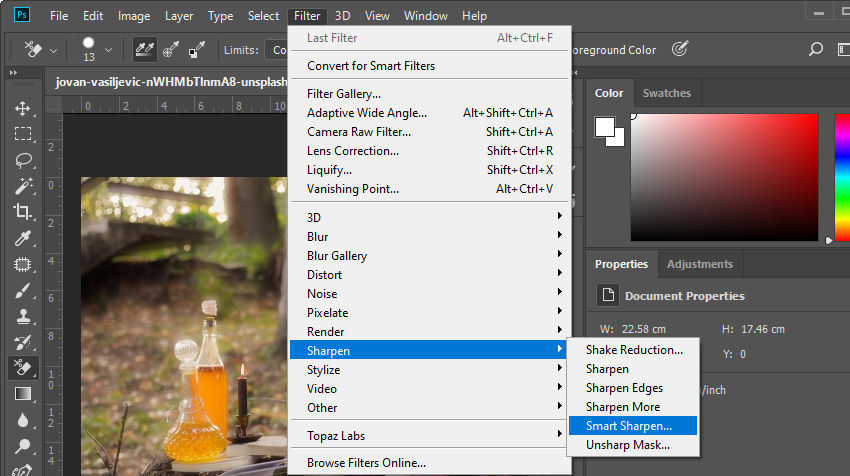
Step 4. Adjust settings:
- Amount – Strength of sharpening.
- Radius – Controls the area affected around edges.
- Reduce Noise – Minimizes grain.
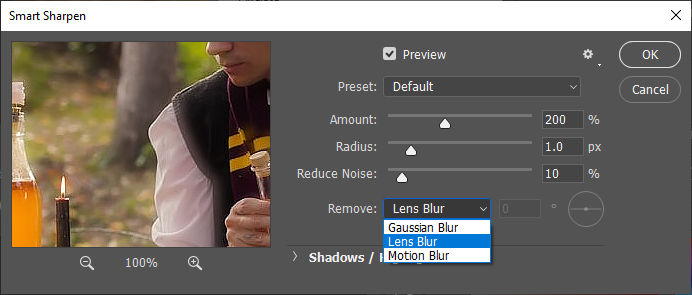
Step 5. Under Remove, select the blur type (Gaussian Blur, Lens Blur, or Motion Blur).
Step 6. Fine-tune sliders until the result looks sharp but natural.
By combining these methods — High Pass Filter, Unsharp Mask, Shake Reduction, and Smart Sharpen, you can effectively unblur your images in Photoshop. It may take some experimentation, but with the right filter and settings, even heavily blurred images can be significantly improved.
While Aiarty Image Enhancer and Photoshop offer powerful tools for unblurring photos, there are some people looking for excellent options available for mobiles as well. Here, we'll explore two popular apps that can help you sharpen blurry photos on your iPhone or Android device: Remini and Snapseed.
Method 3. Unblur Images with Remini
Remini is one of the most popular AI-powered mobile apps designed specifically for enhancing images and videos. Available on both iOS and Android, it uses advanced AI models to reconstruct lost details, sharpen faces, and improve overall clarity. Unlike traditional editing apps, Remini focuses on automatic enhancement, making it ideal for users who want fast results without manual adjustments.
It performs particularly well on low-resolution or slightly blurry photos of people, restoring facial details like eyes, skin texture, and hair. However, results may vary depending on the severity of the blur and the type of image.
- Excellent at restoring facial details in blurry portraits.
- Fully automatic AI enhancement.
- Supports video enhancement.
- Best results are limited to portraits; less effective for landscapes or text.
- AI may generate artificial-looking details in some cases.
- Few options for manual editing or controlling the intensity of the enhancements.
How to unblur an image on iPhone/Android with Remini?
Step 1. Download and install the Remini app from the App Store or Google Play. Open the app and sign in or continue with a guest account.
Step 2. On the home screen, tap the Enhance option (this is the main AI unblur feature). Then select the blurry photo you want to fix from your gallery.
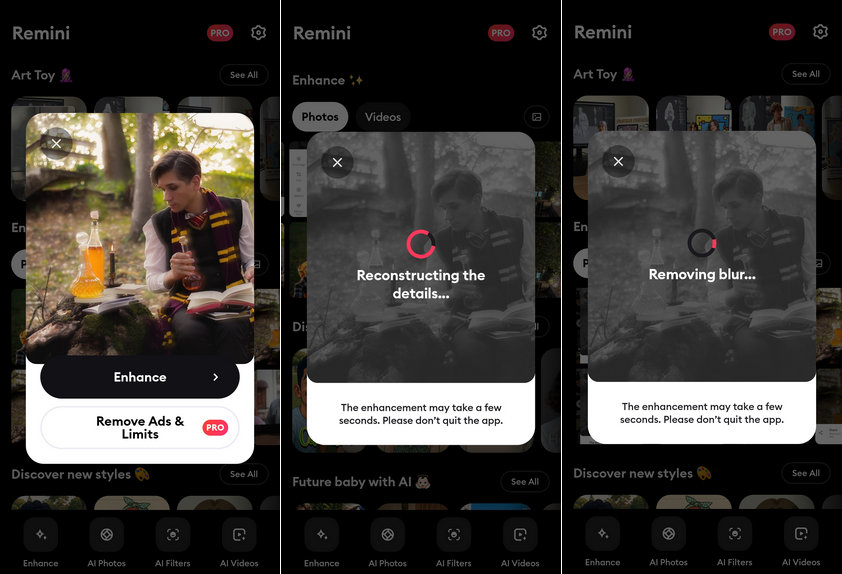
Step 3. Tap the Enhance button to start processing. Remini will automatically analyze the image and apply AI detail reconstruction, and noise reduction.
Step 4. Wait a few seconds for the enhancement to complete. You can compare the before-and-after results using the preview slider.
Step 5. If you're satisfied with the result, tap the download/save icon to export the enhanced image to your device.
Note: For best results, use Remini on images with visible faces and moderate blur. Extremely blurry or motion-blurred images may not be fully recoverable, as the AI generates details based on prediction rather than original data.
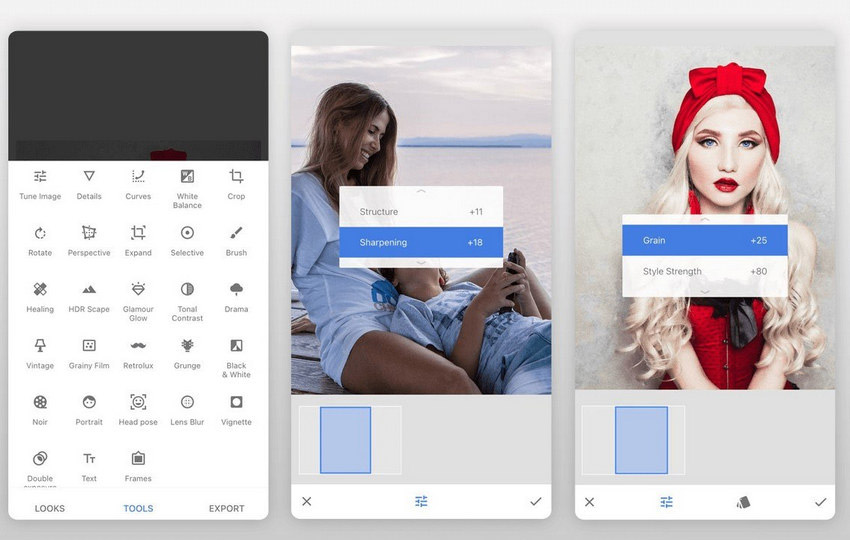
Method 4. Unblur Images with Snapseed
Another app you can use to unblur images on iPhone or Android is Snapseed. It is a versatile image editor that comes with a lot tools, such as Details, Tune Image, Curves, Brush, White Balance, etc.
To fix blurry images, you should make use of the Details tool. Within this tool, you can adjust the amount of Sharpening and Structure.
Sharpening focuses on enhancing edges in your photo. Increasing the values of Sharpening can increase contrast along these edges, making them appear crisper. Structure uses a special algorithm to selectively bring out the texture within objects throughout your photo without affecting their edges.
- Completely free and lightweight with a simple user interface.
- "Details" tool provides effective Sharpening and Structure adjustments.
- Supports local adjustments for targeted blur removal.
- No batch processing capability.
- Less effective for restoring extremely blurry or pixelated photos.
How to unblur an image on iPhone/Android with Snapseed
Step 1. Download and install the Snapseed app on the store of your Android or iPhone.
Step 2. Open Snapseed and then open the blurry image you want to fix.
Step 3. Click Tools and select the Details.
Step 4. Adjust Sharpening and Structure to the level you want. Once satisfied, save your edits and download your modified image.
While powerful desktop software and mobile apps exist for unblurring images, sometimes you need a quick and easy solution. Thankfully, several online tools can help you sharpen blurry photos directly from your web browser. Here, we'll explore two popular options: Canva and Picsart.
Method 5. Remove Blur from Photo Online Free with Canva
This graphic design tool offers a lot of image editing features, including the ability to unblur images. To make your images sharper and clearer, you can utilize the Sharpen and Clarity slider in Canva.
In addition to adjust the sharpness and clarity, you can also adjust the brightness, contrast, saturation, and more to further enhance your images. And there’re many fun filters and effects for you to play with.
- Browser-based tool with no installation required.
- Intuitive Sharpen and Clarity sliders with real-time preview.
- Offers additional design filters and effects for social media.
- Requires an account to use and export results.
- Not a dedicated tool for complex photo restoration.
How to unblur an image with Canva
Step 1. Open a browser and then open Canva enhancer within the browser.
Step 2. Sign in Canva.
Step 3. Choose to create a new design or open an existing one.
Step 4. Click the Choose file button to upload the blurry image you need to fix.
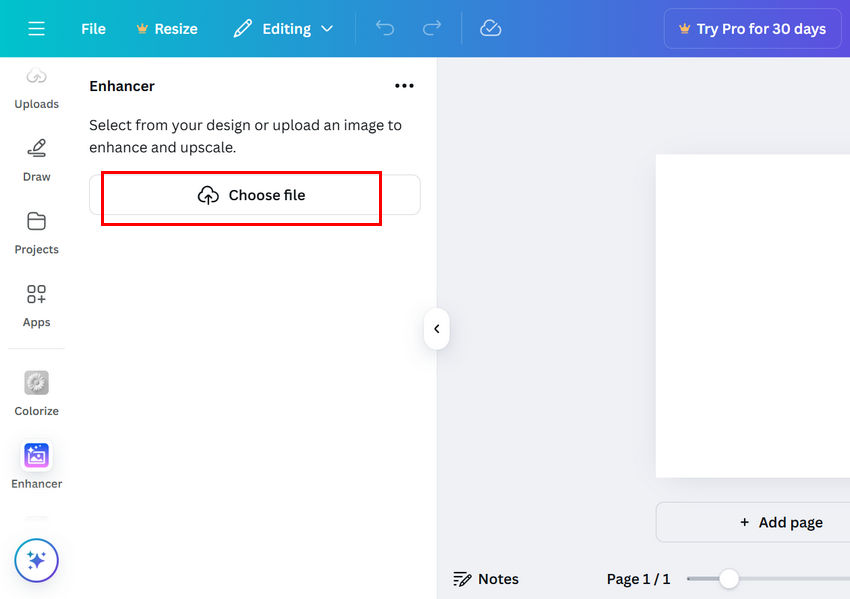
Step 5. Toggle on Enhance face if you need to enhance the face in your photo.
Step 6. Click Enhance image. Then, Canva will start enhancing your image. Once done, click Add to design.
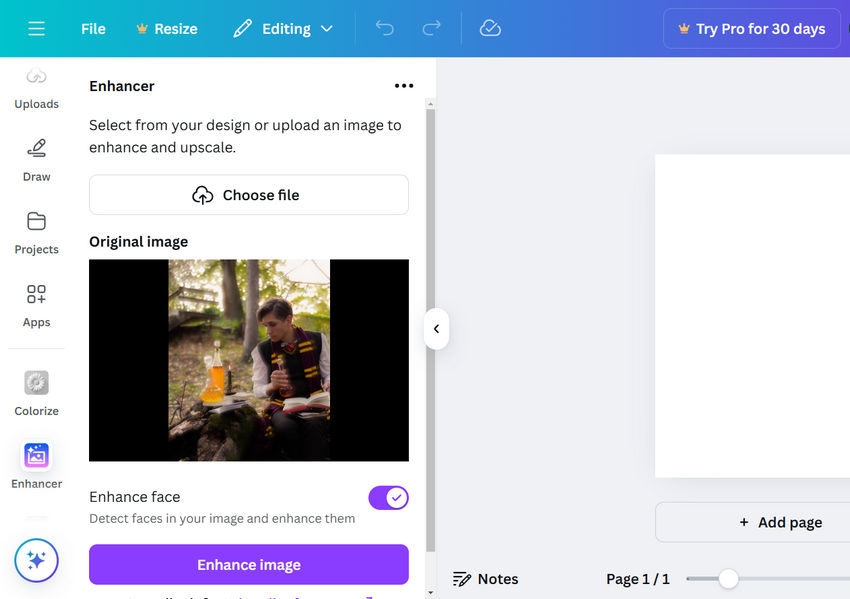
Step 7. If you still need to further remove the blurriness, click the Adjust tab, scroll down to find Sharpen and Clarity, and then move the sliders. You can preview the result in the right window in real-time.
Step 8. Click the Share button on the top-right corner to download or share your image.
Method 6. Unblur Pictures Online Free with Picsart
Picsart is a powerful online image editor that provides an automatic enhancement tool to unblur images. If the result isn’t satisfactory, you can refine it using either the Sharpen effect or the Clarity adjustment.
- Combines automatic AI enhancement with manual editing tools.
- Stylish interface and easy export options.
- One-click auto-unblur feature for fast fixes.
- Results can be inconsistent depending on the image quality.
- Many advanced controls are tucked away behind multiple menus.
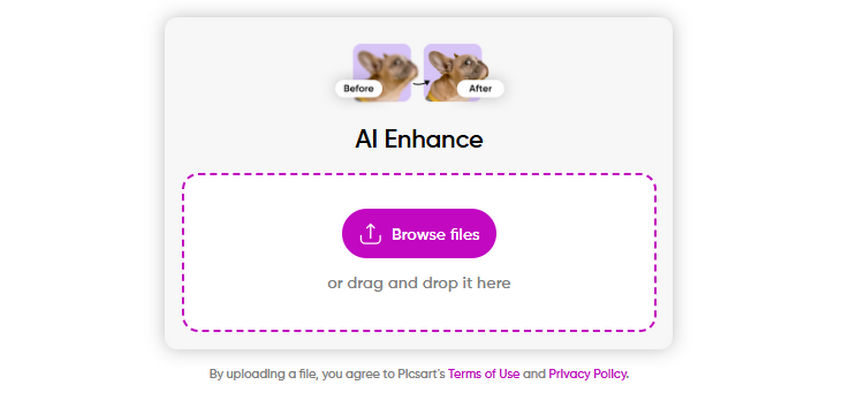
How to unblur an image with Picsart
Step 1. Open Picsart in your preferred browser.
Step 2. Click the Browse files button to import your blurry image.
Step 3. Picsart will automatically process the image. Once done, preview and compare it with the original.
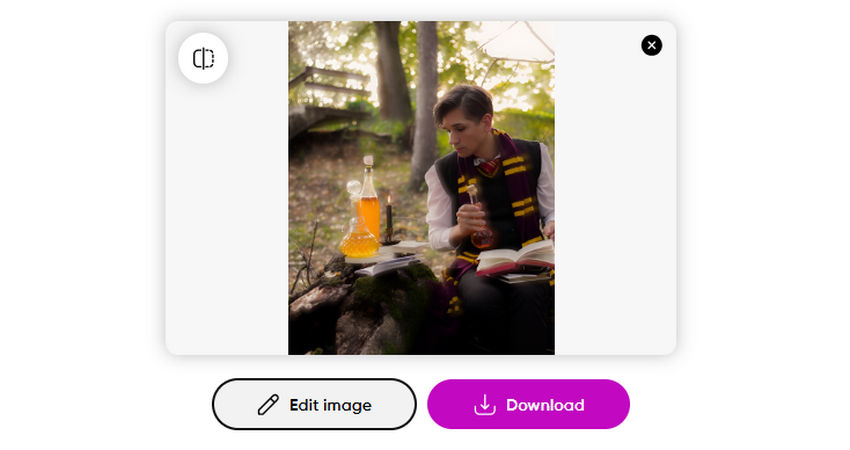
Step 4.
- If you're satisfied with the result, click the Download button.
- If further enhancement is needed, click Edit image to access the Picsart Editor.
To sharpen the image, go to Effects > FX > Sharpen and adjust the Fade and Blend Modes if necessary.
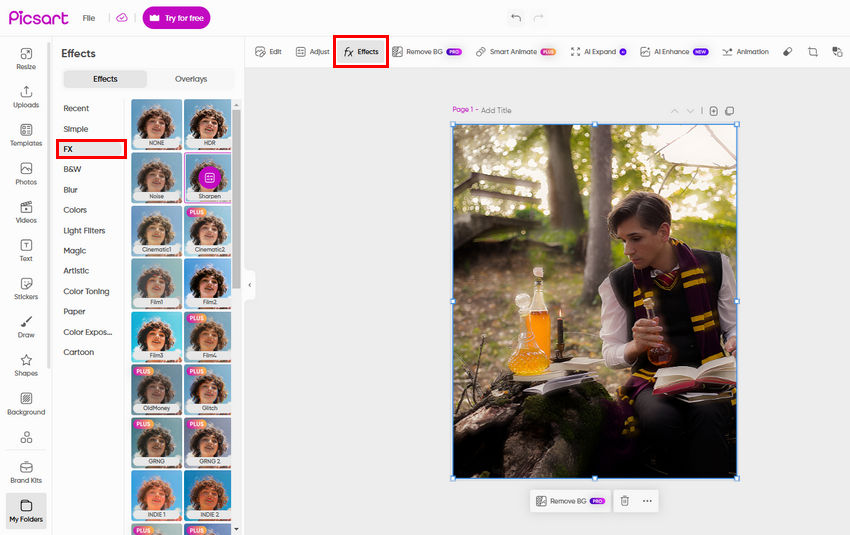
Alternatively, go to the Adjust tab, expand Details, and tweak the Clarity slider.
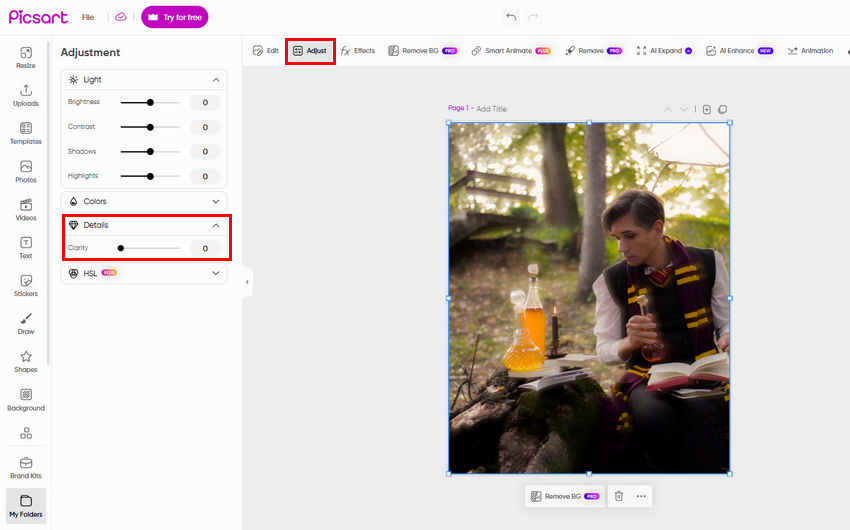
Step 5. Once satisfied, click the Export button to download the final image.
By following these steps, you can easily unblur images using Picsart's automatic enhancement and manual editing tools.
Step 6. Click the Export button to export the edited image.
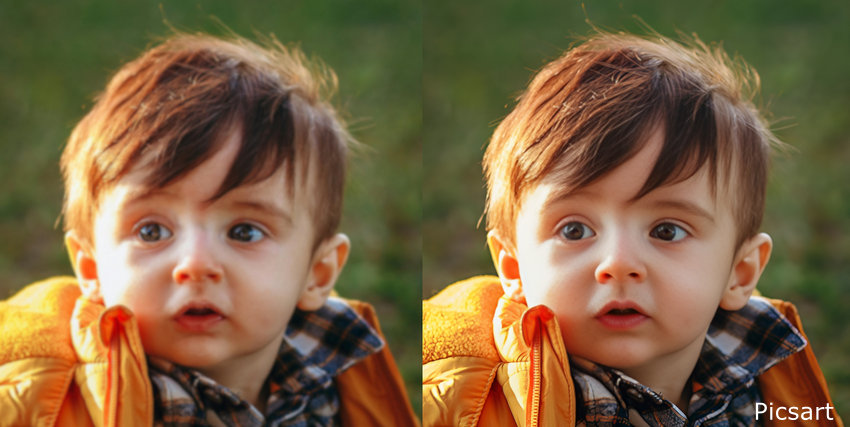
Portrait Test: Picsart Auto-Enhancement
While Picsart’s automatic processing significantly improves overall clarity and effectively eliminates noticeable blur from this portrait, a closer look reveals that it falls short of Aiarty when reconstructing ultra-fine details, such as the individual textures of the eyelashes.
Why Pictures Get Blurry? How to Avoid It?
There are numerous factors that can contribute to blurry images, including camera shake, moving subjects, inappropriate camera settings (such as slow shutter speeds, incorrect aperture settings, or high ISO values), excessive zooming, compression during image transfer, and using outdated camera equipment. Understanding these causes can help us take appropriate measures to get rid of blurry images.
Camera shake
If you accidentally move the camera, even a tiny bit, while taking the photo, you will get a blurry image. To avoid this, steady your hands by using two hands, plant your elbows, or brace against a solid object. Or, you can use a tripod.
Moving subject
If your photo subject is wiggling around, you might end up with blurry results. This is called "motion blur." To freeze the action and get a sharper picture, try using a faster shutter speed on your camera.
When capturing fast-moving subjects, such as sports or kids playing, set your shutter speed to a high value, like 1/1000 of a second. If you're taking pictures of things that aren't moving much, or you want a special blurry effect, use a slower shutter speed. Try something around 1/30 or 1/60 of a second.
Here's a special trick for slower shutter speeds: panning. Imagine you're tracking a race car with your camera. You can pre-focus on the spot where the car will be and then smoothly move your camera along with the car as you press the shutter button. This will keep your subject sharp while blurring the background, creating a sense of movement. But panning takes practice, so don't worry if you don't get it perfect right away!
Some cameras also have a "burst mode" that takes several pictures really quickly, increasing your chances of getting a clear shot when your subject is moving.
Wrong camera settings
There are different settings on your camera, kind of like controls. If your camera fails to lock onto your subject, your photo will end up out of focus. If you're taking pictures in low light, you might need to use a setting that keeps the camera open for a longer time to capture enough light. But the problem is, if you don't hold the camera super still with this setting, your photo might get blurry. It's a good idea to play around with the settings on your camera to see what works best in different situations.
Zooming in too much
When you zoom in really close on your camera, it can sometimes make it harder to focus properly. This is because the area that's in focus gets smaller the more you zoom. If you're having trouble getting a clear photo, try zooming out a bit and see if that helps.
App-caused blur
Some apps you use to edit or share photos might actually lower the quality of the picture to make the file size smaller. This can make your photos look blurry. To avoid this, try transferring your photos using email or apps that don't compress images, so your pictures stay nice and sharp.
Photos taken with older cameras might naturally look a bit less crisp compared to pictures from newer ones. Technology has come a long way, and modern cameras capture way more detail. There is no way to avoid it, but now there are photo restoration software and services that can help sharpen them up and bring those memories back to life.
 FAQ about Unblurring Images
Yes, blurry screenshots can often be improved using AI-based tools like Aiarty Image Enhancer. These tools detect and restore edge clarity, making interface elements, icons, or fine lines more readable.
To make blurry text readable again, use tools that specialize in detail enhancement. Aiarty’s AI models, especially Real-Photo or More-Detail GAN, work well for restoring text clarity. In Photoshop, you can try High Pass Filter or Unsharp Mask for manual sharpening.
Yes. Free tools like Snapseed, Remini, and some online editors (e.g. Fotor, PineTools) let you adjust sharpening and structure without paying.
Partially. Mild motion blur can be reduced using sharpening tools or AI models that reconstruct edge patterns. However, strong motion blur may be difficult to fully correct without advanced deblurring algorithms.
Most well-known online editors like Canva and Picsart are safe. Still, avoid uploading sensitive images to unknown sites, and check privacy policies before use.
Yes. AI can improve the clarity of blurry photos, but the results depend on how the blur was created.
AI-based tools use trained models to analyze image structure and recover visual information, which often produces more natural results than basic editing filters. Instead of just sharpening edges, AI can enhance textures, reduce noise, and improve overall detail perception.
That said, AI does not truly “recover” all lost data. Its effectiveness varies by situation:
- Works best for slight to moderate blur, where enough visual information still exists
- Helps enhance textures, edges, and readability in many cases
- May struggle with severe blur or completely out-of-focus images
In practice, AI is most useful for improving image quality and making photos appear clearer, even when full restoration isn’t possible.
Final Words
So there you have it! With the tools we introduced above, you should be able to unblur your photos and salvage those precious moments.
Although there are numerous dedicated software, mobile apps, and online solutions you can use to transform blurry pictures into sharp ones, prevention is always better than cure. Understand the common causes of blurry photos and take steps to prevent them from happening in the first place.
You May Also Like
Brenda Peng is a seasoned editor at Digiarty Software who loves turning ordinary photos into extraordinary works of art. With years of experience behind the lens and in front of the computer, Brenda shares her passion for photography, image enhancement, and editing through easy-to-follow tutorials.