You line up the shot. The light is right. The subject does exactly what you hoped it would do. You press the shutter, head home, open the file, zoom in on the eye…and the image is soft.
If you photograph wildlife long enough, that moment is going to happen. It has happened to me more times than I care to admit. For years I blamed the wrong things. Sometimes I blamed the lens. Sometimes I blamed autofocus. Sometimes I just assumed I had bad luck. What I eventually learned is that sharpness is almost never about one thing. It is usually the result of one or more of any number of issues that occurred during the shoot.
That is what this article is about. These are the field issues that most often rob wildlife images of being sharp, followed by the fixes I rely on in the field and, when needed, the corrections I make later with Aiarty Image Enhancer. The goal is not just to list tips. The goal is to explain why each one works so you can make better decisions in the field and come home with more keepers.
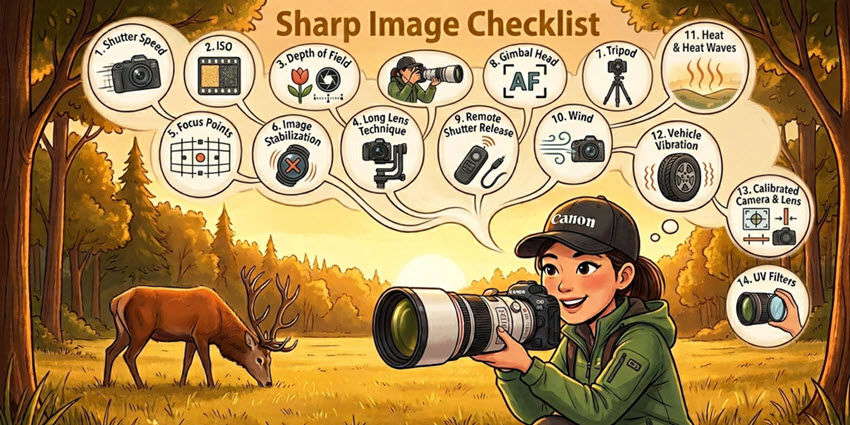
Sharpness Killer #1 – Shutter Speed
What’s the Issue?
If I had to pick the one thing that ruins more wildlife photos than anything else, it would be shutter speed. Wildlife moves, even when it looks still. Birds twitch, mammals breathe, ears flick, heads turn, and long lenses magnify every bit of movement from both the subject and the photographer.
Today, with dense sensors and heavy cropping being common, the margin for error is smaller. And a shutter speed that is too slow for the situation being shot will always result in soft images.
Learn More: How to Clean a Camera Sensor - Remove Dust Spots and Keep Your Photos Sharp
What’s the Solution?
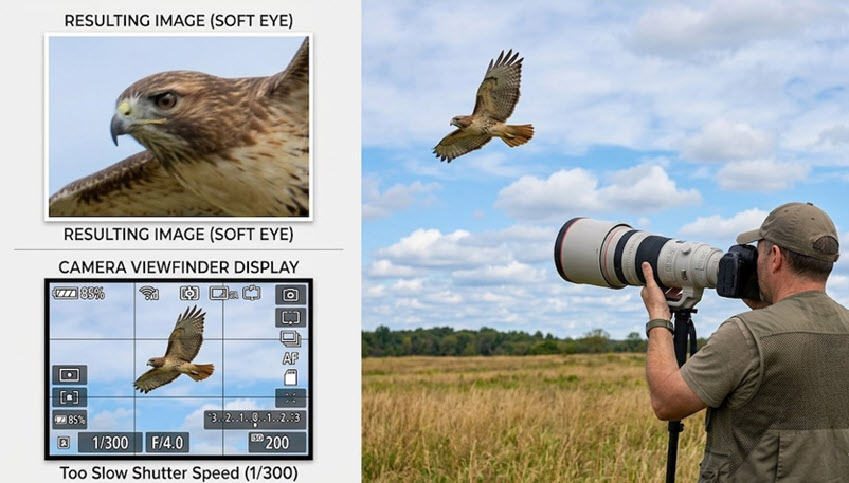
I treat shutter speed as the first decision, not the last. Before I worry about perfect ISO or perfect background blur, I ask one question: what shutter speed do I need for this subject and this kind of movement?
Use a faster baseline than the old focal-length rule. When I hand-hold a 500mm lens, I want at least 1/1000 second as a starting point, not 1/500. Doubling the speed gives me more protection against micro-shake that high-megapixel cameras reveal very quickly.
Match shutter speed to subject behavior, not just focal length. A perched owl and a diving kingfisher do not need the same shutter speed. Larger, slow-moving subjects may allow lower shutter speeds, while birds in flight, rapid wingbeats, and erratic movement demand much faster settings. High shutter speeds freeze feather detail and eye sharpness instead of recording motion blur, giving you cleaner files and better results when you later edit bird photos.
Use burst shooting for action. Shoot short bursts to increase your keeper rate because subject pose and camera movement vary slightly frame to frame. One image in a burst often ends up noticeably sharper than the rest.
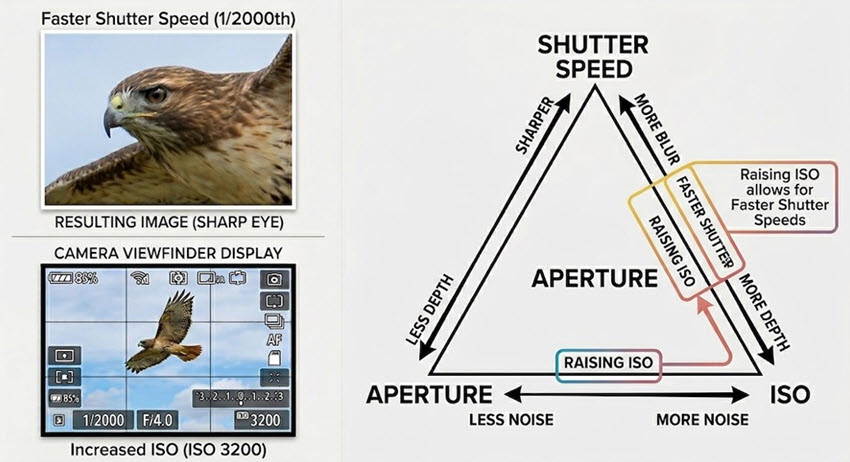
Accept noise before you accept blur. If the light is falling apart and you need to choose, raise the ISO and keep your shutter speed where it needs to be. Noise can usually be managed later. Motion blur usually cannot.
Once you commit to keeping shutter speed high enough, the next variable that starts pulling against you is ISO.
Sharpness Killer #2 – ISO
What’s the Issue?
ISO does not create blur, but it does strip away the crisp fine detail that makes an image look sharp. As ISO climbs, noise starts replacing subtle texture in fur, feathers, and skin. The file may still be in focus, but it loses that clean, refined look that good wildlife images need.
This is where photographers often make the wrong trade. They keep ISO too low because they fear noise, then end up with shutter speed that is too slow. That decision often costs them more sharpness than the extra ISO would have.
Here's a photography cheat sheet, elaborating more on the exposure triagle.
What’s the Solution?
I think of ISO as a support tool. It exists to protect the shutter speed and, in some situations, the aperture I need. I do not chase the lowest ISO possible. I chase the lowest ISO that still lets me make the shot.
Know your camera’s usable range. A quick set of controlled tests at home tells you far more than guessing in the field. Once you know where your files start to break down, you can raise ISO to the acceptable limit with confidence instead of hesitation.
Use Auto ISO intelligently when wildlife is moving fast. Conditions change quickly in wildlife photography. Auto ISO can hold exposure together while you keep shutter speed and aperture where they need to be. That reduces hesitation and keeps you ready for sudden action.
Expose carefully at high ISO. Wild underexposure followed by aggressive brightening in post usually looks worse than a properly exposed high-ISO frame. A cleaner exposure preserves more real information for later editing.
Clean noise selectively in post. Aiarty Image Enhancer can help reduce image noise (high ISO) while holding on to the important edges and textures that make a wildlife file look alive. The idea is not to make the image look plastic. The idea is to remove the noise that is hiding real detail.
Once shutter speed and ISO are working together, the next sharpness decision is usually aperture and depth of field.
Sharpness Killer #3 – Depth of Field
What’s the Issue?
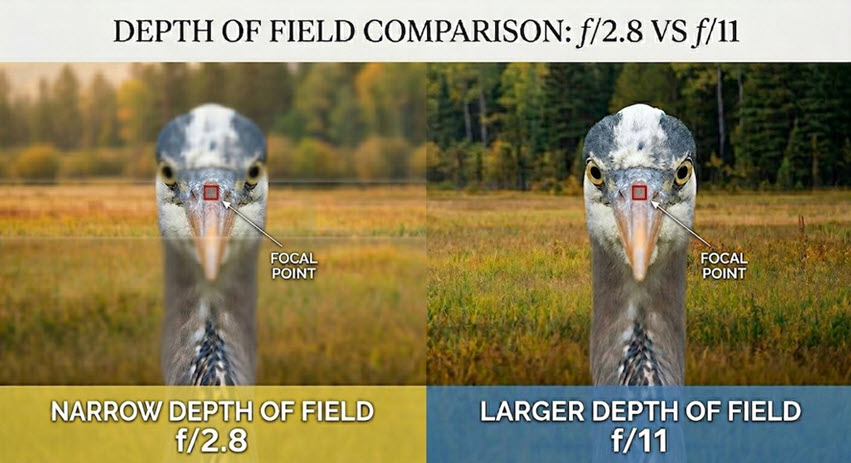
Wide apertures are wonderful for subject separation, but they come with risk. At long focal lengths and close distances, depth of field gets extremely thin. That means you can have the beak sharp and the eye soft.
This is especially noticeable with angled poses, birds in flight, or multiple subjects. The image may feel almost sharp until you check the one place that matters most, the eye.
What’s the Solution?
I use depth of field as both a creative tool and a sharpness tool. Sometimes that means shooting wide open for clean backgrounds. Other times it means stopping down because the subject or the scene demands more margin for error.
Stop down when the subject is not perfectly parallel to the sensor. A little extra depth of field gives you breathing room when the head is angled or one eye sits slightly behind the other. That extra margin can be the difference between a usable frame and a miss.
Stop down for groups or parent-and-young interactions. When you want multiple faces or eyes sharp, a wider aperture often works against you. More depth of field increases the odds that the full story in the frame looks intentional and finished. Think F/8 or f/11, shoot and review that all subjects are in focus.
Remember that many lenses sharpen up slightly when stopped down a little. Some lenses perform well wide open, but many improve when you close them by a stop or two. That improvement can show up as better contrast and cleaner edge detail. This is another time when testing your lenses at home will allow you to know at what f-stop they are sharpest.
Do not stop down blindly. As you close the aperture, shutter speed drops unless you add ISO. The goal is balance. More depth of field helps only if you are not giving away too much shutter speed in exchange.
Once aperture is set, technique with the lens itself becomes the next sharpness test.
Sharpness Killer #4 – Long Lens Technique
What’s the Issue?
Long lenses are unforgiving. Every tiny movement is amplified, whether it comes from your hands, your breathing, your shutter press, or how the lens is balanced. Great glass can still produce soft images if the handling is poor.
This is why two photographers can shoot the same lens at the same settings and get very different results.
What’s the Solution?
Good long-lens technique is really about controlling vibration and making the whole system move as one stable unit.
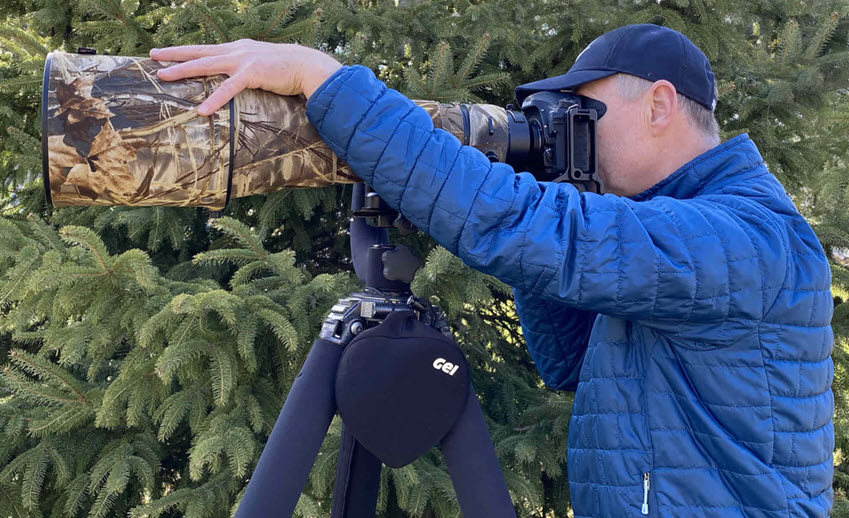
Support the lens properly. In the image above, notice how I use my hand along the lens barrel to help reduce vibration from traveling down the lens back to the sensor. I also have the lens, not the camera, mounted to a heavy-duty tripod with a gimbal head to support the weight. More on tripods and gimbal heads later in the article.
Press Your Eye into the Viewfinder. A stable contact point at the viewfinder can also help to reduce vibration. I replace the stock eye piece with a Hoodman rubber eye cup that forms to my eye which allows me to firmly press my eye against the viewfinder.
Use a smooth rolling shutter press. Jabbing at the shutter introduces a sudden pulse of movement right at the moment of capture. A smooth press reduces that micro vibration which is very noticeable if you are zoomed in on a calibration chart.
Shoot short bursts instead of isolated singles. The first frame can carry the most shutter-induced movement. Later frames in a short burst are often cleaner because the system has settled.
Even perfect handling does not help if focus lands on the wrong part of the animal, which brings us to focus placement and auto-focus modes.
Sharpness Killer #5 – Auto-Focus Modes
What’s the Issue?
A wildlife image rarely needs everything sharp. It needs the right thing sharp. Most often that means the eye. The problem is that autofocus systems are often given too much freedom, especially in busy scenes with branches, grass, water, or strong contrast elsewhere in the frame.
That is when the camera locks onto a shoulder, a wing edge, or something in front of the subject and the file falls apart where it matters most.
What’s the Solution?
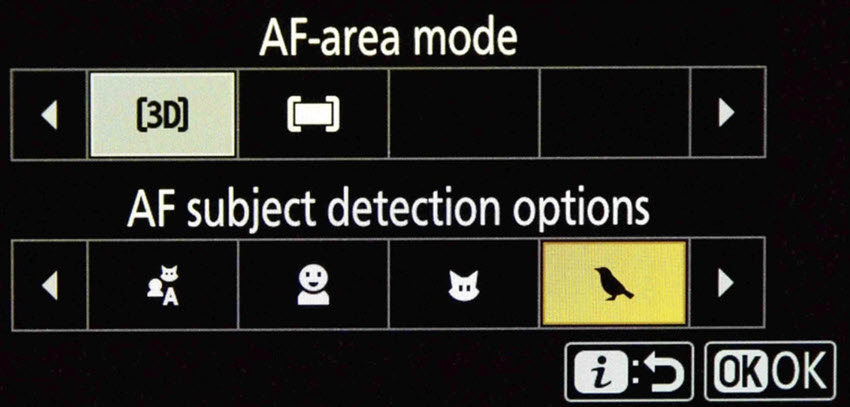
I want the camera helping me, not deciding for me. That means choosing the focus mode that fits the subject instead of leaving everything on a generic all-purpose setting.
Use single-point focus when precision matters most. A small focus point lets you place sharpness exactly where you need it. That is especially effective for perched birds, cooperative mammals, and scenes where foreground clutter can easily steal focus.
Use expanded or dynamic areas when movement becomes too erratic for a single point. For birds in flight or fast-moving action, a slightly larger focus area can help maintain tracking. The reason it works is that it gives the autofocus system a little room to follow movement without completely surrendering control.
Use continuous autofocus for moving wildlife. A moving subject changes distance constantly. Continuous focus updates that distance as the subject moves, which gives you a much better chance of keeping the eye or head plane sharp.
Confirm focus placement at high magnification in the field when time allows. A quick zoomed-in review can tell you whether the eye is really sharp or whether the camera is landing a few inches off. Catching the problem early saves an entire session.
Once focus placement is under control, image stabilization can either help you or quietly work against you depending on how you use it.
Sharpness Killer #6 – Image Stabilization
What’s the Issue?
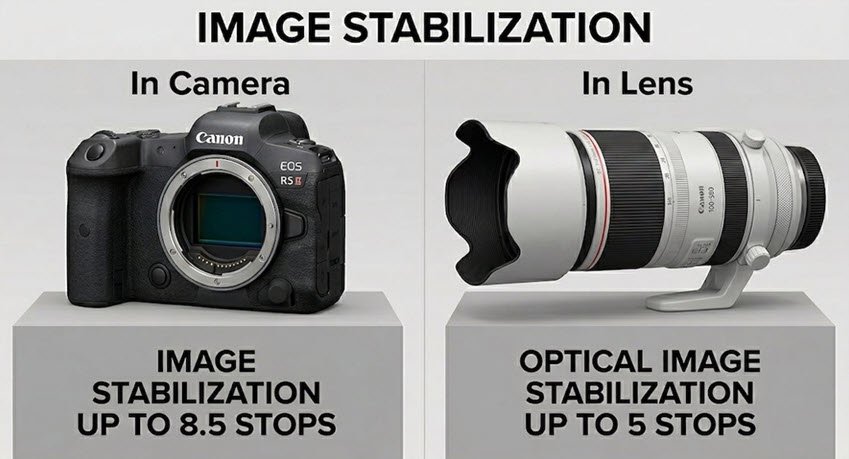
Image stabilization is one of the best tools wildlife photographers have, but it is not magic and it is not needed in every situation. Used correctly, it helps control hand-held movement. Used in the wrong situation, it can waste battery, fight your setup, or in some systems even create small inconsistencies.
The biggest mistake is assuming stabilization should simply stay on all the time.
What’s the Solution?
I treat stabilization as task-specific. I turn it on when it solves a real problem and turn it off when it is no longer helping.
Use stabilization when hand-holding in marginal light. That is where it earns its keep. It helps counter low-level camera movement so you can shoot slower than you otherwise could.
Re-evaluate it when you move to a tripod. Some modern systems detect tripod use well, while some older systems do not. If the setup is truly locked down, stabilization may not be doing anything useful. Testing your gear is the only way to know how your combination behaves.
Use the correct stabilization mode if your lens offers one. Some systems include modes designed for panning. Those modes help stabilize the axis you need while allowing smoother movement in the direction of the pan.
Do not expect stabilization to freeze subject motion. It only addresses camera movement. If the animal moves, you still need shutter speed.
If the lens is on support instead of in your hands, the next question is whether that support system is actually helping.
Sharpness Killer #7 – Tripod Selection
What’s the Issue?
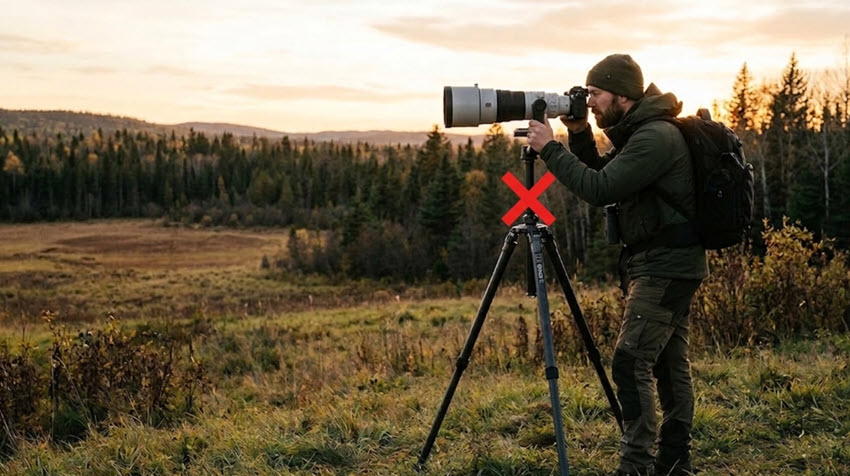
A poor tripod can make an expensive lens feel mediocre. Flex, vibration, unstable footing, and extended center columns all compromise sharpness, especially with big wildlife lenses.
Tripods are often treated like accessories. In wildlife photography, they are part of the optical chain.
What’s the Solution?
A good tripod should reduce movement, not introduce it. That means looking at both the quality of the legs and how you are using them in the field. Carbon fiber legs are stiffer and do not conduct the cold like metal does so on winter shoots your hands will stay much warmer.
Choose stiffness over gimmicks. A rigid set of legs does more for real-world sharpness than small convenience features. Flex in the legs or joints translates directly into blur when you are working with long lenses.
Center columns: I recommend buying a tripod that does not have a center column. If you require height, purchase a tripod that accommodates the height you require without a center column. Center columns raise the center of gravity and turn the setup into more of a vibrating lever. Lower, wider, and stiffer almost always wins.
Widen the stance when conditions get rough. A wider footprint increases stability and reduces the chance that small pushes from you or the wind will rock the system.
Set up on the most stable ground you can find. Soft mud, loose rock, docks, and vehicle floors all add movement. Tripod stability starts with what is under the feet, not just the tripod itself.
Once the legs are solid, the next sharpness question is how the head handles the weight of the lens.
Sharpness Killer #8 – Gimbal Head
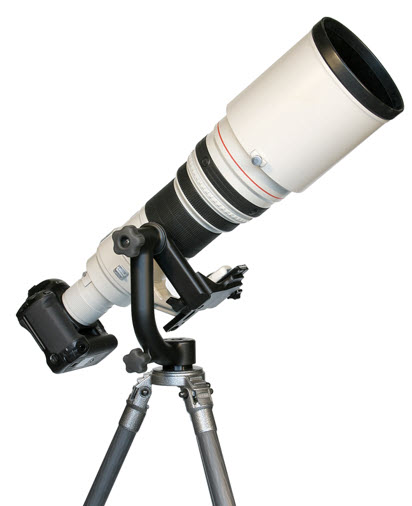
What’s the Issue?
A heavy long lens on the wrong head is harder to control, slower to aim, and more likely to transmit vibration. Ball heads can work with lighter setups, but once the lens gets big, fighting gravity becomes part of every movement.
That resistance often shows up as jerky panning, sagging, or small framing corrections right when you need the system to stay smooth.
What’s the Solution?
A properly set up gimbal head makes a long lens feel lighter, freer, and easier to control, which directly improves sharpness on moving subjects.
Balance the lens so it sits neutrally. When the lens is balanced around the tilt axis, the head is not fighting the weight of the setup. That means smoother tracking and fewer sudden dips or rebounds. Finding the balance point can take time in the field that we often don’t have. I place two marks on my lens foot, one that perfectly balances my camera and lens without a teleconverter and one with the teleconverter added so it is balanced quickly every time.
Leave slight resistance instead of locking everything down. A little drag can steady movement. Too much tension forces you to push harder, and that extra force can travel through the system as vibration. As a best practice leave both adjustment knobs slightly loose to allow for smooth panning.
Use the gimbal for movement-heavy situations. Birds in flight, running mammals, and unpredictable subjects all benefit from support that pans and tilts fluidly without the lens trying to flop.
Check balance again if you change bodies, add a teleconverter, or shift accessories. A small change in weight distribution can change how the system behaves. Rebalancing restores smooth control.
Even with a good head and tripod, the simple act of firing the shutter can still introduce movement.
Sharpness Killer #9 – Remote Shutter Release

What’s the Issue?
At slower shutter speeds or with long focal lengths, pressing the shutter can be enough to move the camera slightly at the exact wrong time. That movement may be tiny, but at high magnification tiny is all it takes.
This issue shows up most often with static subjects, tripod work, and long-lens setups where everything else is already stable.
What’s the Solution?
The less physical disturbance you put into the camera at the moment of capture, the better your chances of a razor-sharp frame.
Use a remote shutter release for critical static work. A remote removes the physical contact that causes small jolts. That makes it especially useful in low light or when the subject is not moving much.
Use the self-timer when a remote is not available. A short delay allows any movement from touching the camera to settle before the exposure begins.
Do not overuse it where reaction speed matters more than ultimate stability. For fast wildlife moments, responsiveness may matter more. The point is to use remote triggering where it helps most, not everywhere by default.
Sometimes the source of softness is not you or the subject at all. Sometimes it is the environment pushing your gear around.
Sharpness Killer #10 – Wind
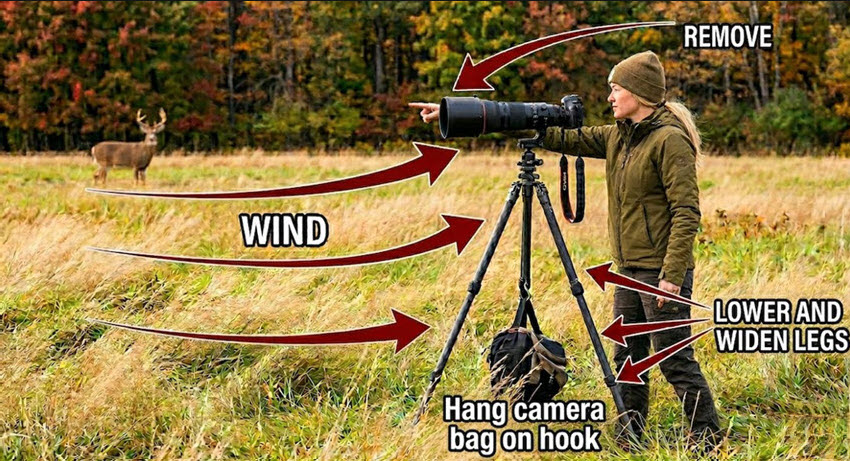
What’s the Issue?
Wind is one of the most overlooked sharpness killers in wildlife photography. It does not just move grass or feathers. It pushes on your lens, your tripod, your body, and anything else with surface area. With long lenses, that push becomes visible very quickly.
A setup can feel stable until you zoom in and realize the whole system was vibrating the entire time.
What’s the Solution?
When I am shooting in wind, I think in terms of surface area, leverage, and mass. Every fix is aimed at reducing how much the wind can move the system or how much that movement affects the image.
Remove the lens hood when conditions are rough. A hood adds surface area for wind to push against. Reducing that surface area lowers the force acting on the front of the lens and helps cut vibration.
Lower the tripod and widen the legs. A lower center of gravity is harder for the wind to disturb. Spreading the legs wider also creates a more stable base, which reduces rocking and oscillation.
Hang weight from the tripod when it is safe and practical. Extra mass can help stabilize the system and dampen small movements. The goal is not just more weight. It is more resistance to motion.
Use your body or terrain as a wind break. Even partial shelter can reduce the gusts reaching your setup. Less force on the lens and tripod means less movement recorded in the frame.
Shoot short bursts instead of single frames. In gusty conditions, movement rises and falls constantly. A burst gives you multiple chances to catch the moment when the system is most settled.
And sometimes, even when the gear feels perfectly still, the air between you and the subject is still softening the image.
Sharpness Killer #11 – Heat Waves
What’s the Issue?
Heat waves, heat haze, atmospheric shimmer, whatever you want to call it, can make a perfectly focused image look soft and wavy. The problem is not the lens and it is not your settings. It is the moving air between you and the subject bending light before it reaches the sensor.
The longer the distance and the warmer the air, the worse this tends to get. That is why distant wildlife over sunlit ground often looks mushy no matter what you do.
What’s the Solution?
Heat distortion is one of the few sharpness problems you cannot really fix with settings alone. The answer is usually to change the conditions, the angle, or the distance.
Shoot early and late when the ground is cooler. Cooler air tends to shimmer less, which means less distortion between you and the subject.
Reduce the distance to the subject when possible. The more air light has to pass through, the more chances there are for distortion. Less distance usually means a cleaner file.
Avoid shooting across heat sources. Roads, rocks, sand, vehicle hoods, and sunlit fields all radiate heat. Changing your angle can sometimes do more than changing any camera setting.
Let your gear acclimate to temperature shifts. Warm air spilling from a lens hood or a lens that just came out of a warm car can create local distortion right in front of the glass. Giving the setup time to equalize can help.
That same idea of hidden vibration and hidden distortion shows up again when you are photographing wildlife from a vehicle.
Sharpness Killer #12 – Vehicle Vibration
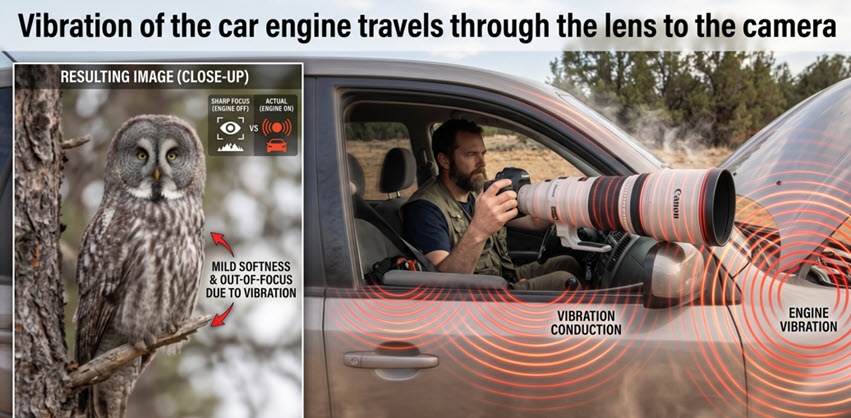
What’s the Issue?
Shooting from a vehicle is one of the best ways to approach wildlife without spooking it, but the vehicle itself can become the source of blur. Engine vibration, people shifting inside the cabin, and hard contact between the lens and the frame can all travel straight into the camera.
The setup often feels stable because the car is stationary, but the file tells a different story.
What’s the Solution?
When I photograph from a vehicle, I try to turn the vehicle into a blind, not a tripod. The goal is to isolate the lens from the vibration that the vehicle naturally carries.
Turn the engine off once the subject allows it. An idling engine sends constant vibration through the body of the vehicle. Turning it off removes one of the biggest sources of hidden motion.
Use a bean bag instead of resting directly on the window frame. A bean bag absorbs and spreads vibration better than a hard contact point. It also cradles the lens more securely.
Set up before the final stop if possible. Having the window down and support in place before you settle reduces extra movement and noise that can spook the subject.
Avoid leaning heavily on the same support point as the lens. If your body is pressing into the door or frame, your own movements can transfer into the support system.
If the image is still consistently soft after all of that, the problem may be something more systematic in the camera and lens relationship.
Sharpness Killer #13 – Camera Lens Calibration

What’s the Issue?
With DSLR systems in particular, autofocus can be consistently a little in front of or behind where you think it is landing. That means you can do everything right and still get repeatable softness in the wrong plane.
This is one reason photographers sometimes think a lens is soft when the real issue is inaccurate focus calibration.
What’s the Solution?
When I was shooting with a DSLR and I saw a pattern rather than random misses, I stopped blaming any of the sharpness killers listed above and started testing my gear for calibration related issues.
Look for repeatable front-focus or back-focus behavior. If sharpness consistently falls in front of or behind the intended focus point, that is a calibration clue, not just bad luck.
Test each lens-and-body combination individually. A lens that behaves perfectly on one body may behave differently on another. Calibration is about the pairing, not just the lens alone and this includes the use of teleconverters.
Use your camera’s micro-adjustment tools if you shoot DSLR. Small corrections can move the autofocus plane closer to where it should be, which improves real-world hit rate.
Outsource calibration if you have multiple bodies, teleconverters, or limited test space. Done properly, calibration takes time and controlled conditions. Sometimes paying for accuracy is faster than chasing the issue in the field.
What About Mirrorless Camera’s? This topic is still hotly debated but generally, mirrorless cameras do not need lens calibration (AF Micro Adjustment) because they focus directly on the image sensor, eliminating front/back focus issue common in DSLRs. I’d say this, if you notice front/back focus issues with your gear try calibrating to see if it fixes the issue.
After all that, there is still one very simple thing that can quietly reduce sharpness right at the front of the lens.
Sharpness Killer #14 – UV Filters
What’s the Issue?
A protective filter can be harmless, but it can also be the weakest optical element in the entire setup. Add lower-quality glass to the front of a premium wildlife lens and you introduce another chance for reduced contrast, flare, and softness.
This issue becomes more noticeable when shooting into difficult light, with long lenses, or when you are scrutinizing detail closely.
What’s the Solution?
My default approach is simple: I would rather trust the lens hood and good handling than put mediocre glass in front of expensive optics.
Remove low-quality protective filters when sharpness matters most. You are eliminating an extra layer of glass that can lower contrast or introduce small image quality penalties.
If you insist on using a filter, buy a good one. Better coatings and better glass reduce the likelihood that the filter itself becomes the weak point.
Be especially cautious in backlit or high-contrast situations. Extra glass surfaces can increase flare and lower clarity when bright light strikes the front element at difficult angles.
Keep the front element and filter clean. Smudges, dust, and moisture all reduce contrast and make an image feel softer even when focus is correct.
If you follow all of these tips, you have done everything you reasonably can in the field. The final step is deciding what can still be improved during the editing process and that’s where Aiarty Image Enhancer often comes to the rescue.
How I Sharpen Wildlife Photos Using Aiarty Image Enhancer
Even if you do everything right in the field, not every file comes home perfect. Sometimes the image is slightly soft because of high ISO noise. Sometimes the eye is just a touch behind where you wanted it. Sometimes the file is good enough to save, but not yet as strong as it could be.
That is where editing comes in. My goal in post is not to manufacture a fake image. It is to recover the best version of what was already there. Used carefully, Aiarty Image Enhancer can work as an image enhancer for wildlife by improving detail, cleaning up noise, and helping sharpen wildlife photo files that are close but not quite finished.
Steps to Sharpen Wildlife Photos in Aiarty Image Enhancer
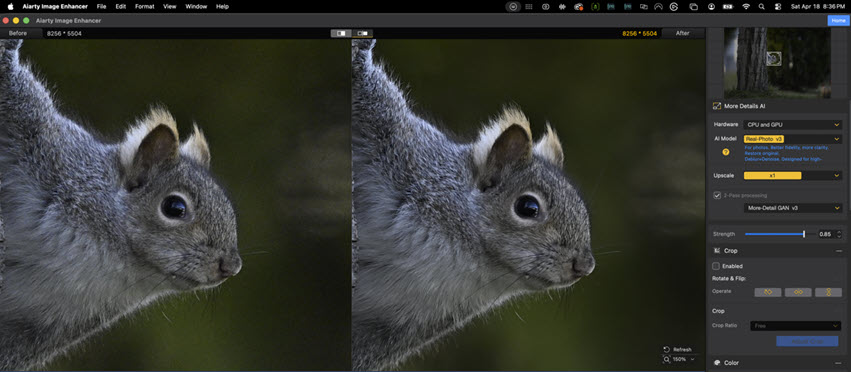
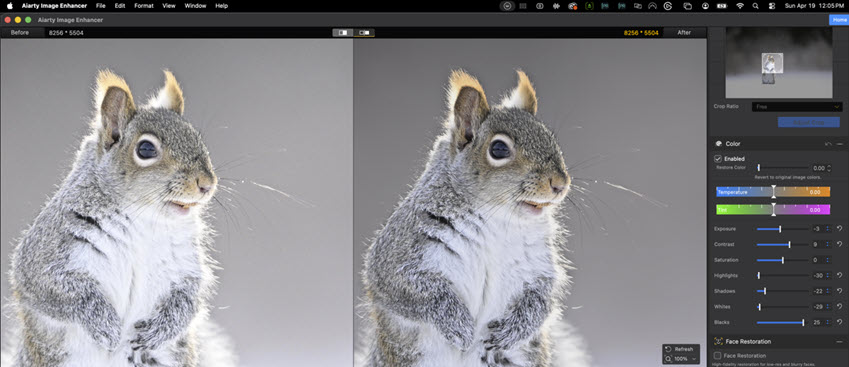
Let’s kick this off with a sample image of a grey squirrel that I was not happy with due to the level of noise and lack of detail.
- Before: High ISO and low light softened fur detail and introduced visible noise.
- After: Aiarty Image Enhancer helped reduce image noise (high ISO) and restore cleaner detail in the eye and the fur.
Even if you do everything right in the field, not every file comes home perfect. Sometimes the image is slightly soft because of high ISO noise. Sometimes the eye is just a touch out of focus. Sometimes the file is good enough to save, but not yet as strong as it could be.
That is where editing comes in. My goal in post is not to manufacture a fake image. It is to recover the best version of what was already there. Used carefully, Aiarty Image Enhancer can work as an image enhancer for wildlife by improving detail, cleaning up noise, and helping sharpen wildlife photo files that are close but not quite finished.
As someone who has used Aiarty Image Enhancer to process many images I thought it would be beneficial to walk you through the step-by-step process for enhancing your images.
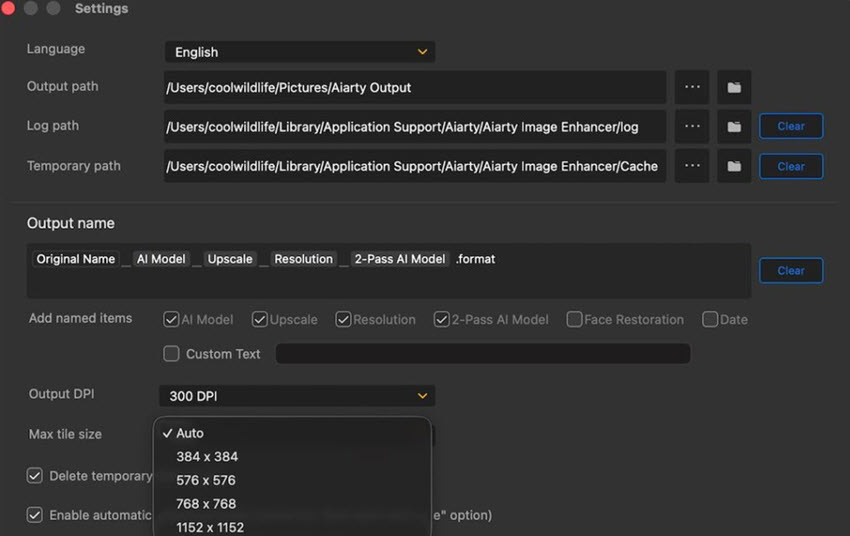
Before we dive into the steps there is one setting that I recommend you change in the settings menu.
RECOMMENDED SETTING CHANGE: Given wildlife photographers are dealing with large image file sizes there is one setting that I recommend you change. Go to the settings menu found in the top left hand corner, click on Aiarty Image Enhancer and scroll down until you see Max tile size. By setting this to Auto you'll get the very best results for large image file sizes.
Explore more about best practices for using Aiarty Image Enhancer effectively, case by case, and with test images.
Step 1. Importing Your Image
After launching Aiarty Image Enhancer, the first step is to import the wildlife image you want to enhance.
- Click on the Add or + button on the bottom left of the screen.
- Select your image file from your computer.
- Aiarty supports various file formats, but for best results, use RAW or high-resolution JPEG images.
Step 2. Image Evaluation
Start by evaluating the file honestly. Before touching any sliders, zoom in on the eyes, feather edges, fur texture, and the smooth parts of the background. Figure out whether the image suffers from noise, slight missed focus, motion blur, or a combination. This matters because each problem needs a different amount of correction.
Step 3. Choosing an Enhancement Mode
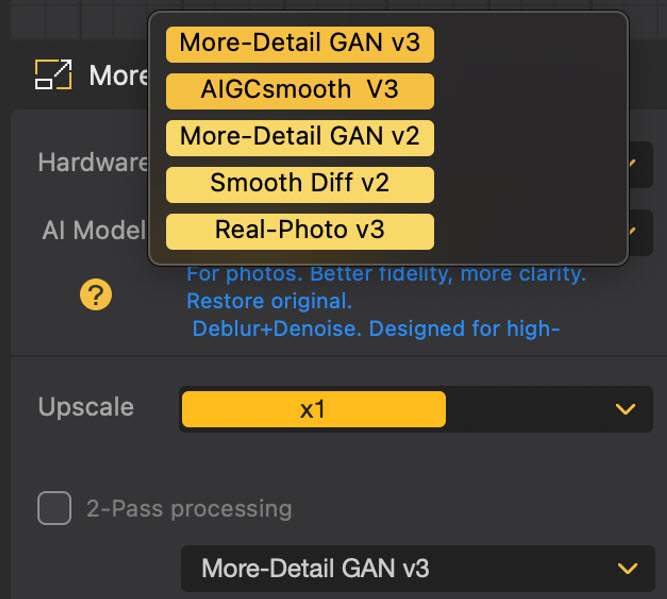
Next you'll want to select an AI model. Aiarty offers multiple enhancement modes, however I have had the best results starting with Real-Photo v3. For wildlife photography, consider the following options:
- Real-Photo v3: I recommend starting with this AI model for removing noise and improving image clarity and fine details.
- More-Detail GAN v3: Use this AI model when you need to bring out detail in your image. Don't be afraid to experiment by stacking this model on top of Real-Photo v3 through 2-Pass Processing when additional clarity in required.
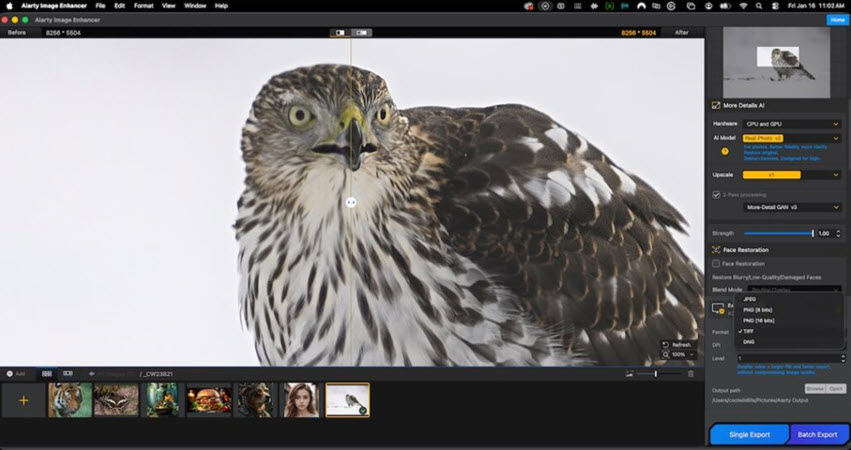
Step 4. Prioritize the eye area.
In wildlife photography, the eye is where viewers judge the image first. If the eye holds up, the frame usually feels sharp. If the eye falls apart, the whole image feels soft. Zoom in to 100% on the area around the eye once you’ve applied your enhancement mode to determine if it is sharp.
Step 5. 2-Pass Processing
Use 2-Pass Processing if the result you are looking for is not rendered after processing your image with Real-Photo v3 or More-Detail GAN v3.
Check the box beside 2-Pass Processing to turn on this function.
Step 6. Color and Tone Adjustments
Aiarty Image Enhancer provides you with the tools to adjust not only color but also the tonal range within your image to suit your eye. I personally perform these functions in Camera RAW and Photoshop but it’s a great addition for those of you looking to perform these actions within the same tool.
Step 7. Upscale wildlife photos
Quite often wildlife images are cropped and require upscaling for larger print jobs. Select 1X if no upscale is required.
If upscale is required click on the upscale drop-down menu and select the level of upscaling desired from 2X to 8X.
Note: In the current version, Real-Photo v3 is limited to 2X upscaling. All other AI models support up to 8X upscaling.
Step 8. Export Settings
Once you're happy with your processed image it's time to export it to your drive.
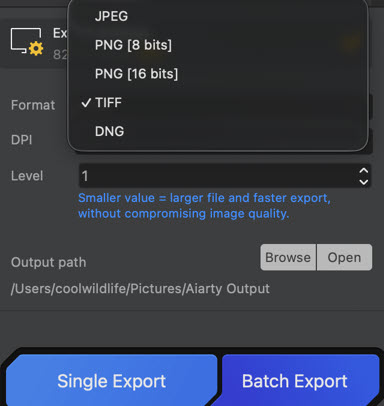
- Select the output format, JPEG or PNG (8 or 16 bit), Tiff or DNG. I recommend DNG if this is the first step in your editing process. DNG will allow you to process the resulting export as a RAW format when you bring the image into your editing software like adobe Camera RAW.
- Select the DPI (Values from 72 to 1000). Select 72 for social feeds and higher DPI like 300 for print jobs. Consult your printer for the best DPI resolution before you submit your image.
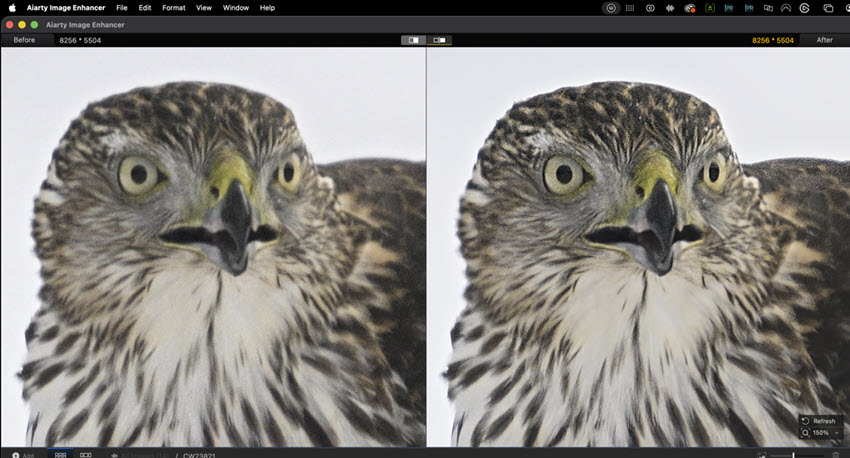
- Select the level for output. Level 1 produces the largest file and level 9 the smallest. As an example, for the Cooper's hawk image at 8256x5504 exporting at 300 DPI when I selected Level 1 the resulting TIFF file was 27.5 MB. At Level 9 the file was reduced to 18.9 MB.
- Select the output path you wish to save the image to.
- If it is a single image click Single Export and your image will be saved.
Step 9. Batch Export
If you have a number of images that you wish to apply the exact same settings to you can load multiple images in step 1 above.
When you are ready to save the images click on Batch Export and all of the images you imported will be processed based on your selections.
Conclusion
The biggest lesson I have learned about sharp wildlife photography is that sharpness is usually won or lost long before the file ever reaches the computer. Shutter speed, focus placement, lens handling, environmental conditions, support gear, and simple field discipline all matter. The good news is that once you understand what each sharpness killer is actually doing, you can start making decisions that stack the odds in your favor.
Then, when a file is close but not quite there, post-processing becomes the final part of the workflow rather than a desperate rescue. Used carefully, a wildlife image enhancer like Aiarty Image Enhancer can help you clean up noise, recover subtle detail, and sharpen wildlife photo files without losing the natural feel that made you want to keep the image in the first place, making photos look professional.
If you remember nothing else, remember this: get the eye as sharp as you can in the field, protect the file with the right settings, and let your editing support the image instead of trying to invent it.
You May Also Like
This post was written by Bill Maynard, an award-winning wildlife photographer and the creative force behind coolwildlife.com. The post is edited by Abby Poole.