If you’re new to photography, you’ve probably found yourself searching everywhere for a photography cheat sheet. But in reality, you’re not looking for more theory, you’re looking for something practical. What settings should you use right now? How do you shoot in bright sunlight, low light, or indoors? And most importantly, how do you stop guessing exposure every time you pick up your camera?
This guide is built as a real-world camera cheat sheet system that brings together essential concepts, practical shooting settings, and proven shortcuts like the Sunny 16 Rule, all structured in a way that helps you learn through application rather than memorization. Instead of overwhelming you with technical details, the goal is to help you recognize patterns, make faster decisions, and develop settings that actually work in real shooting situations.
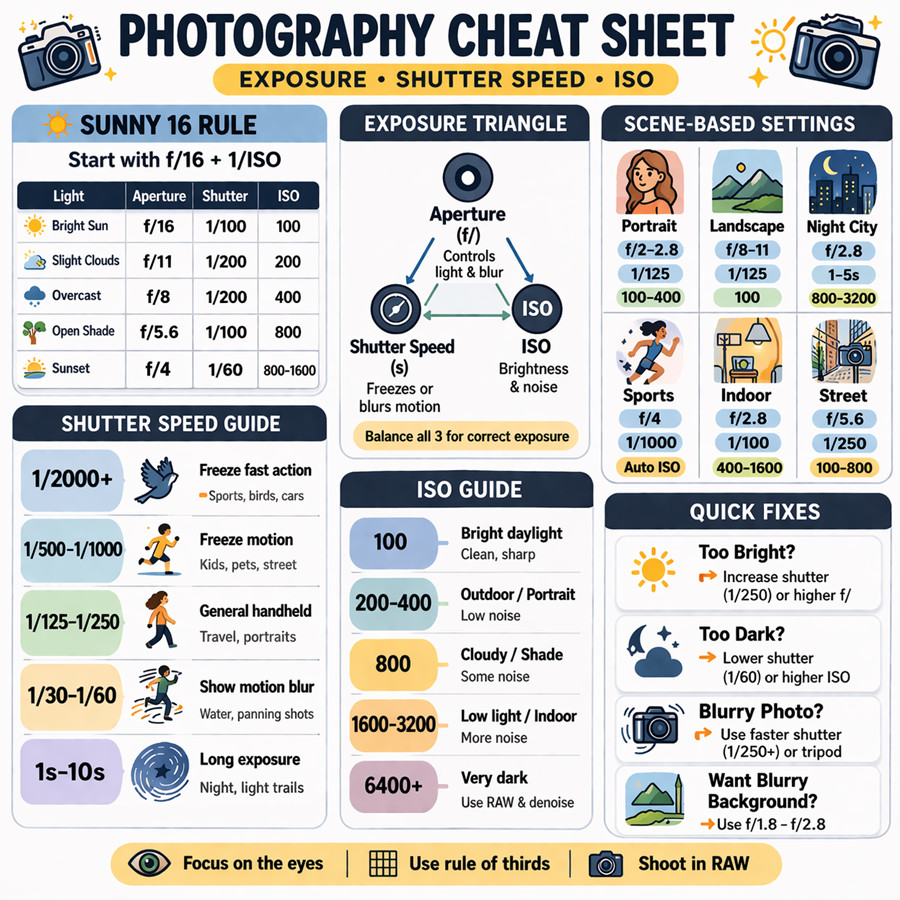
Photography is all about balancing three settings: aperture, shutter speed, and ISO. This cheat sheet helps you quickly choose the right camera settings based on real shooting situations instead of guessing.
- Aperture controls background blur and depth of field
- Shutter speed controls motion and sharpness
- ISO controls brightness and image noise
Quick starting points:
- Portraits photography settings: wide aperture (f/1.8–f/2.8), low ISO
- Landscapes photography settings: narrow aperture (f/8–f/11), ISO 100
- Night photography settings: high ISO + slow shutter
- Action photography settings: fast shutter speed (1/500+)
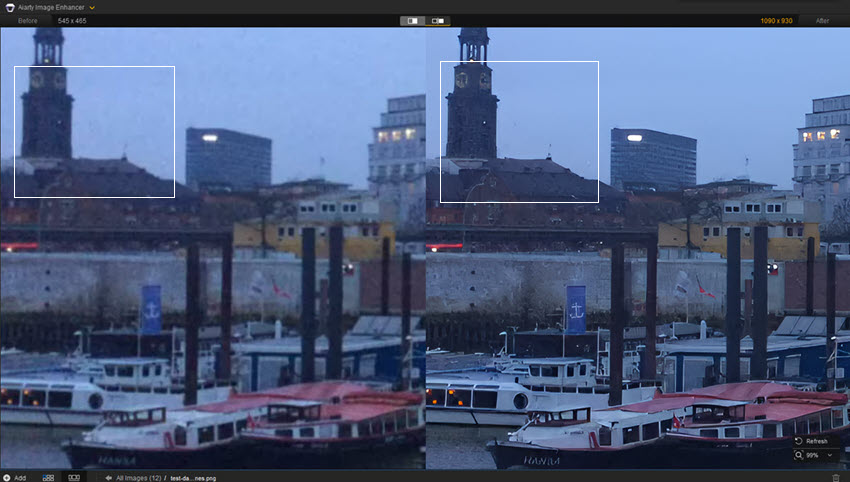
Tips: If the recorded photos are blurry, noisy, pixelated, or faded in color due to wrong settings, improve the photo quality easily with Aiarty Image Enhancer.
Exposure Triangle (Core Foundation of Any Camera Cheat Sheet)
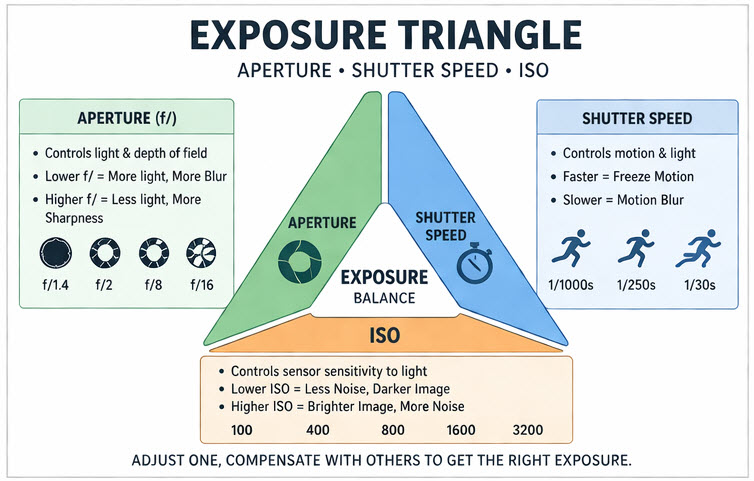
Before you can truly use any photography cheat sheet or camera setting cheat sheet, you need to understand the foundation that controls every photo you take: the Exposure Triangle. This concept is not just theory, it is the decision engine behind every correct exposure in photography. Whether you are shooting portraits, landscapes, or night scenes, every camera setting you choose is simply a balance between three variables:
- Aperture
- Shutter Speed
- ISO
Once you understand how these three interact, any camera cheat sheet instantly becomes more intuitive. Think of it like this: Every photograph is a trade-off between brightness, motion, and image quality. So you’re never just “choosing a setting”, you’re making a trade-off.
1. Aperture (Light + Depth of Field Control)
Aperture refers to the opening inside your lens that controls how much light enters the camera. In most camera cheat sheet guides, aperture is the “creative control” parameter because it directly affects the visual style of your photo.
- Lower f-number (e.g., f/1.8) means more light + stronger background blur
- Higher f-number (e.g., f/11–f/16) means less light + sharper overall scene
What aperture really affects:
- Brightness of image
- Background blur (bokeh)
- Subject separation
Cheat sheet interpretation:
- Portraits are typically shot with wide aperture (f/1.8–f/2.8)
- Landscapes are typically shot with narrow aperture (f/8–f/11)

2. Shutter Speed (Motion Control)
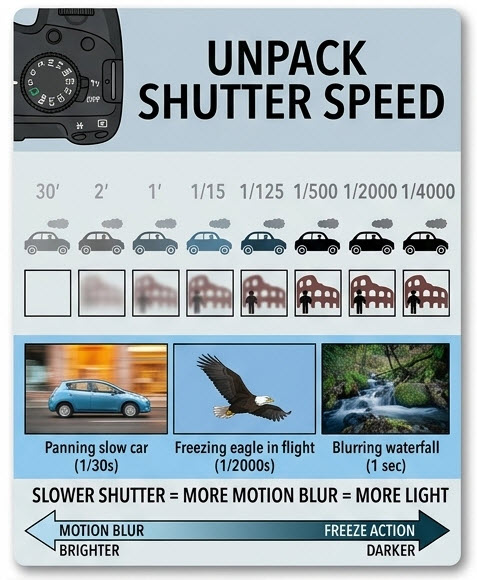
Shutter speed determines how long the camera sensor is exposed to light. In a photography cheat sheet, shutter speed is the most important setting when movement is involved.
- Fast shutter (1/1000s) means freezes motion
- Slow shutter (1s or longer) means creates motion blur
What shutter speed affects:
- Motion clarity
- Sharpness of moving subjects
- Ability to capture action or light trails
Cheat sheet interpretation:
- Sports typically require fast shutter (1/500–1/2000)
- Night lights typically require slow shutter (1–10s)
- Everyday handheld typically requires ~1/125s baseline
Learn More: How to Clean a Camera Sensor - Remove Dust Spots and Keep Your Photos Sharp
3. ISO (Sensor Sensitivity + Noise Trade-off)
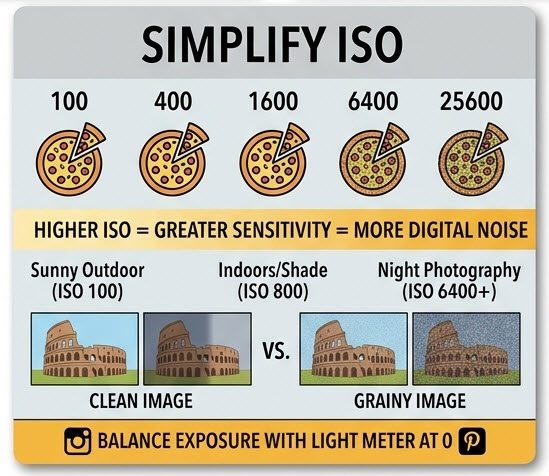
ISO controls how sensitive your camera sensor is to light. ISO is the “backup control” in any camera setting cheat sheet, you increase it only when aperture and shutter cannot provide enough light.
- Low ISO (100–200) results in clean image, less noise
- High ISO (800–6400+) results in brighter image, more grain/noise
What ISO affects:
- Image brightness
- Noise level
- Low-light usability
Cheat sheet interpretation:
- Daylight photography typically uses ISO 100
- Indoor photography typically uses ISO 400–1600
- Night photography typically uses ISO 1600+
How the Three Work Together
The Exposure Triangle only makes sense when you see it as a balance system:
- If you open aperture, you may need faster shutter or lower ISO
- If you increase shutter speed, you may need higher ISO or wider aperture
- If you lower ISO, you may need more light from aperture or shutter
Let’s say you’re shooting a portrait indoors. You choose a wide aperture to blur the background, but the image turns out too dark. At that point, you have options: slow down the shutter slightly, or raise the ISO to compensate. You’re not guessing anymore, you’re adjusting within a system.
The same idea applies everywhere:
- In bright sunlight, you should reduce light by using a smaller aperture or faster shutter speed
- In low light, you should increase sensitivity (ISO) or exposure time
- For fast action, you should prioritize shutter speed, then adjust aperture and ISO accordingly
Over time, these adjustments become instinctive. That’s exactly the goal of using a photography cheat sheet, not memorization, but faster decision-making.

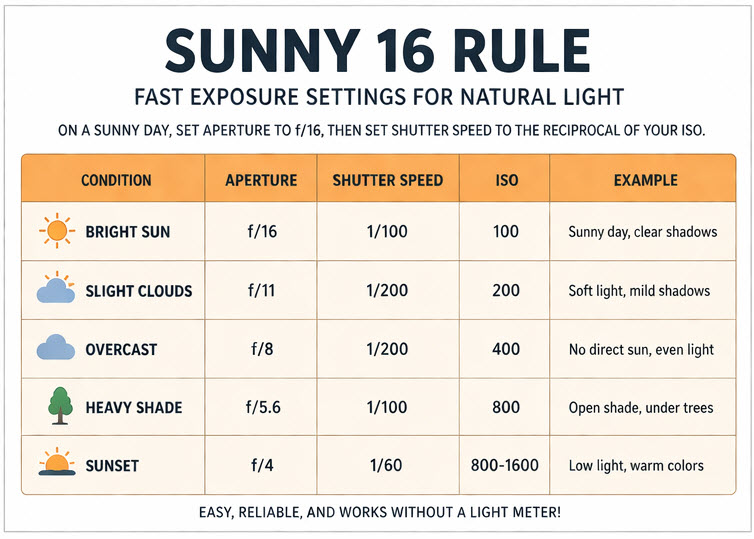
Sunny 16 Rule (The Most Important Natural Light Cheat Sheet)
After understanding how the Exposure Triangle works, the next step is learning how to apply it quickly in real-world situations. This is where one of the most classic and practical tools in photography comes in: the Sunny 16 Rule.
Unlike many camera setting guides that require you to constantly check your screen or histogram, the Sunny 16 Rule gives you something far more valuable: A reliable way to estimate correct exposure using only the light around you. In other words, it turns your environment into a built-in light meter.
What Is the Sunny 16 Rule?
The rule is simple: On a bright sunny day, set your aperture to f/16, and your shutter speed to the inverse of your ISO. So if your ISO is 100, your shutter speed should be around 1/100. If your ISO is 200, your shutter should be around 1/200. This combination will usually give you a well-balanced exposure in direct sunlight, without needing any automatic settings.
The Sunny 16 Rule is based on a consistent property of natural light: Midday sunlight is relatively predictable in brightness.
Because of that consistency, photographers were able to standardize a baseline exposure that works in most outdoor daylight conditions. What makes this powerful is not just accuracy, but speed, you don’t need to “figure out” exposure every time. You start from a known baseline and adjust from there.
Turning Sunny 16 Into a Practical Photography Cheat Sheet
In reality, light conditions change constantly: clouds, shade, sunset, and reflections all affect exposure. The Sunny 16 Rule becomes much more useful when you treat it as a starting point that adapts to different lighting scenarios.
Here’s how that looks in practice:
| Lighting Condition | Aperture | Shutter Speed | ISO | What It Means |
|---|---|---|---|---|
| Bright sun | f/16 | 1/100 | 100 | Strong light, hard shadows |
| Slight clouds | f/11 | 1/200 | 200 | Softer light, mild contrast |
| Overcast | f/8 | 1/200 | 400 | Even lighting, low contrast |
| Open shade | f/5.6 | 1/100 | 800 | Less direct light, softer shadows |
| Sunset / golden hour | f/4 | 1/60 | 800–1600 | Warm tones, low light |
How to Actually Use It While Shooting
The biggest mistake beginners make is treating Sunny 16 as something to memorize, instead of something to build intuition from.
Begin by observing the light around you:
- Is the sunlight harsh and bright? Then safely start at f/16.
- Is the light softer like on a cloudy day? You naturally open up the aperture to f/11 or f/8.
- Is the light getting dark like during sunset or in shaded areas? Move toward f/5.6 or wider, or begin increasing ISO to compensate.
Camera Cheat Sheet (Scene-Based Shooting Settings)
Now it’s time to apply the photography cheat sheet in real-world situations. This is where a camera cheat sheet becomes most useful, not as a list of fixed terms and settings, but as a set of starting points tailored to different shooting scenarios. Instead of asking "What exact settings should I use?", it's more effective to think: "Given this scene, what should I prioritize, depth, motion, or light?"
Each scenario below gives you a reliable baseline, along with the reasoning behind it so you can adjust confidently.
A photography cheat sheet is only useful if you actually apply it. The real improvement happens when you take these settings into real-world situations. That’s when a camera cheat sheet stops being a list of numbers and becomes a practical tool, helping you quickly adjust your settings based on different scenes and lighting conditions
Portrait Photography (Subject Separation First)
Portrait photography is usually about making your subject stand out from the background. That’s why aperture becomes the primary control here.
A typical setup might look like:
- Aperture around f/1.8 to f/2.8 to create background blur
- Shutter speed at least 1/100 to avoid motion blur
- ISO kept as low as possible for clean skin tones
But the numbers themselves matter less than the intention. You’re prioritizing depth of field, so everything else adjusts around that. If the image is too bright, increase shutter speed. If it’s too dark, raise ISO slightly. This is how a camera setting cheat sheet becomes flexible rather than rigid.
Landscape Photography (Sharpness and Detail)
Landscape photography flips the priority. Instead of blur, you usually want everything in focus, from foreground to background.
That’s why photographers typically:
- Use f/8 to f/11 for maximum sharpness
- Keep ISO at 100 for highest image quality
- Adjust shutter speed to balance exposure
In this scenario, shutter speed becomes more flexible because the scene is often static. If needed, you can slow it down significantly—as long as your camera is stable. This is also where using a tripod becomes more impactful than changing settings.
Night & Low-Light Photography (Light Gathering)
In night photography, low-light scenes are where most beginners struggle, because there simply isn’t enough light to work with. Here, all three exposure settings are pushed closer to their limits.
A common approach:
- Use a wide aperture (f/1.8–f/4) to let in more light
- Slow down shutter speed (from 1 second to several seconds)
- Increase ISO (800–3200 or higher if necessary)
The key here is compromise. You’re balancing brightness vs noise vs sharpness. For example, if your subject is static (like a cityscape), you can afford a long shutter. If it’s moving, you may need to raise ISO instead.
Action / Sports Photography (Motion Priority)
In action photography, everything revolves around freezing motion. That makes shutter speed your top priority.
You typically start with:
- Fast shutter speed (1/500 to 1/2000)
- A moderately wide aperture (f/2.8–f/5.6)
- ISO adjusted automatically or manually to maintain exposure
Unlike other scenarios, you don’t compromise on shutter speed here. Instead, you let aperture and ISO adapt to support it. This is a great example of how a photography cheat sheet is really about prioritization, not fixed numbers.
Indoor Photography (Mixed and Limited Light)
Indoor environments introduce a different challenge: inconsistent and often low-quality lighting.
A balanced setup usually includes:
- Aperture around f/2–f/4
- Shutter speed around 1/60–1/125 (to avoid handshake blur)
- ISO increased as needed (400–1600+)
But beyond exposure, indoor shooting is where additional settings start to matter more.
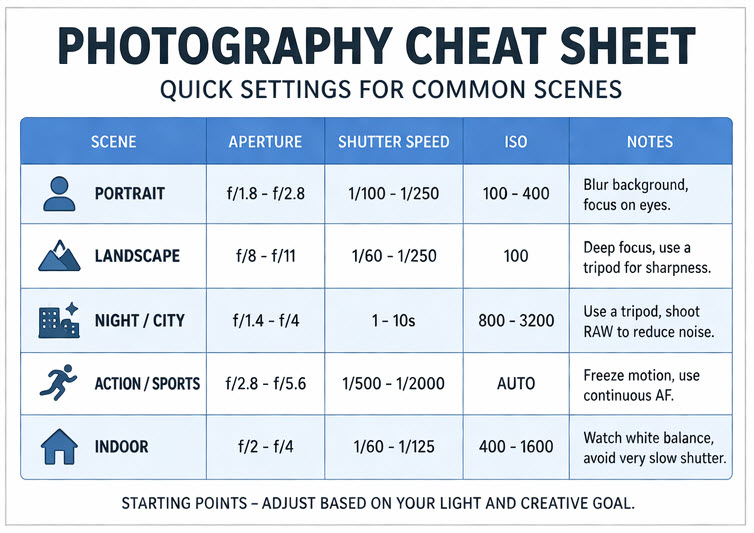
Quick Camera Settings Cheat Sheet (At-a-Glance)
After going through the exposure basics and scene-based breakdowns, it helps to have a single, quick-reference table you can glance at before shooting.
Think of this as your “mental shortcut” when you don’t have time to think through every setting.
| Scene | Aperture | Shutter Speed | ISO | What to Prioritize |
|---|---|---|---|---|
| Portrait | f/1.8–f/2.8 | ~1/250 | 100–400 | Background blur |
| Landscape | f/8–f/11 | ~1/250 | 100 | Sharpness & detail |
| Night | f/2–f/4 | 1–10s | 800–3200 | Light gathering |
| Action | f/2.8–f/5.6 | 1/500–1/2000 | Auto | Motion freezing |
| Indoor | f/2–f/4 | ~1/125 | 400–1600 | Balance |
Common Photography Mistakes (And How to Fix Them)
Even with a solid photography cheat sheet, many disappointing results come down to a few common image artifacts. The good news is that once you recognize them, they’re usually quick to fix.
1. Photos Look Too Dark
One of the most frequent issues is underexposed photos. This often happens when shooting in low light or when the shutter speed is set too fast. Instead of randomly adjusting settings, think in terms of balance: either allow more light in by opening your aperture, slow down the shutter if your subject is still, or increase ISO when needed.
2. Photos Are Blurry
Another common problem is blurry images. In most cases, this isn’t caused by poor focus, but by motion, either from your subject or your hands. If you’re shooting handheld, a shutter speed that’s too slow can easily introduce blur.
Increasing your shutter speed is usually the most effective fix, even if it means slightly raising ISO.
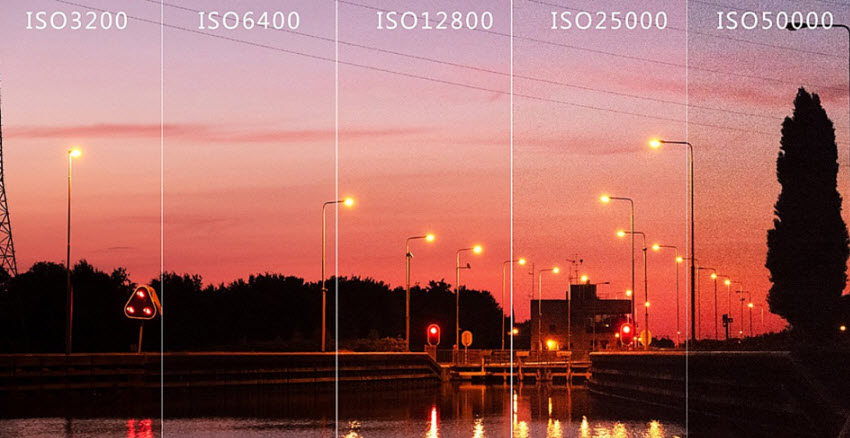
3. Too Much Noise (Grainy Images)
You may also notice excessive noise or grain, especially in indoor or night photography. This is typically the result of using a high ISO. While some noise is unavoidable in low light, you can minimize it by using the lowest ISO possible for the situation, stabilizing your camera, or allowing more light through a wider aperture or longer exposure.
4. Subject Doesn’t Stand Out
Another subtle but important issue is when images look flat or lacking subject separation. This often happens when the aperture is too narrow, causing everything in the frame to appear equally sharp. For portraits or subject-focused shots, using a wider aperture and increasing the distance between your subject and the background can dramatically improve depth and visual impact.
5. Exposure Looks Wrong in Difficult Lighting
Finally, many beginners struggle with incorrect exposure in tricky lighting, such as backlit scenes or high-contrast environments. In these cases, your camera’s automatic metering may not interpret the scene correctly. Learning to use exposure compensation or manually adjusting your settings can help you retain detail in both highlights and shadows.
Even with perfect camera settings, photography mistakes are still common, such as underexposed images, noise in low-light shots, soft focus, or lost fine details. This is where AI-powered post-processing tools can help recover and enhance your images.
Aiarty Image Enhancer can significantly improve photos that were affected by common shooting problems. It helps restore clarity, reduce noise from high ISO settings, and enhance fine textures that may have been lost due to incorrect exposure or low-light conditions. Whether you're working with night photography, indoor shots, or slightly out-of-focus images, it can intelligently upscale and refine details while preserving a natural look.
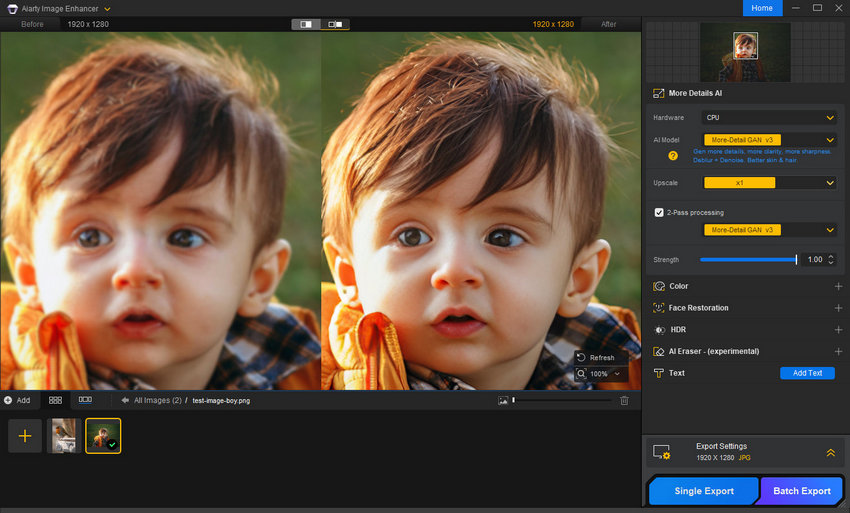
In addition, it offers adjustable enhancement strength to control how the final image should look. You can choose a cleaner, more polished result with stronger noise reduction, or retain a subtle level of natural grain for a more realistic and film-like texture. This flexibility makes it suitable for both commercial work that requires clean, sharp visuals and creative photography where preserving atmosphere and texture is important.
Final Thoughts
Mastering photography is not about memorizing endless settings, but about understanding how light, motion, and exposure work together. This photography cheat sheet gives you a practical framework to make faster and more confident decisions in real shooting situations.
By learning the exposure triangle, applying simple rules like Sunny 16, and using scene-based camera settings cheat sheet, you can quickly adapt to any environment, from bright outdoor portraits to challenging low-light scenes. Over time, these settings become instinctive rather than calculated.
And when photos don’t turn out perfectly, post-processing tools like Aiarty Image Enhancer can help refine details, reduce noise, and recover clarity, giving you a second chance to turn good shots into great ones.
The goal is simple: shoot less randomly, and create more intentionally.
 FAQs
FAQs
A photography cheat sheet is a quick reference guide that helps you choose camera settings based on lighting conditions and shooting scenarios.
There’s no single “best” setting, but a good starting point is:
- Aperture Priority mode
- ISO 100–400 (daylight)
- Let the camera handle shutter speed
Typically between ISO 800 and 3200, depending on your camera. If noise becomes too noticeable, you can reduce it later using tools like Aiarty Image Enhancer.
Yes, but mainly as a learning and backup tool.
The Sunny 16 rule is often discussed in photography communities (including Reddit) as a way to quickly estimate exposure in bright daylight without relying on the camera meter. However, many photographers note that while it is not always perfectly accurate, it is still useful for building exposure intuition and shooting in manual mode more confidently.
This is one of the most common beginner issues discussed in photography forums. A photography cheat sheet cannot prevent blur if shutter speed is too slow for the subject or handheld shooting conditions. Motion blur usually happens because:
- Shutter speed is too slow for moving subjects
- Camera shake from handheld shooting
- Poor lighting forcing slower exposure
You May Also Like
This post was written by Brenda Peng who is a seasoned editor at Digiarty Software who loves turning ordinary photos into extraordinary works of art. With AI assistance for brainstorming and drafting, the post is reviewed for accuracy by our expert Abby Poole for her expertise in this field.