


Lightroom presets make it easy to give your photos a professional look in just one click. Whether you've downloaded a free preset pack, purchased presets from a photographer, or created your own, the next step is getting them into Lightroom correctly.
If you're new to Lightroom, this process can be surprisingly confusing. Depending on whether you're using Lightroom Classic, Lightroom Desktop, or Lightroom Mobile, the steps are different. You may also run into issues like presets not appearing after import, unsupported file formats, or not knowing whether you need XMP or DNG files.
This guide walks you through how to add presets to Lightroom on every major version, explains the differences between preset formats, and shows you how to fix the most common import problems so you can start editing with confidence.
Before You Apply a Preset
Lightroom presets are designed to change the style of a photo, such as its colors, contrast, and overall mood. They don't remove image noise, sharpen blurry details, or increase resolution.
If your original photo was taken in low light, at a high ISO, or needs extra detail restoration, consider improving its image quality first. AI-powered tools like Aiarty Image Enhancer can reduce noise, recover fine details, and upscale images before you import them into Lightroom for final color grading. Starting with a cleaner image often gives presets a better foundation to work with.
What Are Lightroom Presets?
A Lightroom preset is a saved collection of editing adjustments that can be applied to a photo with a single click. Instead of manually changing settings like exposure, contrast, highlights, shadows, white balance, and color grading every time, you can use a preset to apply those adjustments instantly.
Think of presets as a starting point rather than a one-click solution. A preset can create a consistent look across multiple photos, making it especially useful for wedding photography, portraits, travel, landscapes, and social media content. After applying a preset, you can still fine-tune individual settings to better match the lighting and subject in each image.
- Save time by applying multiple adjustments at once.
- Create a consistent editing style across an entire photo collection.
- Work with both RAW and JPEG files (results are usually more flexible with RAW images).
- Remain fully editable, allowing you to adjust or remove the preset at any time without affecting the original photo.
Before You Start
Before importing presets, take a minute to identify which version of Lightroom you're using and what type of preset you've downloaded. This helps avoid many of the most common import issues.
Step 1. Check Your Lightroom Version
Adobe offers several Lightroom applications, and the import process isn't exactly the same for each one.
If you're unsure which version you're using, open Lightroom and check the application name on the launch screen or under Help > About (Windows) or Lightroom > About Lightroom (Mac).
Step 2. Know Your Preset File Type
The two most common preset formats are XMP and DNG.
- XMP (.xmp): The standard format for Lightroom Classic and Lightroom Desktop. Most preset packs you download today include XMP files.
- DNG (.dng): A photo file containing preset settings. This format is commonly used for Lightroom Mobile, especially when presets are installed manually without Creative Cloud syncing.
If your downloaded presets come as a ZIP file, extract it before importing. Lightroom cannot import presets directly from a compressed ZIP archive.
Step 3. Back Up Your Existing Presets (Optional)
If you've already built a collection of custom presets, consider backing them up before adding new ones. Although importing presets doesn't normally overwrite existing files, keeping a backup makes it easy to restore your collection if you switch computers or reinstall Lightroom in the future.
Now that you've confirmed your Lightroom version and preset format, you're ready to import your presets. The following sections walk through the process for Lightroom Classic, Lightroom Desktop, and Lightroom Mobile.
How to Add Presets to Lightroom Classic
Lightroom Classic is Adobe's desktop application for photographers who prefer to organize and edit photos locally. If you've downloaded a preset pack containing .xmp files, follow these steps to import them.
Step 1. Extract the Preset Files
If your presets were downloaded as a ZIP file, extract it first. Inside the extracted folder, you should see one or more .xmp files. Lightroom Classic cannot import presets directly from a ZIP archive.
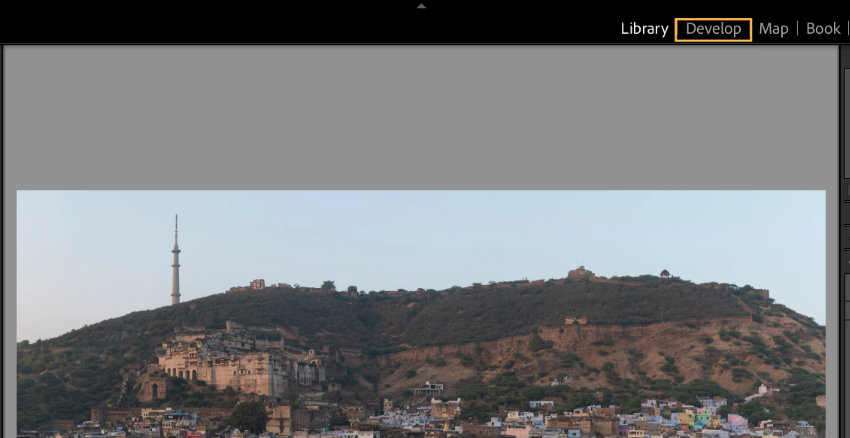
Step 2. Open Lightroom Classic and Switch to the Develop Module
Launch Lightroom Classic and select any photo from your library. Then click Develop in the module bar at the top of the window. Presets can only be imported and applied from the Develop module.
Step 3. Locate the Presets Panel
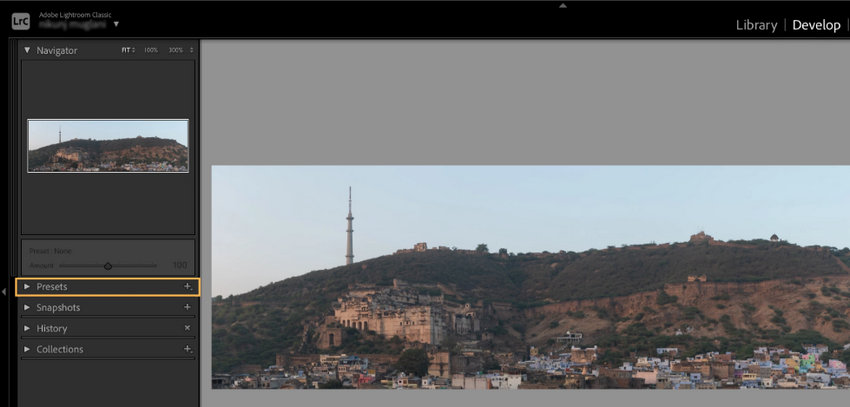
On the left side of the Develop workspace, find the Presets panel. If it's collapsed, click its title or the small arrow next to it to expand the panel.
Step 4. Import the Presets
At the top of the Presets panel, click the + icon and choose Import Presets.
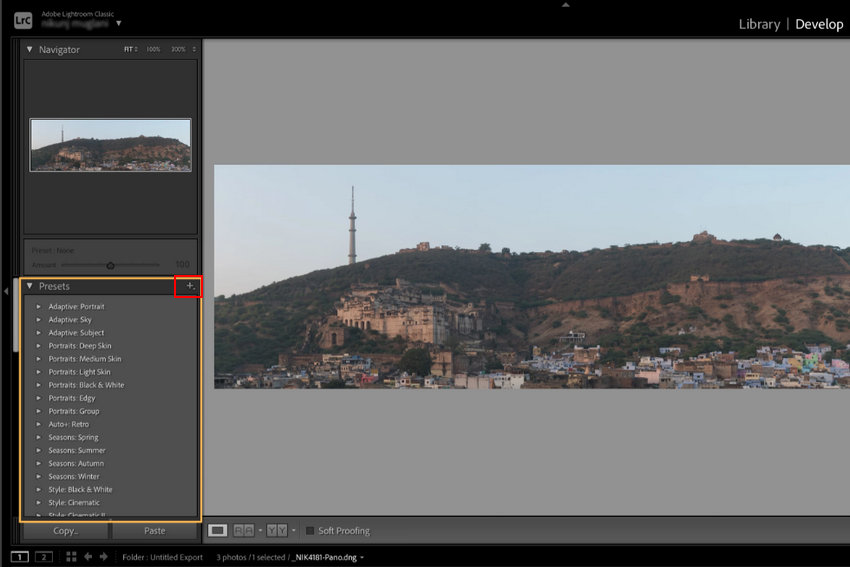
In the file browser that opens, navigate to the folder containing your extracted .xmp files. You can select a single preset or multiple presets at the same time, then click Import.
Step 5. Find Your Imported Presets
Once the import is complete, the new presets will appear in the Presets panel. Depending on how the preset creator organized the files, they may be grouped inside a new preset folder instead of appearing under "User Presets."
If you don't immediately see them, expand all preset groups by clicking the arrows next to each folder.
Step 6. Apply a Preset
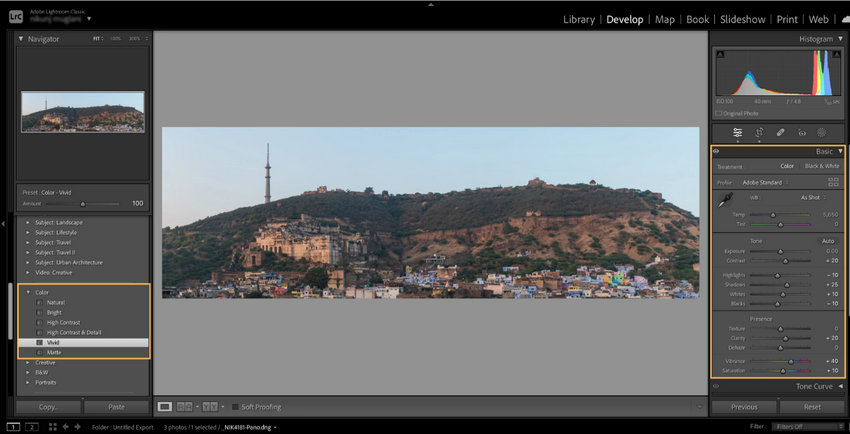
Select a photo in the Develop module and simply click one of your imported presets. Lightroom will instantly apply all the saved adjustments to the image.
Remember that a preset is only a starting point. Different photos have different lighting conditions, so you may still want to adjust settings such as Exposure, White Balance, Highlights, or Shadows after applying the preset.
Can You Import Multiple Presets at Once?
Yes. Lightroom Classic allows you to import multiple XMP files simultaneously. If you've purchased a preset pack containing dozens or even hundreds of presets, simply select all the XMP files—or the entire folder, if supported by your operating system—during the import process. Lightroom will organize them automatically.
How to Remove Imported Presets?
If you no longer want a preset, right-click (Windows) or Control-click (Mac) the preset in the Presets panel and choose Delete. This removes the preset from Lightroom but does not affect any photos you've already edited with it. Your original images also remain unchanged because Lightroom edits are non-destructive.
How to Add Presets to Lightroom (Desktop)
Although Lightroom Classic and Lightroom (Desktop) share many editing features, they are different applications. Lightroom (Desktop) is Adobe's cloud-based version that automatically syncs your photos and edits across supported devices.
The good news is that importing presets is just as straightforward, and modern versions of Lightroom support the same .xmp preset format.
Step 1. Prepare Your XMP Files
If your downloaded preset pack is compressed as a ZIP file, extract it first. Make sure you can see the individual .xmp files before continuing.
Step 2. Open Lightroom
Launch Lightroom on your Windows PC or Mac and open any photo in the editing workspace.
Step 3. Open the Presets Panel
Click the Presets icon on the right side of the editing panel. This opens your current preset library.
Step 4. Import the Presets
Click the three-dot menu (...) at the top of the Presets panel and choose Import Presets.
Browse to the folder containing your XMP files, select the presets you want to install, and click Import.
Step 5. Start Using Your Presets
After the import finishes, your new presets will appear in the Presets panel. Simply click a preset to preview its effect on your selected photo. If you like the result, leave it applied and continue making any additional adjustments you need.
Will These Presets Sync to Lightroom Mobile?
If you use the same Adobe account across your devices and your Creative Cloud syncing is enabled, imported XMP presets in Lightroom are typically synced automatically to Lightroom Mobile. This means you only need to import them once on your desktop, and they should become available on your phone or tablet after syncing completes.
If your presets don't appear on your mobile device, make sure you're signed in with the same Adobe account, allow a few minutes for syncing to finish, and confirm that cloud sync is enabled.
How to Add Presets to Lightroom Mobile
There are two common ways to use presets in Lightroom Mobile. The easiest method is to let Adobe Creative Cloud sync presets you've already imported into Lightroom on your computer. If you don't have access to the desktop version, you can also install presets manually using DNG files.
Choose the method that matches the type of preset you downloaded.
Method 1. Sync XMP Presets from Lightroom Desktop (Recommended)
If you already use Lightroom on your Windows PC or Mac, this is the simplest approach. Once you've imported XMP presets into Lightroom (Desktop), they can automatically sync to Lightroom Mobile as long as you're signed in with the same Adobe account.
- Import your XMP presets into Lightroom on your computer.
- Make sure you're signed in with the same Adobe account on both desktop and mobile.
- Wait for Creative Cloud to finish syncing.
- Open Lightroom Mobile and edit any photo.
- Tap Presets to view your synced preset collection.
If your presets don't appear immediately, refresh Lightroom Mobile or wait a few more minutes while syncing completes. A stable internet connection is also required.
Method 2. Import DNG Presets Manually
Some preset creators provide .dng files instead of XMP presets. A DNG preset is actually a photo file with preset settings embedded inside it. After importing the DNG file into Lightroom Mobile, you can save those settings as a reusable preset.
Step 1. Download and Extract the Preset Files
If the preset pack is delivered as a ZIP file, extract it first. You should see one or more .dng files.
Step 2. Import the DNG Files into Lightroom Mobile
Open Lightroom Mobile and tap the Add Photos button. Locate the downloaded DNG files on your device and import them into your Lightroom library.
Step 3. Open a DNG Preset Photo
After the import finishes, open one of the DNG images. It may look like an ordinary photo, but the preset settings are already stored inside it.
Step 4. Save the Settings as a Preset
Tap the three-dot menu (...) in the upper-right corner, then choose Create Preset. Give the preset a descriptive name, select or create a preset group if you'd like, and tap Save.
The preset is now available in your Presets panel and can be applied to any compatible photo in your Lightroom library.
Step 5. Apply Your New Preset
Open another image, tap Presets, select the preset you just created, and Lightroom will instantly apply the saved editing adjustments.
Can You Import XMP Presets Directly into Lightroom Mobile?
Generally, no. Lightroom Mobile doesn't provide a built-in option to import standalone XMP preset files directly from your phone or tablet. Instead, XMP presets are typically imported into Lightroom on a desktop computer first and then synced to your mobile device through Adobe Creative Cloud.
If you only use Lightroom Mobile and don't have access to the desktop application, look for preset packs that include DNG versions specifically designed for mobile users.
How to Check Whether a Preset Was Installed Successfully
After installation, open any photo and tap the Presets button. If you can see the name of your newly imported preset or preset group in the list, the installation was successful.
If the preset isn't there, don't worry. The most common causes are easy to fix, such as importing the wrong file type, forgetting to extract the ZIP archive, or signing in with a different Adobe account. The troubleshooting section below covers each of these issues in detail.
Lightroom Mobile Tips for Beginners
- Keep your original photos. Applying a preset is non-destructive, so you can remove or change it at any time.
- Don't expect every preset to look perfect on every photo. Lighting, camera settings, and white balance all affect the final result.
- If the image looks too dark or too bright after applying a preset, adjust the Exposure slider before changing other settings.
- For the best editing flexibility, use RAW photos whenever possible, although presets also work with JPEG images.
Why Are My Lightroom Presets Not Showing Up? (8 Fixes)
Imported your presets but can't find them? You're not alone. This is one of the most common problems Lightroom users encounter, especially if they're installing presets for the first time.
In most cases, the presets haven't been lost—they're simply hidden, imported incorrectly, or incompatible with the version of Lightroom you're using. Here are the most common causes and how to fix them.
1. You Imported the Wrong Preset Format
Lightroom supports different preset formats depending on the application you're using.
- Lightroom Classic: XMP presets
- Lightroom (Desktop): XMP presets
- Lightroom Mobile: DNG presets for manual installation, or XMP presets synced through Adobe Creative Cloud
If you try to manually import a DNG preset into Lightroom Classic or import a standalone XMP file directly into Lightroom Mobile, the preset won't appear where you expect it.
Fix: Check which version of Lightroom you're using and make sure you've downloaded the correct preset format.
2. You Didn't Extract the ZIP File
Many preset packs are downloaded as ZIP archives. Lightroom cannot import presets directly from a compressed ZIP file.
Fix: Extract the ZIP file first, then import the XMP or DNG files from the extracted folder.
3. You're Looking in the Wrong Preset Group
Preset creators often organize their presets into custom folders such as "Wedding Collection," "Film Pack," or "Portrait Presets." As a result, the presets may not appear under User Presets.
Fix: Expand all preset groups in the Presets panel and look for a folder named after the preset pack or its creator.
4. You're Using the Wrong Lightroom Application
Many beginners don't realize that Lightroom Classic and Lightroom (Desktop) are separate applications with different interfaces. Tutorials written for one version may not match the other exactly.
Fix: Confirm whether you're using Lightroom Classic, Lightroom (Desktop), or Lightroom Mobile, then follow the instructions designed for that specific version.
5. Creative Cloud Sync Hasn't Finished Yet
If you imported XMP presets on your computer and expect them to appear on Lightroom Mobile, synchronization may still be in progress.
Fix:
- Make sure you're signed in with the same Adobe account on both devices.
- Verify that cloud syncing is enabled.
- Connect to a stable internet connection.
- Wait a few minutes, then reopen Lightroom Mobile.
6. The Preset Isn't Compatible with Your Lightroom Version
Some older preset packs were created for earlier versions of Lightroom and may not work correctly in current releases. Likewise, very old Lightroom versions may not support modern XMP presets.
Fix: Update Lightroom to the latest available version whenever possible. If the preset creator provides multiple versions of the presets, download the one recommended for your Lightroom release.
7. The Preset File Is Damaged or Incomplete
If the preset download was interrupted or the files were modified accidentally, Lightroom may fail to import them properly.
Fix: Download the preset pack again from the original source and try importing the files one more time.
8. You're Expecting the Preset to Look Exactly Like the Example Photo
Sometimes the preset is installed correctly, but the result looks completely different from the preview image. This usually isn't an installation problem.
Preset previews are often created using photos with similar lighting, exposure, white balance, and camera settings. Applying the same preset to a different image can produce very different results.
Fix: After applying the preset, adjust settings such as Exposure, White Balance, Highlights, and Shadows to better match your photo. Most presets are designed to serve as a starting point rather than a finished edit.
Still Can't Find Your Presets?
If you've checked all of the solutions above and your presets still don't appear, try restarting Lightroom after the import. In rare cases, the preset library may not refresh immediately until the application is reopened.
If the problem persists, verify that the preset pack you're using is specifically designed for Lightroom and not for another editing application such as Adobe Camera Raw or a different photo editor.
How to Get the Best Results with Lightroom Presets
Installing a preset is only the first step. To achieve results similar to the examples shown by photographers or preset creators, you'll usually need to make a few additional adjustments based on your own photo.
Here are some simple tips that can make a big difference, especially if you're new to Lightroom.
Start with the Best Image Possible
Presets work best when the original photo is already well exposed and reasonably sharp. If an image is heavily underexposed, noisy, blurry, or low in resolution, a preset can change its style but won't fix those quality issues.
For the best editing experience, begin with the highest-quality image you have. If necessary, reduce noise or improve image quality before applying your preset.
Use RAW Files Whenever Possible
Lightroom presets work with both RAW and JPEG images, but RAW files usually produce better results because they contain much more image data.
With RAW photos, you have greater flexibility to recover highlights, brighten shadows, adjust white balance, and fine-tune colors after applying a preset. JPEG files can still look great, but they offer less room for editing before image quality begins to degrade.
Don't Expect One Preset to Work Perfectly on Every Photo
A preset is a saved collection of editing adjustments, not an automatic editing solution. The same preset can produce very different results depending on factors such as:
- Lighting conditions
- Time of day
- Camera model
- Lens used
- Exposure settings
- White balance
For example, a warm preset designed for golden-hour portraits may look too orange on a snowy landscape, while a moody preset might make an already dark indoor photo appear even darker.
Adjust Exposure and White Balance First
If your photo doesn't look quite right after applying a preset, resist the temptation to move every slider immediately. Instead, start with these two adjustments:
- Exposure: Brighten or darken the image until it looks natural.
- White Balance: Correct the overall color temperature if the image appears too warm or too cool.
Making these two corrections first often brings the image much closer to the look you expected from the preset.
Fine-Tune Individual Adjustments
Once the overall brightness and color look good, you can fine-tune other settings as needed, including:
- Highlights and Shadows
- Contrast
- Whites and Blacks
- Vibrance and Saturation
- Texture and Clarity
- Crop and Straighten
Small adjustments usually produce more natural-looking results than making dramatic changes to every slider.
Keep Your Presets Organized
As your preset library grows, finding the right preset can become more difficult.
Consider organizing presets into folders based on style or purpose, such as:
- Portrait
- Wedding
- Travel
- Landscape
- Black & White
- Film Look
A well-organized preset library makes editing faster and helps you maintain a consistent style across different projects.
Frequently Asked Questions
You can download Lightroom presets from a variety of trusted sources, including Adobe, professional photographers, and online marketplaces. Many creators offer free starter packs, while premium collections often include presets designed for specific styles such as portraits, weddings, travel, landscapes, or film-inspired editing.
- Adobe: Built-in presets are included with Lightroom, and additional resources may be available through the Adobe community.
- Professional photographers: Many photographers sell or share presets on their own websites.
- Creative Market: A popular marketplace for professionally designed Lightroom preset collections.
- Etsy: Offers a wide selection of both free and paid presets from independent creators.
Before downloading, check whether the preset pack includes the correct file format for your version of Lightroom. Most desktop users need XMP presets, while mobile users installing presets manually typically need DNG files.
Yes. Many photographers and websites offer free Lightroom preset packs. Adobe also provides some built-in presets with Lightroom. Whether the presets are free or paid, the installation process is generally the same.
Yes. Presets can be applied to both RAW and JPEG images. However, RAW files typically provide more editing flexibility and often produce better results after additional adjustments.
You can, but the results won't always be consistent. Differences in lighting, exposure, and white balance mean that most photos benefit from a few manual adjustments after applying a preset.
XMP is the standard preset file format used by Lightroom Classic and Lightroom (Desktop). DNG presets are image files with editing settings embedded inside them and are commonly used for manual installation in Lightroom Mobile.
Preset preview images are usually created using photos captured under specific lighting conditions and camera settings. Applying the same preset to a different photo may produce a different look. Adjusting Exposure, White Balance, and other basic settings often helps achieve a similar result.
Yes. You can delete a preset from your preset library at any time. Removing a preset doesn't affect the original photos or edits you've already made because Lightroom editing is non-destructive.
Absolutely. After editing a photo, you can save your adjustments as a custom preset. This is a great way to maintain a consistent editing style across future projects and speed up your workflow.
Final Thoughts
Learning how to add presets to Lightroom is one of the first skills every Lightroom user should master. Whether you're using Lightroom Classic, Lightroom Desktop, or Lightroom Mobile, importing presets only takes a few minutes once you understand which file format your version supports.
Remember that presets are designed to speed up your editing workflow, not replace it entirely. Start with a high-quality image, choose a preset that matches your style, and make a few simple adjustments to exposure and white balance when needed. With a little practice, you'll be able to create consistent, professional-looking edits much more efficiently.
You May Also Like


This post was written by Brenda Peng who is a seasoned editor at Digiarty Software who loves turning ordinary photos into extraordinary works of art. With AI assistance for brainstorming and drafting, the post is reviewed for accuracy by our expert Abby Poole for her expertise in this field.
