


When a single exposure cannot hold the bright sky, deep shadows, and fine detail you want, shooting a bracketed sequence gives you more to work with in post. By capturing the same scene at different exposures, you can preserve highlight and shadow information and combine the frames into a balanced HDR image.
Lightroom makes this workflow straightforward with its HDR Merge feature. You can combine bracketed exposures into an HDR DNG, then continue with your usual adjustments for exposure, white balance, contrast, and color.
In this guide, you'll learn how to merge bracketed photos in Lightroom.
How to Shoot Bracketed Photos for HDR Merge
A good HDR merge starts with a well-planned bracketed sequence. The goal is not to capture as many exposures as possible, but to record enough tonal information that every important part of the scene is properly exposed in at least one frame. This gives Lightroom enough data to recover bright highlights and dark shadows without unnecessarily increasing the risk of alignment problems or ghosting.
Choose the Right Number of Exposures
The number of frames you need depends on the total exposure range of your bracket. As a general guideline, Lightroom recommends using fewer frames when the bracket covers a smaller range and adding exposures as the dynamic range increases.
| Bracket range | Photos to use for HDR merge |
| -1.5 to +1.5 stops | 2 |
| -3.0 to +3.0 stops | 3 |
| -4.5 to +4.5 stops | 4 |
| -6.0 to +6.0 stops | 5 |
For example, if you shoot at ±1.5 stops, you can use only the darkest and brightest exposures for the HDR merge. The middle, 0 EV exposure is not necessary for the merge in this case. If the scene has a wider dynamic range, additional exposure steps can provide the tonal coverage Lightroom needs.
The key is to make sure that important highlights and shadows are properly captured in at least one frame rather than simply increasing the number of exposures.
Use Automatic Exposure Bracketing
Set your camera to Automatic Exposure Bracketing (AEB) and choose an exposure range appropriate for the scene. A typical ±2-stop bracket, for example, generally requires three exposures.
The exact AEB controls vary by camera, so check your camera's manual if you're unfamiliar with the setting. Keep the composition and other camera settings as consistent as possible throughout the sequence.
Keep the Camera Still
A tripod is ideal for HDR bracketing because it keeps the camera in the same position while the exposures are captured. This makes it easier for Lightroom to align the frames during the merge.
If you need to shoot handheld, keep the camera as steady as possible and capture the sequence quickly. Minimizing movement between frames can reduce alignment problems and make the final HDR blend cleaner.
Watch for Movement in the Scene
The camera is not the only source of movement. People, vehicles, leaves, branches, and moving water can all appear in different positions across the bracketed frames and create ghosting during the merge.
You cannot always eliminate movement, but capturing the sequence quickly and avoiding unnecessary exposures can reduce the chance of visible artifacts. Lightroom also provides deghosting controls during the HDR merge for scenes where some movement is unavoidable.
Shoot in RAW
RAW capture gives you more flexibility when working with challenging lighting and is well suited to a Lightroom-based HDR workflow. The bracketed RAW files can be merged into an HDR DNG, after which you can continue with exposure, white balance, colour, and other adjustments in Lightroom.
How to Merge Bracketed Photos in Lightroom
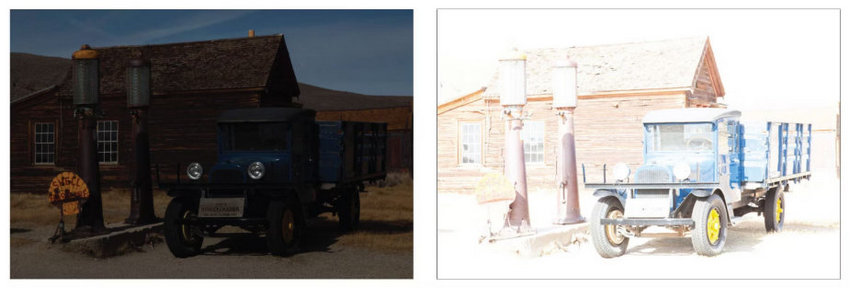
Once you have captured your bracketed exposures, Lightroom can combine them into a single HDR photo while retaining the tonal information from the different frames. The HDR Merge process is non-destructive, and Lightroom creates a new HDR DNG rather than replacing your original source photos.
1. Select Your Bracketed Photos
Open your bracketed sequence in Lightroom and select the photos you want to merge. You can make your selection in Photo Grid or Square Grid view, or from the filmstrip when working in Detail view.
On macOS, hold Command while selecting the photos. On Windows, hold Ctrl to select multiple exposure-bracketed images.
Make sure the selected photos belong to the same bracketed sequence and cover the exposure range you need for the scene.
2. Open HDR Merge
With your bracketed photos selected, choose Photo > Photo Merge > HDR Merge.
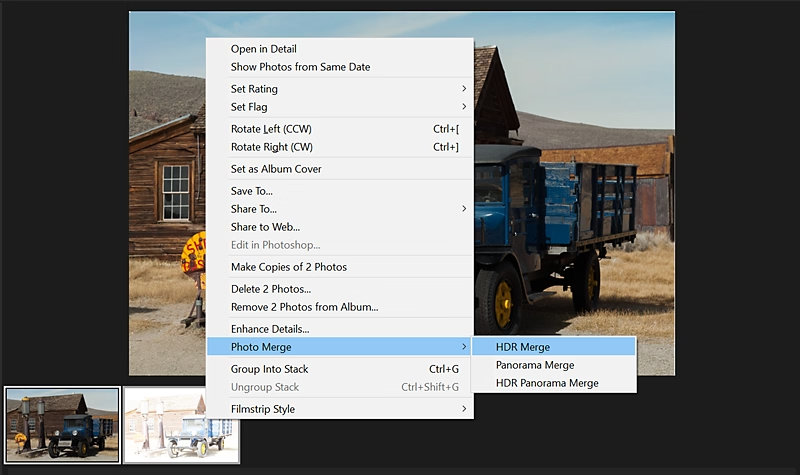
You can also right-click the selected photos and choose Photo Merge > HDR Merge from the context menu.
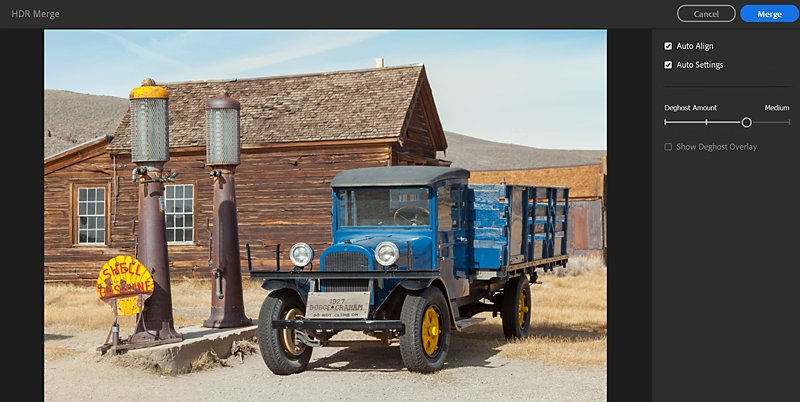
Lightroom opens the HDR Merge preview dialog, where you can review the result before creating the merged image.
3. Check Auto Align
Auto Align compensates for slight shifts between frames. It is particularly useful when you captured the bracketed sequence handheld.
If you used a tripod and the camera remained completely stable, Auto Align may not be necessary. When in doubt, you can enable it and check the preview before merging.
4. Decide Whether to Use Auto Settings
Auto Settings provides a starting point for an evenly toned HDR image. Lightroom applies these settings to the merged result, and you can preview the effect before creating the HDR.
If you prefer to make your own exposure, contrast, and color adjustments afterward, you can leave Auto Settings disabled and make those edits using Lightroom's Edit controls after the merge.
5. Adjust Deghosting if Needed
Movement between exposures can cause parts of the merged image to look semi-transparent or otherwise unnatural. This is known as ghosting and can occur when people, vehicles, foliage, water, or other elements move between frames.
Lightroom provides four Deghost Amount options:
- None: No deghosting correction
- Low: For minor movement
- Medium: For more noticeable movement
- High: For significant movement
Start with Low when ghosting is visible and increase the setting if necessary. If the preview is already clean, there is no need to apply deghosting.
You can also enable Show Deghost Overlay, or press O, to see where Lightroom is applying deghosting corrections in the preview.
6. Preview the Result and Merge
Review the HDR preview and make sure important areas of the image look natural. Pay particular attention to moving subjects, fine details, and areas where the individual exposures overlap.
When you're satisfied with the settings, click Merge.
Lightroom creates a new HDR image with the suffix HDR.dng appended to the filename. By default, the merged HDR photo is placed in a stack with the original source photos, with the new HDR image at the top of the stack.
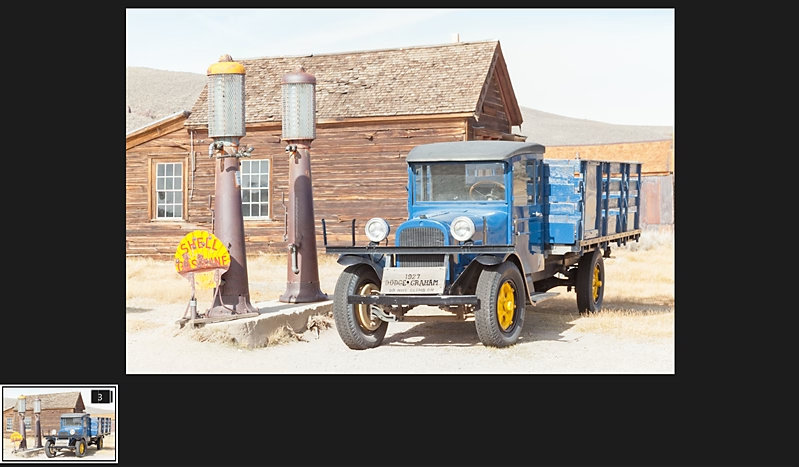
Your original bracketed photos remain available, while the merged HDR DNG can be edited using Lightroom's Edit controls just like an individual photo.
How to Edit HDR Photos After Merging in Lightroom
After the HDR merge, Lightroom gives you a new HDR DNG that you can edit like any other photo. Start with the overall tonal balance, then fine-tune color and detail based on the scene and your intended output.
Adjust Exposure and Dynamic Range
Start with White Balance and Exposure to establish the overall look. Then adjust Highlights and Shadows to balance bright and dark areas while keeping important details visible.
Use Whites, Blacks, and Contrast to bring back depth and definition. Avoid pushing these adjustments too far, as excessive HDR processing can make the image look flat or unnatural.
Fine-Tune Color
Adjust Temperature, Tint, Vibrance, and Saturation as needed. For a natural HDR look, subtle adjustments are often enough. You can also use Lightroom's more targeted color controls when specific colors need refinement.
Check Noise and Fine Detail
Zoom in to check shadow areas, textures, foliage, and other fine details. Lifting shadows can reveal noise, while high ISO, lens softness, or heavy cropping can leave the merged image looking less detailed than expected.
Apply Lightroom's sharpening and noise reduction controls as needed. If the image still needs more detail recovery, noise reduction, or resolution after these adjustments, an AI image enhancement step can be considered before the final export.
When Your HDR Photo Needs More Enhancement
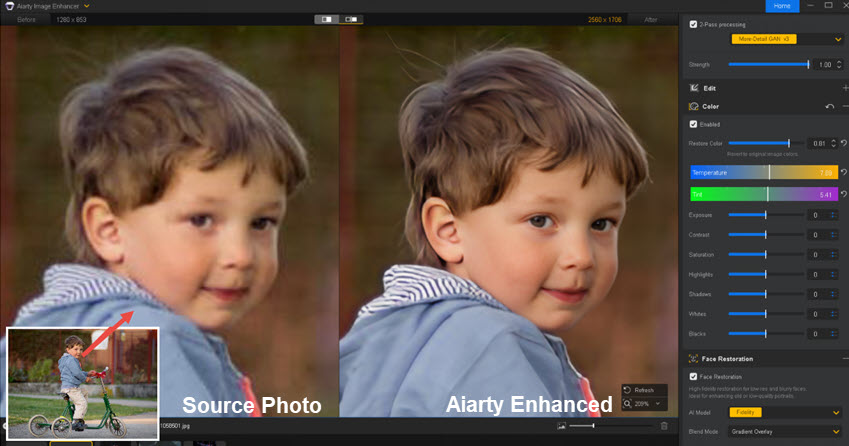
Lightroom can take care of the HDR merge and most of your core adjustments, but some images may still need more work. High-ISO noise, soft fine details, or the need for a larger output can be difficult to address with standard editing controls alone.
This is where Aiarty Image Enhancer can fit into the workflow. Instead of exporting the HDR image first, you can send it directly from Lightroom using Edit In > Aiarty Image Enhancer. Aiarty can then be used for additional noise reduction, detail enhancement, or upscaling before you prepare the final image for export.
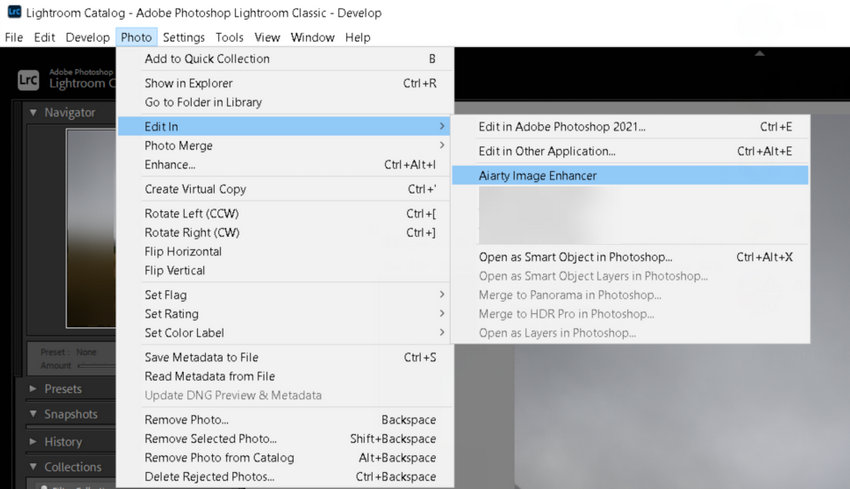
This workflow keeps Lightroom as the main editing environment while giving you an additional step when the merged HDR image needs more than basic tonal and color adjustments.
Need more detail, cleaner results, or higher resolution from your HDR image? Try Aiarty Image Enhancer as the next step in your Lightroom workflow.
You May Also Like


This post was written by Brenda Peng who is a seasoned editor at Digiarty Software who loves turning ordinary photos into extraordinary works of art. With AI assistance for brainstorming and drafting, the post is reviewed for accuracy by our expert Abby Poole for her expertise in this field.
