


Lightroom Output Sharpening (also called export sharpening) is the final sharpening Lightroom applies when you export a photo. Unlike the sharpening controls in the Develop module, it is designed specifically for the way an image will be viewed or printed, taking the output medium and image size into account.
This makes Output Sharpening useful for everything from photos shared online to images prepared for glossy or matte prints. But it is easy to confuse it with regular sharpening, or assume that a stronger setting will fix a soft or low-resolution photo. In practice, Output Sharpening is meant to refine the appearance of an image at the final output stage, not restore detail that was never captured or has already been lost.
This guide explains what Lightroom Output Sharpening does, where to find it, how Screen, Matte Paper, and Glossy Paper settings differ, and how to choose an appropriate sharpening amount for different types of output.
What Is Lightroom Output Sharpening?
Lightroom Output Sharpening is an export setting that applies a final round of sharpening to a photo based on its intended output, such as screen viewing or printing. It helps preserve the appearance of crisp edges and fine details after resizing and preparing an image for its final destination.
Output Sharpening Is Applied at Export
Unlike the sharpening controls in Lightroom's Develop module, Output Sharpening is applied when you export a photo. It works alongside the sharpening you've already applied during editing, rather than replacing it.
For example, you might sharpen a RAW photo in the Develop module to refine its details, then enable Output Sharpening when exporting a JPEG for your website or preparing a print. Lightroom applies this additional sharpening according to the selected output medium and amount.
| Develop Sharpening | Output Sharpening | |
| Where | Develop → Detail | Export |
| Purpose | Improve image detail/edge definition during editing | Prepare final output |
| Applied | During editing | At export |
| Depends on output medium | No | Yes |
| Can be used together | Yes | Yes |
Why Do Photos Need Output Sharpening?
A photo that looks sharp while you're editing it may appear slightly softer after export or printing. Resizing changes how image details are represented, while the display or print medium affects how sharpness is perceived. Output Sharpening helps compensate for these changes so the final image looks crisp at its intended viewing size.
The appropriate setting depends on where the photo will be used. An image shared online has different output requirements from one printed on matte or glossy paper, which is why Lightroom provides separate options for screens and print media.
Does Output Sharpening Make a Blurry Photo Sharp?
Not exactly. Output Sharpening enhances the perceived sharpness of existing edges and details, but it cannot reliably recover information lost through missed focus, motion blur, or severe softness. It also doesn't increase the image's pixel dimensions.
If a photo is already noticeably blurry, noisy, or low-resolution, increasing Output Sharpening may make edges look harsher without restoring the missing detail. In these cases, address the underlying image-quality issues during editing or use a dedicated image enhancement tool before applying final output sharpening.
Where to Find Output Sharpening in Lightroom
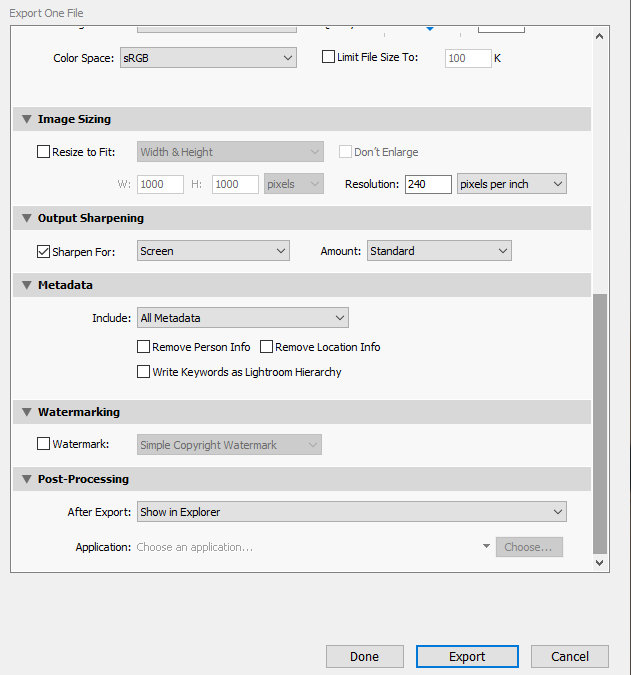
In Lightroom Classic, Output Sharpening is available in the Export dialog. You can enable it when saving a photo for web use, sharing, or printing.
Follow these steps:
- Select the photo you want to export.
- Go to File > Export.
- In the Export dialog, scroll to the Image Sizing section.
- Under Output Sharpening, check Sharpen For to enable output sharpening.
- Choose the output medium and sharpening amount that suit your intended use.
- Click Export to save the photo with the selected settings.
The Sharpen For menu offers three options: Screen, Matte Paper, and Glossy Paper. You can also choose Low, Standard, or High for the sharpening amount.
Lightroom Output Sharpening Settings Explained
| Setting | What it does | When to use |
| Screen | Optimized for screen viewing | Websites, social media, digital sharing |
| Matte Paper | Optimized for matte paper | Matte prints |
| Glossy Paper | Optimized for glossy paper | Glossy prints |
| Low | Less sharpening | Already crisp images |
| Standard | Default balance | Most situations |
| High | Stronger sharpening | Images that need more output crispness |
If you're exporting photos for different purposes, you can adjust these settings for each export rather than using the same sharpening option for every image. For example, select Screen for images intended for digital viewing and the appropriate paper type for printed photos.
Note: Output Sharpening is a feature of Lightroom Classic's Export dialog. If you're using the cloud-based Lightroom desktop app, the available export controls may differ.
Common Lightroom Output Sharpening Mistakes
Lightroom Output Sharpening is easy to use, but choosing the wrong setting or expecting too much from it can lead to disappointing results. Here are some common mistakes to avoid.
Using High Sharpening for Every Photo
A higher sharpening amount doesn't automatically produce a better result. Applying High to every export can make edges look harsh and emphasize noise or other unwanted details, particularly in already-sharp images.
Start with Standard for most photos, then compare the exported result with a Low or High setting if needed. The goal is to achieve natural-looking sharpness, not to make every edge stand out.
Choosing the Wrong Output Medium
Screen, Matte Paper, and Glossy Paper are designed for different output conditions. Selecting Screen for a print, for example, may not deliver the most suitable sharpening for the paper surface.
Choose the setting based on the photo's final destination. Use Screen for digital viewing, Matte Paper for matte prints, and Glossy Paper for glossy prints. If you're unsure, make a test export or print before processing a large batch.
Confusing Output Sharpening With Detail Recovery
Output Sharpening refines the appearance of existing details; it isn't a substitute for recovering lost image information. Increasing the sharpening amount won't reliably fix missed focus, motion blur, heavy noise, or a low-resolution image.
For these problems, address the underlying image quality first. Depending on the photo, that may involve noise reduction, deblurring, or upscaling before you apply final output sharpening.
Ignoring Image Resizing
Resizing changes the amount of detail represented in an image and can affect its perceived sharpness. A photo exported at a smaller resolution for social media may look different from the same photo exported at full resolution for printing.
Set the required output dimensions before judging the final sharpness. If you're exporting a smaller version, check that file at its intended display size rather than relying solely on how the original looks in Lightroom.
Judging Sharpness Only in Lightroom
The preview in Lightroom doesn't always tell you exactly how an exported image will look on another screen or in print. Viewing size, display scaling, and print conditions can all affect perceived sharpness.
After exporting, inspect the actual file at a realistic viewing size. Look for clear details without exaggerated edges, halos, or excessive noise. For printed photos, a test print is often more informative than judging sharpness on a monitor.
What If You're Not Satisfied With Lightroom Sharpening?
Lightroom offers useful sharpening controls for a wide range of photos, but results can vary depending on the image and the type of softness you're trying to correct. If you're not satisfied with the result, trying a different tool may help. No single photo editing tool delivers the best results for every image.
Aiarty Image Enhancer is another option worth trying. It uses AI models to sharpen images, reduce noise, restore details, and upscale photos when higher resolution is needed. You can compare the results with your Lightroom edits and decide which works better for the particular image.
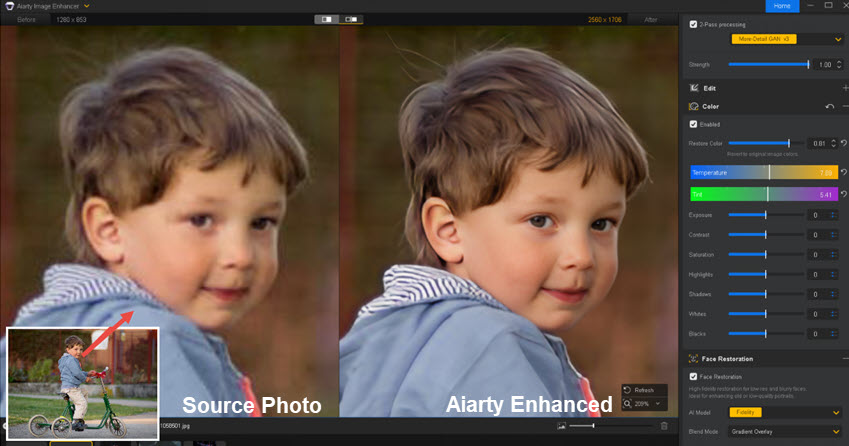
If you use Lightroom Classic, you can send a photo directly to Aiarty without manually importing it again:
- Select the photo in Lightroom Classic.
- Go to Photo > Edit In > Aiarty Image Enhancer.
- Adjust the image in Aiarty and export the enhanced result.
- Return to Lightroom Classic for any final adjustments and export sharpening.
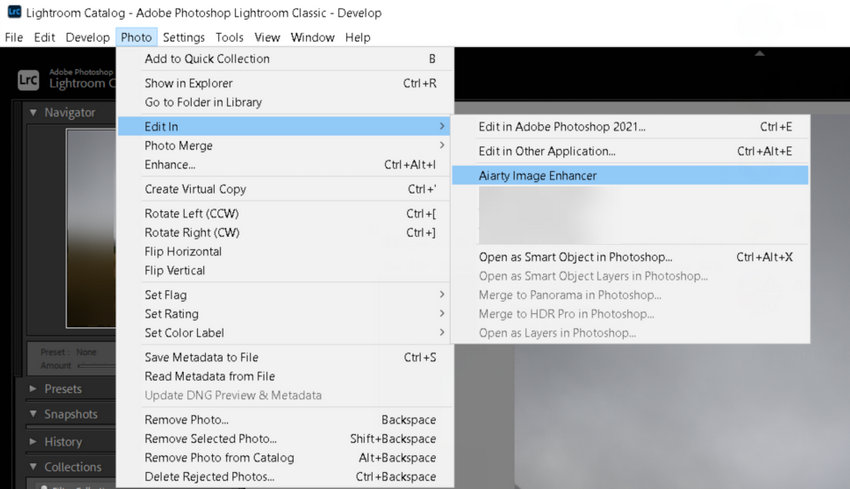
Once configured as an external editor, Aiarty can be launched directly from Lightroom Classic's Edit In menu, making it easy to try a different approach while keeping Lightroom in your existing workflow.
 FAQs
FAQs
Yes, Output Sharpening is useful for preparing photos for their final destination. It applies an additional round of sharpening during export, helping maintain perceived sharpness for screen viewing or printing. Choose the output medium that matches your intended use and adjust the amount based on the image. You can also leave it off if the photo already looks sharp enough for its intended output.
For most photos, Standard is a good starting point. Choose Screen for digital viewing, Matte Paper for matte prints, or Glossy Paper for glossy prints. Use Low if the image is already crisp or High if a stronger effect improves the result. The best setting depends on the image, output size, and viewing conditions, so check the exported file before settling on a setting.
Choose the option that matches how the photo will be viewed or printed:
- Screen: For websites, social media, and other digital displays.
- Matte Paper: For photos printed on matte paper.
- Glossy Paper: For photos printed on glossy paper.
These options tailor output sharpening to different output conditions. If you're unsure which works best, export a test image or make a test print and compare the results.
Regular sharpening is applied during editing in Lightroom's Develop module, where you can refine edge definition and image details. Output Sharpening is applied separately during export and is adjusted for the selected output medium and image dimensions. The two work together: you can sharpen a photo while editing and then apply Output Sharpening to prepare it for its final use.
Yes. The terms generally refer to the same process: applying sharpening when exporting a photo. Output Sharpening is the name of the setting in Lightroom Classic's Export dialog, while export sharpening is a commonly used descriptive term.
No. Output Sharpening can make existing edges and details appear crisper, but it does not increase pixel dimensions or recover substantial amounts of missing detail. To produce a larger image, you need to increase its pixel dimensions through resizing or upscaling. If a photo is also noisy or lacks detail, an image enhancement tool such as Aiarty Image Enhancer may help improve its appearance before final export sharpening.
You May Also Like


This post was written by Brenda Peng who is a seasoned editor at Digiarty Software who loves turning ordinary photos into extraordinary works of art. With AI assistance for brainstorming and drafting, the post is reviewed for accuracy by our expert Abby Poole for her expertise in this field.
