


Lightroom sharpening helps make blurry photos look crisper by increasing contrast along edges and emphasizing fine details. In Lightroom, you can control sharpening with four settings: Amount, Radius, Detail, and Masking. The key is to sharpen important details without exaggerating noise, creating halos, or making textures look unnatural.
This guide explains how to sharpen in Lightroom, which settings to try for different types of blurry photos, and when AI sharpening may help with photos that remain soft after editing.
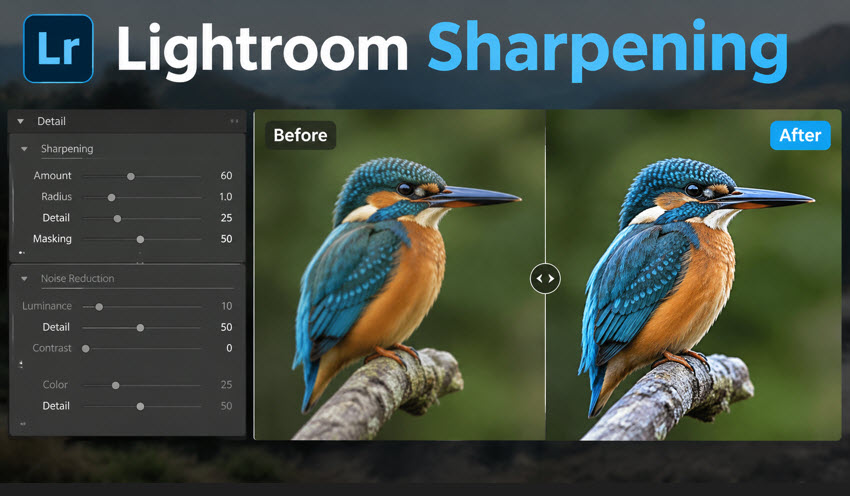
What Does Sharpening Do in Lightroom?
Sharpening in Lightroom increases contrast along edges, making details appear clearer and more defined. It does this by making the lighter sides of an edge even lighter and the darker sides even darker, creating a visual accentuation of boundaries It can emphasize eyelashes, feathers, tree branches, architectural lines, and other fine textures.
Therefore, Lightroom sharpening can restore the crispness that is naturally lost during the physical light-capture process, the anti-aliasing filter on a camera sensor, and standard RAW demosaicing.
However, sharpening enhances existing edge information rather than recovering detail that was never captured. It cannot fully correct missed focus, substantial motion blur, or severely limited resolution. Applying too much sharpening may also make noise and artifacts more noticeable.
How to Sharpen in Lightroom: A Step-by-Step Guide
You can make a blurry photo sharp in Lightroom using the Detail panel. The following steps apply primarily to Lightroom Classic and the desktop editing interface; panel names and locations may differ slightly in Lightroom mobile or web.
Step 1. Import Your Blurry Photo
Import the blurry photo into Lightroom. To sharpen soft photos in Lightroom, you need to switch to the Develop module.
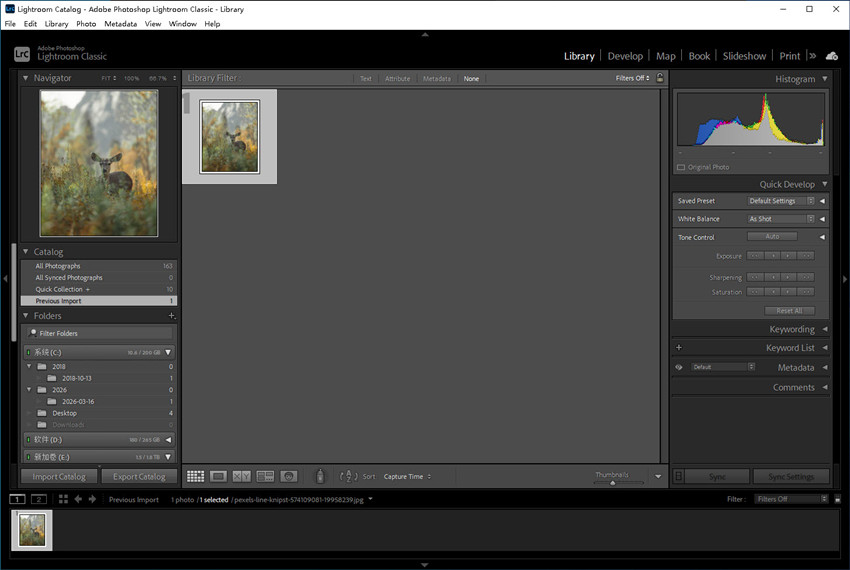
Step 2. Open the Detail Panel
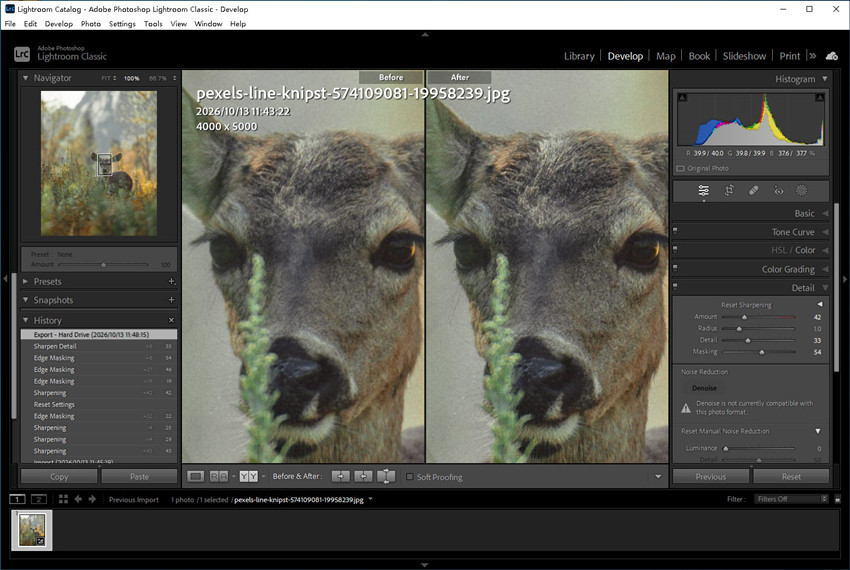
On the right side of the workspace, expand the Detail panel to find the Sharpening controls. Lightroom Classic applies default sharpening to RAW files during initial processing, with Amount commonly set to 40, though the default may vary by camera and settings. JPEG files may already have sharpening applied in-camera or during previous editing, so adjust the settings based on the image's existing sharpness.
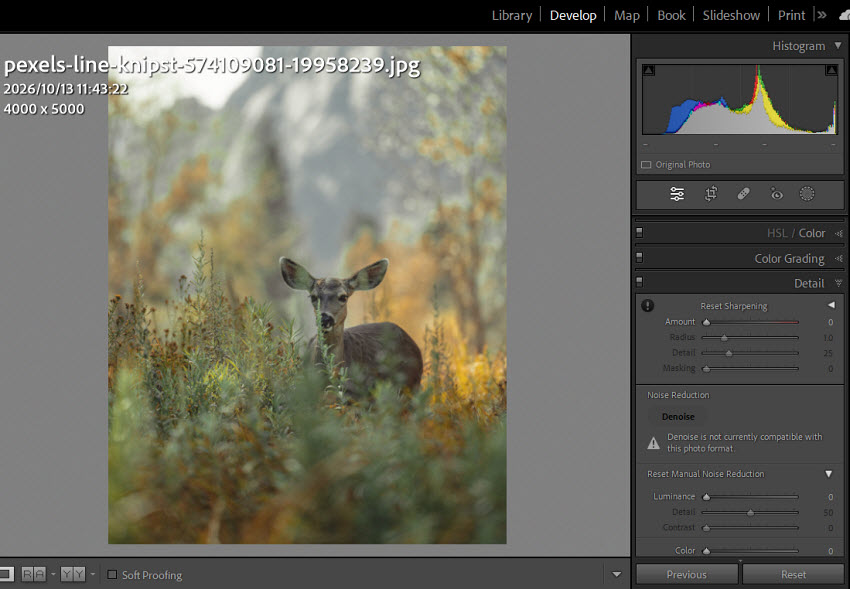
Step 3. Adjust Lightroom Sharpening Settings
In the Detail panel, adjust the four sharpening controls to make blurry photos clear while keeping textures natural.
- Amount: Controls the overall strength of sharpening. Increase it to make edges more defined, or reduce it if the image starts to look harsh.
- Radius: Controls the width of the edges affected by sharpening. A smaller Radius is generally better for fine details, while a larger Radius emphasizes broader edges and may create halos.
- Detail: Controls how much fine texture is emphasized. Higher values bring out more texture but can also make noise and artifacts more visible.
- Masking: Controls where sharpening is applied. Higher values restrict sharpening to stronger edges, helping protect smooth areas such as skin and skies.
Start with moderate settings and adjust the sliders while viewing the image at 100% zoom. To preview the Masking effect, hold Alt on Windows or Option on Mac while dragging the slider. White areas indicate where sharpening is applied, while black areas are masked out.
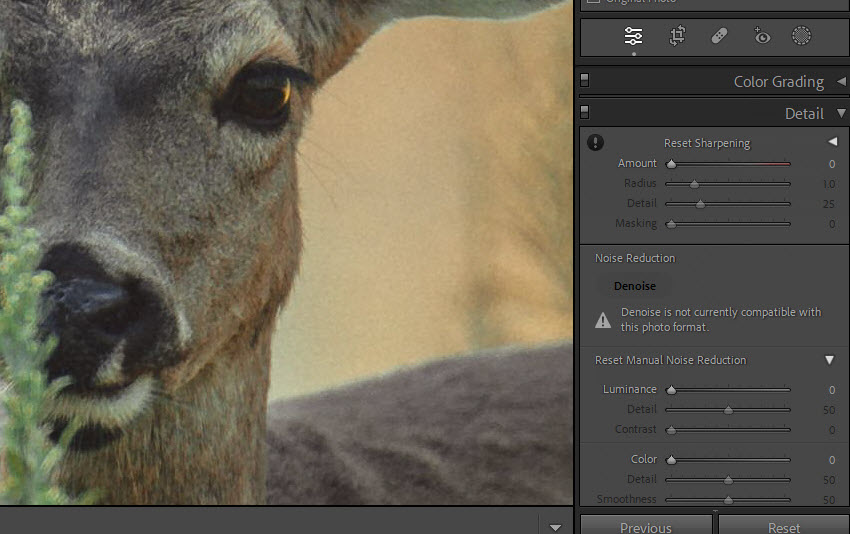
There are some general starting points for Lightroom sharpening. Adjust them according to the image's sharpness, noise level, subject, and intended output.
| Setting | Practical Starting Point |
| Amount | Start around 25–50 and adjust by eye |
| Radius | Around 0.7–1.2 for fine details |
| Detail | Around 15–40 for a restrained result |
| Masking | Around 30–70 when protecting smooth areas |
Step 4. Compare Before and After
Toggle Lightroom's Before/After view to compare the sharpened photo with the blurry original. Check fine details at 100% zoom, then zoom out to assess the overall appearance.
Look for clearer subject details without harsh edges, exaggerated noise, or unnatural textures. If the image looks too crunchy, reduce Amount or Detail. If smooth areas appear grainy, increase Masking or revisit noise reduction.
Step 5. Apply Output Sharpening When Exporting
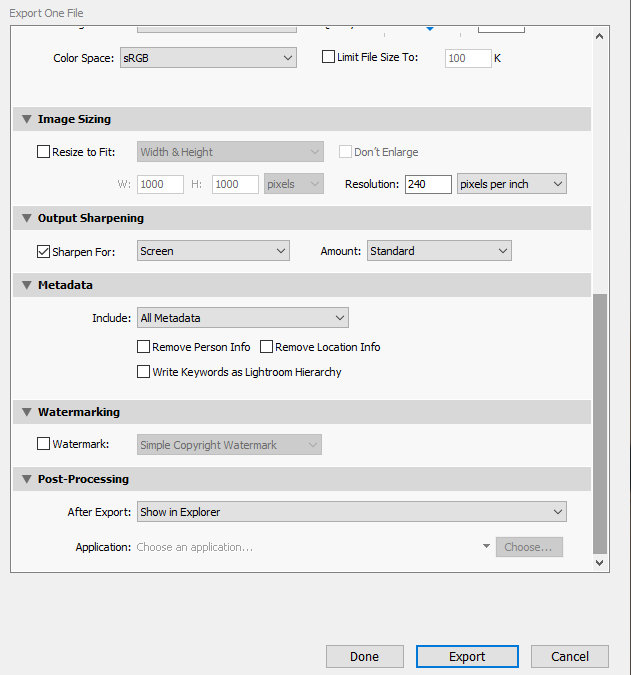
Lightroom Classic provides Output Sharpening in the Export dialog to optimize sharpness for the final viewing medium.
Under Output Sharpening, select Screen for digital viewing or Matte Paper / Glossy Paper for printing, then choose Low, Standard, or High based on the image and output needs.
Output sharpening complements the adjustments made in the Detail panel; it does not replace them.
Best Lightroom Sharpening Settings for Different Blurry Photos
There is no single sharpening preset for every image. Use these ranges as starting points, then adjust them according to the photo's original sharpness, noise level, and fine details.
| Photo Type | Amount | Radius | Detail | Masking |
| Portraits | 25–45 | 0.7–1.0 | 10–25 | 50–80 |
| Landscapes | 35–60 | 0.7–1.2 | 25–45 | 20–60 |
| Wildlife | 35–60 | 0.7–1.2 | 20–45 | 40–80 |
| Architecture | 30–55 | 0.7–1.2 | 20–40 | 20–50 |
| Night photos | 15–40 | 0.7–1.0 | 10–25 | 50–85 |
Lightroom Sharpening Masking: How to Use It Correctly
Masking controls where sharpening is applied, helping preserve smooth areas while sharpening important edges. To preview the mask, open the Detail panel, hold Alt (Windows) or Option (Mac), and drag the Masking slider. White areas receive sharpening, while black areas are masked out.
- Higher Masking: Protects smooth skin, skies, and noisy backgrounds.
- Lower Masking: Retains more texture across detailed scenes.
Tip: For precise sharpening of an eye, feather, or building detail, use a local mask instead. If edges look harsh or noise becomes more visible, reduce Amount, Radius, or Detail and review your noise reduction settings.
Lightroom Sharpening vs. Noise Reduction: Which Comes First?
Noise reduction can soften fine textures, while Lightroom sharpening can make noise more visible. For a balanced result, follow this workflow:
- Correct exposure and basic tones.
- Reduce distracting luminance and color noise.
- Apply sharpening to restore edge definition.
- Refine Masking to protect smooth areas.
- Check the result at 100% zoom and normal viewing size.
For heavily noisy RAW files, try Lightroom's AI Denoise first, then reassess the sharpening settings.
When Lightroom Sharpening Doesn't Restore Enough Detail
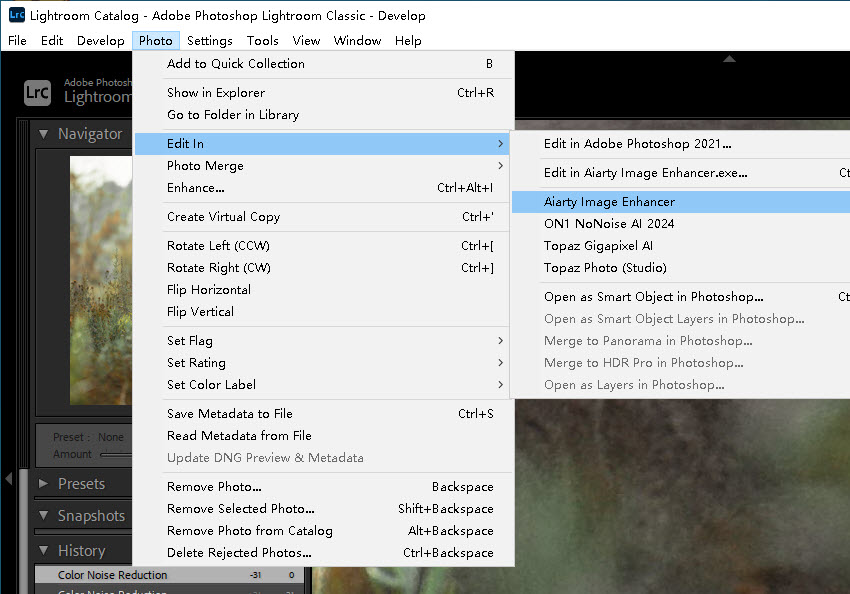
If a photo still looks soft or blurry after Lightroom sharpening, or noise reduction has left fine textures looking weak, you can send it to Aiarty Image Enhancer for further enhancement
Workflow: Select a photo in Lightroom Classic → Go to Photo > Edit In > Aiarty Image Enhancer → Enhance and export the image in Aiarty → Return to Lightroom Classic for final adjustments and export sharpening.
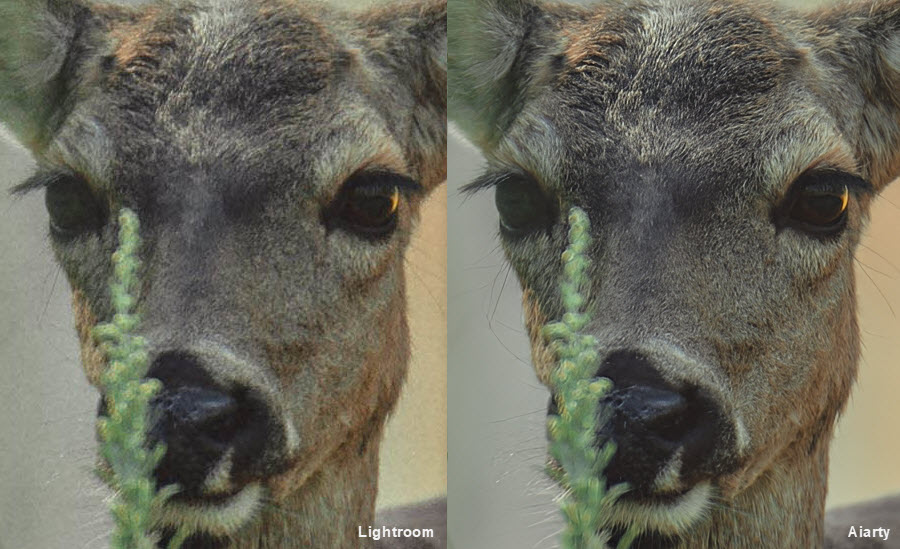
Aiarty Image Enhancer helps take image sharpening further by enhancing fine textures, reducing noise, and improving apparent sharpness when Lightroom's sharpening tools aren't enough. It can help bring out details in soft-looking feathers, hair, and other textures while keeping noise and sharpening artifacts in check.
Download Aiarty Image Enhancer and add it to your Lightroom workflow for extra detail enhancement when sharpening alone isn't enough.
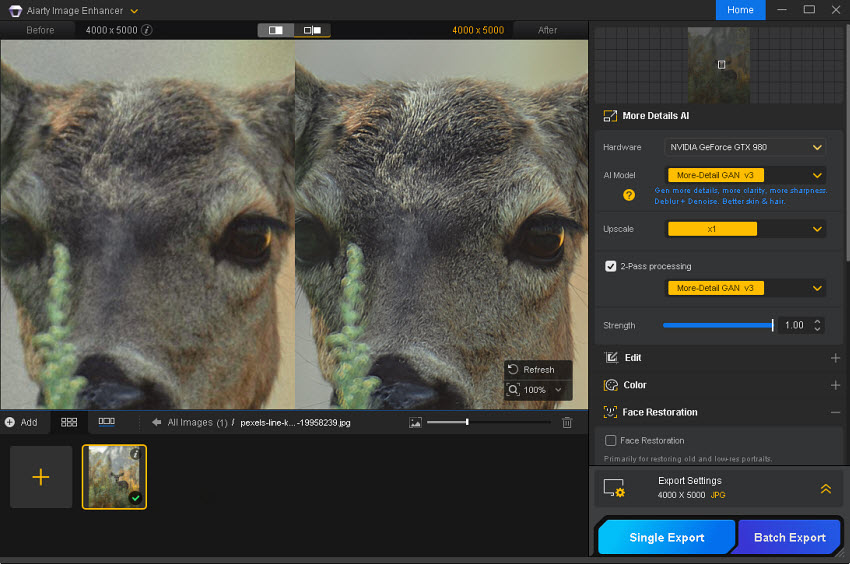
Compare Lightroom sharpening with Aiarty Image Enhancer in the examples below. When Lightroom's sharpening tools aren't enough to bring out fine textures, Aiarty can provide an additional step for detail enhancement, sharpening, and noise reduction. Send challenging photos from Lightroom to Aiarty when needed, then return to Lightroom to continue your usual editing workflow.
Final Thoughts
Lightroom sharpening works best when you fine-tune Amount, Radius, Detail, and Masking according to the photo's content. For a natural result, balance edge definition with noise reduction and check fine details at 100% zoom. If Lightroom sharpening still leaves feathers, hair, or other textures looking soft, Aiarty Image Enhancer offers an additional AI-powered step to enhance detail and reduce noise before you finish editing in Lightroom.
 FAQs
FAQs
Sharpening Masking in Lightroom controls which areas receive sharpening. Lower values apply sharpening to more areas, while higher values restrict it mainly to stronger edges, helping protect smooth skin, skies, and noisy backgrounds. Hold Alt (Windows) or Option (Mac) while dragging the Masking slider to preview the mask: white areas receive sharpening, while black areas are masked out.
The best Lightroom sharpening settings depend on the photo's subject, noise level, and fine details. As a starting point, try Amount 25–50, Radius 0.7–1.2, Detail 15–40, and Masking 30–70. Use lower Detail and higher Masking for portraits or noisy images, and adjust the settings while viewing the photo at 100% zoom.
To make a blurry sharper in Lightroom, open the Detail panel and adjust Amount, Radius, Detail, and Masking. Start with moderate Amount and Radius values, then increase Detail if needed. Use Masking to avoid sharpening smooth areas and apply noise reduction if grain becomes more visible. If the photo is out of focus or has significant motion blur, sharpening alone may not restore the lost detail.
Photos may look grainier after exporting from Lightroom because sharpening emphasizes existing noise, noise reduction is insufficient, or the exported image is viewed at a different size or magnification. Check the image at 100% zoom, balance sharpening with luminance noise reduction, and consider increasing Masking to protect smooth areas. Also check export dimensions and output sharpening settings.
Lightroom includes AI-powered Denoise, which reduces noise in supported RAW files and can help preserve detail in high-ISO photos. However, Denoise is primarily a noise-reduction feature, not a dedicated AI sharpening tool. Lightroom also offers conventional sharpening controls in the Detail panel. For additional texture enhancement or detail recovery, you can test a dedicated AI image enhancer such as Aiarty Image Enhancer.
Ligthroom sharpening can make a photo look noisy because it increases local contrast around edges and fine variations in texture, including visible grain. To reduce the effect, lower Amount or Detail, increase Masking to protect smoother areas, and apply noise reduction before finalizing sharpening. Review the image at 100% zoom to find a balance between clear details and natural-looking texture.
You May Also Like


This post was written by Brenda Peng who is a seasoned editor at Digiarty Software who loves turning ordinary photos into extraordinary works of art. With AI assistance for brainstorming and drafting, the post is reviewed for accuracy by our expert Abby Poole for her expertise in this field.
