


Editing portraits in Lightroom is about more than making a photo brighter or adding a preset. A good portrait photo editing workflow should improve exposure, color, skin tones, and facial details while keeping the person looking natural.
Adobe Lightroom provides most of the tools you need for editing portraits in Lightroom, from basic exposure adjustments and color grading to masking and skin retouching. However, if a portrait is noisy, slightly blurry, low-resolution, or lacks fine detail, traditional editing tools may not always be enough.
In this guide, we'll walk through how to edit portraits in Lightroom step by step, then show how Aiarty Image Enhancer can complement Lightroom when a portrait needs additional AI-powered enhancement.
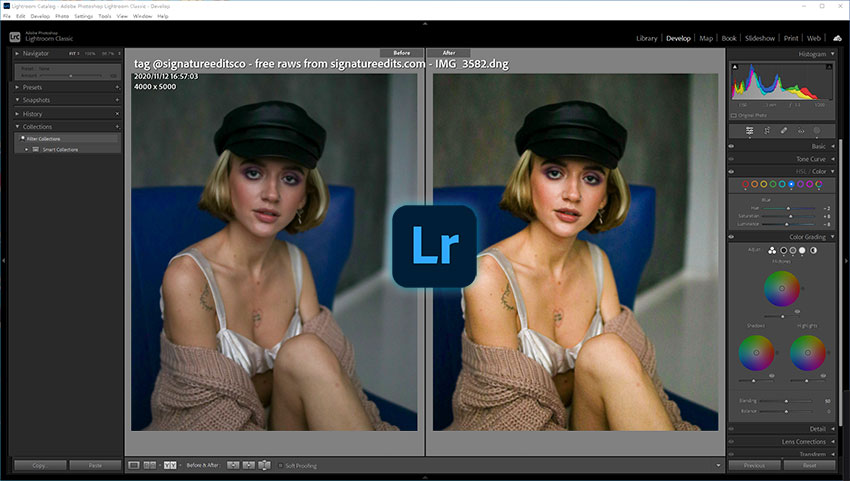
Quick Answer: How Do You Edit Portraits in Lightroom?
The easiest way to edit a portrait in Lightroom is to work from overall adjustments to targeted retouching. Start by correcting exposure and white balance, then refine skin tones, retouch imperfections, enhance eyes and hair, adjust colors, and finish with noise reduction and sharpening. If the original photo is still noisy, soft, low-resolution, or needs more detail, you can use an AI enhancer such as Aiarty Image Enhancer as a final enhancement step.
Quick workflow: Exposure → White Balance → Skin Tones → Retouching → Color → Details → Noise Reduction → Sharpening → AI Enhancement (Optional)
How to Edit Portraits in Lightroom: Step-by-Step Guide
A natural-looking portrait edit usually works best when you move from broad adjustments to more targeted edits. Start with exposure and white balance, then work on skin tones, retouching, colors, and details.
Also learn: How to Fix Blurry Face in A Photo >>
1. Correct Exposure and White Balance
Start with the overall lighting before making detailed adjustments to the face. In Lightroom's Basic panel, adjust:
- Exposure to set the overall brightness;
- Contrast to define the tonal range;
- Highlights to recover overly bright areas;
- Shadows to reveal darker areas;
- Whites and Blacks to fine-tune the tonal extremes;
- Temperature and Tint to correct white balance.
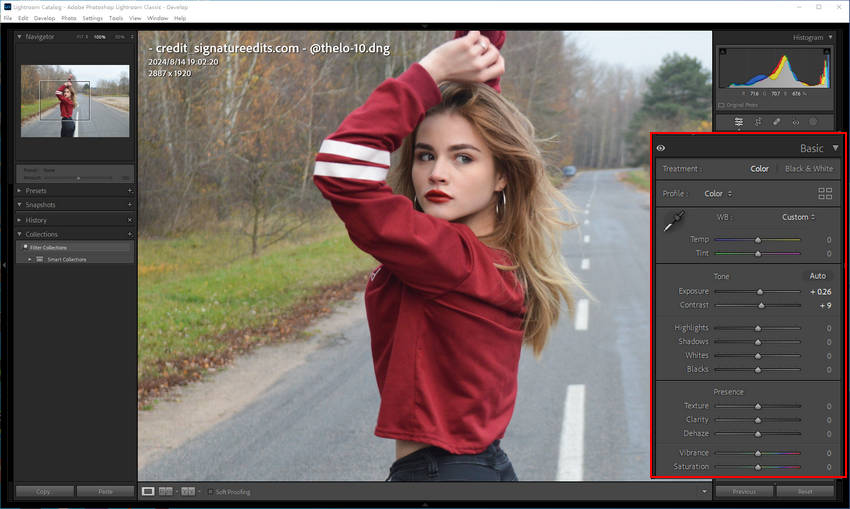
For portraits, avoid making the image excessively bright just to make the face stand out. Check the highlights on the forehead, cheeks, and other bright areas to make sure skin doesn't look washed out. A slightly warmer white balance can create a pleasant portrait look, but don't use warmth to compensate for an incorrect color cast.
Tip: Awlays make small adjustments first. It is easier to build a polished portrait gradually than to fix an over-processed image later.
Learn more: Underexposed vs Overexposed Photos - What Are the Differences & How to Fix Them
2. Adjust Skin Tones Naturally
Skin tone is one of the most noticeable elements of portrait editing. After correcting exposure and white balance, use Lightroom's Color Mixer/HSL controls to refine skin tones. Depending on the original photo, orange and red channels often have the biggest impact on skin.
You can adjust:
- Hue to change the character of the skin color;
- Saturation to control color intensity;
- Luminance to make skin appear lighter or darker.
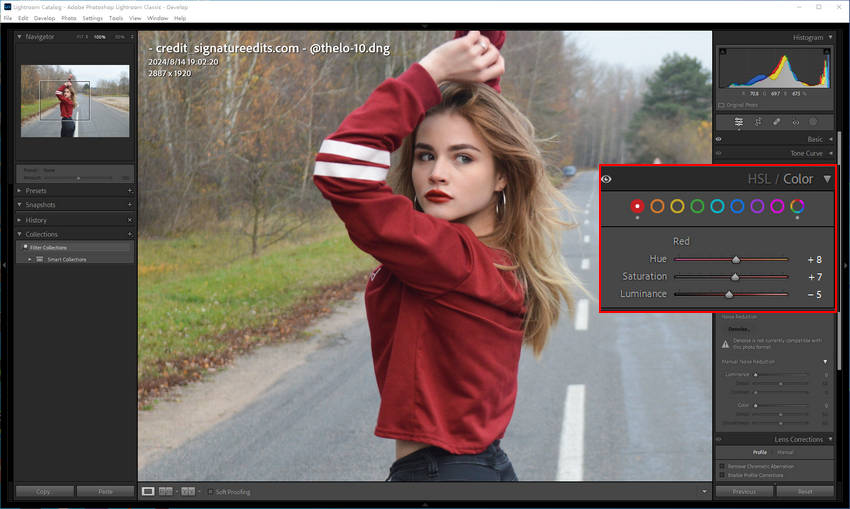
Be careful with strong saturation adjustments. Pushing orange tones too far can make skin look unnaturally orange, while reducing saturation too much can leave the portrait looking gray or lifeless.
The goal of Lightroom portrait editing isn't to make every face look identical. Instead, preserve the subject's natural complexion while correcting distracting color shifts.
3. Retouch Skin Without Losing Natural Texture
Skin retouching is an important part of editing portraits, but the goal is to refine the skin rather than make it look perfectly smooth.
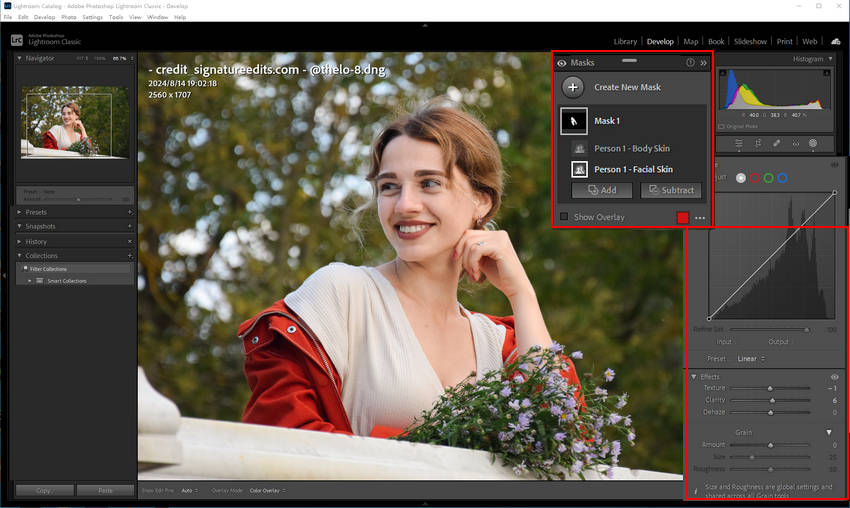
In Lightroom, use Masking to target the skin and make subtle adjustments to Texture, Clarity, or Exposure. You can also use the Remove tool to clean up temporary blemishes, spots, or other small distractions.
For portraits with many small distractions, Aiarty Image Enhancer can provide another option. Its AI Eraser can help remove unwanted details such as blemishes, acne, spots, and other small distractions. This can be useful when you want to clean up individual imperfections without spending too much time manually editing each one.
A practical approach is to use Lightroom for overall skin tone and texture adjustments, then use Aiarty when specific unwanted marks still need to be cleaned up. Remove temporary blemishes selectively rather than changing permanent facial features, and keep natural skin texture visible for a more authentic result.
4. Enhance Eyes, Hair, and Facial Details
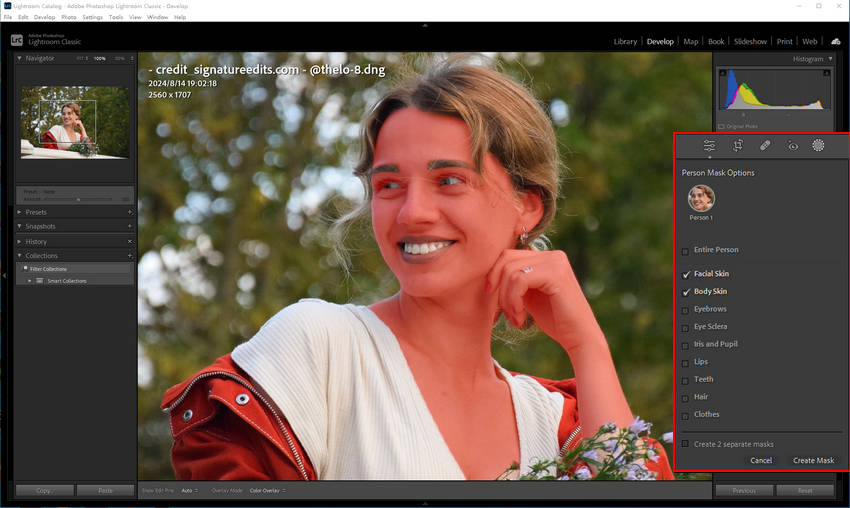
Once the skin looks natural, refine the features that give the portrait its definition. Use Lightroom's Masking tools to make targeted adjustments to the eyes, eyebrows, hair, and lips. A small increase in Texture or Clarity can bring out important details without making the entire portrait look overly sharp.
For the eyes, focus on subtle definition rather than excessive brightness or sharpening. For hair and eyebrows, moderate detail enhancement can help individual strands stand out.
Avoid applying strong sharpening across the entire face. Excessive sharpening can emphasize pores, noise, and other unwanted texture. The goal is to create selective detail and contrast while keeping the portrait natural.
5. Refine Colors and Create Your Portrait Look
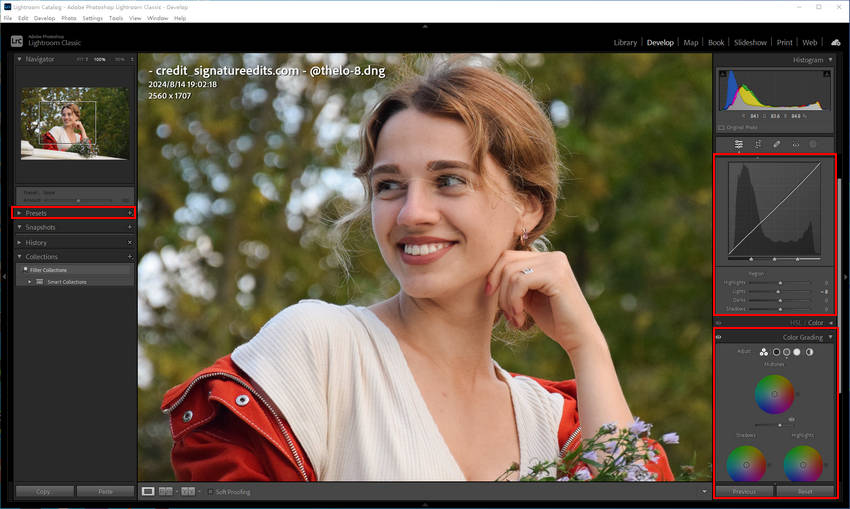
Once the basic portrait looks balanced, you can develop its overall style. Lightroom gives you several ways to do this, including Color Mixer, Curves, Color Grading, Vibrance, Saturation and Presets. For a natural portrait, Vibrance can often be more subtle than increasing overall Saturation. You can also use Color Grading to introduce a consistent tone into highlights, shadows, or midtones.
If you're editing a series of portraits, consistency is particularly important. Once you find a color treatment that works, you can save it as a preset and apply it as a starting point for other images.
Remember that presets are starting points, not necessarily final settings. Different lighting conditions and skin tones may require individual adjustments.
6. Reduce Noise and Sharpen the Portrait
Noise and softness are common problems in portrait photography, especially with high-ISO images or photos captured in low light. Lightroom provides noise reduction and sharpening controls that can improve the perceived clarity of a portrait.
- For Lightroom sharpening, pay attention to Amount, Radius, Detail, and Masking.
- For noise reduction, adjust Luminance, Detail, Contrast, and Color.
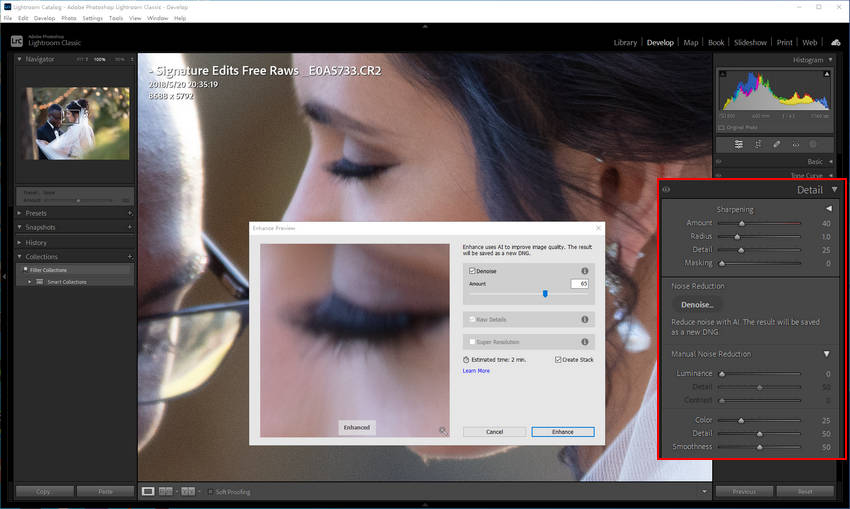
Use the Masking slider when sharpening to avoid applying excessive sharpening to smoother areas such as skin. But there's an important limitation: sharpening can make existing edges more noticeable, but it cannot fully recreate detail that was never clearly captured.
If the original portrait is low-resolution, heavily cropped, noisy, or slightly blurry, you may still need an additional enhancement step.
When Lightroom Isn't Enough for Portrait Editing
Lightroom is excellent for editing the characteristics of a portrait: exposure, white balance, color, skin tones, masking, retouching, and creative adjustments.
But some problems come from the original image itself rather than the editing. For example, you may be working with a portrait that has:
- High-ISO noise
- Soft facial details
- Slight blur
- Low resolution
- JPEG compression
- Heavy cropping
- Insufficient detail for a larger print
In these situations, increasing Sharpness or Clarity in Lightroom may not produce the result you want. This is where an AI image enhancer can complement your Lightroom workflow.
Enhance Your Edited Portrait With Aiarty Image Enhancer
Lightroom is ideal for adjusting exposure, refining skin tones, retouching imperfections, and shaping the overall look of a portrait. After these main edits, Aiarty Image Enhancer can serve as a dedicated image enhancement step when a photo still has noise, soft facial details, limited resolution, or distracting details that need further attention.
- Refine facial details: Aiarty's AI models can improve facial clarity and restore details in portraits that look soft or lack definition. Use Face Restoration with Select Faces to target specific people, and adjust the Blend Modes to balance restored details with the original appearance.
- Reduce noise while preserving detail: Aiarty can reduce luminance and color noise in high-ISO portraits while retaining visible skin, hair, and clothing details. This is especially useful for indoor, evening, and low-light shots that still look noisy after Lightroom adjustments.
- Improve soft or slightly blurry portraits: AI enhancement and deblurring can help recover clarity affected by slight focus issues, camera shake, compression, or resolution loss. Severely out-of-focus or motion-blurred images may not be fully recoverable.
- Upscale portraits for larger output: Aiarty can enlarge portraits for printing, larger displays, or tighter crops while helping preserve visible detail. Complete your main edits in Lightroom first, then upscale the image if you need more resolution.
- Make final color adjustments: Aiarty provides manual controls for brightness, contrast, saturation, color temperature, tint, highlights, and shadows. Lightroom remains the better choice for detailed skin-tone adjustments, HSL editing, curves, and advanced color grading.
Keep Lightroom as your main portrait editor and use Aiarty Image Enhancer when a photo needs extra noise reduction, facial detail restoration, or upscaling. Adjust the enhancement strength carefully and review the result at 100% to maintain natural-looking skin and facial features.
A Practical Lightroom + Aiarty Image Enhancer Portrait Editing Workflow
Instead of choosing between Lightroom and AI enhancement, you can use them at different stages of the same portrait editing workflow.
Lightroom: Complete the Main Portrait Edit
Start with the original RAW or high-quality image and complete your main portrait editing in Lightroom. This includes exposure, white balance, skin tones, retouching, color grading, and other creative adjustments.
The goal is to finish the portrait's overall look in Lightroom before moving to AI enhancement. Once you're satisfied with the color, skin, and overall style, export a high-quality version for the next stage.
When to Use Aiarty in Your Portrait Workflow
Not every portrait needs AI enhancement. After completing your main edits in Lightroom, move to Aiarty when the image still has specific quality issues:
- Noisy low-light portraits: Reduce remaining luminance and color noise while retaining natural skin and hair details.
- Soft facial details: Use Face Restoration and Select Faces when faces still lack definition after your Lightroom adjustments.
- Group portraits: Enhance selected faces individually when people in the same photo need different levels of restoration.
- Low-resolution or tightly cropped portraits: Upscale the image when you need more pixels for printing, larger displays, or further cropping.
If the portrait already looks clean and detailed, you can skip AI enhancement. Otherwise, choose the relevant settings in Aiarty and review the result at 100% to ensure skin texture and facial features remain natural.
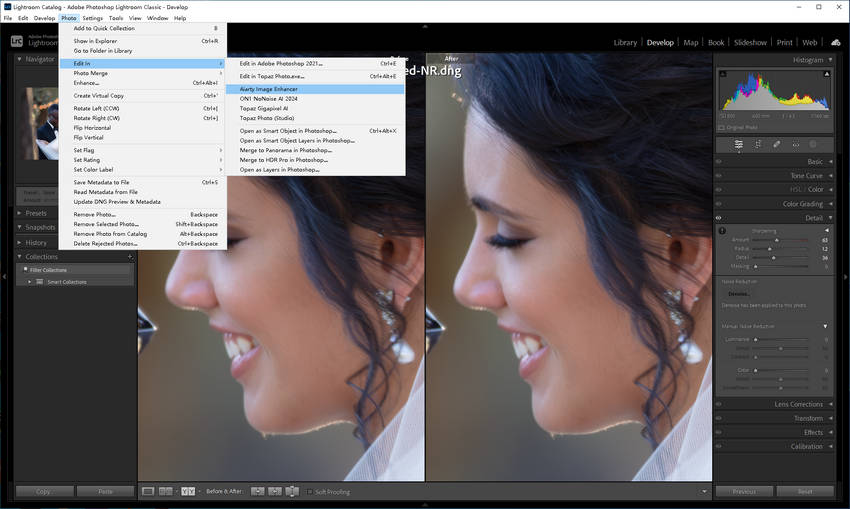
After you've finish portrait editing in Lightroom, send it to Aiarty Image Enhancer when you need additional image-quality improvements. Simply go to Photo > Edit in > Aiarty Image Enhancer or right-click on the photo and choose Edit In > Aiarty Image Enhancer.
Aiarty Image Enhancer: Enhance and Finish the Portrait
Depending on the source image and final output, you can follow the steps:
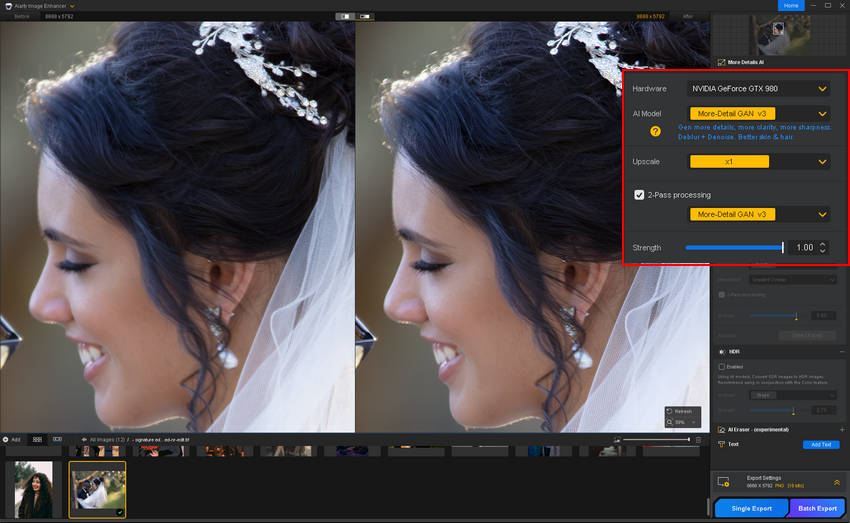
- Choose an AI model based on the portrait and desired result. More-Detail GAN v3 is a good choice for detailed portrait enhancement.
- Choose the Upscale factor based on your output needs, such as 1x, 2x, 4x, 4K, 8K, 10K, or 32K. Higher resolutions are useful for larger prints, displays, or more aggressive crops.
- Adjust the enhancement strength to control how strongly Aiarty enhances the portrait. Use a moderate setting to reduce noise and blur while keeping natural details and textures.
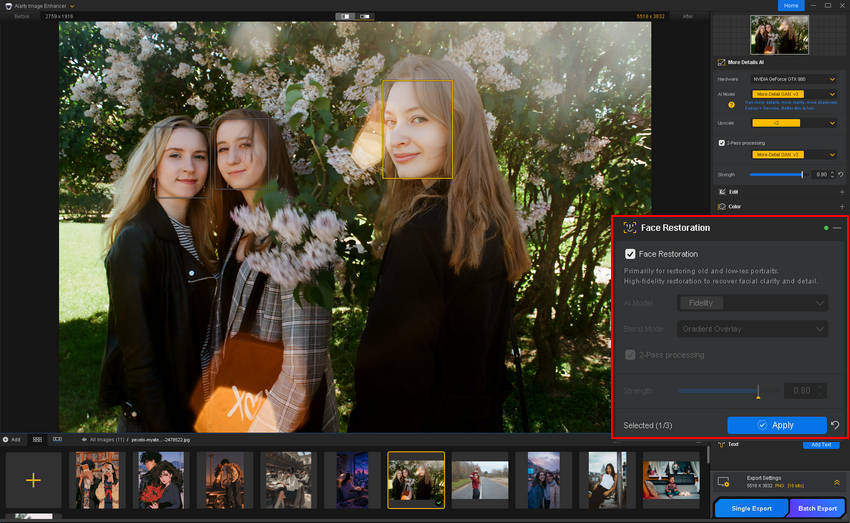
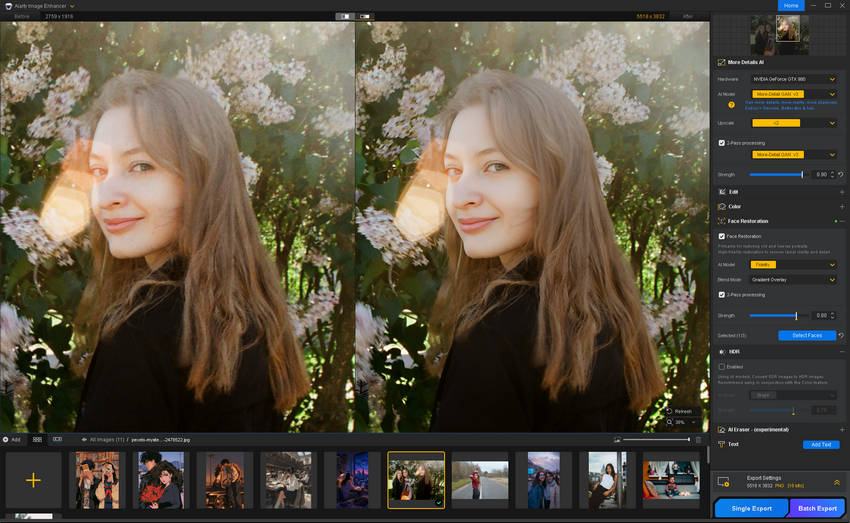
- Enable Face Restoration when facial details need extra refinement. Use Select Faces to target specific faces rather than applying the same restoration to everyone. This is especially useful for group portraits where foreground faces need more definition while background faces should remain softer.
- Choose a Blend Mode based on the face and desired result. Alpha better preserves the original colors and works well for clearer, slightly higher-resolution faces. Gradient highlights more of the model's reconstruction and is better suited to blurrier, lower-resolution faces.
- Preview and export the AI enhanced portraits. Compare the enhanced result with the original at 100% to check facial details, skin texture, and overall sharpness. Once you're satisfied with the result, export the final portrait.
Optional finishing touches: If needed, use AI Eraser to remove remaining blemishes, acne, spots, or other small distractions. You can also apply basic color correction for quick adjustments to brightness, contrast, saturation, or overall color.
In short: Lightroom edits the portrait. Aiarty enhances and finishes the image.
Lightroom vs. Aiarty for Portrait Editing
The two tools serve different roles in a portrait editing workflow. Lightroom focuses on creative editing and detailed color control, while Aiarty specializes in AI-powered enhancement, restoration, and upscaling.
In short, Lightroom is the main tool for editing the portrait, while Aiarty complements the workflow when you need stronger detail enhancement, face restoration, noise reduction, deblurring, or upscaling.
Portrait Editing Tips for Natural-Looking Results
- Don't Over-Smooth Skin: Keep natural skin texture visible. Excessive smoothing can make a real person look artificial.
- Keep Skin Tones Consistent: Check the face against the neck, hands, and other visible skin areas. A face that is noticeably warmer or cooler than the rest of the body can look unnatural.
- Don't Over-Sharpen the Face: Strong sharpening can emphasize pores, noise, and compression artifacts. Use selective sharpening whenever possible.
- Retouch Temporary Blemishes Carefully: Removing acne, spots, or temporary blemishes can improve a portrait, but avoid changing defining facial features unless that is the intended style.
- Check Your Portrait at 100%: An edit that looks perfect when zoomed out may reveal excessive texture or sharpening when viewed at 100%.
- Don't Overdo AI Enhancement: AI enhancement is most effective when used selectively. Moderate enhancement generally produces more natural portrait results than pushing every setting to its maximum.
Final Takeaway
Learning how to edit portraits in Lightroom gives you a solid foundation for creating polished, natural-looking results. From exposure and white balance to skin tones, retouching, masking, color grading, sharpening, and noise reduction, Lightroom covers most essential portrait editing needs.
When a finished portrait still looks noisy, soft, low-resolution, or lacks fine detail, Aiarty Image Enhancer can take over as a second-stage enhancement tool. Its AI-powered denoising, deblurring, upscaling, and AI Eraser features can help refine image quality beyond what conventional editing can achieve.
A simple portrait editing workflow is: Edit in Lightroom → Retouch and color-grade → Export → Enhance in Aiarty → Final portrait
Ready to give your portraits an extra quality boost? Try Aiarty Image Enhancer after your Lightroom edits.
 FAQ About Lightroom Portrait Editing
1. How do you edit portrait photos in Lightroom?
Start by correcting exposure and white balance, then adjust skin tones, retouch imperfections, refine eyes and hair, apply color grading, and finish with noise reduction and sharpening. If the image still lacks detail or needs upscaling, you can use an AI image enhancer after Lightroom.
2. What is the best way to edit portraits in Lightroom?
A good workflow is to work from general to specific: correct exposure and white balance first, refine skin tones and colors, retouch the skin, enhance important facial details, and then apply sharpening and noise reduction.
3. How do I make skin look better in Lightroom?
Use Color Mixer/HSL to refine skin tones and Lightroom's masking tools for targeted adjustments. Keep Texture and Clarity changes subtle so that natural skin texture remains visible.
4. How do I smooth skin in Lightroom without losing texture?
Use a mask to target the skin and make a modest reduction in Texture or Clarity rather than applying strong global smoothing. Avoid removing all fine details from the skin.
5. How do I sharpen a portrait in Lightroom?
Use the Sharpening controls for Amount, Radius, Detail, and Masking. The Masking control can help keep sharpening away from smoother skin areas.
6. Can Lightroom fix a blurry portrait?
Lightroom can improve the perceived sharpness of a mildly soft image, but sharpening cannot fully recover information that was never captured. For a slightly blurry or low-detail portrait, an AI enhancement tool such as Aiarty Image Enhancer may provide additional improvement.
7. How can I improve the quality of a low-resolution portrait?
First complete your exposure, color, and retouching work in Lightroom. Then use an AI image enhancer to improve details and upscale the finished portrait. This workflow can be useful when the portrait needs to be printed or displayed at a larger size.
You May Also Like


This post was written by Brenda Peng who is a seasoned editor at Digiarty Software who loves turning ordinary photos into extraordinary works of art. With AI assistance for brainstorming and drafting, the post is reviewed for accuracy by our expert Abby Poole for her expertise in this field.
