


If you are learning how to edit portraits in Photoshop, the most important thing is knowing what to change, what to leave alone, and in what order to make those changes. A good portrait edit should still look like the person. Skin should retain natural texture, eyes should not look unnaturally bright, and facial features should not appear reshaped simply because Photoshop makes it possible.
This guide walks through a practical Photoshop portrait editing workflow, from the original RAW or JPEG file to a finished portrait suitable for social media, a portfolio, a headshot, or print.
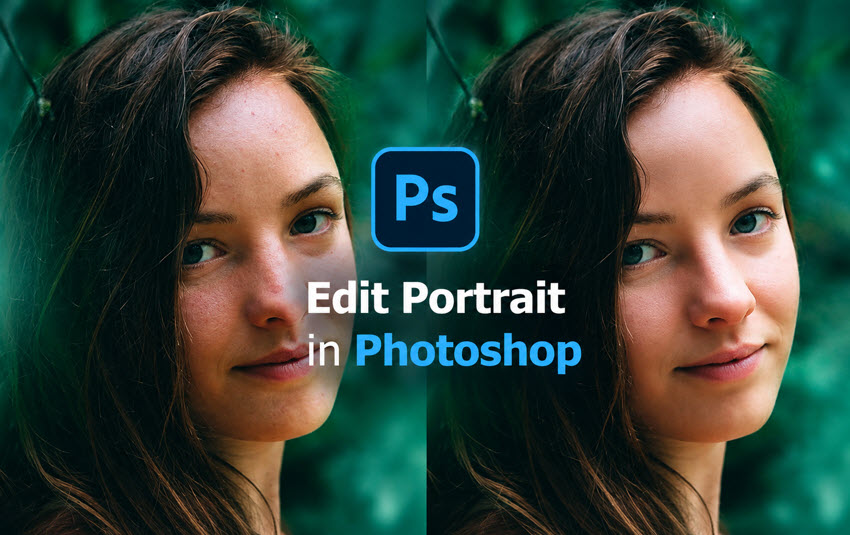
How to Edit Portraits in Photoshop Workflow
Portrait editing in Photoshop doesn’t have to mean going through every tool and every step. The right workflow depends on the photo and what needs fixing. A clean headshot may only need a few basic adjustments, while a noisy, unevenly lit, or low-resolution portrait may need more work.
If the original portrait is noisy, soft, blurry, or low-resolution, try improving its image quality before starting detailed Photoshop retouching using Aiarty Image Enhancer here >>
Once the image is ready, the Photoshop portrait editing process can be broken down into seven steps:
- Make Global Adjustments in Camera Raw
- Clean Up Blemishes with Healing Tools
- Sculpt Facial Light and Shadow with Dodge and Burn
- Refine Skin with Frequency Separation
- Correct Uneven Skin Tone with Hue/Saturation
- Enhance Fine Details with Unsharp Mask
- Resize and Export the Final Portrait
1. Make Global Adjustments in Camera Raw
Whenever possible, start editing portraits in Photoshop with a RAW portrait in Adobe Camera Raw. If you're editing a JPEG or another supported format in Photoshop, go to Filter > Camera Raw Filter to open the same workspace.
Start by checking the overall image. Use Masking to select the subject or background when you want to adjust them separately, then fine-tune the Exposure, Contrast, Highlights, Shadows, Whites, and Blacks as needed. These basic adjustments give your Photoshop portrait a solid foundation before you move on to detailed retouching.
Under Effects, adjust Texture, Clarity, and Dehaze carefully to bring out detail or improve overall definition. Keep these settings subtle, especially on skin, as too much Texture or Clarity can make pores and fine lines stand out.
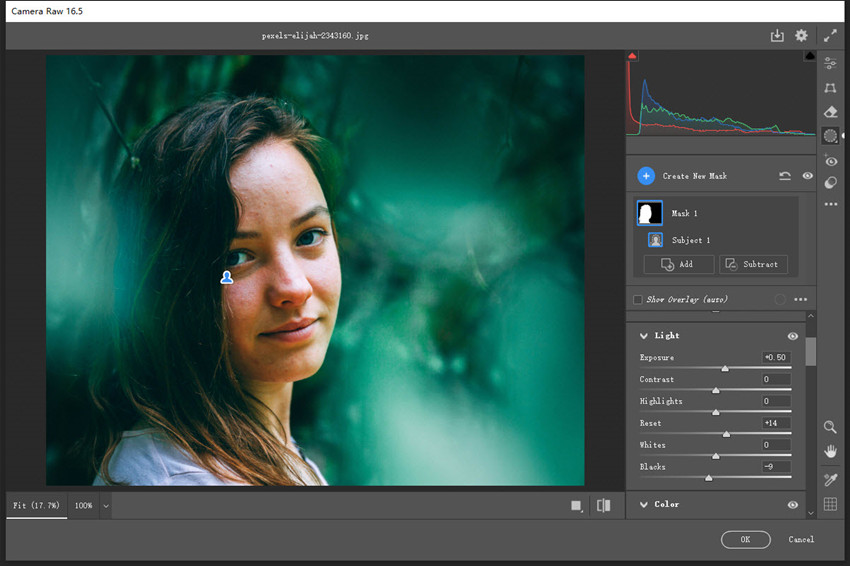
Tip: Don't try to perfect the skin at this stage. Focus on getting the overall exposure, contrast, and detail into a good starting point before moving on to detailed portrait editing in Photoshop.
2. Clean Up Blemishes with Healing Tools
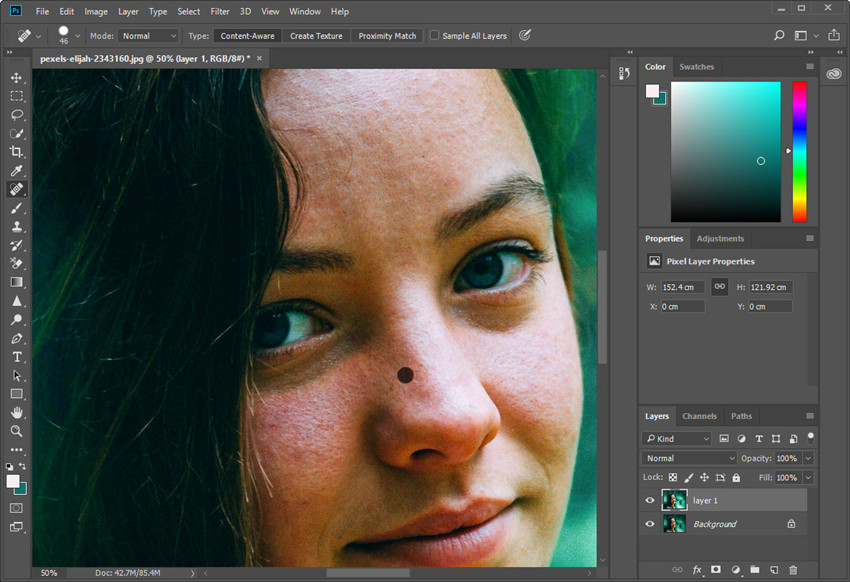
Blemish removal is one of the most common steps when editing portrait photos in Photoshop. Create a new empty layer and select the Spot Healing Brush Tool. In the top options bar, set Sample to Current & Below, then click or paint over small blemishes, dust spots, and other temporary distractions.
For areas that need more control, switch to the Healing Brush Tool. Hold Alt/Option and click a clean area to sample, then paint over the problem area.
Use the Clone Stamp Tool when you need to copy pixels directly, such as cleaning up a difficult hairline or background edge. This gives you more control when Photoshop portrait editing requires precise retouching.
See detailed steps to remove blemishes in Photoshop here >>
3. Sculpt Facial Light and Shadow with Dodge and Burn
Dodge and Burn is a useful technique in portrait editing Photoshop workflows for refining facial light and shadow. It evens out uneven lighting and defines features like cheekbones, the nose, and the jawline for a natural 3D effect without altering the face's actual shape.
In the Layers panel, click the + / Create New Layer icon and choose Curves. For the Dodge layer, slightly drag the curve upward to brighten the image, then create a second Curves layer and drag the curve downward to darken it. Rename the two layers Dodge and Burn for easier control.
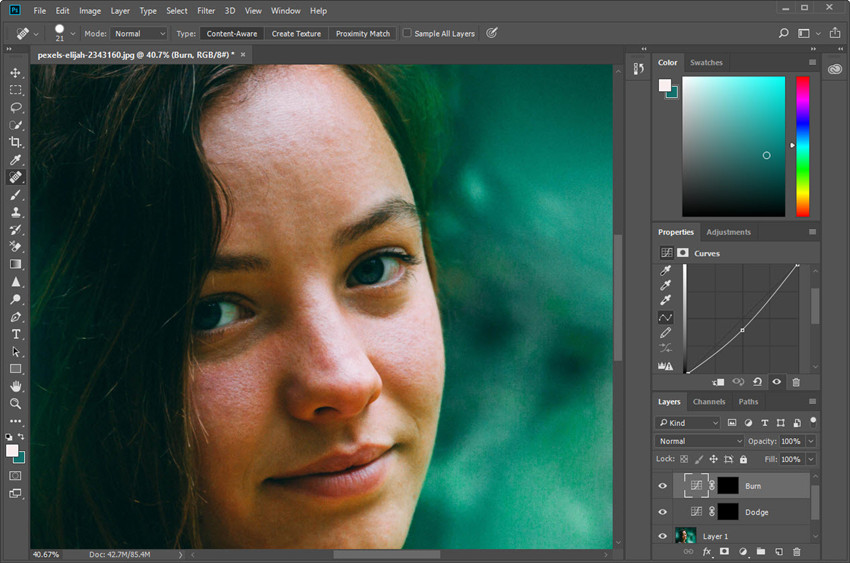
Select the Dodge layer and use the Brush Tool to paint over areas you want to brighten, such as the cheekbones, nose bridge, and forehead. Then select the Burn layer and paint over areas where you want to deepen natural shadows, such as the sides of the nose, jawline, and hairline.
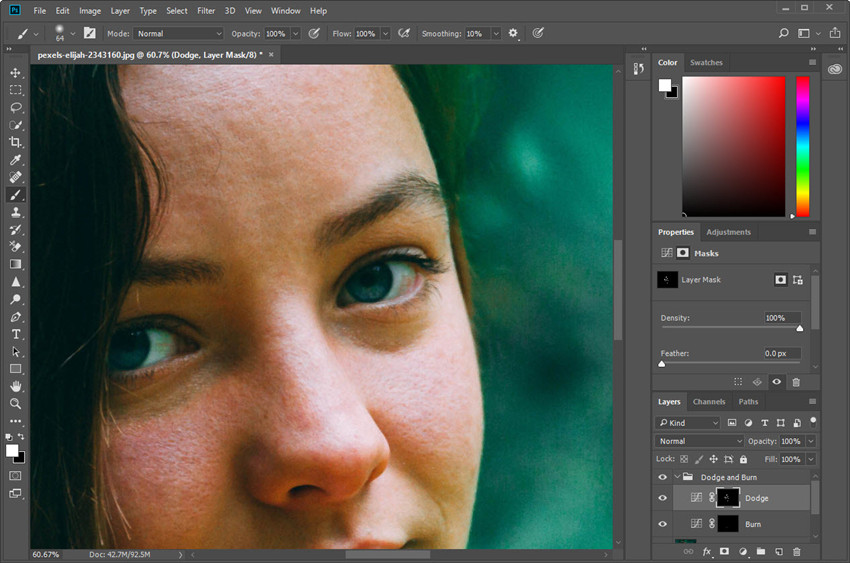
Tip: Keep the Brush Tool's Flow or Opacity low and build the effect gradually. Use a soft brush and avoid making the light and shadow too obvious—the goal is to refine the existing facial structure, not reshape it.
4. Refine Skin with Frequency Separation
Frequency Separation is a common technique in Photoshop portrait editing for working on skin tone and texture separately. It splits skin into two independent layers: one for color/tone and another for texture. This lets you fix blotchy complexions without smoothing away natural pores.
Select your background layer and press Ctrl + J (Windows) or Cmd + J (Mac) twice to create two copies. Name the top copy "Texture" and the middle copy "Blur".
Turn off the Texture layer. Select the Blur layer, go to Filter > Blur > Gaussian Blur, and adjust the radius just until the fine skin texture disappears, leaving only smooth color and blotches. Click OK.
Select the High Frequency layer and turn it back on. Go to Image > Apply Image:
- Set Layer to your Low Frequency layer.
- Set Blending to Subtract.
- Set Scale to 2, Offset to 128, and click OK.
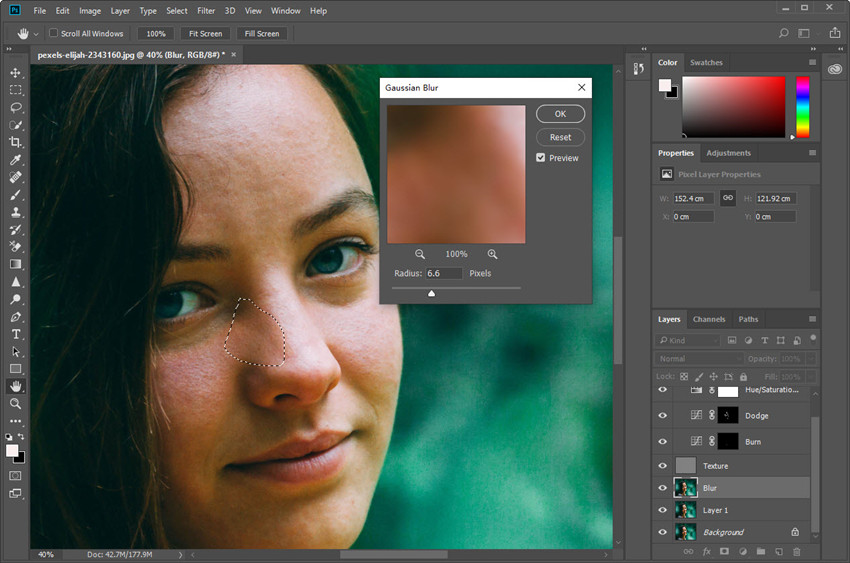
Change the blend mode of the Texture layer from Normal to Linear Light. (Your image should now look identical to the original).
Then select the Blur layer to paint over blotchy skin tones using Lasso Tool > Filter >Blur and smooth the skin. Select the Texture layer to clean up micro-texture imperfections using the Clone Stamp or Healing Brush.
Tips: For natural-looking results when editing portraits in Photoshop, avoid smoothing large areas more than necessary. The goal is to correct uneven skin rather than remove its natural texture.
5. Correct Uneven Skin Tone with Hue/Saturation
Uneven redness and color can become more noticeable during Photoshop headshot editing, particularly when the face has different tones across the cheeks, nose, forehead, or other areas. If certain areas have noticeably uneven skin tones, use a Hue/Saturation adjustment layer to correct the color without affecting the rest of the image.
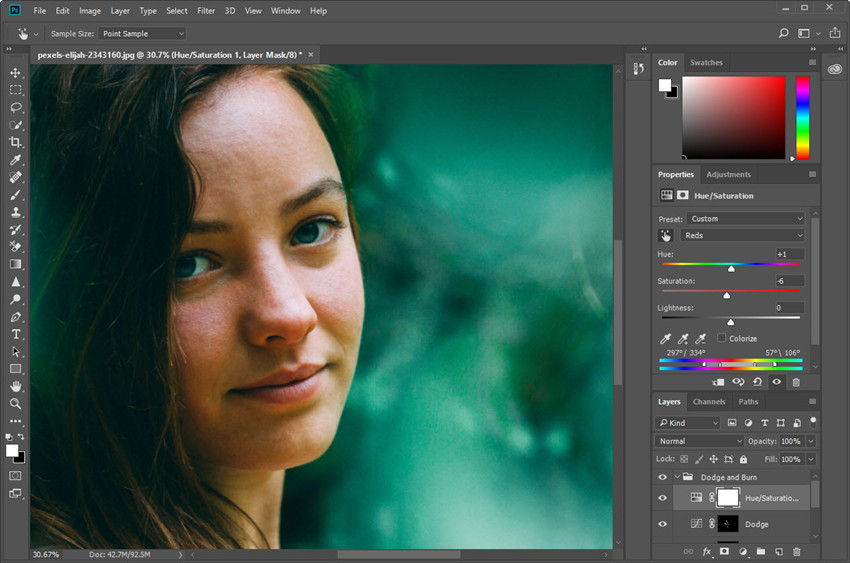
In the Layers panel, click the Create New Fill or Adjustment Layer icon at the bottom and choose Hue/Saturation. In the Properties panel, select Reds from the color range menu, then slightly lower the Saturation to reduce excessive redness. If the skin tone still looks off, adjust the Hue slightly until it looks more natural.
To apply the correction only to the affected areas, click the layer mask on the Hue/Saturation adjustment layer and use a soft black or white brush to control where the effect appears. Paint with black to hide the adjustment and white to reveal it. You can also use a low Brush Flow or Opacity to blend the correction gradually around the edges.
6. Enhance Fine Details
Once the main retouching is finished, make a final pass to enhance detail and prepare the portrait for its intended use. This is especially useful when editing headshots in Photoshop, where the eyes, eyebrows, hair, and other facial details often need a little extra definition.
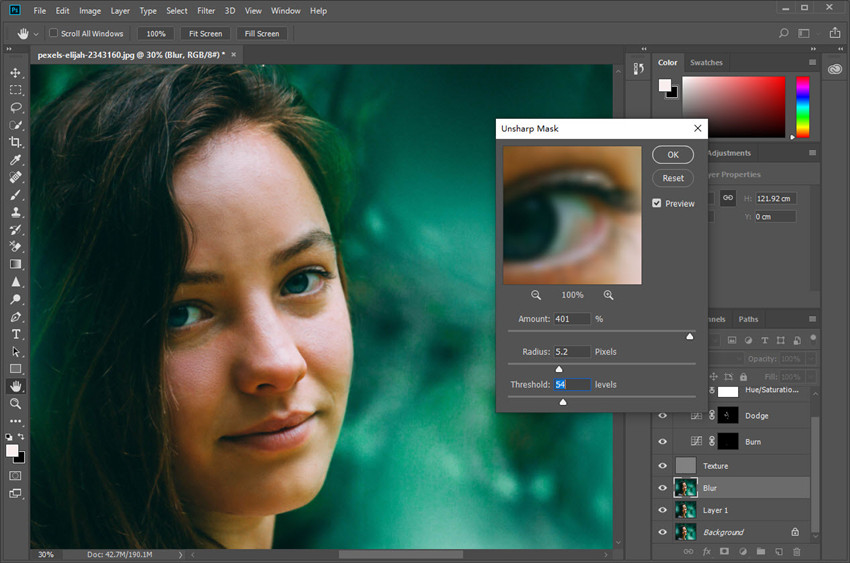
Go to Filter > Sharpen > Unsharp Mask. Start with a moderate Amount, a small Radius, and a low Threshold. Preview the effect at 100% and adjust the settings until the eyes, eyebrows, hair, and other important details look clearer without making the skin look harsh. If needed, add a layer mask and limit the sharpening to areas that need more definition.
If the image is noisy, apply Reduce Noise before sharpening. If you need a larger image for printing or cropping, you can also use Super Resolution in Camera Raw to increase the image dimensions before the final sharpening.
7. Resize and Export the Final Portrait
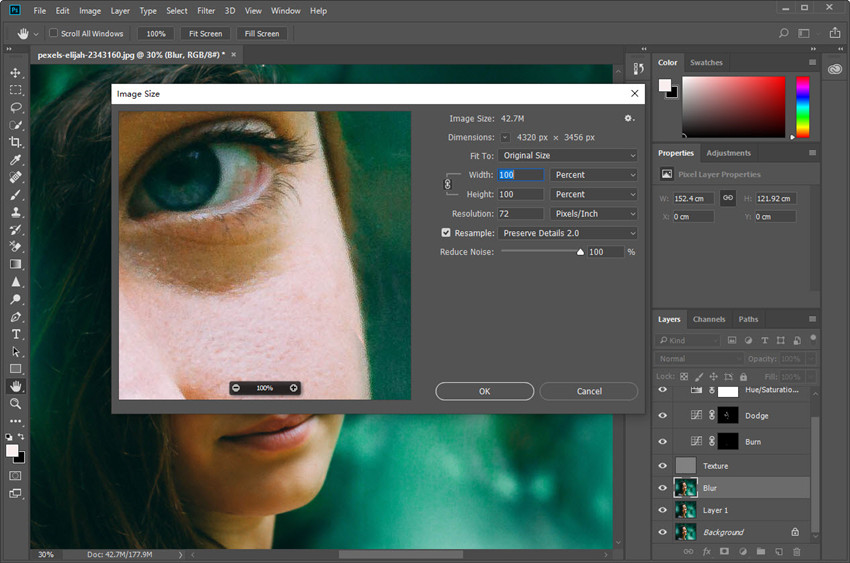
Before exporting, go to Image > Image Size to check the final dimensions. If the portrait needs to be enlarged, you can upscale the image in Photoshop by increasing the pixel dimensions while preserving the desired aspect ratio. Set the final size based on how the portrait will be used, such as a smaller size for social media or profile photos and a larger size for printing.
Once the image is ready, choose the appropriate format and quality: JPEG works well for general sharing, WebP is useful for websites, and TIFF is a good choice for high-quality printing or further editing.
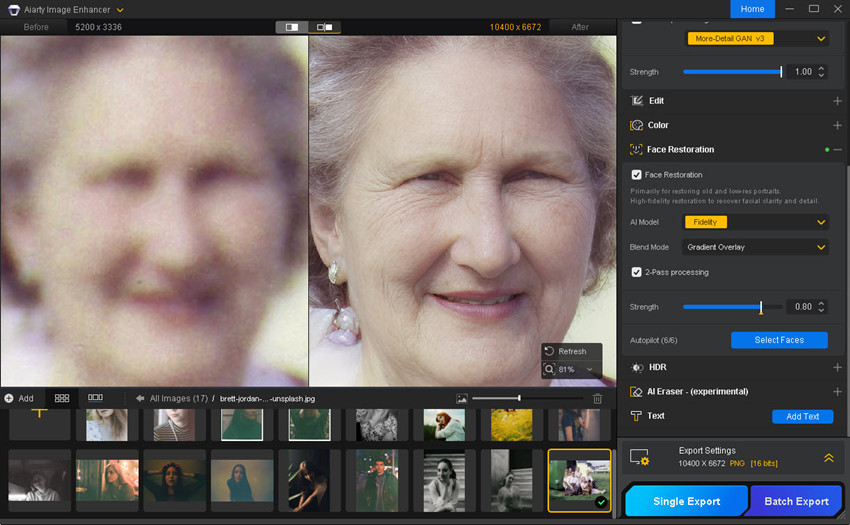
Fix Image Quality Before Editing Portraits in Photoshop
Photoshop is excellent for detailed portrait retouching, but it is not designed to solve every image-quality problem that exists before portrait editing even begins. For example, you may be working with a portrait that is:
- Low resolution or heavily cropped
- Noisy from high ISO shooting
- Soft because of focus or motion blur
- Compressed or missing clear facial detail
In these situations, it makes sense to improve the source image before starting detailed Photoshop work. A practical workflow is:
Original portrait → AI enhancement when needed → Photoshop retouching → color grading → final export
One option is Aiarty Image Enhancer, which can handle several image-quality problems that commonly appear in portrait photos, including noise, softness, low resolution, and insufficient facial detail.
Restore Facial Detail with Face Restoration
Viewers naturally focus on the face. If a portrait is small or degraded, facial features may lack definition. Aiarty Image Enhancer includes a dedicated Face Restoration feature to recover natural clarity in soft or compressed features.
Note: The goal of AI enhancement is to create a cleaner, more detailed starting point for Photoshop, not to replace Photoshop's manual touch. A natural-looking result is always more useful than an aggressively over-reconstructed face.
Learn details steps to fix blurry faces in photos >>
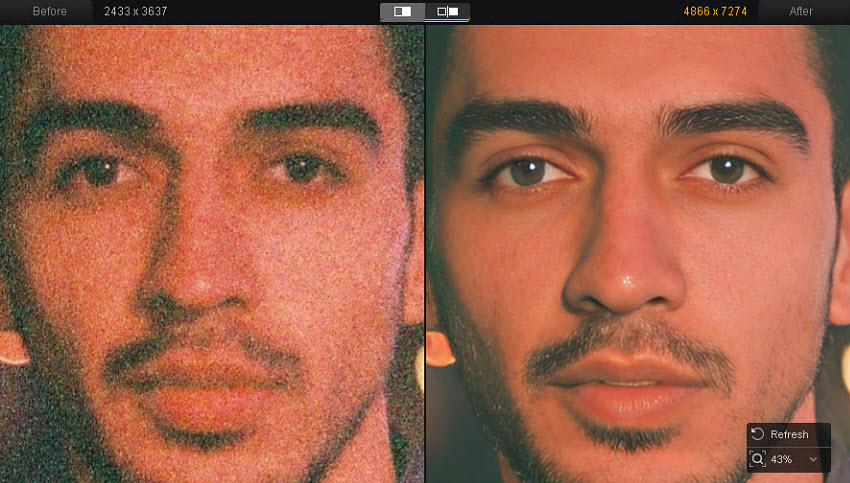
Reduce Noise Before Retouching
Noise in high-ISO portraits (especially in shadows, dark backgrounds, hair, and skin) becomes much worse if you sharpen or increase local contrast too early.
Aiarty Image Enhancer eliminates luminance and color noise cleanly at the preprocessing stage, giving Photoshop a smooth, noise-free foundation.
Upscale Low-Res and Heavily Cropped Portraits for Large Prints
A common portrait-editing problem is simply not having enough pixels, such as working with an old profile photo, a small social-media image, a heavily cropped portrait, or a screenshot.
If you immediately enlarge the image in Photoshop, it becomes larger, but the underlying pixels still lack useful detail. Using Aiarty Image Enhancer as a preprocessing step allows you to upscale the portrait to HD, 4K, and higher resolutions with clean structural definition before bringing it into Photoshop for finishing.
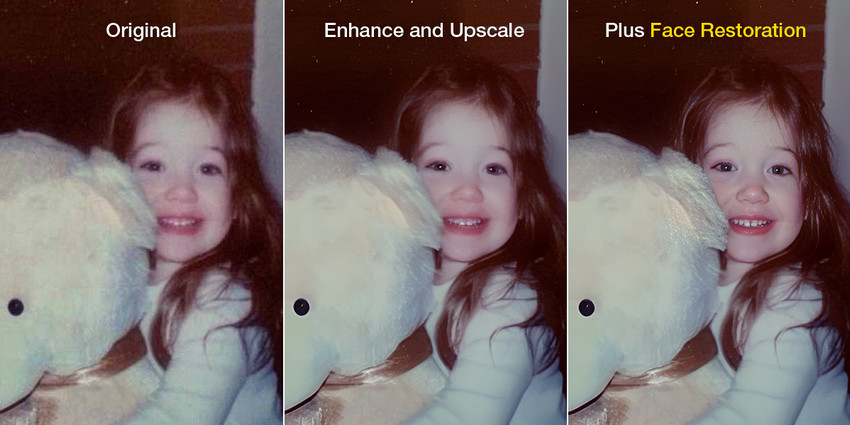
Aiarty Image Enhancer can complement Photoshop by improving image quality before or after detailed portrait editing. The two tools serve different roles, with Photoshop focused on retouching and creative control and Aiarty focused on enhancement, restoration, and upscaling.
Final Takeaway
Good portrait editing in Photoshop is less about using every tool and more about making the right adjustments for each image. Start with the overall exposure and color, clean up distracting blemishes, refine skin and facial lighting, then finish with selective color correction, sharpening, and export.
If the original portrait is noisy, soft, blurry, or low-resolution, consider improving its image quality before detailed Photoshop retouching. Aiarty Image Enhancer can complement Photoshop by handling AI denoising, facial detail enhancement, and upscaling, giving you a cleaner starting point for the editing process.
The best results usually come from keeping each adjustment subtle and preserving the natural texture, features, and character of the portrait.
 FAQ
FAQ
1. How do I avoid making retouched skin look like "plastic" or over-processed?
To avoid unnatural results in Photoshop portrait editing, always perform your edits on separate, dedicated layers rather than directly on the background. When using tools like Frequency Separation, lower your brush opacity or layer transparency (often down to 40%–60%) so the underlying real skin texture bleeds through.
Focus strictly on temporary flaws (acne, stray hairs, harsh redness) rather than trying to erase pores, moles, or natural expression lines.
2. Frequency Separation vs. Dodge & Burn: Which one should I actually use?
The 2 Photoshop tools serve two entirely different purposes and are often used together in high-end workflows:
- Frequency Separation splits the image into color/tone and texture layers, making it ideal for fast color-evening and blotch removal. However, overuse can lead to a muddy or blurred look.
- Dodge and Burn meticulously shapes light and shadow using a 50% gray layer. It is the gold standard for preserving maximum skin texture while fixing uneven lighting and sculpting facial dimension.
3. Is frequency separation good for portrait retouching?
Yes, frequency separation can help separate skin tone from texture, making it easier to correct blotchy color without removing pores. However, it should be used selectively rather than simply blurring large areas of skin, which can produce an overly smooth or artificial result.
4. Should I sharpen a portrait before or after retouching?
In most cases, apply your final sharpening after the main retouching and resizing are complete. Sharpen selectively around important details such as the eyes, eyebrows, hair, and lips, and keep it subtle to avoid emphasizing skin texture and noise.
You May Also Like


This post was written by Brenda Peng who is a seasoned editor at Digiarty Software who loves turning ordinary photos into extraordinary works of art. With AI assistance for brainstorming and drafting, the post is reviewed for accuracy by our expert Abby Poole for her expertise in this field.
