


You spent thousands of dollars on a Sony a7C II, Canon EOS R5, or Nikon Z8 expecting razor-sharp, breathtaking photos. But after importing those premium RAW files into the editor, the images often look flat, slightly soft, noisy, and completely lacking contrast.
That's completely normal. Unlike JPEG images that are already processed inside the camera, RAW files are designed to preserve maximum sensor data, but not to look finished. The real challenge in modern digital photography isn't just editing RAW files; it's extracting every single bit of detail they contain without introducing artificial artifacts, oversharpening, or destructive digital noise.
Traditional editors like Lightroom or Capture One are great for global RAW editing, but achieving the best image quality requires more than exposure and color adjustments. This guide shows how to edit RAW photos for ultimate clarity by fixing noise, restoring details, enhancing sharpness, and upscaling images with Aiarty Image Enhancer.
Aiarty Image Enhancer - Recover fine details, remove high-ISO noise, sharpen soft images, and upscale RAW photos with clicks, all while preserving a natural photographic look. Supports Canon CR3/CR2, Sony ARW, Nikon NEF, Fujifilm RAF, Leica DNG, and many other RAW formats.
✓ Free trial available ✓ No subscription required ✓ Integrated in Lightroom
Why AI Enhancement is Essential in RAW Photo Editing?
Many amateurs assume that downloading raw images to edit means they instantly possess the highest-quality version of an image. Technically, a RAW file contains the maximum amount of uncompressed sensor information, but the final rendered image quality still depends on several real-world bottlenecks: camera sensor performance, high ISO grain, lens diffraction, focus accuracy, and aggressive cropping.
For example:
- A Sony a6700 shooting an indoor wedding reception at ISO 6400 captures excellent dynamic range, but shadow areas will be plagued by color noise.
- A Canon EOS R7 used for wildlife photography captures brilliant frames, but a heavy crop reveals soft, blurry feather details.
- A Nikon Z8 landscape image contains enormous resolution, but fine textures like distant foliage can still lose clarity due to optical diffraction at small apertures.
Instead of simply increasing contrast or applying destructive traditional sharpening, Aiarty Image Enhancer utilizes deep-learning models to analyze image patterns. When you are looking for the best way to edit raw photos, understanding how to separate unwanted noise from authentic textures is key—and that is exactly where Aiarty generates true-to-life clarity that traditional RAW processors simply cannot match.
Common RAW Image Quality Problems and How to Fix Them
When learning how to edit RAW photos for the best image quality, many photographers focus on exposure, colors, and creative adjustments. However, the biggest challenges in editing RAW images are often hidden technical problems: noise, softness, lost details, and limited resolution.
Below are the most common RAW image problems photographers face and how Aiarty Image Enhancer helps improve RAW images for editing through AI-powered denoising, detail restoration, sharpening, and upscaling.
1. High ISO Noise vs. The "Plastic" Destructive Smoothing
When editing raw images taken during night landscapes, concerts, or fast-moving wildlife with cameras like the Sony Alpha 7C II / A7 IV or the Nikon P950/1000, cranking up the ISO is mandatory. The resulting .ARW or .NEF files suffer from grainy shadows and multicolored chroma noise. This is one of the biggest challenges when trying to edit RAW images without losing quality as traditional noise reduction tools may smooth pixels and thus turns skin textures, animal fur, and bird feathers into a mushy, plastic mess.
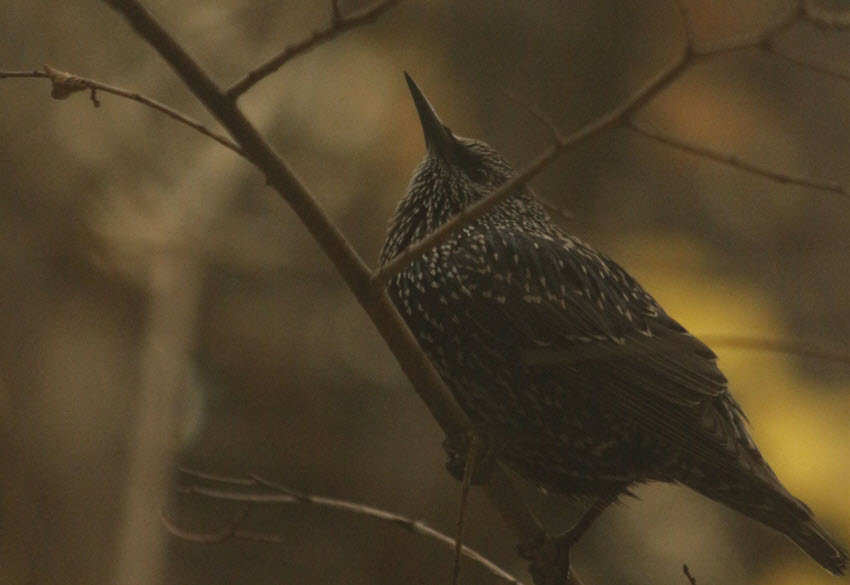
Aiarty uses AI-powered denoising technology to analyze noise patterns while preserving important image structures. Instead of simply blurring pixels, it identifies the difference between unwanted noise and meaningful details, helping photographers achieve cleaner results while maintaining natural textures. For example, a high-ISO bird photograph taken with a Sony a6700 at ISO 6400 maintains individual crisp feather textures, completely bypassing the trade-off between noise reduction and detail loss.
2. Texture Disappearance After Heavy Cropping
In wildlife, sports, and bird photography, you can rarely get close enough to the subject, meaning you rely heavily on editing raw images through tight crops. Photographers often have to crop away 50% or more of the original frame. This drastic reduction in pixel count leads to pixelation, blurry details, and an image that is completely unsuitable for large-format printing or professional portfolio display.
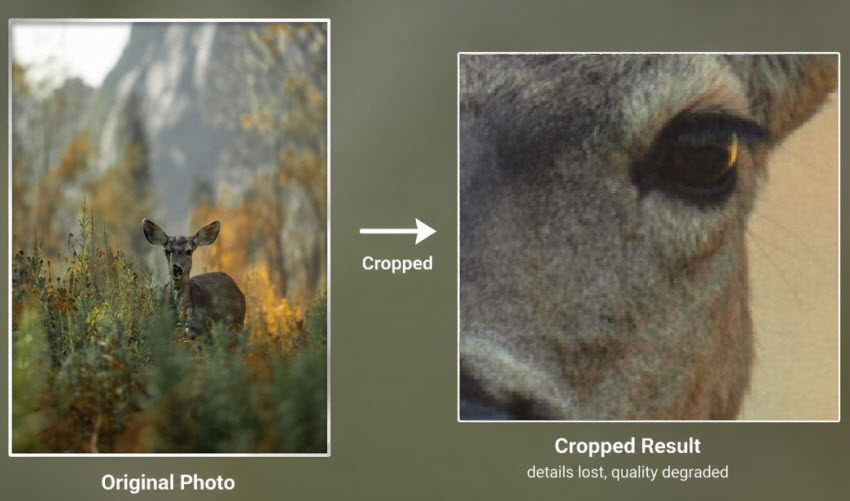
The best way to edit RAW photos after heavy cropping is to combine enhancement with AI upscaling. Aiarty Image Enhancer features an industry-leading AI Upscale engine that allows you to upscale your heavily cropped images by 2x, 4x, or 8x, boosting resolutions up to 4K, 8K, or even 32K. The reconstructed textures in fur, fabric, or landscape elements look completely organic.
3. Blurriness & Softness from Lens Limitations and Sensor Demosaicing
Many photographers searching for how to edit a RAW photo are surprised when their original RAW files appear softer than the JPEG previews displayed on their cameras. This happens because RAW files do not include automatic sharpening or processing. Factors such as lens quality, demosaicing, and camera movement can also affect fine details.
For example, Sony A6400 images taken with the 16-50mm kit lens may appear slightly soft, especially around the edges. Fujifilm X-T5 RAW files can also require careful processing due to the X-Trans sensor design.
Unlike traditional sharpening tools that merely increase edge contrast and create ugly white halos around objects, Aiarty uses generative AI Sharpening and Deblur models. It maps the optical softness caused by budget kit lenses and intelligently reconstructs the missing micro-contrast. It sharpens eyelashes, hair strands, and architectural lines naturally, making a soft kit-lens shot look like it was captured with a premium prime lens—achieving a "tack-sharp" finish rather than a digitally over-processed mess.
4. Loss of Fine Micro-Textures in Landscape and Macro Shots
When editing raw photos for gallery-quality outputs, you realize professional photography relies heavily on micro-textures—the rough surface of a rock, the intricate veins of a leaf, the weave of clothing, or the texture of human skin. Standard editing pipelines often compromise these fine structures through heavy compression or uniform sharpening.
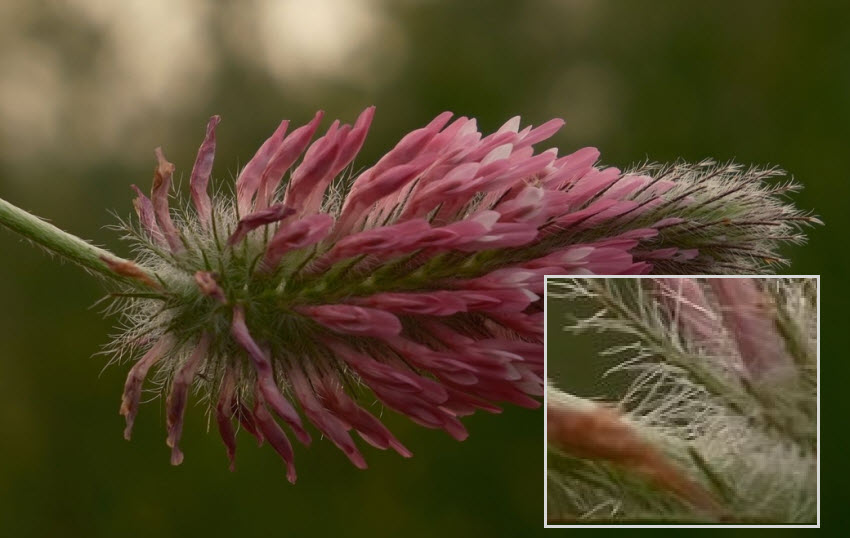
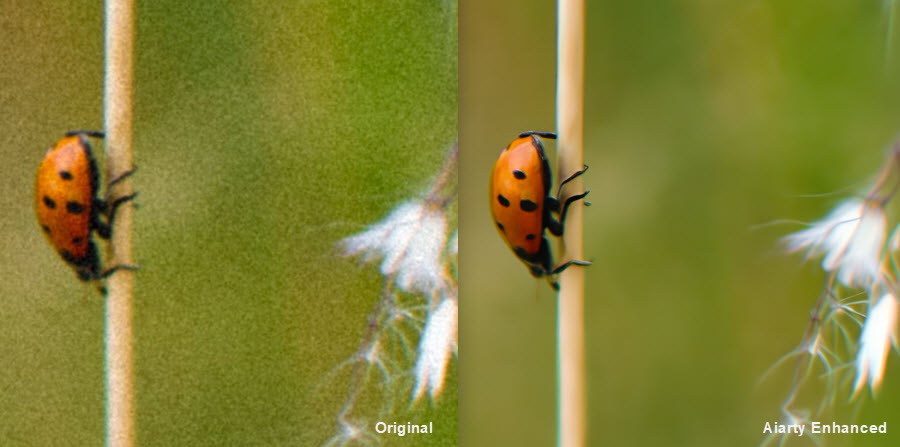
Aiarty offers tailored processing modes specifically designed to respect different textures. For example, the More Detail Mode focuses entirely on magnifying and restoring the absolute finest micro-structures within complex elements like grass, clouds, and insect wings. It ensures that your landscape or macro shots preserve their realism and premium bite, making them ideal for commercial use and elite stock photography.
How to Integrate Aiarty into Your RAW Editing Pipeline for the Best Quality
For a quality-focused RAW workflow, you don't need to replace traditional RAW image editors such as Adobe Lightroom, DxO, or Capture One. Instead, use them for what they do best—RAW development, lens and optical corrections, exposure, and color adjustments—while using Aiarty Image Enhancer for the tasks that benefit most from AI, such as advanced denoising, detail reconstruction, and high-resolution upscaling.
The idea is simple: develop and correct your RAW file in a traditional RAW editor first, then use Aiarty to enhance details and recover image quality when needed.
Here is a practical workflow for combining both:
[Original Camera RAW File (.ARW / .CR3 / .NEF / .RAF)]
▼
[Step 1: RAW Development & Optical Corrections]
(Lens Corrections, Exposure, White Balance, Highlights, Shadows, Basic Color Adjustments)
▼
[Step 2: AI Enhancement in Aiarty Image Enhancer]
(Advanced Denoising, Detail Reconstruction, Face Restoration, Upscaling)
▼
[Step 3: Lossless 16-bit Export & Final Polish]
(Continue Editing with the Enhanced DNG/TIFF, Then Print or Export)
Step 1. Start with RAW Development and Optical Corrections
Import your original camera RAW files (.ARW, .CR3, .NEF, or .RAF) into Lightroom, DxO, Capture One, or another RAW editor for editing. Apply camera and lens profiles, correct lens distortion and vignetting, and adjust white balance, exposure, highlights, shadows, and basic color.
Pro Tip for Best Quality: Keep sharpening and noise reduction relatively low. Let your RAW editor handle exposure, color, and optical corrections, while leaving advanced denoising and detail reconstruction to Aiarty.
Step 2. Direct Native Import into Aiarty Image Enhancer
Once your basic RAW development and optical corrections are complete, send the image to Aiarty for AI enhancement. If you use Lightroom, Aiarty automatically configures itself as an external editor, so you can send photos directly from Lightroom for enhancement. Rather than replacing Lightroom or DxO, Aiarty focuses on pixel-level tasks such as advanced denoising, detail reconstruction, and high-resolution upscaling.
Aiarty Image Enhancer natively supports the vast majority of camera RAW formats, seamlessly reading the underlying sensor data from your Sony, Canon, Nikon, or Fujifilm camera, bypassing tedious file conversion steps and save massive amounts of hard drive space.
In addition, Aiarty is optimizing its local AI inference engine to provide a smoother experience when dealing with high-resolution RAW files from modern cameras, especially images in the 24MP–60MP range.
If you don't have Aiarty Image Enhancer installed yet, grab the free trial here to follow along with this step in real time.
Step 3. Choose Your AI Model and Resolution
Once your RAW image is loaded, choose an AI model based on your image and enhancement needs:
- More Detail Mode: Choose it for restoring complex textures in landscape, wildlife, architecture, and macro RAW photography. It helps bring back fine details such as feathers, foliage, hair, and surface textures.
- Real-Photo Mode: Choose it for realistic RAW photographs, this mode improves clarity, reduces noise, and helps restore details in older or lower-quality images.
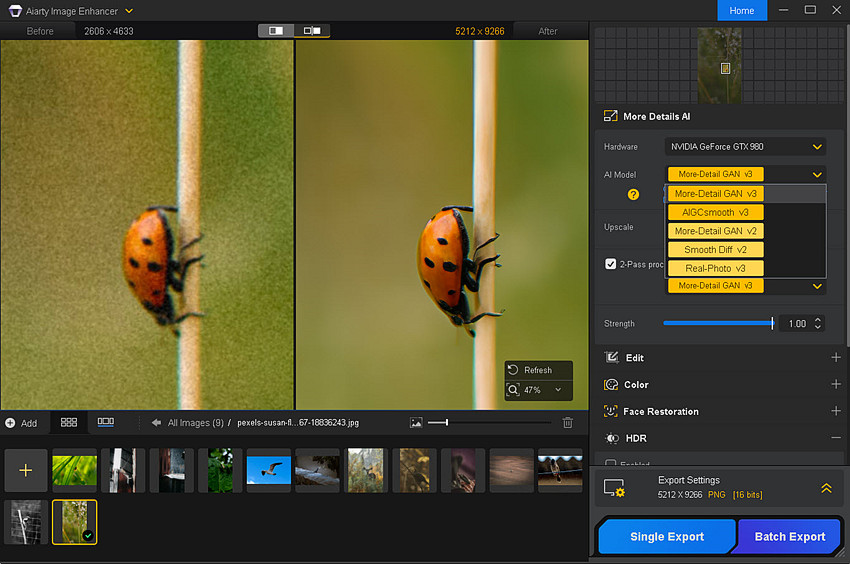
The other two models, AIGCSmooth and Smooth Diff, are mainly optimized for AI-generated images and specific enhancement scenarios, so they are generally not the first choice for editing RAW photography.
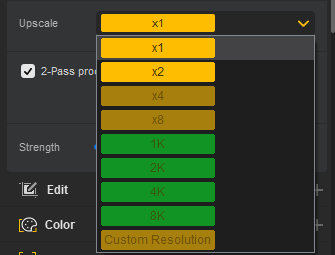
Set Your Resolution: Keep the scale at 1x when you only need to reduce high-ISO noise, correct softness, or improve image quality at the original resolution. Choose 2x, 4x, or 8x when you need to enlarge cropped RAW photos for high-resolution displays or large prints.
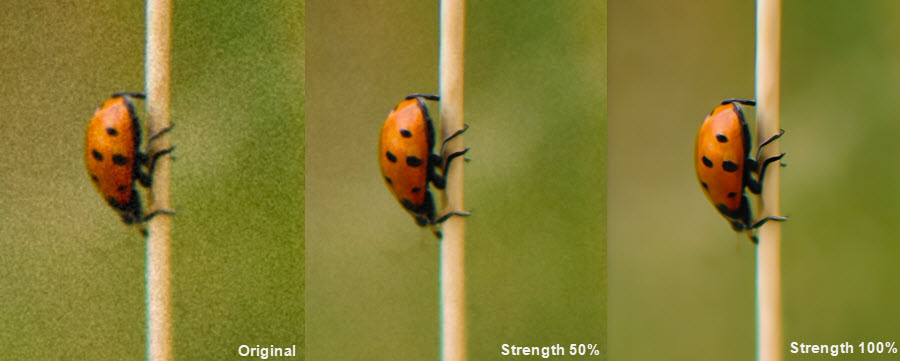
Adjust the Strength: Use the real-time split-screen preview at 100% zoom to compare the results and fine-tune the enhancement strength. Adjust gradually to achieve a balance between restored details and a natural photographic look.
Step 4. Fine-Tune the Raw Images
While you may use dedicated RAW editors for color grading, exposure adjustments, and removing unwanted elements, Aiarty also provides convenient tools for quick color adjustments and AI-powered object removal. So you can further refine your images in one workflow.
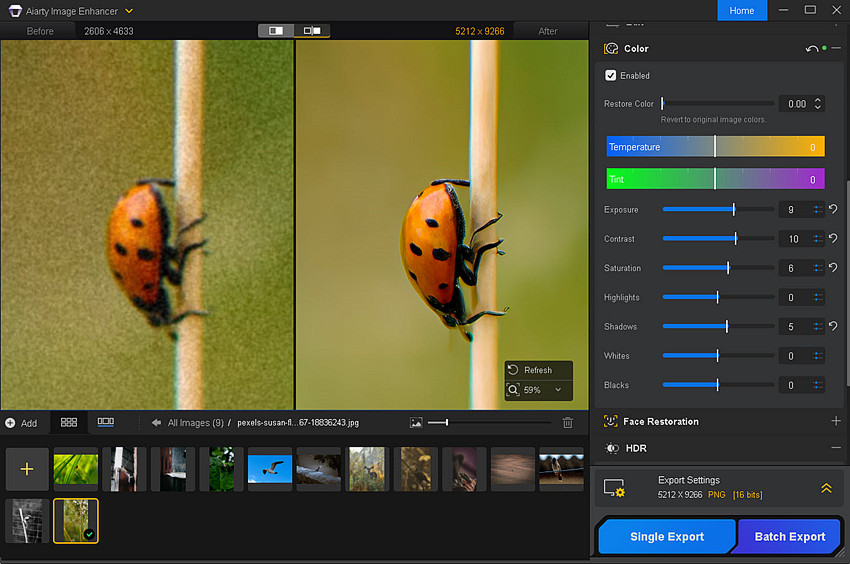
For portrait RAW photos, enable Face Restoration to recover fine facial details and improve clarity while keeping skin texture natural.
Step 5. Export a Lossless 16-bit Master for Your Catalog
Once the AI enhancement is complete, export the result as a high-quality DNG or TIFF for further editing, printing, or delivery.
If you want to continue working in Lightroom or Capture One, add the enhanced file back to your catalog for final color adjustments, cropping, local edits, and export.
This workflow lets you combine the RAW development and optical correction of traditional editors with Aiarty's AI-powered denoising, detail reconstruction, and upscaling.
Editing RAW Photos for Maximum Quality: Real-World Before & After Tests
To see how this hybrid workflow performs under demanding conditions, let’s examine three real-world photography scenarios where traditional processing hits a wall, and see how Aiarty rescues the shot.
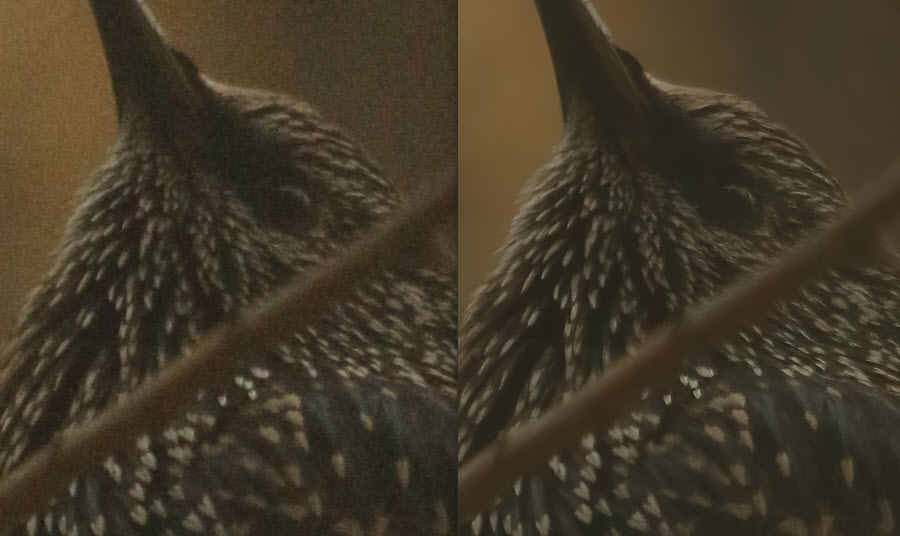
Test 1. High ISO RAW Noise Reduction
Raw Source: Canon EOS 700D (.CR2), 3456 × 5184 • 160mm • f/5.0 • ISO 3200 • 1/2000s
Captured at a demanding ISO 3200 with a high shutter speed to freeze motion, the original uncompressed file is plagued by severe digital grain and multicolored chroma noise across the shadows and midtones, threatening to ruin the shot.
When editing raw images with high ISO limitations, Aiarty's specialized denoise networks completely strip away the grainy sensor noise. Unlike legacy software that blurs the image to hide grain, Aiarty clears the background clutter while fully preserving the underlying edge sharpness and authentic textures.
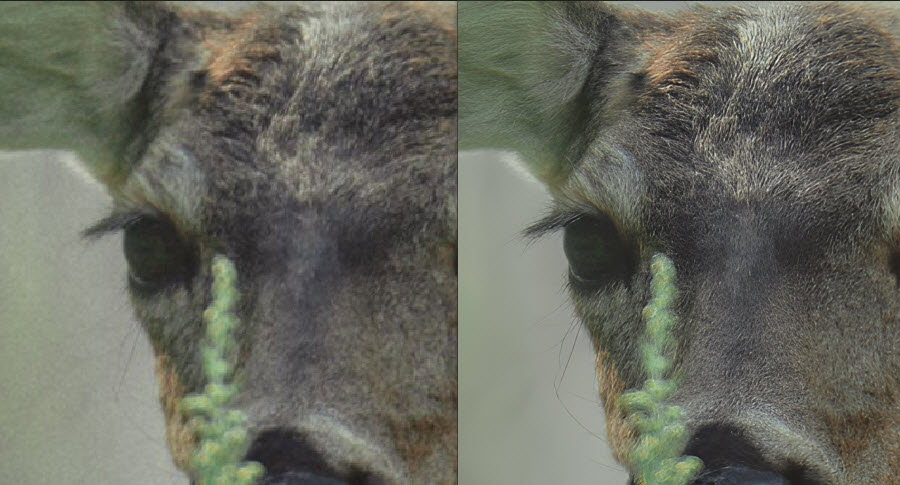
Test 2. Recover Details from a Heavily Cropped RAW Image
Raw Source: Sony ILCE-7M3 (.ARW), 4000 × 5000 • 180mm • f/3.2 • ISO 100 • 1/500s
Although this image was captured at a low ISO, the deer was far from the camera, requiring a significant crop. After cropping, the subject appeared noticeably softer, with reduced fur detail and slight pixelation.
With Aiarty RAW image editing, fur become much more defined, with individual strands appearing clearer and better separated. Fine textures around the face and ears were restored, while the overall image remained natural without excessive sharpening artifacts.
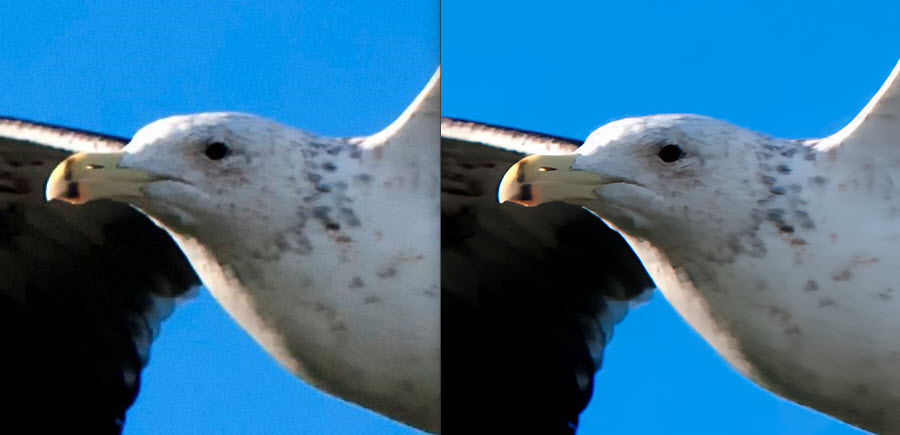
Test 3. Restore Sharpness in a Soft RAW Photo
Raw Source: Nikon D300 (.NEF), 3424 × 2160 • 130mm • f/6.3 • ISO 800 • 1/1200s
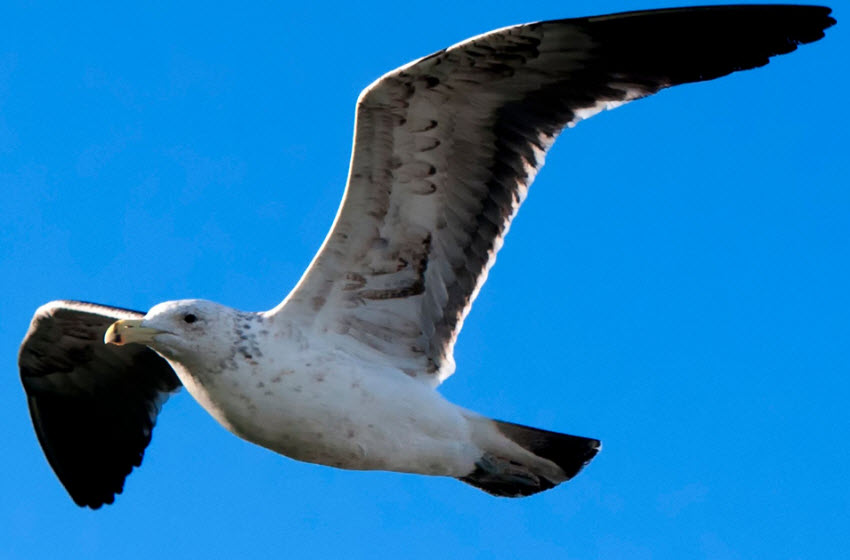
Captured on a legacy DSLR sensor, the original image of an eagle looks noticeably "soft" and lacks high-frequency micro-contrast, a common issue stemming from lens optical limitations and slight shutter vibration.
Aiarty noticeably improved edge definition and feather texture without introducing obvious halos. The eagle's eye appeared sharper, feather layers became more distinct, and the overall subject gained much better visual clarity.
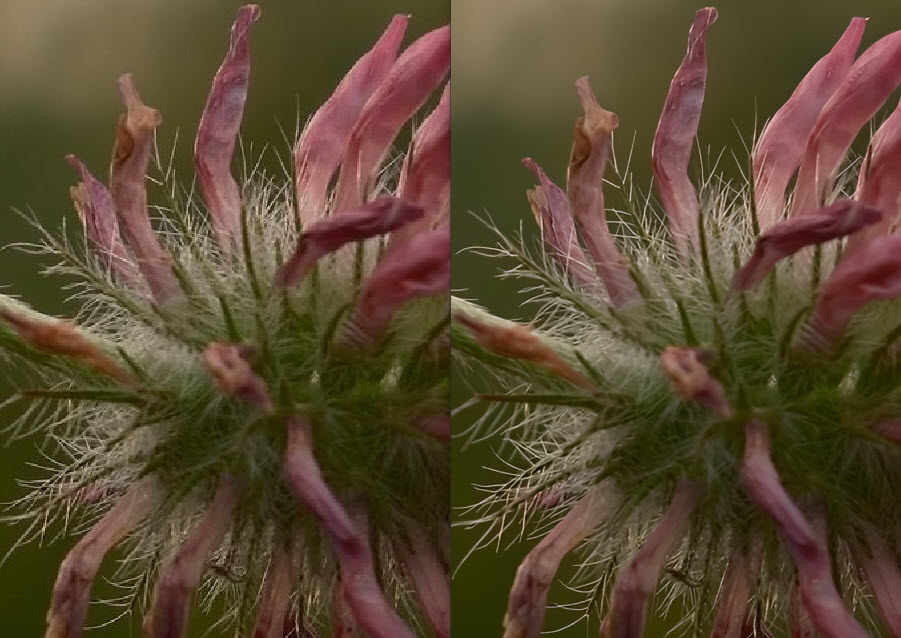
Test 4. Upscale a RAW Image Without Pixelation
Raw Source: Fujifilm X-S20 (.RAF), 3120 × 2080 • 45mm • f/5.6 • ISO 160 • 1/150s
When zooming in to inspect fine diagonal lines or patterns at a 100% crop, the digital rendering reveals visible pixelation and jagged stair-step edges (aliasing).
For photographers hunting for the ideal raw images to edit for large displays, jagged edges are a dealbreaker. Aiarty evaluates the geometric layout of the pixels, smoothing out the aliasing artifacts and rendering perfectly clean, continuous curves and high-fidelity structures.
Conclusion: Unlock the Full Quality Hidden Inside Your RAW Photos
RAW files capture the maximum amount of information from your camera sensor, but achieving the best image quality requires more than basic adjustments. Noise, softness, lost textures, and resolution limitations can still affect the final result when editing RAW photos.
The best way to edit RAW images is to combine traditional RAW processing with AI-powered enhancement. Use your preferred RAW editor for exposure and color adjustments, then use Aiarty Image Enhancer to reduce noise, restore fine details, improve sharpness, and upscale images while maintaining a natural photographic look.
Whether you are working with Canon CR3/CR2, Sony ARW, Nikon NEF, Fujifilm RAF, Leica DNG, or other RAW formats, AI enhancement can help you extract more quality from the photos you already captured.
With the right workflow, your RAW files are not just digital negatives, they are high-quality images with even more detail and potential waiting to be revealed.
 FAQ
FAQ
RAW photos often look flatter, softer, and noisier than JPEG files because RAW files contain unprocessed sensor data. Unlike JPEG images, cameras do not automatically apply sharpening, noise reduction, contrast enhancement, or color processing to RAW files.
A true RAW file contains raw, untouched sensor data that hasn't undergone sensor demosaicing or sharpening. It is meant to look slightly soft and flat initially—it represents the ultimate blank canvas for you to edit raw images and extract maximum quality manually or via AI.
Traditional noise reduction algorithms create a "plastic doll" skin look or "mushy" bird feathers because they uniformly blur pixels to hide grain. Aiarty takes a completely different, generative approach. Its AI models are trained on millions of real-world professional photographic datasets, allowing it to differentiate between digital sensor anomalies and real physical structures. When you use More Detail Mode or Face Restoration, Aiarty intelligently reconstructs genuine micro-textures (like individual hair strands, skin pores, and feather shafts) naturally without adding artificial artifacts or harsh white edge halos.
The best software to edit RAW photos depends on your workflow and image quality goals. Traditional RAW editors like Adobe Lightroom and Capture One are excellent for exposure adjustments, color correction, white balance, and organizing large photo libraries.
However, when you need to fix specific image quality issues such as high ISO noise, soft details, heavy cropping, or low-resolution images, AI enhancement tools can provide additional improvements.
A professional RAW editing workflow often combines both approaches: Using Lightroom, Capture One, etc. for RAW development, color grading, and overall adjustments; and using Aiarty Image Enhancer for AI denoising, detail restoration, sharpening, and upscaling.
You May Also Like


This post was written by Brenda Peng who is a seasoned editor at Digiarty Software who loves turning ordinary photos into extraordinary works of art. With AI assistance for brainstorming and drafting, the post is reviewed for accuracy by our expert Abby Poole for her expertise in this field.
