If you’re looking for a Sony photo editing software, Imaging Edge Desktop is likely one of the first options you’ll encounter. As Sony’s official desktop application, it’s designed to handle everything from RAW processing to tethered shooting. But once you start using it, you’ll quickly notice that it works very differently from modern tools like Adobe Lightroom.
This guide walks you through how Sony Imaging Edge Desktop softwaqre actually works in practice, from download and installation to a complete editing workflow, while also clarifying many of the small but important details that often confuse users.
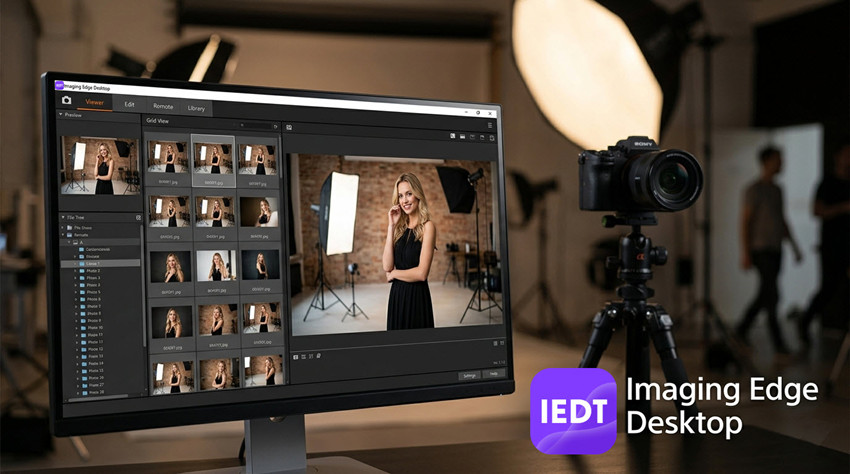
What Is Imaging Edge Desktop?
Imaging Edge Desktop is a free photo editing and camera control software developed by Sony, designed specifically for photographers using Sony cameras. It is designed to handle essential photography tasks such as viewing and selecting images, processing RAW (ARW) files, and controlling cameras for tethered shooting.
Unlike catalog-based tools like Adobe Lightroom, Sony Imaging Edge Desktop uses a file-based workflow, allowing you to work directly with images stored on your computer without importing them into a library. Its biggest advantage lies in its native integration with Sony cameras, providing:
- Accurate color reproduction based on Sony camera profiles
- Optimized handling of ARW RAW files
- Built-in lens correction and metadata support
Imaging Edge Desktop focuses on precision, reliability, and hardware compatibility, making it particularly suitable for photographers who want a faithful representation of their original capture, especially in professional or controlled shooting environments. However, this also means the software leans more toward traditional RAW processing rather than modern AI-powered image enhancement, which is something to keep in mind when evaluating it against newer editing solutions.
Key Features of Sony Imaging Edge Desktop Software
Before you download Sony Imaging Edge Desktop, it’s important to understand how each feature plays a role in a typical photography process. In fact, it’s not a single editor, but a modular desktop application composed of three integrated tools:
- Viewer – for browsing, previewing, and selecting images
- Edit – for processing and developing RAW (ARW) files
- Remote – for tethered shooting and camera control
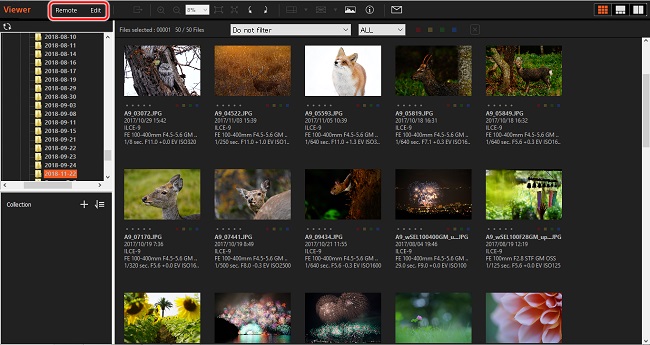
1. Viewer – Image Browsing and Selection
The Viewer module is your starting point. After a shoot, you’ll likely have dozens or even hundreds of images to go through. Here’s what Viewer helps you do:
- Quickly preview images without importing into a catalog
- Rate photos using stars
- Filter by rating or metadata
- Compare multiple shots side-by-side
In practice, this is where you perform culling, selecting the best images from a batch. However, compared to Lightroom, Sony Imaging Edge Desktop’s Viewer lacks AI-powered features like face recognition, smart tagging, and automatic grouping. So while it’s functional, it may feel slow for large projects.

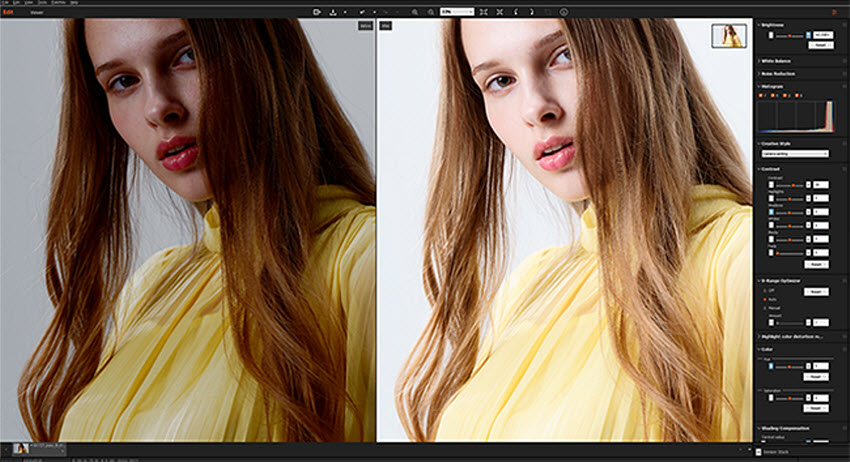
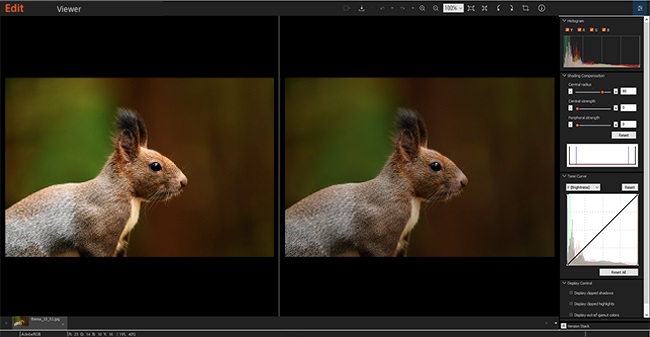
2. Edit – RAW Processing Engine
Once you’ve selected your best images, the next step is editing in Sony Imaging Edge Desktop and that’s where the Edit module comes in. This module allows you to:
- Adjust exposure, contrast, highlights, and shadows
- Fine-tune white balance and color tones
- Apply lens corrections
- Use sharpening and noise reduction
One of the biggest advantages here is color accuracy and RAW fidelity. Because the software is developed by Sony, it uses native camera profiles, which often results in more consistent and faithful rendering of Sony RAW files compared to some third-party RAW photo editors.
Where It Feels Limited in Modern Workflows
At the same time, the Edit module is built on a traditional (non-AI) processing pipeline, which means some limitations become noticeable, especially in more demanding scenarios:
- Noise reduction can struggle in high ISO conditions
- Detail recovery is limited
- Over-sharpening can introduce artifacts
This becomes especially obvious in night photography, wildlife shots, and low-light or high-ISO indoor scenes.
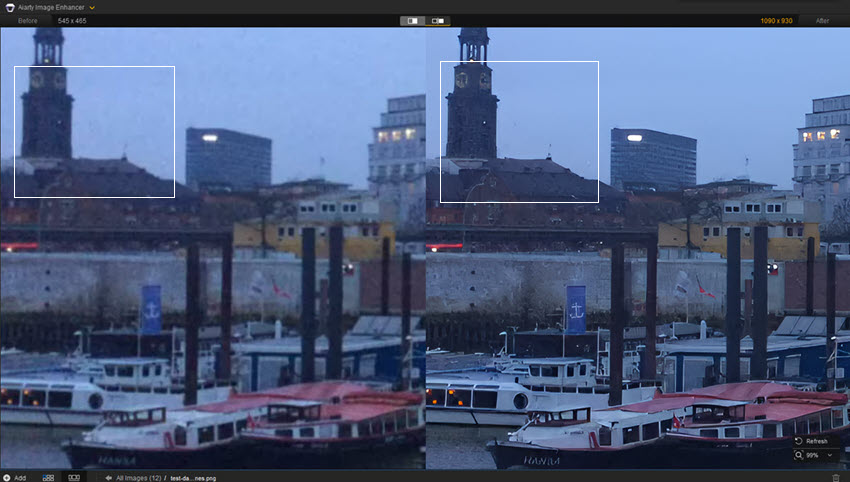
Extending RAW Quality Beyond the Edit Module
Because of these constraints, many photographers treat the Sony Imaging Edge Desktop application as a base development step, and then use additional tools for further enhancement. For example, after exporting a developed RAW image, you can use tools like Aiarty Image Enhancer to go further, especially when dealing with noise, softness, or resolution limitations.
Unlike traditional editors, AI-based tools can:
- Enhance RAW-derived images with better texture reconstruction
- Reduce noise while preserving fine details
- Improve clarity in challenging lighting conditions
Some workflows also involve directly working with RAW or high-bit-depth formats to retain as much image information as possible before enhancement, which helps maintain quality throughout the process.
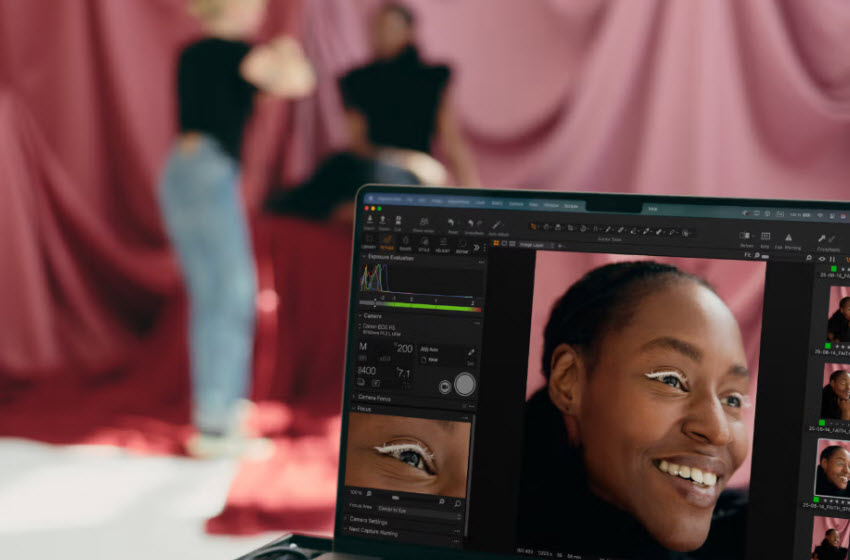
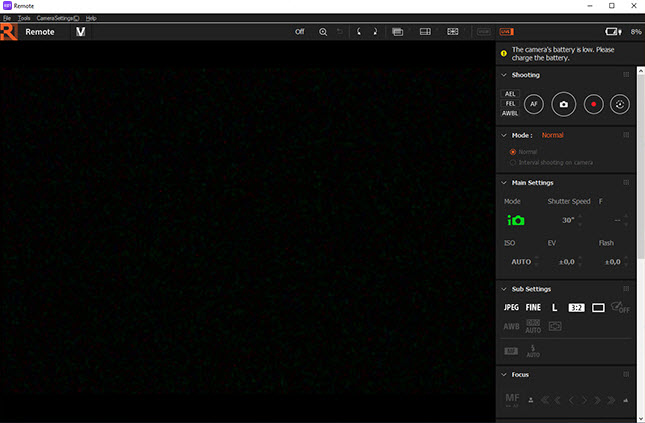
3. Remote – Tethered Shooting
The Remote module is one of the strongest parts of Sony Imaging Edge Desktop. This is extremely useful for controlled environments like studio photography, product shoots, and portrait sessions. In fact, for many Sony users, this feature alone justifies installing Imaging Edge Desktop software.
It allows you to:
- Connect your camera via USB
- Control settings (ISO, aperture, shutter speed)
- Capture images directly to your computer
- Preview shots instantly on a larger screen
How to Use Sony Imaging Edge Desktop Software to Edit Photos?
While Sony Imaging Edge Desktop is designed to be relatively straightforward, its workflow is slightly different from modern catalog-based editors. In the following section, we’ll walk through how to use Sony Imaging Edge Desktop to edit photos from start to finish, including importing images, applying RAW adjustments, and exporting final results.
Step 1. Download and Install Imaging Edge Desktop (Windows & Mac)
To begin using the software, you’ll need to download Imaging Edge Desktop from Sony’s official site. From the download page, download Imaging Edge Desktop for Windows or macOS. After you download the .exe or .dmg file, install it.
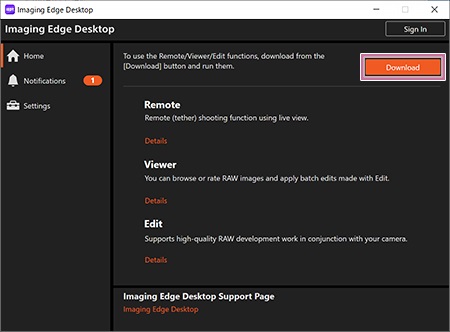
After the initial installation, opening the application will display a Home screen with an orange [Download] button. Then you need to click this to download the actual working modules:
- Remote
- Viewer
- Edit
These are installed as a single package (e.g., .exe or IE_INST.pkg). Once installed, the software is fully functional. This two-step setup is part of Sony’s design and ensures you always install the latest module versions.
Note: When launching Imaging Edge Desktop for the first time, you need to make sure your computer should be connected to the internet; on macOS, you may need to allow permissions for proper operation.
Imaging Edge Desktop supports both Windows and Mac systems, but performance and compatibility can vary depending on OS version and camera model, so keeping your system updated is important. Unlike many modern editing applications, Sony Imaging Edge Desktop does not require a user account to get started. You can immediately open, edit, and use Remote for shooting.
Step 2. Importing Photos (Different from Most Software)
Once installed, the next step is getting your images into the application, but this is where Imaging Edge Desktop works differently from tools like Lightroom.
There is no built-in import system. Instead, you’ll need to:
- Connect your camera or insert your SD card
- Manually copy images to your computer
- Open the folder inside Viewer
This design can feel unusual at first, but once understood, it keeps the workflow simple and file-based rather than catalog-based.
Step 3. Browsing and Selecting Images (Viewer)
After your images are accessible inside Sony Imaging Edge Desktop, the first working stage begins in the Viewer module, which acts as your main image browsing and selection workspace.
- Preview images quickly
- Assign star ratings
- Filter and sort photos
- Compare multiple shots side-by-side
This step is essential for narrowing down large batches into your best selections. Viewer is often used as a culling stage, where photographers remove duplicates, identify sharpest frames, and select final candidates for editing.
Note: Extending Viewer with External Software
If you want to expand your workflow, Imaging Edge Desktop allows you to register external programs. By configuring settings inside Viewer, you can link to editors like Photoshop or open images directly in other software. Then you can selected images directly in external editors, send files to other applications without manual searching, and build a more flexible editing pipeline.
This makes the application more flexible, even though its built-in editing tools are relatively basic.
Step 4. Editing RAW Images (Edit Module)
Once you’ve selected your images, you can open them in the Edit module. This is where you perform core RAW adjustments:
- Exposure
- White balance
- Contrast and tone curve
- Highlights and shadows
- Sharpening and noise reduction
One of the strongest aspects here is color accuracy, especially when working with Sony RAW files, as the software uses Sony’s native color science and camera profiles.
Applying Adjustments to Multiple Images
If you’re working with a batch of photos taken under similar conditions, you can reuse settings. Simply edit one image, save or copy its adjustments and then apply them to multiple images in Viewer. While this enables basic batch processing, it’s more manual compared to Lightroom’s synchronization features.
Step 5. Tethered Shooting (Remote Module)
The Remote module enables direct camera control from your computer, turning Sony Imaging Edge Desktop app into a tethered shooting solution.
- After connecting your Sony camera via USB, you can:
- Adjust ISO, aperture, and shutter speed
- Capture images instantly
- Preview shots on a larger screen
Note: Connection Considerations
If your camera is not detected or Remote does not function properly, common causes include:
- USB mode not set correctly (should be “PC Remote” on the camera)
- Missing system permissions (especially on macOS)
- Background software interfering with the connection
Once these settings are properly configured, Remote becomes one of the most stable and reliable features in the entire Sony Imaging Edge Desktop ecosystem.
Pros and Cons of Sony Imaging Edge Desktop
Like any photography software developed by Sony, Imaging Edge Desktop has its strengths and limitations. While it works well as a free RAW processing and camera control application, it is not designed to compete with modern AI-powered editors or full-scale post-production platforms like Adobe Lightroom.
Below is a clear breakdown of its advantages and drawbacks based on real-world usage.
- Imaging Edge Desktop is completely free with no subscription or hidden costs for all Sony users.
- Sony Imaging Edge Desktop provides accurate color rendering and reliable support for ARW RAW files.
- The Remote module offers solid camera control for studio and product photography workflows.
- It runs offline, requires no account login, and keeps a simple file-based workflow.
- Noise reduction is basic and not AI-driven, and detail recovery is also limited, especially in soft or underexposed images.
- There is no intelligent denoising, sharpening, or automated enhancement, so all adjustments are fully manual.
- The software cannot intelligently enlarge images.
- Batch processing is still manual compared to Lightroom-style synchronization.
- The software only supports Sony cameras.
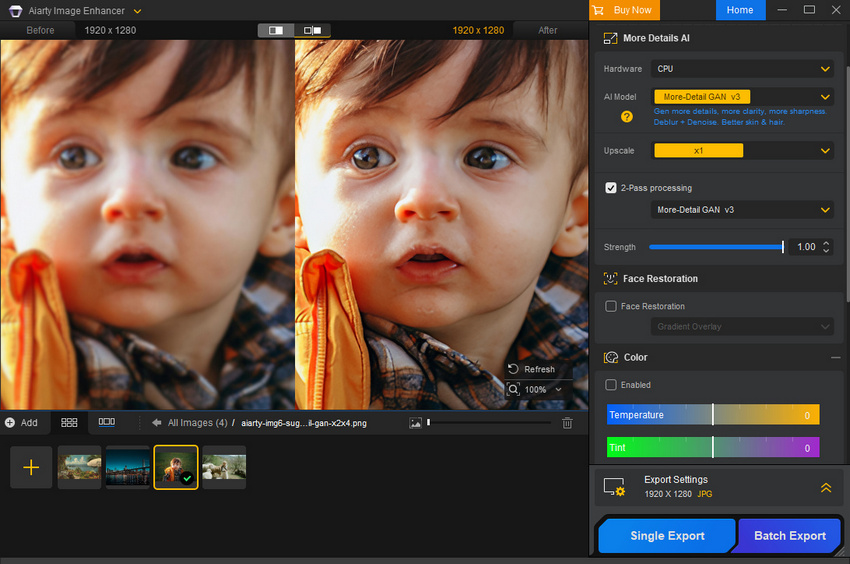
Enhance Your Sony Workflow with Aiarty Image Enhancer
Imaging Edge Desktop focuses on accurate RAW development for Sony cameras, but it lacks advanced image enhancement capabilities such as AI-based denoising, detail reconstruction, and high-quality upscaling. This is where tools like Aiarty Image Enhancer can extend the workflow.
Aiarty is designed to improve the overall image quality of imperfect RAW photos. It can enhance, denoise, and deblur Sony RAW formats including ARW, SRF, and SR2, along with a wide range of professional RAW formats such as DNG, CR2, CR3, NEF, RAF, and RW2 from major camera brands like Canon, Nikon, Fujifilm, Panasonic, and Olympus.
Key capabilities include:
- AI image upscaling up to 2×, 4×, and higher to 4K, 8K, and even as high as 32K.
- Remove low-light noise, rain, blurriness, and compression artifacts while preserving natural and realistic textures.
- Face restoration technology that enhances portraits and improves facial details in old or low-quality photos.
- Multiple AI models optimized for real photos, portraits, and AI-generated images.
- Batch enhance multiple images in a single workflow with fast speed.
Final Thoughts
Imaging Edge Desktop is a solid and reliable software solution for Sony users, especially when it comes to accurate RAW processing and tethered shooting. As a free desktop application developed by Sony, it delivers strong compatibility with ARW files and maintains consistent color rendering straight out of the camera.
However, as photography workflows continue to evolve, the software shows its limitations in areas such as noise reduction, detail recovery, and overall editing efficiency. Its traditional, non-AI-based approach means it works best as a starting point rather than a complete solution.
For most users, the ideal workflow is to use Imaging Edge Desktop for initial RAW development, then extend the process with more advanced tools when higher image quality is required.
In that sense, Imaging Edge Desktop remains a valuable part of the Sony ecosystem, but it becomes significantly more powerful when combined with modern enhancement workflows.
 FAQ
FAQ
Sony Imaging Edge Desktop is used for viewing, editing, and processing Sony RAW (ARW) images, as well as controlling Sony cameras through tethered shooting. It is mainly designed for RAW development and basic photography workflow management.
Yes. Imaging Edge Desktop is completely free software developed by Sony. There is no subscription or paid upgrade required to access its core features, including Viewer, Edit, and Remote modules.
Yes. Imaging Edge Desktop supports both Mac and Windows systems. After downloading the installer from Sony’s official website, Mac users install a .pkg file, while Windows users install an .exe file.
Yes. It supports Sony RAW formats such as ARW, SRF, and SR2, making it fully compatible with most Sony Alpha and Cyber-shot cameras.
You May Also Like
This post was written by Brenda Peng who is a seasoned editor at Digiarty Software who loves turning ordinary photos into extraordinary works of art. With AI assistance for brainstorming and drafting, the post is reviewed for accuracy by our expert Abby Poole for her expertise in this field.