Quick Answer: To edit bird photos, start with RAW adjustments in Lightroom to correct exposure and color. Use minimal noise reduction and sharpening to preserve feather detail. Use Aiarty Image Enhancer for heavy crops or soft images to restore detail and upscale. Finish in Photoshop with light retouching like eye enhancement and distraction removal. This workflow produces sharper and more natural-looking bird photos.
Bird photography is one of the most challenging genres. Birds move fast, are often far away, and are usually shot in low light such as forests or early mornings. As a result, even well-captured images often show common issues:
- High ISO noise from fast shutter speeds in low light
- Soft, low-resolution images caused by heavy cropping
- Motion blur, harsh shadows, and flat lighting
The goal of bird photo editing is to recover clarity and detail while keeping a natural look without overprocessing.
This guide walks through a practical workflow from RAW adjustments in Lightroom to AI detail recovery and final retouching in Photoshop.

Prepare Your Bird Photo Before Editing
Before opening Lightroom or Photoshop, spend a minute preparing your image. Starting with the best file and frame will make every editing step more effective and help preserve as much detail as possible.
Start with the Sharpest Possible Image
Whenever possible, shoot in RAW to retain the maximum amount of detail and dynamic range. RAW files provide greater flexibility for recovering shadows, highlights, and subtle feather textures during editing.
Next, select the strongest frame from your sequence. Look for:
- Sharp focus on the bird's eye
- Minimal motion blur
- The best wing position or pose
Even the most advanced editing tools can't fully recover an image that's out of focus.
Evaluate Cropping and Resolution Loss
Bird photos often require aggressive cropping. A 24MP image can quickly become a small fraction of its original resolution when zooming in on distant subjects.
This step matters because heavy crops directly impact noise levels and feather detail recovery later in the workflow.
Learn More: How to Crop Images Without Losing Quality (Even After Heavy Cropping)
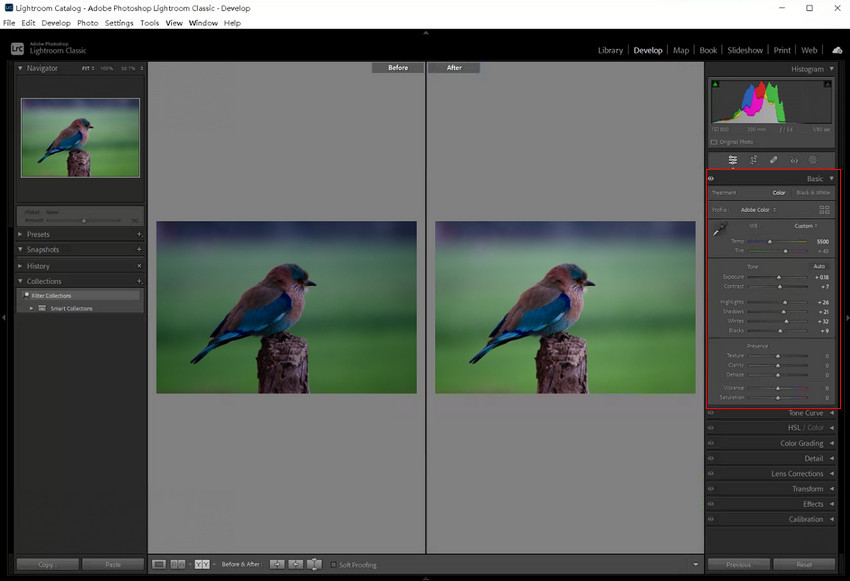
Make Essential RAW Adjustments in Lightroom
Lightroom (or similar RAW editors) is the foundation of bird photo editing. The goal here is to build a clean and balanced base image without destroying fine detail.
Adjust Exposure, Color, and Contrast
Start by building a balanced base image in Lightroom. Correcting exposure, white balance, and contrast early helps recover detail while keeping the bird's colors natural.
Focus on these adjustments:
- Recover shadows and highlights to reveal feather detail without clipping bright plumage.
- Correct white balance so feather colors appear true to life, especially in forest shade or warm sunrise light.
- Increase contrast and texture moderately to add depth without creating harsh edges or an overprocessed look. Use Vibrance instead of Saturation for more natural color.
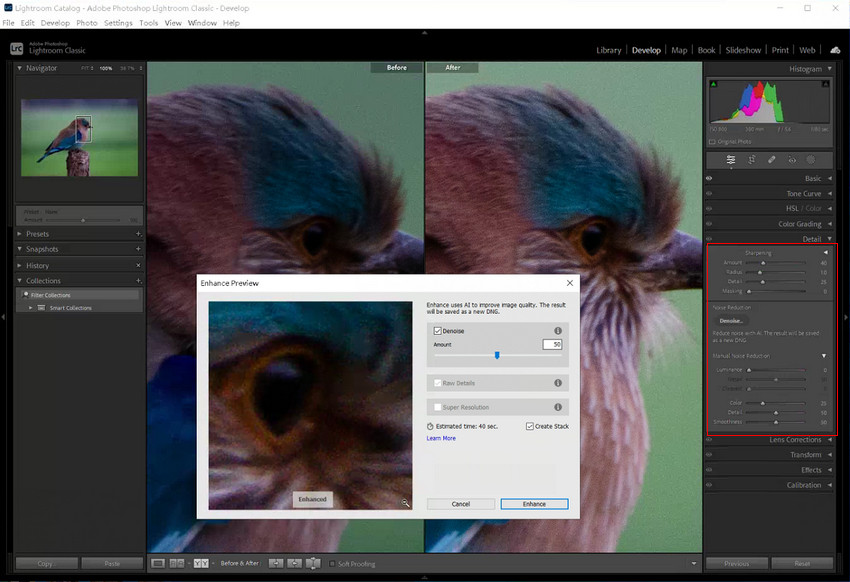
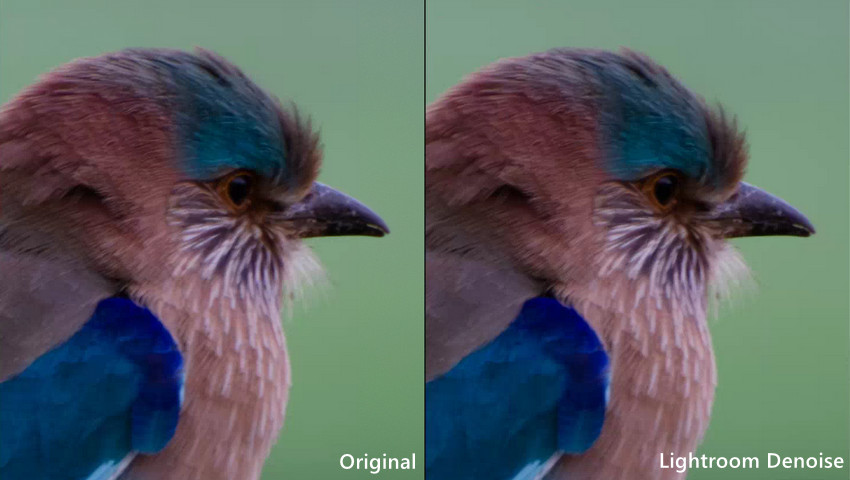
Reduce Noise Without Losing Feather Detail
Noise reduction is one of the most important and most delicate steps in bird photo editing.
High ISO noise is common because bird photographers often use fast shutter speeds in low light. However, aggressive denoising can easily remove fine feather texture, soften edges, and leave the subject looking plastic.
Instead of trying to eliminate every trace of noise, aim for a balanced result that reduces grain while preserving natural detail. If the image still looks soft after Lightroom's denoising, it's often better to restore detail later rather than increase sharpening immediately.
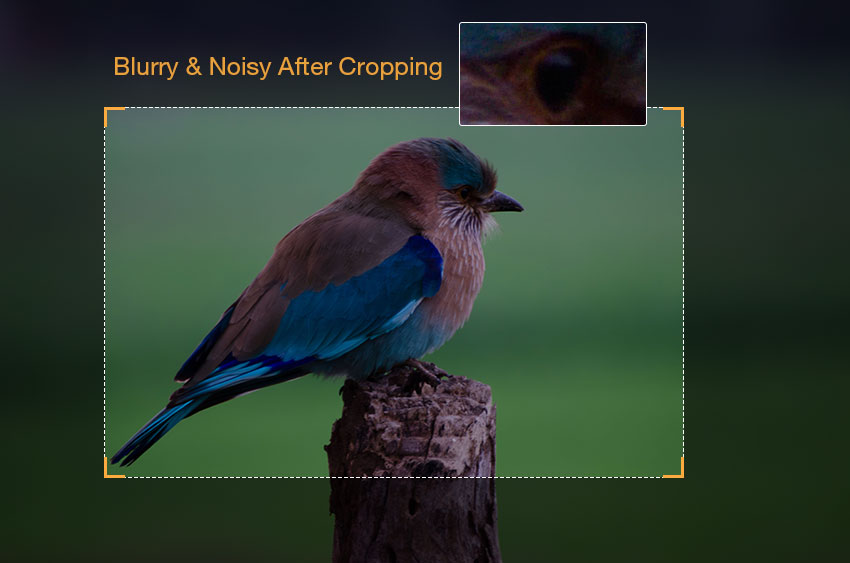
Why Bird Photos Still Look Soft After Lightroom
Lightroom can improve exposure, color, and overall clarity, but bird photos often remain soft even after careful editing. As shown below, the image looks cleaner after noise reduction and sharpening, yet fine feather textures and distant subject details are still limited.
Heavy Cropping Reduces Detail
Birds are often photographed from a distance. After significant cropping, much of the original detail is lost, leaving fewer pixels to describe feather patterns and facial features.
Sharpening Cannot Restore Missing Texture
Traditional sharpening improves edge contrast but cannot recreate feather structure that is no longer present. Increasing sharpening further may introduce halos and make noise more noticeable.
Noise Reduction Can Smooth Fine Details
While noise reduction helps clean high-ISO images, stronger settings may also remove subtle feather textures, causing the bird to look softer or less natural.
When traditional adjustments reach their limit, AI photo enhancement can help recover finer detail and improve overall subject definition.
Recover Feather Detail with AI Enhancement
Modern AI tools have changed how bird photos are edited, especially when traditional methods are no longer enough.
When AI Enhancement Becomes Necessary
- Heavily cropped bird photos with reduced resolution
- High ISO noise (typically ISO 3200–6400 or higher)
- Soft or missing feather detail in the original image
- Images from older cameras or smaller sensors
- Shots taken using phone zoom or digital zoom
In these situations, traditional sharpening and noise reduction often reach their limits.
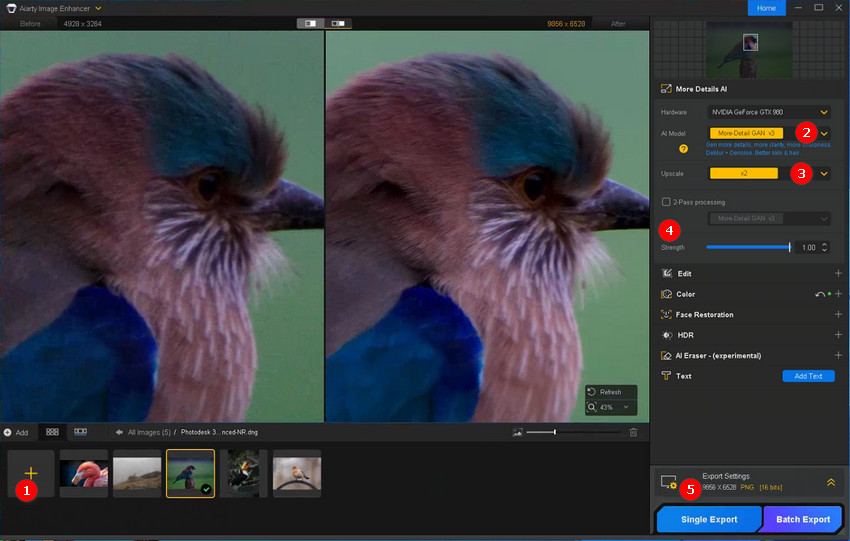
How Aiarty Image Enhancer Fits into the Workflow
Aiarty Image Enhancer uses deep learning models to reconstruct missing textures while reducing noise. Unlike traditional sharpening, it does not simply enhance edges; it rebuilds fine details such as feather structure based on learned image patterns.
This makes it especially effective for bird photography, where fine textures are often lost due to high ISO noise or heavy cropping.
Key Features for Bird Photo Editing
- AI-based detail reconstruction for feathers, eyes, and fine textures in bird photography
- Noise reduction without over-smoothing natural feather details
- Image upscaling up to 2×, 4×, and 8× resolution, supporting up to 32K output quality
- Batch processing for multiple wildlife images in a single workflow
- Supports low-resolution, heavily cropped, or phone-shot bird images
Download Aiarty Image Enhancer and start recovering lost feather detail in your bird photography workflow.
A typical workflow looks like this:
- Import the lightly edited RAW export from Lightroom. This provides a clean base after exposure, color, and noise adjustments.
- Select an suitable AI model, such as More-Detail model, which is optimized for bird photography. It focuses on reconstructing fine textures such as feather layers, eye detail, and natural edge structure.
- Apply upscaling (1x, 2×, 4×, or higher) to recover resolution lost from distance shooting or heavy cropping. This helps enlarge bird photos to 4K-ready quality for printing.
- Adjust enhancement strength based on image condition. Use lower strength for mildly soft images and higher strength for heavy noise or severe cropping where detail loss is stronger.
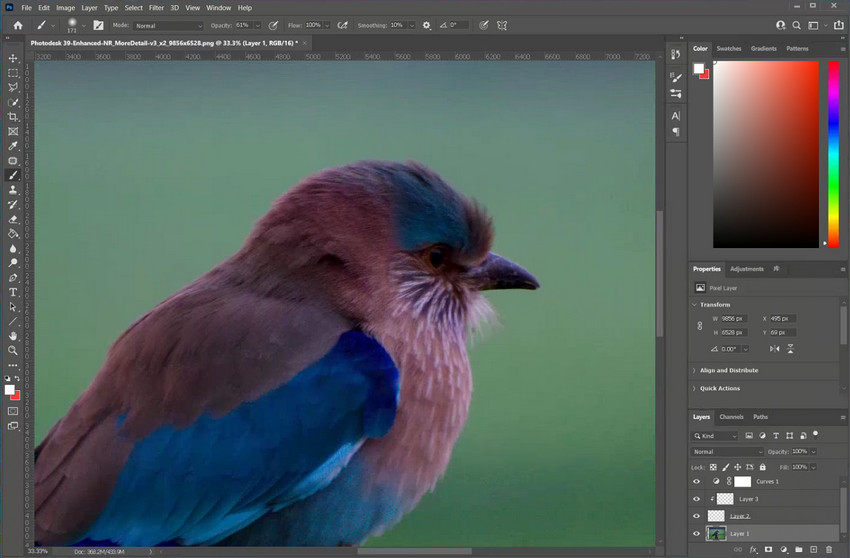
- Export enhanced image for final use or optional retouching in Photoshop. Photoshop allows you to refine local details such as eye sharpness and remove distractions if needed.
Optional Enhancements in Aiarty: In addition to AI enhancement, Aiarty also provides optional tools for further image refinement when needed, including crop refinement to improve composition after upscaling, color tuning like exposure and contrast adjustment to balance overall tone and enhance natural feather tones. These adjustments are optional and can be used before exporting the final image for Photoshop retouching.
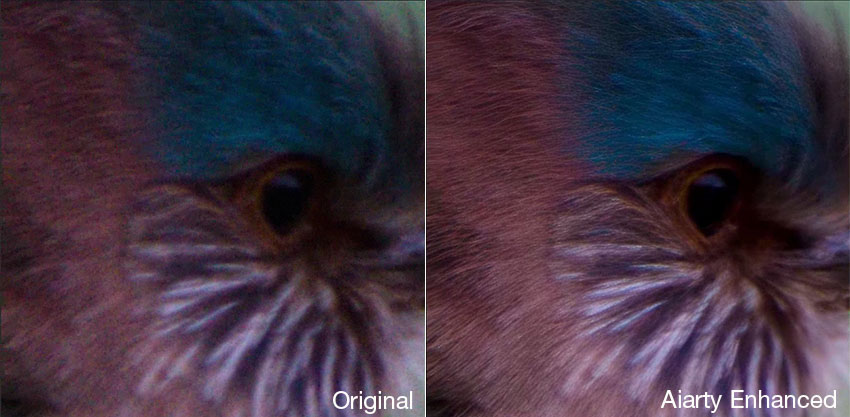
Before and After Results
The original crop appears noisy and lacks fine detail, with soft feathers and an indistinct eye. Aiarty restores clarity throughout the subject, revealing feather-by-feather texture while sharpening the eye and facial features. Noise is cleaned up without smearing detail, producing a natural-looking result that remains sharp, detailed, and free from the waxy AI artifacts common in many enhancement tools.
See Aiarty in Action
Watch how Aiarty restores feather detail and reduces noise in heavily cropped bird photos:
Finish the Image in Photoshop (Optional)
After AI enhancement, Photoshop is used for final refinements rather than major corrections. These adjustments are subtle and focused on improving visual impact while keeping a natural look.
Final Retouching
- Remove Distracting Elements: Remove branches crossing the subject, clean background distractions, or fix small imperfections that draw attention away from the bird.
- Enhance Eye Detail and Catchlight: The bird’s eye is the focal point of most wildlife photography. Subtle sharpening and light enhancement of catchlight can significantly improve focus and emotional impact without making the image look artificial.
- Apply Final Local Adjustments: Use light dodge and burn to add depth to feathers, improve subject separation, and enhance natural dimensional lighting.
At this stage, less is more. The goal is not to change the image, but to refine it—small, controlled adjustments can make a strong photo look polished, while overediting can quickly destroy its natural character.
Export Bird Photos for Web or Print
Export settings depend on how the image will be used, especially in terms of color accuracy, detail retention, and file size balance.
- Web & social media: Optimized JPEG in sRGB color space for fast loading and consistent display across devices.
- Print: High-resolution TIFF or JPEG at 300 DPI to preserve fine feather detail and ensure print quality.
- Wildlife forums: Balanced JPEG compression to maintain detail while keeping file size manageable for sharing.
Lightroom vs Photoshop vs AI Tools (Aiarty Image Enhancer)
Lightroom, Photoshop, and AI enhancement tools each play a different role in bird photo editing. The table below compares their strengths when it comes to noise reduction, detail recovery, sharpening, and handling heavily cropped wildlife images.
Common Bird Photo Editing Mistakes
Bird photo editing often goes wrong when global or local adjustments are overused, leading to unnatural textures, lost detail, or reduced visual impact.
- Over-sharpening feathers: Creates halos and unnatural edges around fine feather details.
- Excessive noise reduction: Removes important feather texture and makes the image look overly smooth or plastic-like.
- Over-cropping without considering resolution: Leads to irreversible softness and loss of detail.
- Over-saturating bird colors: Makes plumage appear unrealistic and visually unnatural.
- Ignoring eye sharpness: Reduces emotional impact and weakens the subject’s focus point.
- Overusing clarity sliders: Produces harsh textures and exaggerated edge contrast.
Conclusion
Editing bird photos is not just about applying filters or adjusting sliders. It is about preserving and restoring detail under real-world shooting limitations such as distance, motion, and low light.
A modern workflow combines three layers:
- Lightroom for foundational adjustments
- Aiarty Image Enhancer for recovering lost detail and resolution
- Photoshop for precise refinement
When used together, this workflow allows photographers to transform noisy, heavily cropped bird images into sharp, natural-looking wildlife photos without overprocessing.
Try Aiarty Image Enhancer and recover lost feather detail in your bird photos with AI enhancement and upscaling.
 FAQs
FAQs
They typically combine Lightroom for RAW adjustments, Photoshop for retouching, and AI tools when dealing with noise, blur, or heavy cropping.
Lightroom is sufficient for basic exposure and color adjustments, but it often struggles with heavy cropping and fine feather detail recovery in wildlife images.
Lightroom is used for global RAW adjustments such as exposure and color, while Photoshop is used for local retouching, cleanup, and fine detail refinement.
Yes. AI tools like Aiarty Image Enhancer can recover feather detail, reduce noise, and upscale resolution in heavily cropped or low-quality bird photos.
Traditional sharpening often increases noise, so a better approach is to use light sharpening combined with AI-based detail reconstruction to preserve natural feather texture.
Lightroom is best for RAW processing, Photoshop for precision editing, and AI tools like Aiarty Image Enhancer for restoring detail and improving resolution in wildlife photos.
You May Also Like
This post was written by Brenda Peng who is a seasoned editor at Digiarty Software who loves turning ordinary photos into extraordinary works of art. With AI assistance for brainstorming and drafting, the post is reviewed for accuracy by our expert Abby Poole for her expertise in this field.