Noise is one of the fastest ways to ruin an otherwise great photo, especially when shooting in low light or at high ISO settings. To help photographers recover cleaner images, Capture One now offers two different denoising technologies: the traditional Noise Reduction tool and the newer AI-powered Enhanced Denoise feature.
Enhanced Denoise has quickly become one of Capture One's most talked-about additions, delivering noticeably cleaner results on supported RAW files while preserving more detail than conventional noise reduction. At the same time, the standard Noise Reduction controls remain an essential part of many photographers' editing workflows.
So which tool should you use? Is Enhanced Denoise always the better choice? Which file formats are supported, and what are your options when a photo requires additional cleanup, sharpening, or detail recovery?
In this guide, we'll compare Capture One's denoise tools, examine their real-world performance, explain their strengths and limitations, and explore alternative workflows for achieving the cleanest possible results.
Does Capture One Have AI Denoise?
Yes. Capture One now offers two different noise reduction methods: the traditional Noise Reduction tool and the newer Enhanced Denoise feature.
Standard Noise Reduction
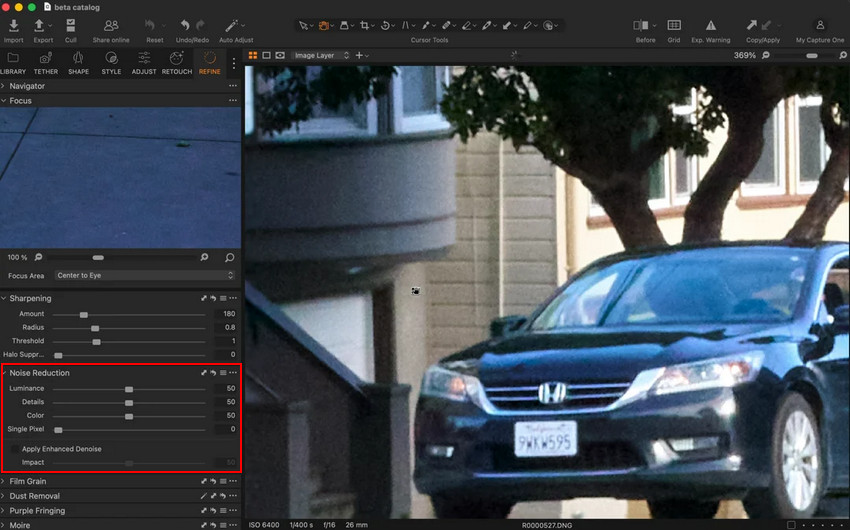
The standard Noise Reduction tool has been part of Capture One for years and is available for all supported image files. It relies on four manual controls:
- Luminance: reduces grain (brightness noise) from photos
- Detail: balances noise reduction and detail retention
- Color: removes color speckles and chroma noise
- Single Pixel: eliminates isolated hot pixels
This method is fast, flexible, and suitable for everyday noise cleanup, especially when working with JPEG, TIFF, and other non-RAW formats.
Enhanced Denoise
Enhanced Denoise is Capture One's AI-powered denoising technology introduced to deliver better results on high-ISO RAW images. It is specifically designed for supported Bayer-pattern RAW files and tends to provide the most noticeable improvements on photos shot at ISO 3200 and above.
Unlike the traditional slider-based approach, Enhanced Denoise automatically analyzes the image and applies AI processing to reduce noise while preserving fine detail, making it particularly useful for wildlife, event, sports, and low-light photography.
How to Use Noise Reduction in Capture One
How to Use Standard Noise Reduction for Quick Fixes
The traditional Noise Reduction controls are found in the Details tool tab and can be applied to all supported image files.
- Open the Details tool tab.
- Locate the Noise Reduction section.
- Adjust the Luminance slider to reduce grain-like brightness noise.
- Fine-tune the Detail slider to balance noise reduction and texture preservation.
- Use the Color slider to remove unwanted color speckles.
How to Use Enhanced Denoise for High-ISO Images
For supported Bayer RAW files, Capture One's AI-powered Enhanced Denoise offers a more automated approach.
- Select the RAW photo you want to clean up.
- Open the Noise Reduction panel under the Details tab.
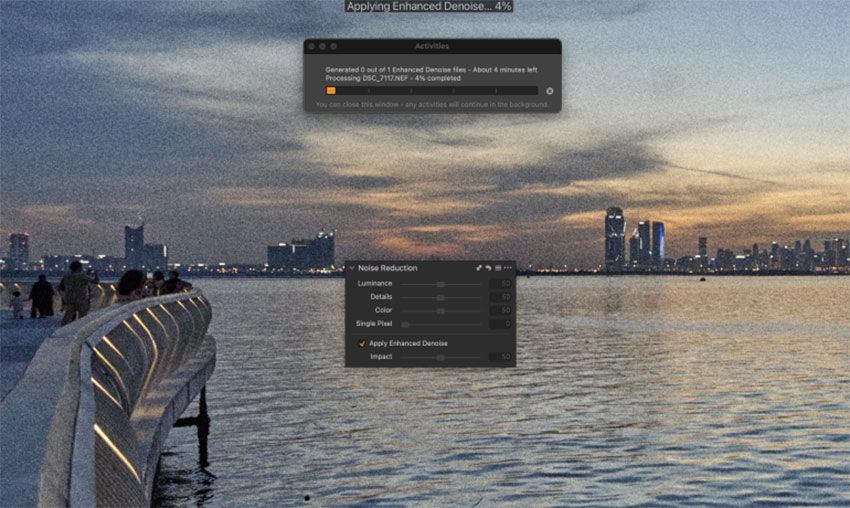
- Enable Enhanced Denoise and let Capture One analyze the image.
- Wait for the AI processing to finish. The progress can be tracked in the Activity window.
- Adjust the Impact setting until you find the right balance between noise reduction and detail retention.
Unlike the standard Noise Reduction tool, Enhanced Denoise does not rely on manual sliders. Instead, it analyzes the image and applies AI-based noise reduction automatically.
One important difference is that Enhanced Denoise creates a new variant rather than modifying the original image. The processing also runs in the background, allowing you to continue browsing or editing other photos while Capture One generates the denoised version.
When to Use Standard Noise Reduction vs Enhanced Denoise
Now that Capture One offers both traditional Noise Reduction and the newer Enhanced Denoise, the next question is no longer what they do, but when you should use each one. While both tools are designed to reduce image noise, they serve very different workflows depending on file type, ISO level, and editing needs.
Key Differences at a Glance
As shown in the comparison above, both tools serve different purposes depending on your workflow.
- Use Standard Noise Reduction for quick edits, JPEG/TIFF files, or situations where you need fast manual control.
- Use Enhanced Denoise when working with high-ISO RAW images that require stronger noise reduction and better detail recovery.
In many real-world workflows, photographers often switch between the two depending on file type and shooting conditions.
How Well Does Enhanced Denoise Work in Real Photos?
To understand the real value of Capture One’s Enhanced Denoise, it’s more meaningful to focus on how it performs in challenging, high-ISO situations rather than simple controlled comparisons. The following tests highlight how the AI-based denoising behaves in real shooting conditions where noise is most noticeable.
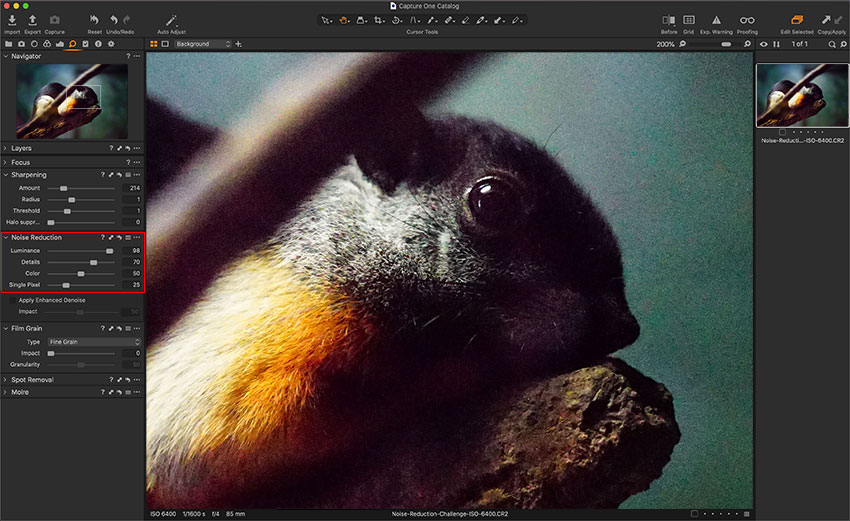
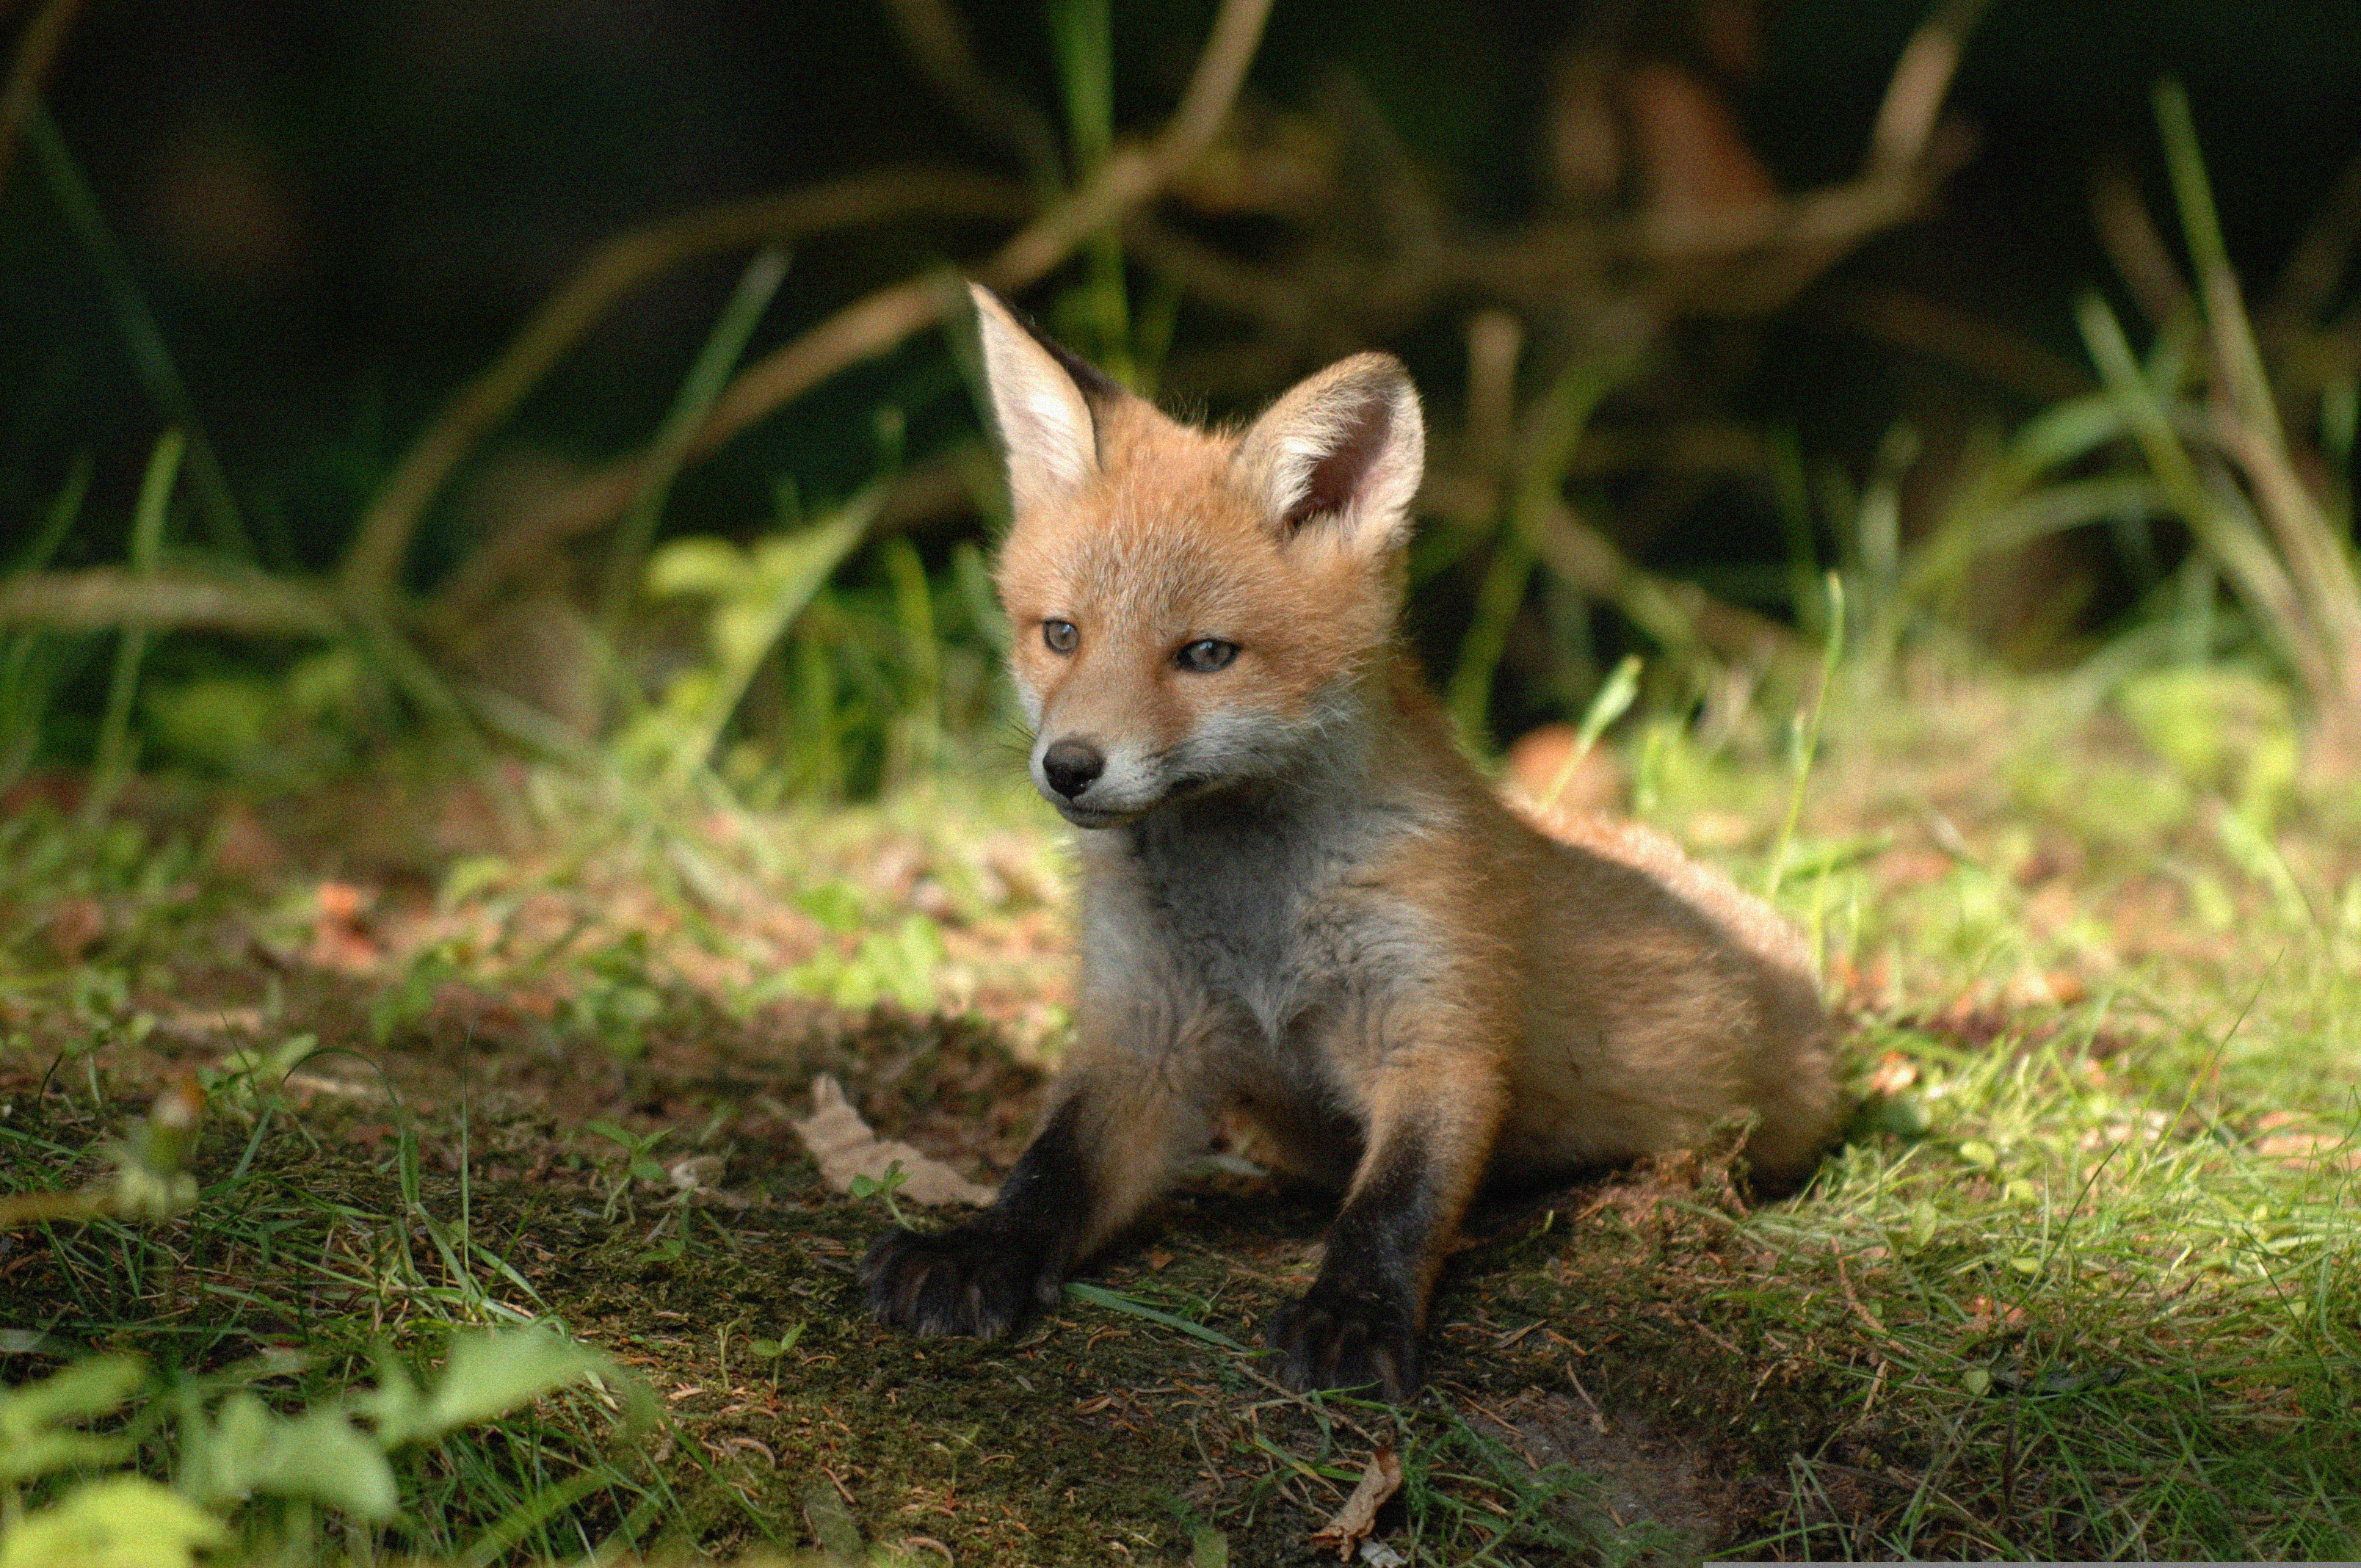
Test 1: ISO 6400 Wildlife RAW
This wildlife image was captured at ISO 6400, with visible noise in the background and shadow areas.
After applying Enhanced Denoise, the image looks noticeably cleaner while retaining much of the fine fur texture. Background grain is reduced without making the subject appear overly smooth, and edge details remain well-defined. The result feels natural and balanced rather than heavily processed.

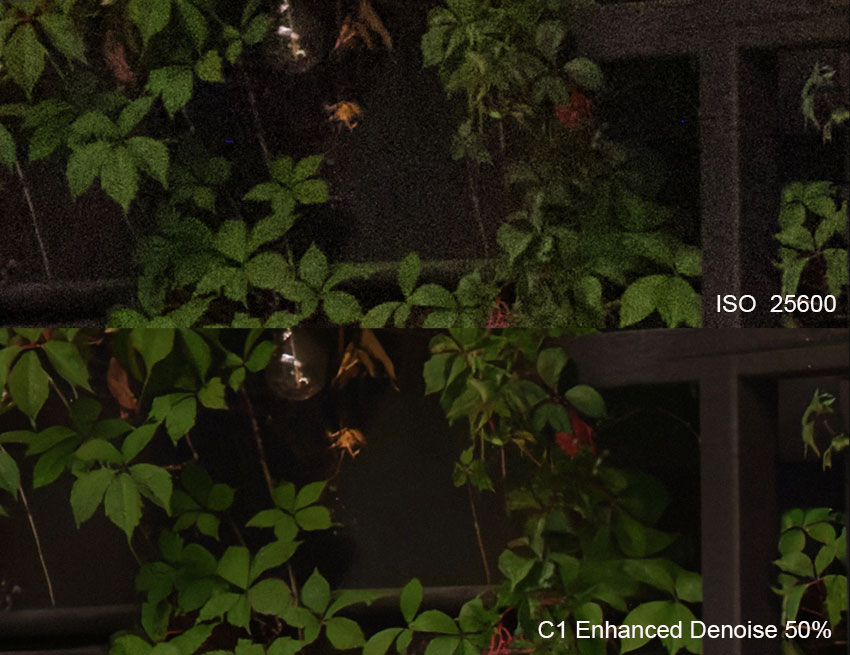
Test 2: ISO 25600 Low-Light Photo
This image was shot at an extremely high ISO 25600 in a dimly lit outdoor environment. The original file contains heavy luminance noise and visible color speckles throughout the darker areas of the frame.
After processing with Enhanced Denoise, noise in the shadows is significantly reduced, making the image appear cleaner and easier to view. What impressed us most is that the leaf shapes and textures remain recognizable despite the aggressive noise reduction. Fine details are not completely preserved at this ISO level, but the image avoids the overly smeared look often associated with strong denoising.
In both tests, Enhanced Denoise delivered the most noticeable improvements on high-ISO RAW images. It effectively cleans up shadow noise while maintaining important subject detail, making it a valuable tool for wildlife, nature, event, and other low-light photography.
When Capture One Enhanced Denoise May Not Be Available
Enhanced Denoise delivers impressive results on supported high-ISO RAW files, but it isn't available in every workflow. Before relying on it, it's worth understanding where support is currently limited.
1. Supported Bayer RAW Files Only
Enhanced Denoise is designed specifically for Bayer-pattern RAW files and cannot be applied to formats such as JPEG, PNG, TIFF, PSD, Apple ProRAW, or Fujifilm X-Trans RAW. For example, in Fujifilm X-Trans RAW workflows, they need to use Fujifilm X RAW Studio or something alike to handle native RAW conversion before moving into further editing or noise reduction.
2. Fujifilm X-Trans RAW Files
This limitation deserves special mention, as many Fujifilm photographers use Capture One as their primary editor. At the time of writing, Enhanced Denoise does not support X-Trans RAW files, meaning Fuji users cannot take advantage of the AI-powered workflow.
3. Long Exposure and Stripe Noise
While Enhanced Denoise performs well on typical high-ISO noise, Capture One notes that certain types of noise may still remain visible. This includes long-exposure noise, edge noise, and repeating stripe patterns that can appear in challenging shooting conditions.
4. HDR and Panorama Workflows
Enhanced Denoise is also unavailable for some DNG-based workflows. For example, images created through HDR Merge or Panorama Stitching cannot be processed using Enhanced Denoise, which may affect landscape and travel photographers who frequently use these features.
What If Your Image Isn't Supported by Capture One Enhanced Denoise?
Capture One's Enhanced Denoise is an excellent option for supported Bayer RAW files, but many photographers work with a much wider variety of formats. You may be editing exported JPEGs, TIFF files, scanned photos, web images, or unsupported RAW formats such as Fujifilm X-Trans files. In these situations, a dedicated AI enhancement tool can help fill the gap.
Recommended Alternative for JPEG, TIFF, and Unsupported RAW Files
Aiarty Image Enhancer can complement Capture One when Enhanced Denoise is unavailable. Instead of focusing only on supported RAW files, it works with a broad range of image formats, including JPEG, PNG, TIFF, RAW files, scanned photos, web and social media images.
To see how Aiarty performs on a real-world image that would typically benefit from Capture One's Enhanced Denoise, we tested it on a fox photo captured at ISO 6400. >> Get it to test yourself
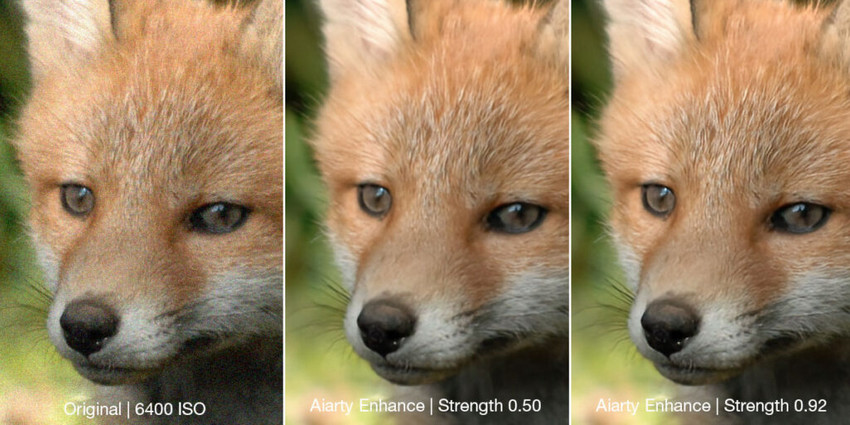
The original image contains visible noise across the fur, especially in the darker shadow areas around the neck and body. While the subject remains recognizable, fine textures appear somewhat soft due to the combination of noise and limited light.
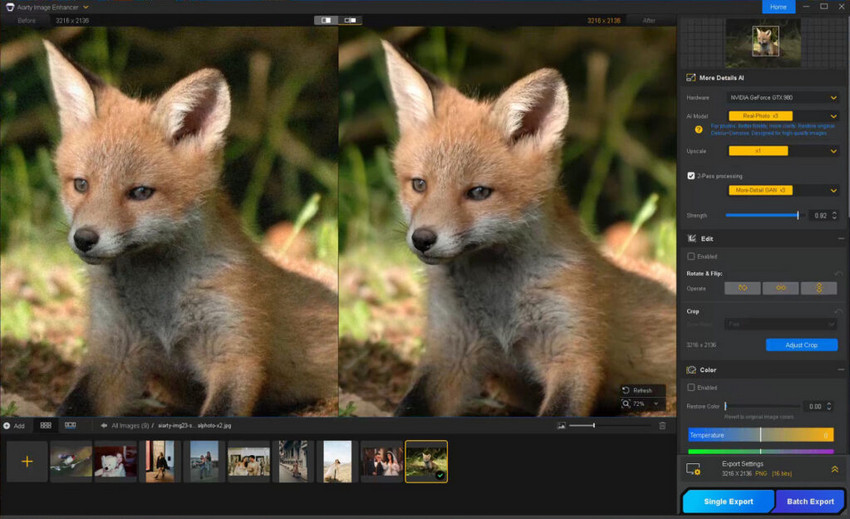
After importing the photo into Aiarty Image Enhancer, we selected the Real-Photo model and used 1× enhancement without additional upscaling. The software automatically reduced luminance and color noise while recovering detail in the fur and facial features.
What stood out most was the balance between cleanup and realism. When setting the Strength to 0.92, the image appeared noticeably cleaner, but the fur retained its natural texture instead of being smoothed into a plastic or waxy surface. Fine details around the eyes, ears, and whiskers also remained well-defined.
Start with a free trial to test Aiarty instantly on your own high-ISO wildlife, event, portrait, or low-light photos before committing to the full workflow.
For JPEGs, TIFFs, unsupported RAW formats, or files exported from Capture One, Aiarty provides a straightforward noise reduction workflow. See the step-by-step process in the video below:
Choosing the Best Denoising Workflow for Your Photos
Capture One's Enhanced Denoise is a powerful addition for photographers working with supported Bayer RAW files. In many cases, it can be your primary solution for cleaning up high-ISO images while preserving detail.
For supported RAW files, a simple workflow is often enough:
- Import and edit the RAW file in Capture One.
- Apply Enhanced Denoise when needed.
- Export the image.
- Optionally use Aiarty Image Enhancer for upscaling if you need a higher-resolution output for printing, cropping, or large displays.
However, not every image fits into that workflow. JPEGs, TIFFs, scanned photos, web images, and unsupported RAW formats such as Fujifilm X-Trans files cannot take advantage of Enhanced Denoise.
For these unsupported files, a different approach may be more effective:
- Make your color and exposure adjustments in Capture One.
- Export the image.
- Use Aiarty Image Enhancer to reduce noise, recover lost detail, fix slightly softness, and optionally upscale the image.
In practice, many photographers end up using both tools. Capture One remains the hub for RAW editing and color work, while Aiarty helps handle images that fall outside Enhanced Denoise's supported workflow or need additional restoration beyond noise reduction alone.
For a more complete restoration workflow, Aiarty is worth trying—download it to see how it fits into your editing process.
You May Also Like
This post was written by Brenda Peng who is a seasoned editor at Digiarty Software who loves turning ordinary photos into extraordinary works of art. With AI assistance for brainstorming and drafting, the post is reviewed for accuracy by our expert Abby Poole for her expertise in this field.