Ever snapped a vacation photo that came out blurry, dark, or flat? If your shots lack clarity, color, or detail, you don’t have to settle. Photoshop lets you refine every detail, while AI tools like Aiarty Image Enhancer can instantly sharpen, brighten, and upscale photos, even in bulk.
In this guide, we’ll show you step-by-step how to enhance your images in Photoshop, whether fixing blurry shots or creating pro-level content. Ready to turn ordinary photos into stunning, share-worthy masterpieces?
⚡ Faster Alternative to Photoshop AI Enhancement
Photoshop offers powerful tools like Super Resolution, Smart Sharpen, and Neural Filters to enhance image quality. However, achieving the best results often requires multiple steps, manual adjustments, and some editing experience.
If you want a faster way to AI enhance photos, tools like Aiarty Image Enhancer provide a much simpler workflow. With its automatic AI enhancement, you can improve image quality in seconds—no layers, filters, or complex settings required.
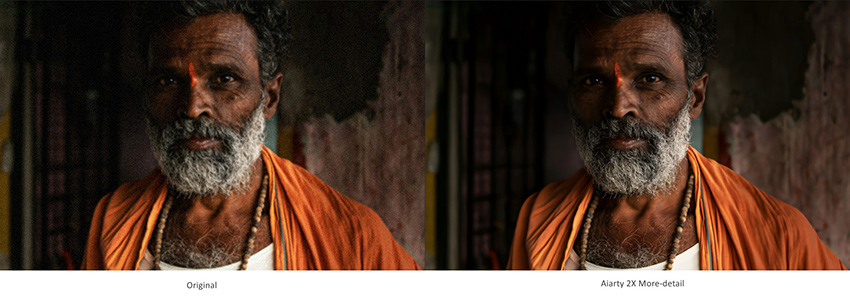
Aiarty uses advanced AI models to deblur, denoise, restore details, and upscale images automatically. It works well for both AI-generated images and traditional photos such as RAW, DNG, PNG, or TIFF.
Another advantage is batch processing, allowing you to enhance hundreds or even thousands of images at once—something that would take much longer in Photoshop.
Try Aiarty Image Enhancer to quickly improve photo clarity and resolution.
How to AI Enhance Images in Photoshop
Many users search for a way to AI enhance images in Photoshop. While Photoshop doesn't have a single “AI enhance” button like some automated tools, it includes several AI-powered features that can significantly improve image quality.
For example, Super Resolution uses machine learning to upscale low-resolution photos, Neural Filters can restore old or damaged images automatically, and Smart Sharpen helps fix slightly blurry photos by improving edge detail. Combined with color adjustments like Levels and Curves, these tools can dramatically enhance clarity, detail, and overall visual quality.
Below, we’ll walk through the most effective ways to enhance image quality in Photoshop step by step.
#1. AI Upscale Images in Photoshop Using Super Resolution
If you’re looking for how to make a photo clear in Photoshop, the Super Resolution tool is a reliable option, especially for low-resolution or blurry photos. Introduced as part of Adobe Camera Raw 13.2, this feature leverages advanced artificial intelligence to upscale images, effectively doubling their dimensions while preserving intricate details.
Developed using machine learning trained on vast datasets of images, Super Resolution intelligently reconstructs textures, edges, and patterns, making it ideal for scenarios like enlarging web images for print or revitalizing older photos. This tool streamlines what was once a complex process, offering a quick yet powerful way to achieve crisp, professional-grade outputs.
Here's how to enhance a photo quality in Photoshop using Super Resolution.
- Open your image in Photoshop.
- Navigate to Filter > Camera Raw Filter to access Adobe Camera Raw.
- Zoom the preview image to at least 100%.
- Right-click the image and select Enhance from the context menu.
- In the dialog box, enable the Super Resolution option and click Enhance.
- Allow Photoshop a moment to process; the AI will generate a new, higher-resolution version.
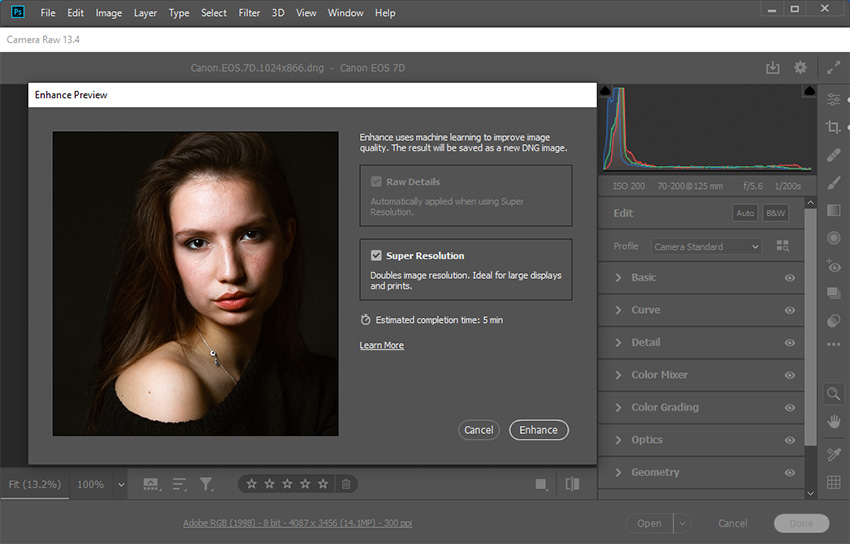
The strength of Super Resolution lies in its ability to add realistic details without introducing pixelation or artifacts common in traditional upscaling. For instance, a 1000x1000-pixel image can be transformed into a 2000x2000-pixel version with enhanced clarity, suitable for large-format printing. While it excels with moderately low-resolution images, extremely blurry photos may yield less dramatic improvements. Nonetheless, Super Resolution remains a go-to way to enhance the quality of a photo in Photoshop.
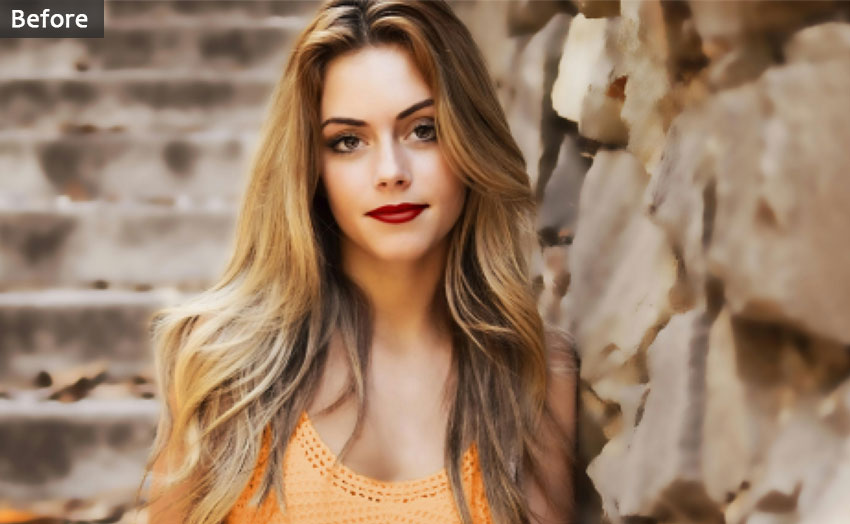
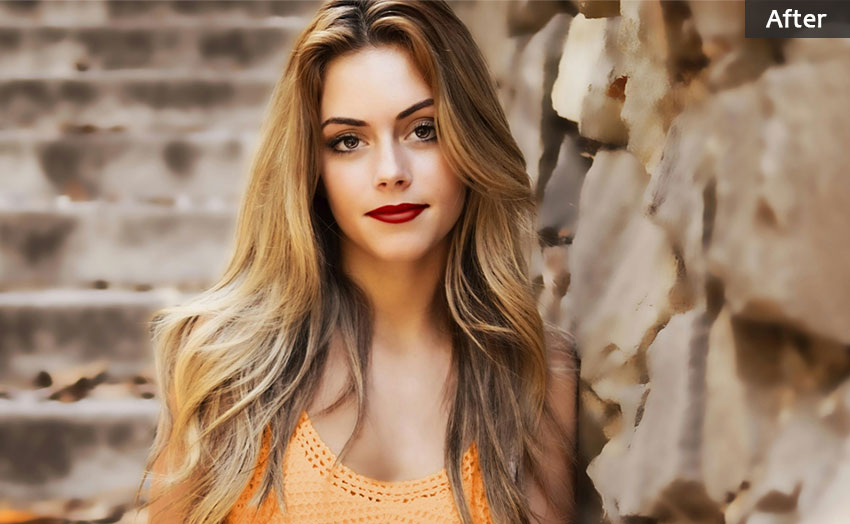
Before vs After Photoshop Image Enhancement
To better understand how Photoshop improves image quality, it helps to compare photos before and after enhancement. With the right adjustments, Photoshop can make blurry or low-resolution images look clearer and more detailed.
The example below shows how Photoshop can enhance image quality by improving clarity, detail, and overall sharpness.
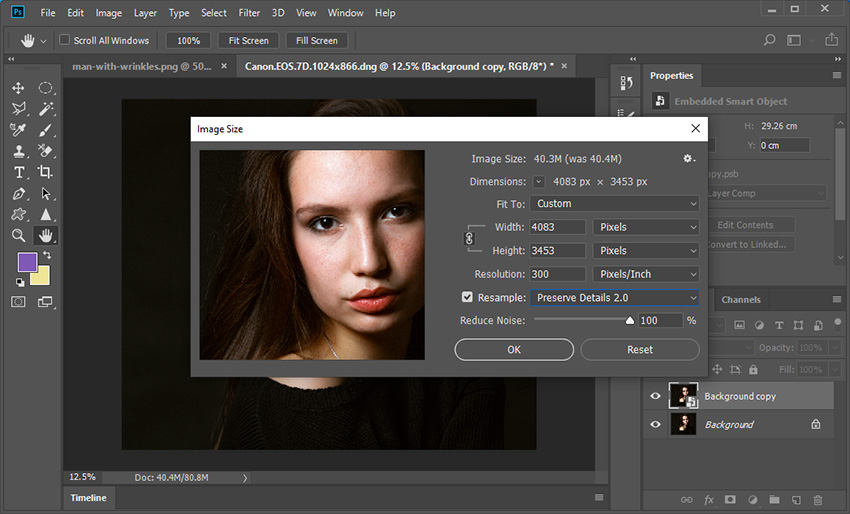
#2. Upscale Images in Photoshop with Preserve Details 2.0
When you increase resolution in Photoshop, you’re essentially asking the program to generate a larger image with more pixels through a process called resampling. This feature works as a Photoshop image upscaler, enlarging images while preserving textures, fine details, and overall visual quality without introducing unwanted artifacts.
Traditional methods like Nearest Neighbor, Bilinear Interpolation, and Bicubic have long been the backbone of this process. They help you create whatever image resolutions you need.
Here's how to increase image resolution in Photoshop without adjusting pixel dimensions.
- Open your image in Photoshop.
- Check Enable Preserve Details 2.0 Upscale in Preferences > Technology Previews.
- Navigate to Image > Image Size to open the resizing dialog box.
- Ensure the Resample checkbox is enabled to allow pixel adjustments.
- Choose a method from the Resample dropdown menu.
- Use Preserve Details 2.0 to preserve important details and textures.
- Select Nearest Neighbor (hard edges) for graphics with sharp lines, like logos, to avoid softening.
- Choose Bilinear for moderate upscaling of images like web photos, balancing speed and smoothness.
- Opt for Bicubic Smoother (enlargement) for high-quality results on detailed photos, such as prints.
- Enter your target resolution (for example, increase from 72 pixels/inch to 300 pixels/inch for print quality).
- Click OK to apply the changes and generate the upscaled image.
#3. Fix Blurry Photos in Photoshop with Smart Sharpen
One of the most effective ways to enhance photo with Photoshop is by using the Smart Sharpen filter, which can transform a soft image into a crisp, professional result. It offers precise control over how and where sharpness is applied, ensuring a natural look while avoiding the harsh, artificial edges that less sophisticated tools might create.
Here's how to sharpen a photo in Photoshop using Smart Sharpen.
- Duplicate the layer with your image.
- Right-click the duplicate layer and choose Convert to Smart Object.
- Go to Filter > Sharpen > Smart Sharpen.
- Set the controls in the Smart Sharpen dialogue box.
- Enable Preview to see real-time changes and fine-tune the sliders.
- Click OK to apply the Smart Sharpen filter when you are happy with the adjustments.

Pro tip: Applying a moderate Amount and a low Radius to a portrait can enhance eyes and hair without exaggerating skin texture. In a landscape, a slightly higher Radius might bring out rocky textures or tree bark while using the Shadows fade to keep clouds smooth. Be cautious not to over-sharpen, as excessive settings can introduce halos or noise—always preview at 100% zoom to judge the effect accurately.
Related Search: Ultimated Guide to Sharpen Images in Photoshop
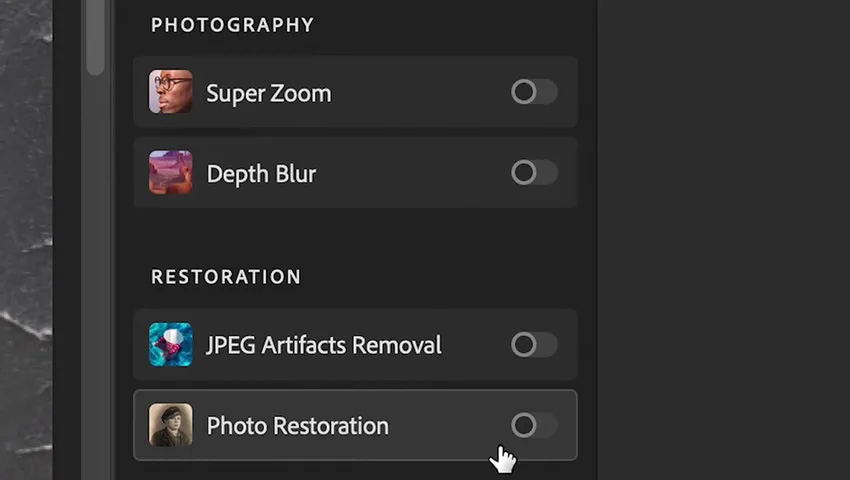
#4. Use Photoshop AI Enhancement (Neural Filters)
The Neural Filters function doubles as an Adobe Photoshop image enhancer, breathing new life into old or damaged photos. With the Photo Restoration filter, you can remove scratches, fix discoloration, reduce dust or creases, and even colorize black-and-white images—all while refining facial details for a natural, polished look.
Here's how to enhance a photo in Photoshop using the AI Photo Restoration filter.
- Open your damaged or old photo in Photoshop.
- Go to Filter > Neural Filters to open the Neural Filters workspace.
- Locate the Photo Restoration filter (if it's not visible, ensure it's downloaded by clicking the cloud icon).
- Toggle on the Photo Restoration option to activate the filter.
- Adjust the Scratch Reduction slider to smooth out scratches, dust, or creases—start with a moderate setting to avoid over-processing.
- Use the Enhance Facial Features slider if the photo includes people, refining details like eyes or skin for a natural appearance.
- Experiment with the Colorize option if your image is black-and-white and you'd like to add realistic color (note: this may require additional tweaking for accuracy).
- Preview the results at 100% zoom to check for smoothness and detail retention.
- Click OK to apply the filter, saving the output as a new layer for non-destructive editing.
The AI Photo Restoration can handle a range of imperfections efficiently. For example, applying it to a scratched 1950s family photo can remove surface marks while enhancing faded clothing textures, making the image feel fresh yet authentic. If the photo has faces, the facial enhancement option can sharpen eyes or soften harsh blemishes without creating an artificial look.
However, be cautious with high settings, as they may blur fine details like hair strands. For heavily damaged areas, you might pair the filter with Photoshop's Clone Stamp or Healing Brush for precision touch-ups.
By the way, there are also some Photoshop AI plugins available for photo enhancement in Photoshop, such as Topaz Photo AI, Dxo PureRaw, Luminar Neo, and more.
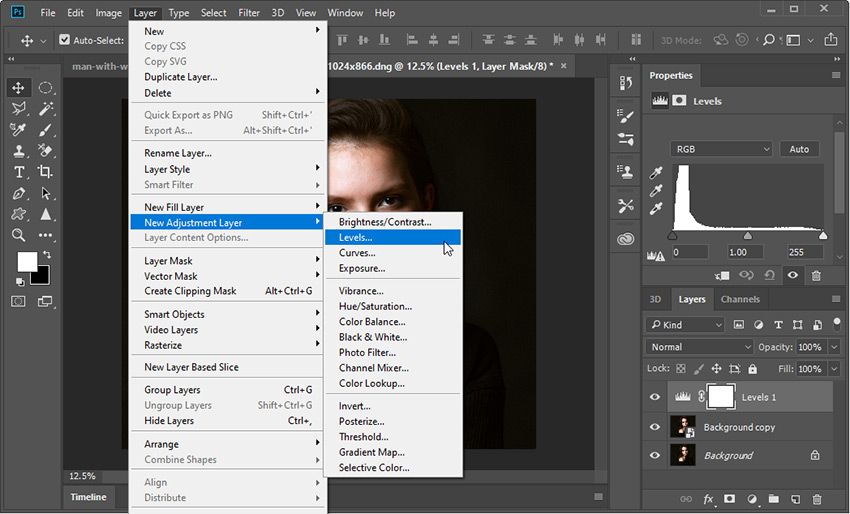
#5. Improve Colors and Details Using Levels and Curves
Adjusting color can enhance the quality of a photo in Photoshop by setting the mood and drawing viewers in.
Levels provides a straightforward way to adjust tonal ranges—shadows, midtones, and highlights—making it ideal for quick fixes, such as brightening a dark image or restoring contrast to a flat one. Curves, on the other hand, offer greater control, allowing you to adjust specific tonal ranges with pinpoint accuracy.
To adjust color using Levels and Curves in Photoshop, follow the steps below.
- Open your image in Photoshop.
- For non-destructive editing, create adjustment layers by going to Layer > New Adjustment Layer and selecting Levels or Curves.
- Levels: In the Properties panel, you'll see a histogram with three sliders—black (shadows), gray (midtones), and white (highlights). Slide the black point right to deepen shadows or the white point left to brighten highlights. Adjust the gray slider to fine-tune midtones, balancing overall brightness.
- Curves: In the Properties panel, click on the diagonal line to add points. Drag a point upward to brighten a specific tonal range (e.g., midtones for overall glow) or downward to darken it. For color adjustments, switch to the Red, Green, or Blue channel—add a point and curve it slightly to enhance or reduce that color's intensity.
- Preview your changes at 100% zoom to ensure natural results, tweaking points as needed.
- Save your work, keeping adjustment layers intact for future edits.
Pro tip: For quick color enhancements, try Vibrance and Hue/Saturation adjustment layers (Image > Adjustments). Vibrance subtly boosts less-saturated colors, perfect for making landscapes pop without overcooking skin tones. Hue/Saturation lets you shift specific colors or tweak overall intensity. Always check your white balance to avoid unnatural casts; use the eyedropper in Levels to set a neutral gray point, ensuring true-to-life hues.
Is Photoshop an AI Image Enhancer?
Many users search for a Photoshop AI image enhancer, wondering whether Photoshop can automatically improve image quality with artificial intelligence. The answer is yes—modern versions of Photoshop include several AI-powered tools designed to enhance photos more efficiently.
For example, Super Resolution uses machine learning to upscale low-resolution images while preserving detail. Neural Filters can restore old or damaged photos, reduce scratches, and even colorize black-and-white images. Tools like Smart Sharpen and Adobe Camera Raw also use advanced algorithms to improve clarity, reduce noise, and recover fine details.
However, unlike dedicated AI image enhancers, Photoshop usually requires multiple steps and manual adjustments to achieve the best results. That’s why some users prefer automated AI tools that can enhance photos in just one click.
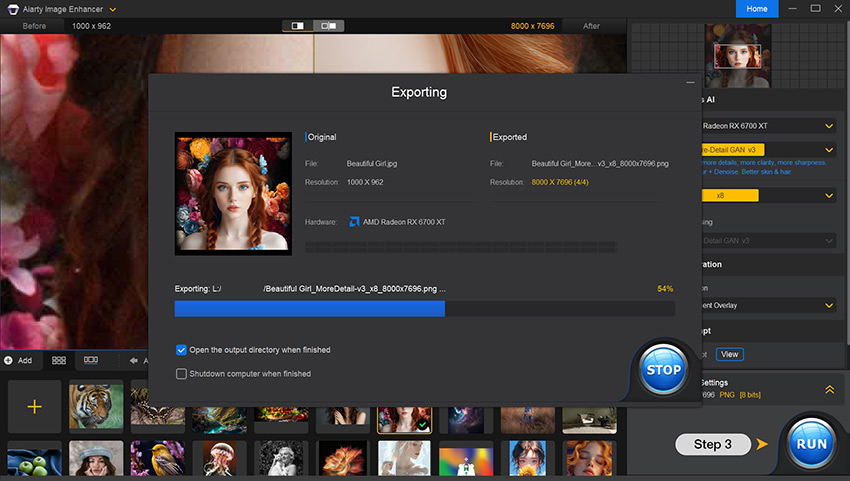
Faster Alternative: Enhance Photos with Aiarty Image Enhancer
Photoshop delivers unmatched precision, but its steep learning curve and manual steps can overwhelm beginners and slow down professionals handling bulk edits.
That’s where an AI photo enhancer like Aiarty Image Enhancer stands out. With automatic 4-in-1 enhancement—deblurring, denoising, restoring, and upscaling—it achieves Photoshop-level results in just a click, making it ideal for users who lack the time or expertise for intricate editing. Its biggest advantage? Batch processing up to 3,000 images at once, making it a game-changer for photographers, e-commerce sellers, and creatives who need speed without sacrificing quality.
How to Enhance Photos with the AI Photo Enhancer
Step 1: Download and install Aiarty Image Enhancer
Click the download button below to download and install the program. 100% free and clean. A free trial is available to test its features.
Step 2: Import your images into the working panel
Launch the software and import your images by dragging and dropping them. You can also select a folder for batch processing. The program supports a wide range of formats, so there's no need to worry about compatibility issues.

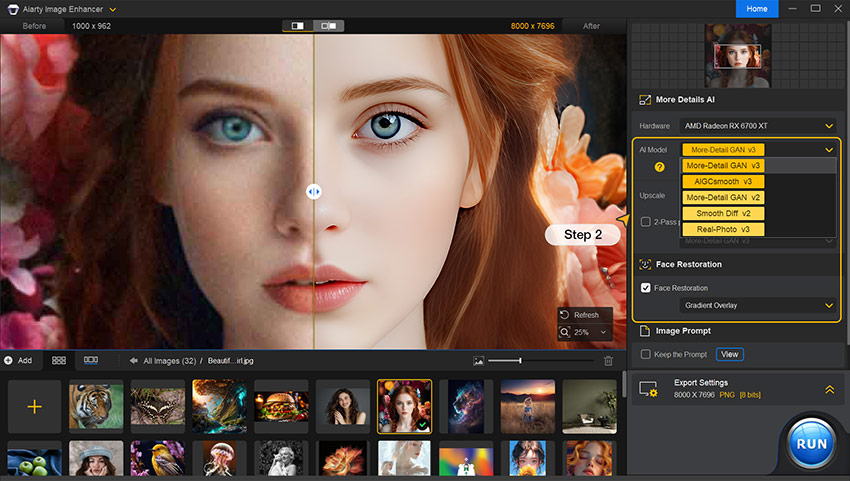
Step 3: Choose an AI model for photo enhancement
Aiarty offers various AI models for different image types, but each can intelligently denoise, deblur, upscale, and enhance your photos. You just need to choose a model based on your needs, set the resolution, and decide whether to perform face restoration.
For the optimal result, you can experiment with different AI model, Strength, and optionally apply the face restoration and color adjustment as you need.
Step 4: Export the enhanced photos
When happy with the preview results, you can click the Single Export option to save the enhanced photo at high speed with hardware acceleration. To export multiple images at once, choose Batch Export.
Beside quality enhancement, you may also need to enhance its composition, adjust color, add stylistic effects, and more. Read the complete guide to enhance an image for better visuals.
 FAQs
FAQs
1. Does Photoshop have an AI photo enhancer?
Yes, Photoshop includes AI-powered tools such as Super Resolution and Neural Filters to automatically enhance images, improve clarity, and restore details without extensive manual editing.
2. What is Photoshop Super Resolution?
Super Resolution is an AI feature in Photoshop that doubles the image resolution while preserving fine details and reducing blur. It’s accessible via Filter > Camera Raw Filter > Enhance > Super Resolution.
3. How do I enhance a blurry image in Photoshop?
Use the Smart Sharpen filter (Filter > Sharpen > Smart Sharpen) and adjust Amount, Radius, and noise reduction. For extra clarity, try Camera Raw’s Texture and Clarity sliders. Preview at 100% for natural results.
4. Can Photoshop upscale images with AI?
Yes, Photoshop can upscale images using AI-based Super Resolution, which increases resolution while maintaining details. Traditional upscaling via Image > Image Size with Preserve Details 2.0 is also available.
You May Also Like
This post was written by Brenda Peng who is a seasoned editor at Digiarty Software who loves turning ordinary photos into extraordinary works of art. With AI assistance for brainstorming and drafting, the post is reviewed for accuracy by our expert Abby Poole for her expertise in this field.