Blemishes such as acne, pimples, dark spots, and scars can easily distract from an otherwise great photo. Fortunately, Adobe Photoshop offers powerful tools to remove imperfections and achieve natural-looking skin.
In this guide, you’ll learn how to remove blemishes in Photoshop using professional techniques, whether you’re a beginner or an experienced editor. We’ll cover manual methods, non-destructive workflows, and advanced retouching tips to help you master Photoshop remove blemish editing.
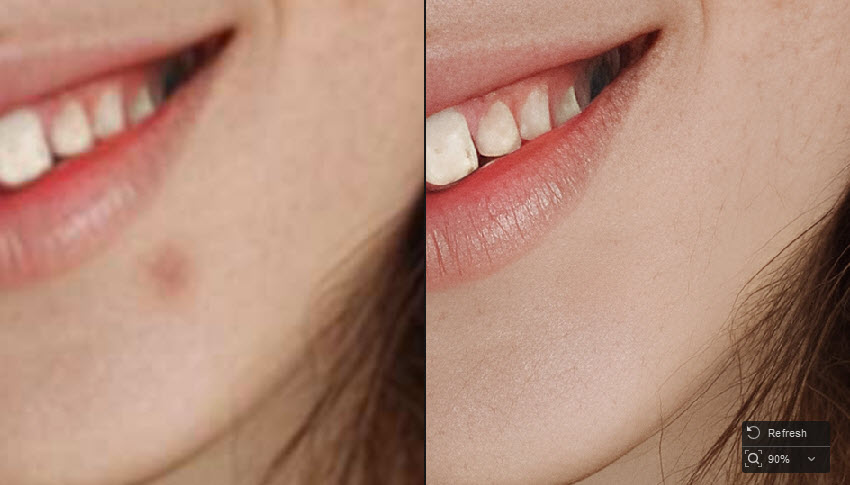
Removing blemishes in Photoshop gives you full control, but it can take time, especially when editing multiple photos. If you’re looking for a quicker and easier option, Aiarty Image Enhancer offers an AI-powered way to clean up skin imperfections and unwanted objects with minimal effort.
Its built-in AI Eraser intelligently fills in removed areas and blends textures naturally, helping you achieve clean, realistic results without complex tools. It also includes features like face restoration, image enhancement, and color correction, making it a useful companion for users who want professional-looking photos with less manual work.
Best Tools for Blemish Remover in Photoshop
Photoshop is a popular blemish remover app that built-in with several tools including Spot Healing Brush, Healing Brush, Clone Stamp, Content-Aware Fill and more. Each works best in different situations.
1. Spot Healing Brush Tool (Best for Beginners)
The Spot Healing Brush Tool is the easiest way to remove blemishes in Photoshop, especially for beginners. With Content-Aware technology, Photoshop automatically samples nearby pixels and blends them over the blemish.
You simply click on small imperfections, and Photoshop handles the rest. This makes it ideal for users learning how to remove blemishes in Photoshop quickly without complex settings. However, it works best on simple backgrounds and evenly lit skin. This tool is best for:
- Pimples
- Small spots
- Dust
- Minor skin flaws
2. Healing Brush Tool (More Control)
The Healing Brush Tool provides more control than Spot Healing. You manually select a clean area as a reference and then paint over the blemish.
Photoshop blends the sampled texture with the target area, helping preserve natural skin details. This tool is widely used in professional Photoshop remove blemish workflows, especially on uneven skin tones and shaded areas. This tool is best for:
- Uneven skin tone
- Larger blemishes
- Complex textures
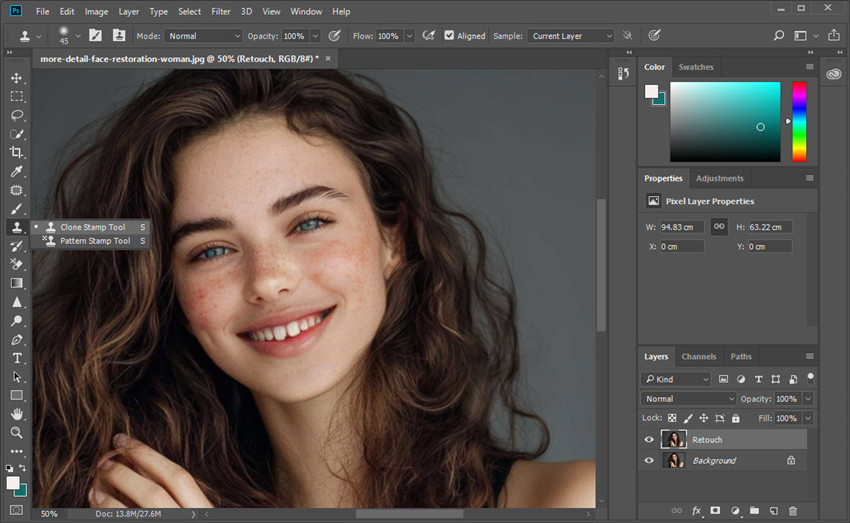
3. Clone Stamp Tool (Advanced Retouching)
The Clone Stamp Tool copies pixels exactly from one area to another, giving you full control over retouching. Unlike healing tools, it does not blend colors automatically.
When using this tool to remove blemishes in Photoshop, it’s best to work with low opacity and soft brushes to avoid unnatural results. It is mainly used when other tools fail. This tool is best for:
- Deep scars
- Large damaged areas
- Complex patterns
4. Patch Tool (Great for Large Areas)
The Patch Tool is designed for fixing larger imperfections, including removing blemishes, wrinkles, acnes, spots and even Photoshop someone out in the picture. You select the blemish and drag it to a clean area, and Photoshop replaces and blends the region automatically.
It is commonly used as a quick solution for large problem areas before refining details with other tools. This makes it a practical option in many blemish remover Photoshop editing workflows. This tool is best for:
- Large acne areas
- Wrinkles
- Uneven skin regions
How to Remove Blemishes in Photoshop (Step-by-Step)
Below is a simple and professional workflow that shows how to remove blemishes in Photoshop while keeping skin texture natural.
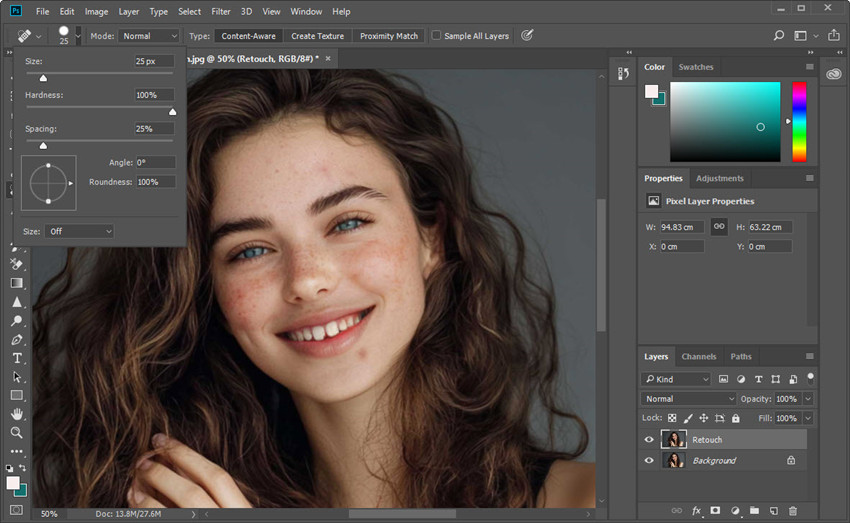
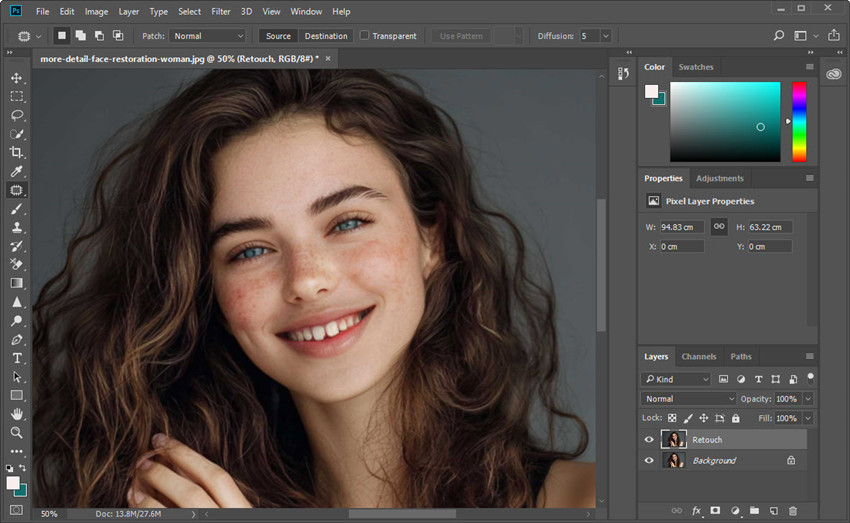
Step 1. Duplicate the Background Layer (Non-Destructive Editing)
Before starting any retouching, always work on a copy of your original image. This allows you to edit safely and revert changes if needed.
Open your photo in Photoshop and press Ctrl + J (Windows) / Cmd + J (Mac). Then rename the new layer to “Retouch”. Working non-destructively is a basic rule in professional Photoshop remove blemish workflows.
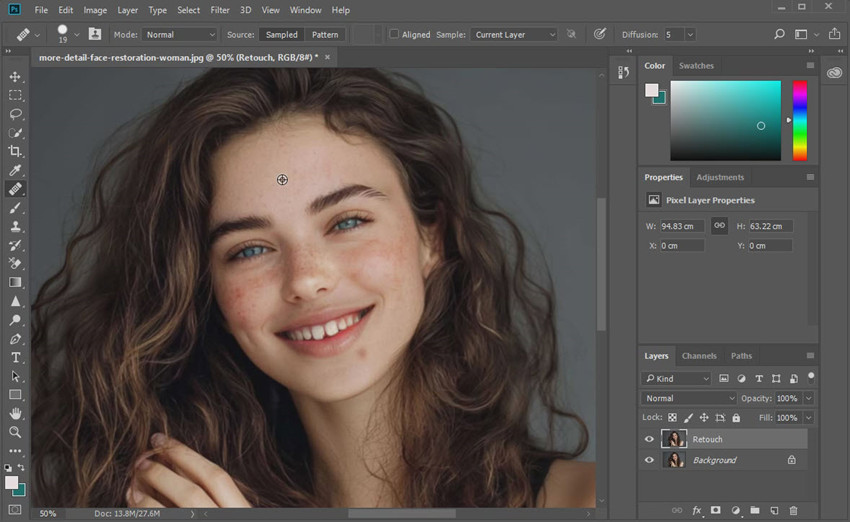
Step 2. Use the Spot Healing Brush Tool
For most beginners, the Spot Healing Brush Tool is the fastest way to remove small blemishes in Photoshop. It automatically analyzes surrounding pixels and blends them over imperfections, making it ideal for quick edits.
Find the Spot Healing Brush Tool (J) in the left-hand toolbar. Then set Type: Content-Aware in the options bar on the top settings.

Next, adjust the brush size so it is slightly larger than the blemish.
Zoom in the photo for accuracy, then click directly on each imperfection one by one. Photoshop will instantly replace the blemish with matching texture.
💡 Tip: If the result looks uneven, undo (Ctrl/Cmd + Z) and try again with a smaller brush or a different click position.

Step 3. Switch to Healing Brush for Difficult Areas
If the Spot Healing Brush produces uneven results, switch to the Healing Brush Tool for more control. This tool lets you manually choose a clean area as a reference, helping preserve realistic skin texture. This method is ideal when removing blemishes in Photoshop on uneven lighting or textured areas.
Select Healing Brush Tool (J) located just below the Spot Healing Brush Tool in the toolbar. Next, hold Alt (Option) and click on a nearby area of clean, evenly lit skin to sample the texture. Try to choose a spot with similar tone and lighting to achieve natural results.
Then, gently paint over the blemish using short, controlled strokes. Photoshop will blend the sampled texture with the target area, helping preserve realistic skin details. For best results, you may need to resample multiple times.

Step 4. Remove Large Blemishes with the Patch Tool
To remove bigger imperfections in Photoshop, like acne clusters, or wrinkles, the Patch Tool works more efficiently. Instead of painting, you replace entire areas with clean skin.
Fist, select Patch Tool and draw a selection around the blemish.

Then simply drag the selection to a clean area and this clean area will be used as the source for replacement.
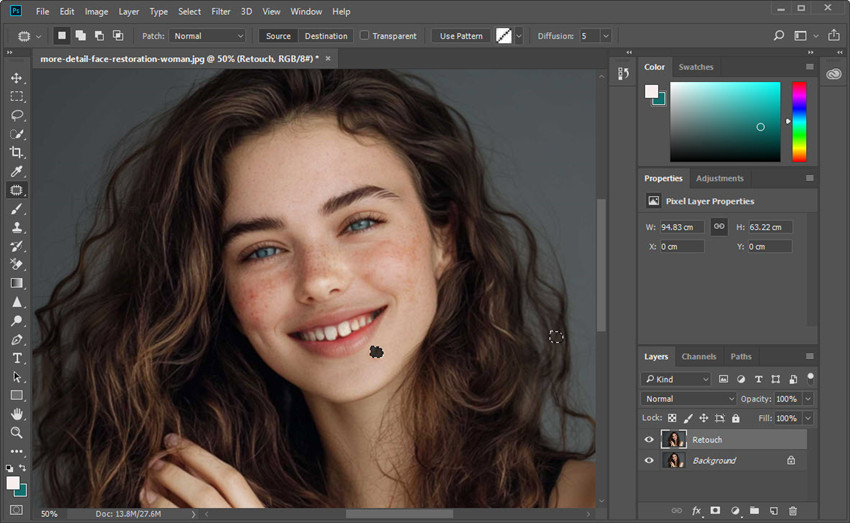
Once you release the mouse button, Photoshop automatically blends the sampled area with the original selection, matching color, brightness, and texture. This intelligent blending makes the Patch Tool an especially useful blemish remover in Photoshop.
For best results, work in small sections and repeat the process if necessary, rather than trying to fix large areas at once.
Learn more: Tips for removing other facial blemishes
Step 5. Refine with Clone Stamp Tool (Optional)
For stubborn marks, deep scars, or complex textured areas, use the Clone Stamp Tool for precise fine adjustments. Unlike healing tools, this tool copies pixels exactly, giving you full manual control over the Photoshop blemishes removal process.
Select the Clone Stamp Tool (S) from the toolbar. In the options bar, set the Opacity to around 20%–40% and choose a soft-edged brush to ensure smooth blending. Next, hold Alt (Option) and click on a nearby area of clean skin to sample. Try to select a source area with similar lighting and texture for more natural results.
Then, lightly paint over the problem area using short, gentle strokes. Instead of covering the blemish in one pass, build up the effect gradually. This layered approach helps maintain realistic skin texture and avoids harsh edges.
Faster Alternative to Photoshop Blemishes Removers
While Photoshop blemish removers offer professional-level control, retouching with different tools can be time-consuming, especially when working with multiple photos. If you’re looking for a faster way to remove blemishes and unwanted objects, Aiarty Image Enhancer provides an AI-powered solution.
It simplifies blemish remover Photoshop-style editing into a few clicks with its AI Eraser, which is designed to remove blemishes, unwanted objects, and background distractions automatically. It intelligently fills the gaps left after removal, blending them naturally with surrounding textures. This makes it ideal for:
- Removing blemishes, acne, skin spots, and scars
- Cleaning up background clutter
- Erasing photobombers, wires, fences, and signs
- Fixing imperfections without complex Photoshop steps
In addition to blemish removal, Aiarty Image Enhancer also helps repair old or low-quality portraits, improve resolution and sharpness, remove artifacts, noise, blurriness, balance skin tones and lighting, and more.
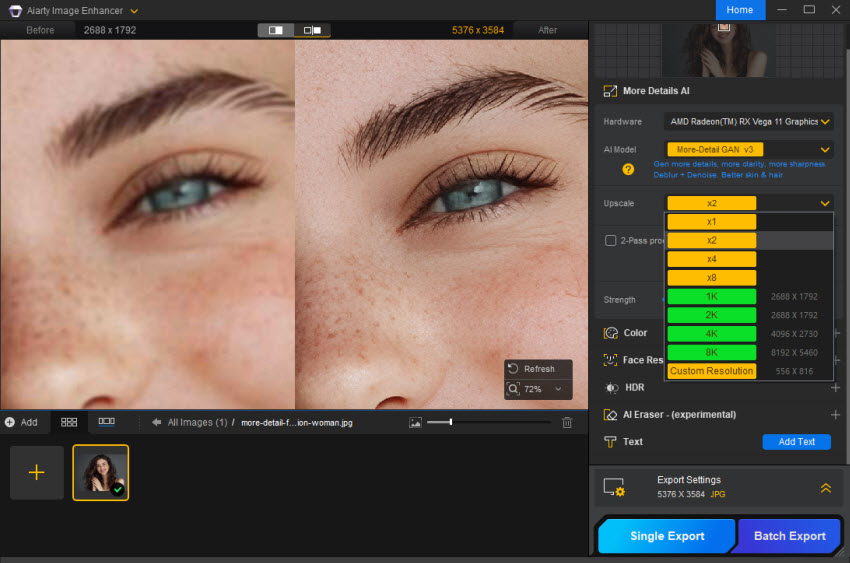
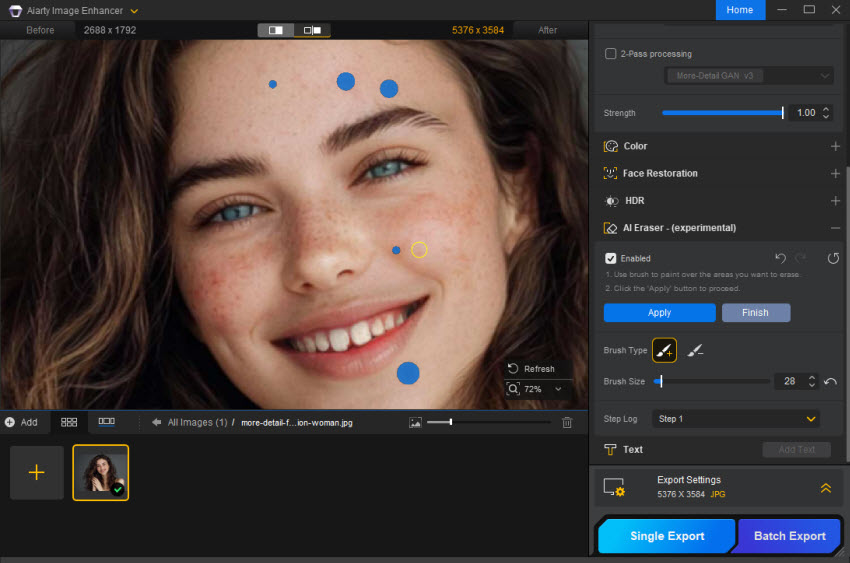
Step 1. Open Aiarty Image Enhancer and import the photo you would normally edit in Photoshop.
Before starting the removal process, decide whether you want to enhance the image resolution first. In the Upscale section, you can choose x1 to remove blemishes only, or select x2/x4 to improve image quality at the same time. It helps clear other artifacts from the photo, like noise, compression blocks, blurriness, etc.
Step 2. Enable the AI Eraser feature in the main interface. Then click Edit Mask. Adjust the brush size to match the blemishes for better accuracy.
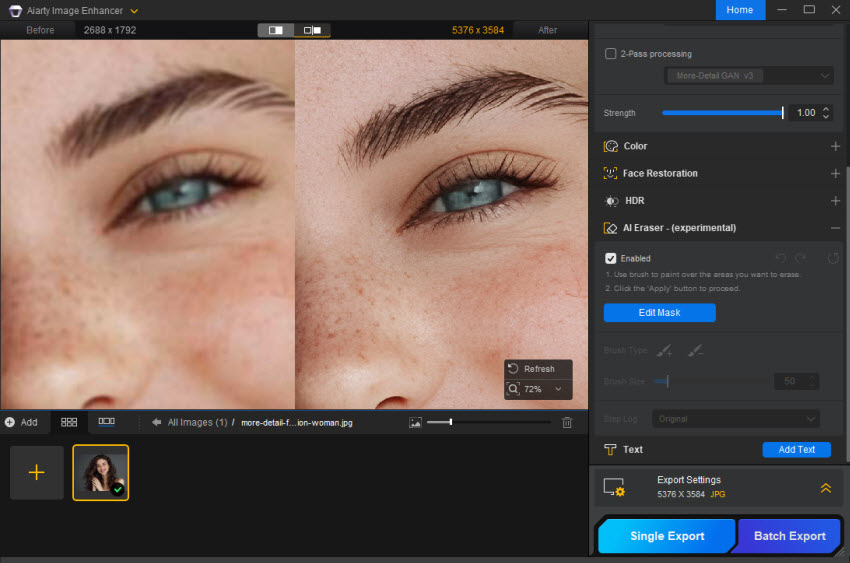
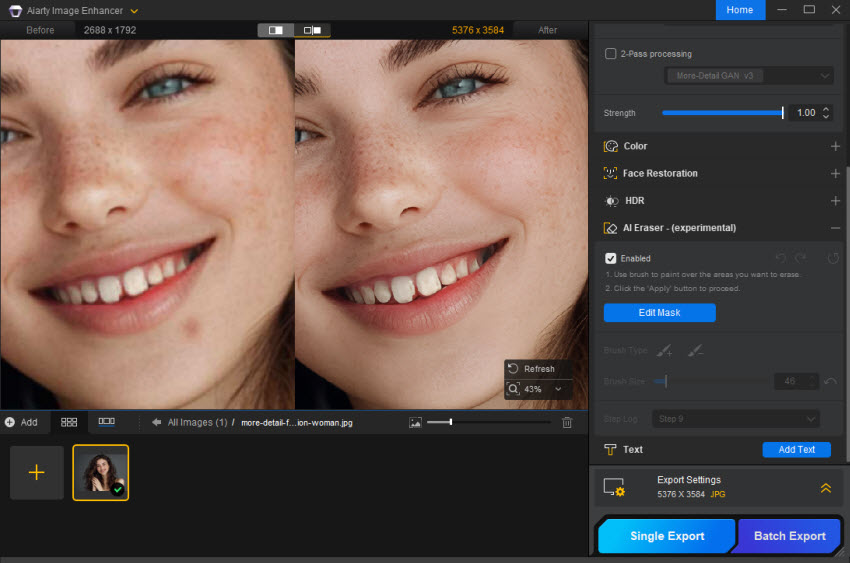
Step 3. Use the brush tool to paint over the blemishes, skin spots, or unwanted elements you want to remove. After selecting all the target blemishes, click Apply to preview the removal result. If the result is not perfect, you can repeat the process and refine the selection.
This makes it ideal for users who want to remove blemishes faster than Photoshop without using different tools.
Step 4. Once you are satisfied with the result, click Finish to generate a before-and-after comparison window. This time it will remove both the blemishes and artifacts from the photo.
Then select Single Export to save the edited image to your local computer. Your photo will be exported with blemishes removed and background reconstructed automatically.
Conclusion
Learning how to remove blemishes in Photoshop is an essential skill for photographers, designers, and content creators. By using tools like the Spot Healing Brush, Healing Brush, Clone Stamp, and Patch Tool, you can effectively fix skin imperfections while preserving natural texture.
The key to professional-looking results is working non-destructively, combining multiple tools, and avoiding over-editing. With consistent practice, you’ll be able to retouch skin confidently and achieve clean, realistic images.
For users who prefer faster workflows, AI-based tools can also be a helpful alternative. Whether you choose manual editing or automated solutions contributing to efficient workflows, mastering blemish removal will significantly improve your photo quality and visual impact.
 FAQs
FAQs
The easiest way to remove a blemish in Photoshop is by using the Spot Healing Brush Tool. Simply duplicate your background layer, select the tool, set it to Content-Aware mode, and click on the imperfection. Photoshop will automatically replace it with surrounding texture.
For more difficult areas, switch to the Healing Brush Tool and manually sample clean skin. This combination allows you to remove blemishes quickly while keeping the skin looking natural.
Bumpy or uneven skin usually requires more than simple spot removal. Start by using the Healing Brush Tool to smooth out visible bumps and rough patches. Then, lightly apply the Clone Stamp Tool at low opacity to refine texture if needed. For professional results, many editors use Frequency Separation to separate skin texture from color. This technique helps reduce bumps while preserving natural pores and details.
To retouch skin in Photoshop, begin with basic blemish removal using Spot Healing and Healing Brush tools. After that, adjust overall skin tone and brightness using adjustment layers such as Curves or Hue/Saturation.
Next, refine details with light Dodge and Burn to enhance highlights and shadows. The goal is not to make skin perfect, but to improve clarity while keeping realistic texture and depth.
You May Also Like
This post was written by Brenda Peng who is a seasoned editor at Digiarty Software who loves turning ordinary photos into extraordinary works of art. With AI assistance for brainstorming and drafting, the post is reviewed for accuracy by our expert Abby Poole for her expertise in this field.