Overexposed video, where highlights look washed out and details disappear, is one of the most common problems editors face. Whether caused by harsh sunlight, incorrect camera settings, or auto-exposure issues, overexposure can seriously hurt video quality.
In this guide, you’ll learn how to fix overexposed video in Premiere Pro using proven methods shared by professional editors and forum users. We’ll cover basic corrections, advanced color grading, and AI-based recovery techniques, so you can restore highlights and improve overall image quality.
If manually adjusting Highlights, Curves, and Color Wheels in Premiere Pro feels slow or inconsistent, Aiarty Video Enhancer offers a smarter alternative. It lets you quickly balance exposure, restore highlights, and improve overall video quality, especially for lightly to moderately overexposed clips.
Instead of spending hours fine-tuning sliders, you can generate a clean, well-balanced base in minutes and finish your edits in Premiere Pro with confidence.
👉 A faster way to fix overexposed video, without sacrificing quality.
What Is Overexposure in Video?
Overexposure occurs when too much light hits the camera sensor, causing certain areas of your video to appear unnaturally bright or “blown out.” This is a common issue for both professional filmmakers and hobbyists, especially when shooting in bright sunlight, under studio lights, or with reflective surfaces.
- Blown-out whites
- Lost highlight details
- Washed-out colors
- Low contrast
When highlights are clipped, the original pixel data is partially or fully lost, making it challenging to recover overexposed video perfectly. This is why understanding the problem is the first step in how to fix overexposed video in Premiere Pro.
Even if complete restoration isn’t possible, the right editing workflow, using tools like Lumetri Color, Curves, and Color Space Overrides, can often bring back a surprising amount of detail, balance brightness, and restore color accuracy. Many forum users and professional editors emphasize that combining manual corrections with technical fixes like scopes and color space adjustments produces the most reliable results.
1. Fix Overexposed Video in Premiere Pro via Lumetri Color
One of the most reliable ways to recover overexposed footage in Premiere Pro is through manual correction using the Lumetri Color panel. If your video’s exposure issues were caused by strong lighting during the shoot, like direct sunlight, studio lights, or reflective surfaces, automatic adjustments may not be enough. By carefully manipulating highlights, whites, shadows, and curves, you can restore detail without turning the footage flat or gray.
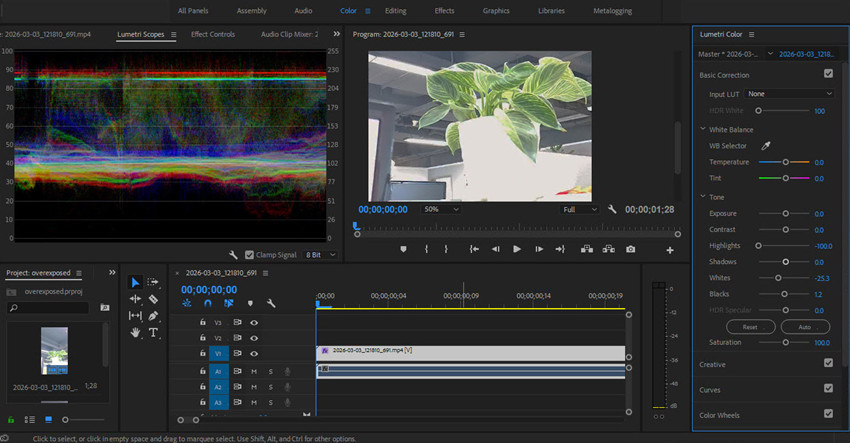
Step 1. Open Lumetri Scopes for Accurate Highlight Monitoring
Before adjusting your footage, it’s essential to see exactly which areas are overexposed. Premiere Pro provides Lumetri Scopes, a professional monitoring tool that helps editors identify clipped highlights.
Click Window on the top menu bar, then choose Lumetri Scopes. Choose the Waveform (Luma) view and play your clip and watch the waveform: any parts hitting 100 IRE are overexposed and losing details.
Tips: Many beginner editors make the mistake of dragging the Exposure slider down first. This can make the entire video look dull and gray, reducing overall contrast. Instead, always check scopes first and target the specific highlights and whites causing clipping.

Step 2. Lower Highlights and Whites
Once you know which parts are overexposed, the next step is to recover detail using the Basic Correction tab in Lumetri Color.
Open Lumetri Color and choose Basic Correction. Pull the Highlights slider to the left until the waveform drops below 100 IRE and detail begins to reappear. Do the same with Whites, but adjust more subtly to avoid crushing the bright areas. This is a key step in how to fix overexposed video in Premiere Pro, as targeting highlights and whites separately preserves midtones and prevents the whole image from looking flat.
After recovering the bright areas, your video may still look slightly washed out. Then you need to restore depth: Slightly lower the Blacks or Shadows sliders and meanwahile, monitor your scopes to ensure the waveform doesn’t drop too low (under 0 IRE), which would crush dark areas. Fine-tune until you have a balanced image where both highlights and shadows retain detail.
Tips: don’t overdo shadow recovery, as this can introduce noise or muddy textures, especially in low-light areas.
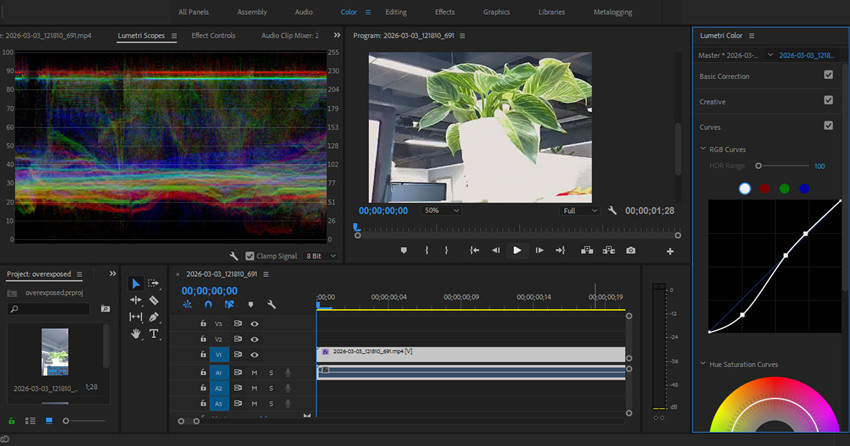
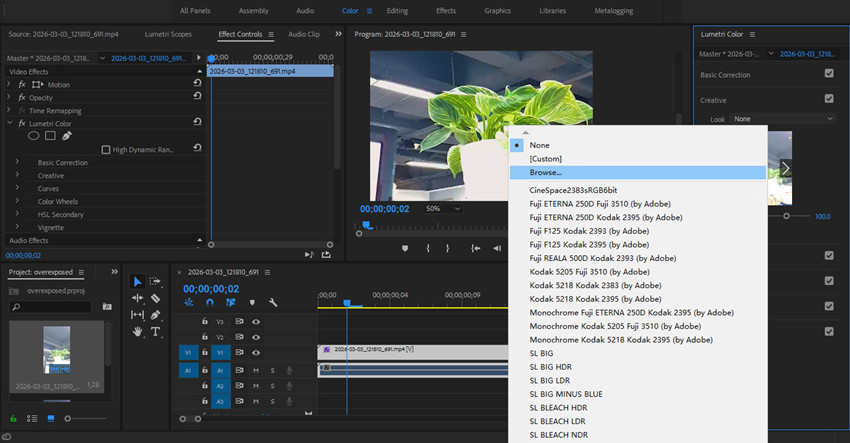
Step 3. Use Secondary Correction with RGB Curves for Precise Highlight Recovery
For more advanced control over bright areas, RGB Curves allow you to selectively adjust the luminance without affecting the entire image.
Open Lumetri Color, enable Curves and under RGB Curves. Add a point in the upper right section of the curve (representing highlights). Then gently pull it downward to bring overexposed highlights back into a safe range. You may also need to add a second point in the midtones to maintain overall brightness and contrast. Optionally, apply a subtle “S” curve for cinematic contrast
Using curves is a crucial part of how to manually fix overexposed video in Premiere Pro. It allows editors to recover lost detail in a targeted way while keeping colors and skin tones natural. Forum discussions highlight that curves often produce more professional results than relying solely on Exposure, Highlights, or Whites sliders.
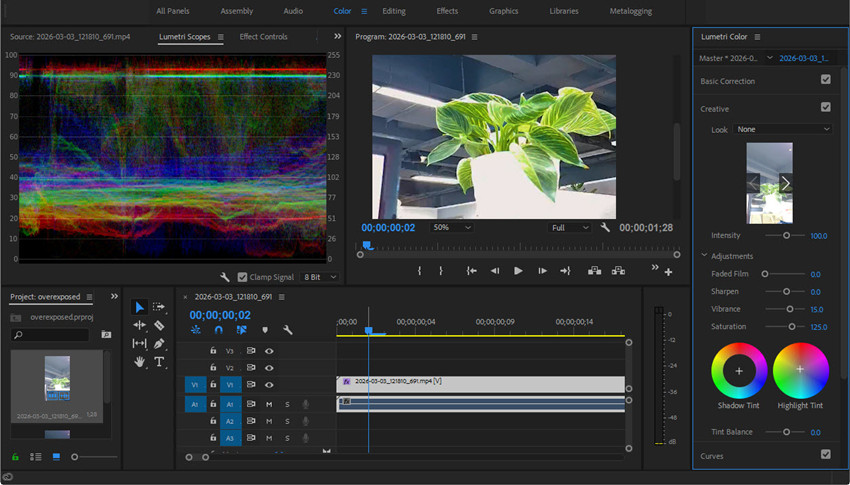
Step 4. Restore Colors with Vibrance and Saturation
After lowering highlights and exposure, many editors notice that their footage looks flat, pale, or lifeless. This is a normal side effect of brightness correction. When learning how to fix overexposed video in Premiere Pro, restoring natural color is an essential step for achieving professional results.
To bring back color depth without damaging skin tones, use Vibrance and Saturation in the Creative tab. Open Lumetri Color and eanble Creative. Then locate the Vibrance and Saturation sliders. Adjust Vibrance first to enhance weak colors while protecting skin tones and apply a small amount of Saturation for final refinement.
Step 5. Combine Techniques for Optimal Recovery
The most effective method for correcting overexposed footage is not based on a single adjustment, but on a structured, multi-stage workflow. For example, you can also add a look to make your video from a certain camera.
By mastering these steps, you can confidently handle even difficult lighting conditions and produce high-quality footage, making this workflow one of the best solutions discussed in forums and community tutorials for how to fix overexposed video in Premiere Pro.
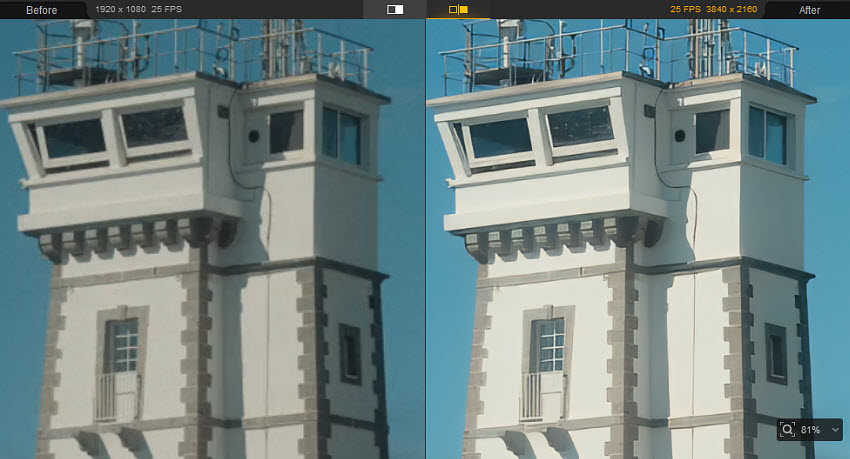
Also see: How to enhance overexposed video resolutions in Premiere Pro
2. Fix Overexposed Video in Premiere Pro via Color Space Override
If your footage looks fine in the source monitor but appears excessively bright on the timeline or after export, you might not have an exposure problem at all. Instead, it’s likely a color space mismatch, one of the most common overexposure issues editors face in 2026.
Many cameras now shoot in HDR formats, such as Rec. 2100 HLG or Rec. 2020 PQ. When this footage is dropped into a Rec. 709 timeline without proper interpretation, Premiere Pro will display it as “nuclear bright,” even if the actual exposure was correct during shooting. >> How to Convert HDR to SDR
Step 1. Locate the Clip in the Project Panel. Right-click the overexposed clip(s) in your project panel.
Step 2. Modify Footage Interpretation. Select Modify and then choose Interpret Footage. This opens the clip interpretation settings.
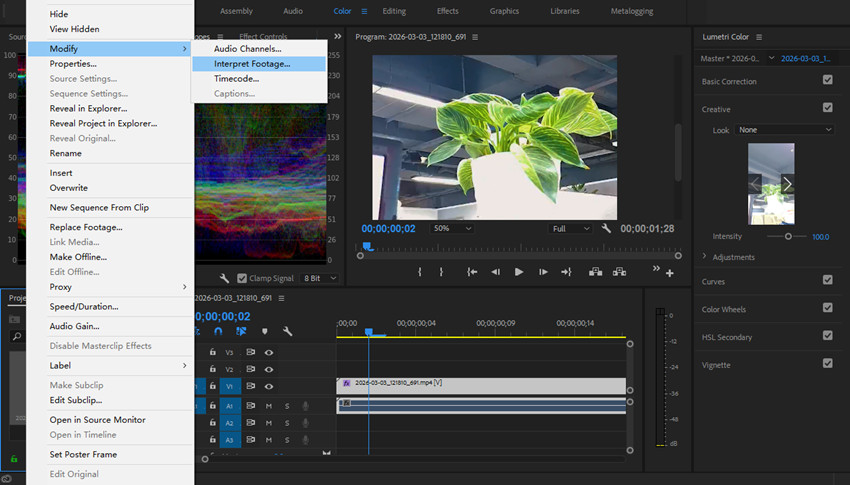
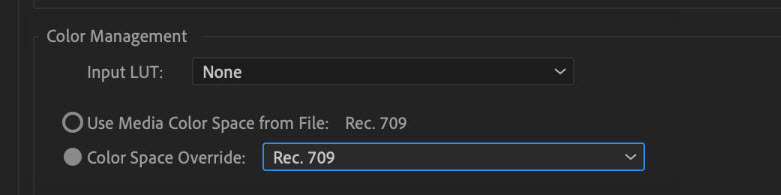
Step 3. Go to Color Management. Scroll to the bottom of the dialog box and find the Color Management section.
Step 4. Override the Color Space. Under Color Space Override, select Rec. 709. This tells Premiere Pro to treat the clip as standard dynamic range footage compatible with most monitors and exports.
Step 5. Confirm and Check. Click OK. Your clip should now immediately appear with normal brightness on the timeline and export correctly.
3. Fix Video Overexposure on Export
If your video looks perfect in Premiere but overexposed after exporting, the issue lies in your Sequence or Export Settings.
- Sequence Settings: Go to Sequence > Sequence Settings. Ensure the Working Color Space is set to Rec. 709.
- Export Settings: In the Export tab, under the Video section, ensure the Export Color Space is set to Rec. 709.
- Auto Tone Mapping: In Premiere Pro 2025/2026, ensure "Auto Tone Map Media" is checked in Preferences > Color. This helps Premiere automatically adjust HDR clips to fit SDR timelines.
4. Fix Overexposed Video via Premiere Pro AI Alternative
For slightly overexposed footage, Premiere Pro’s Lumetri Color tools are usually enough. However, many creators find that manually adjusting Highlights, Curves, Color Wheels, and Creative settings can be time-consuming, especially when working with multiple clips.
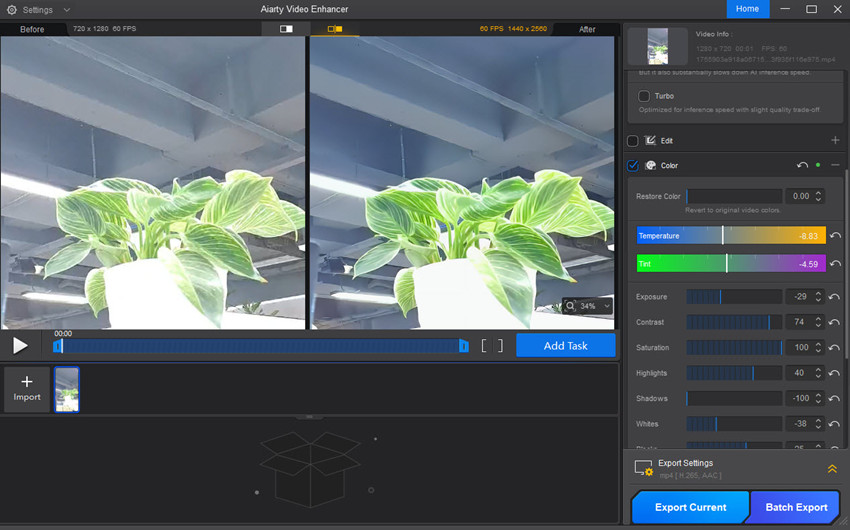
Aiarty Video Enhancer provides a complete set of color adjustment tools designed to simplify the process of fixing overexposed footage. It allows users to fine-tune key parameters such as Exposure, Highlights, Whites, Blacks, Saturation, and Contrast in one interface, making correction faster than manual grading in Premiere Pro.
In addition to correcting overexposure, Aiarty can also improve overall image quality by reducing noise, sharpening details, and restoring lost textures. This makes it especially useful for lightly to moderately overexposed videos, social media content, and batch processing projects.
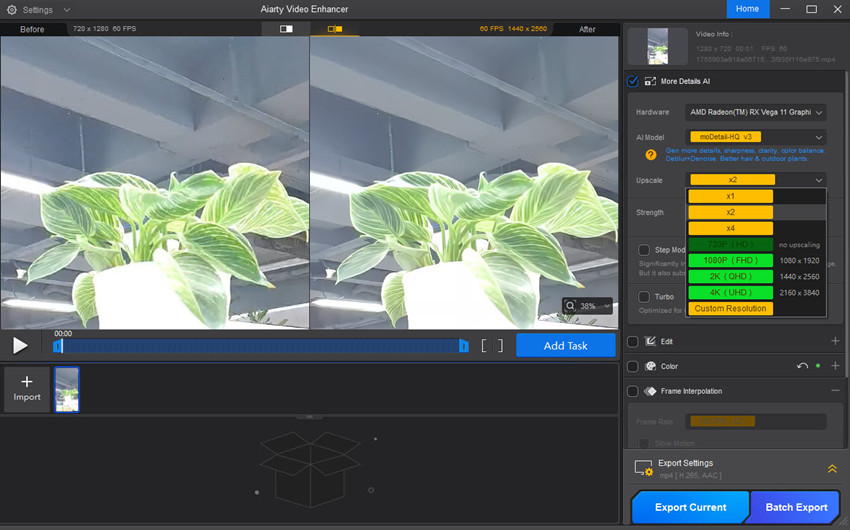
Step 1. Download and install the Premiere Pro alternative, then open it. Simply drag and drop all your overexposed video files into the main interface.
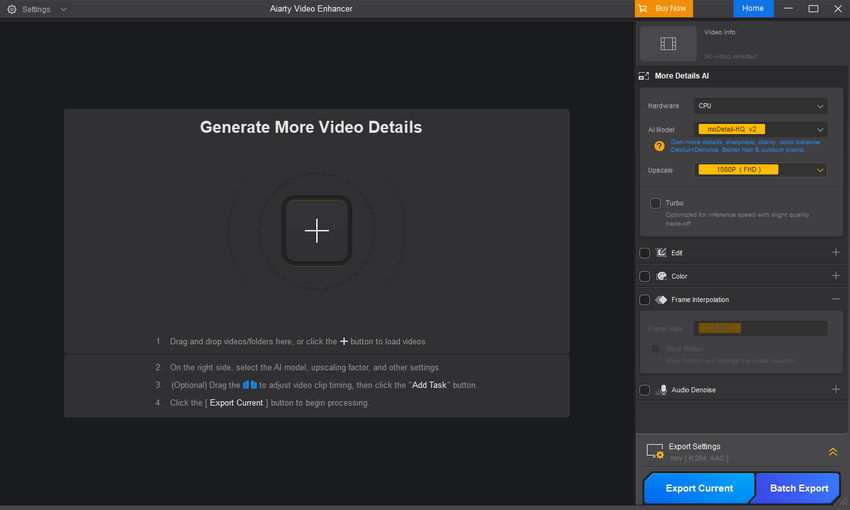
Step 2. On the right panel, select an AI model based on your footage. Then click Upscale and choose a predefined scale (2x, 4x) or set a custom resolution (e.g., 1080p, 4K). You can also choose 1x to simply fix the video exposure. Then the software automatically handles video artifacts (blurriness, noise, compression blocks) in the background.
Step 3. Next, enable the Color box and adjust the color settings like exposure, highlights, shadows, saturation, etc. You can also try to upgrade it to HDR. It will provide preview of side-by-side effects instantly.
Step 4. After the settings, click Export Current or Batch to save the fixed overexposed video.
Conclusion: Choose the Right Tool for Your Footage
Learning how to fix overexposed video in Premiere Pro is an essential skill for modern video editors. Whether your footage is slightly washed out or heavily clipped, the right workflow can make a significant difference in final quality.
By understanding what overexposure is and following a structured process, from Lumetri Scopes and highlight recovery to color space correction and export optimization, you can restore balance, preserve details, and maintain natural colors in most situations. For creators who need faster results or work with large volumes of footage, AI-based alternatives also provide an efficient way to enhance lightly to moderately overexposed videos.
Most importantly, remember that successful exposure correction is not about relying on a single slider. It requires combining technical monitoring, tonal adjustment, color refinement, and creative judgment. With practice, these techniques will become second nature and allow you to handle even challenging lighting conditions with confidence.
Whether you are editing for social media, professional clients, or personal projects, mastering these methods will help you consistently produce clean, well-balanced, and visually engaging videos in Premiere Pro.
If you apply the strategies in this guide, you’ll be well-equipped to fix overexposed footage efficiently and elevate the overall quality of your video content.
 FAQ about Fixing Overexposed Video in Premiere Pro
Use Lumetri Color to lower Highlights and Whites, slightly adjust Exposure, and fine-tune Shadows and Blacks to restore contrast. You can also apply RGB Curves for precise control. For HDR footage, check Color Space Override to correct false overexposure.
Increase Exposure, Shadows, and Blacks in the Lumetri Color panel. Then carefully adjust Highlights and Whites to preserve contrast and detail. Using Curves or Color Wheels can further enhance midtones and balance the image.
Overexposure on export is often caused by a color space mismatch (e.g., HDR footage like Rec. 2100 HLG exported in a Rec. 709 timeline). Make sure to check Color Space Override settings and preview the video with scopes before exporting. Incorrect export settings can make otherwise properly corrected footage appear too bright.
You May Also Like
This post was written by Ashley Brown, a videographer turned AI explorer. As an associate writer at Digiarty Software, she dives into the latest AI-powered tools for video enhancement and content creation, offering practical insights and unbiased commentary. Accuracy confirmed by Abby Poole.