Change Resolution of Premiere Project ? I've been editing a project at a draft resolution of 864x486. The final res is going to be higher. In the video settings for a given sequence, the resolution is not editable, nor do I see way to change resolution in the project settings. Is there a way to change the resolution in Premiere Pro? -- Adobe forum
Changing the resolution of your video project in Adobe Premiere Pro is a very common task when editing videos. However, many users struggle with unexpected issues: mismatched aspect ratios, poor export quality, crashes, and confusion with sequence settings. In fact, there are different ways to change resolution to 1920x1080 or others in Premiere Pro. In this guide, you’ll learn how to change resolution in Premiere Pro step by step.
Method 1: Change Resolution in Premiere Pro Sequence Settings
The sequence is the core of your Premiere Pro project—it's the container where you place all your clips, edits, and effects. Its resolution, or "frame size," dictates the final output dimensions of your video. This is the most straightforward way to change resolution in Premiere Pro from the start or to adapt it to a new deliverable.
Step 1. Locate the Sequence
Launch Premiere Pro and open the project you want to edit. In the Project panel, find the sequence you want to modify. A sequence is typically represented by an icon that looks like a film strip.
Step 2. Access Sequence Settings
Right-click on the sequence in the Project panel. Select Sequence Settings... from the context menu. Alternatively, with the sequence active in the timeline, go to Sequence > Sequence Settings... from the top menu bar.

Step 3. Change Resolution in Premiere Pro
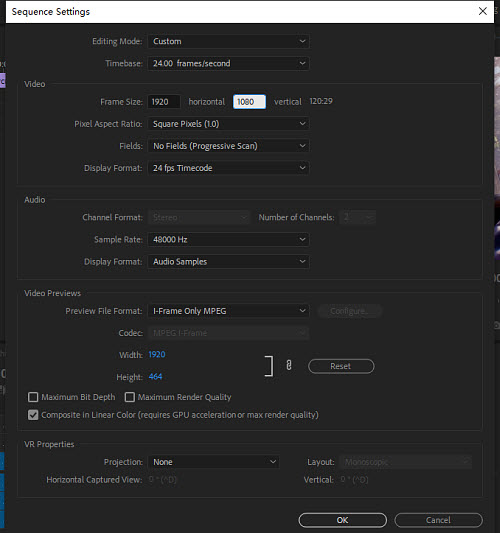
In the Sequence Settings dialog box, you will find the Frame Size options under the Video tab. Then find Frame Size (Horizontal & Vertical) and enter the new width and height in pixels for your desired resolution you’d like to change in Premiere Pro.
- Switching from 4K to HD: If you shot on a 4K camera but want to export a smaller file for web use, you would change the dimensions from 3840 x 2160 to 1920 x 1080.
- Creating Social Media Video: To adapt a standard horizontal video for TikTok or Instagram Reels, you would switch the dimensions to 1080 x 1920. For a square Instagram post, you would set it to 1080 x 1080.
Step 4. Confirm the Change
After you change the resolution in Premiere Pro, click OK. Premiere Pro will warn you that this action cannot be undone. Click OK again to confirm.
Important Note: Changing the sequence resolution will affect how your existing clips look on the timeline. If you've made the sequence smaller, parts of your footage may be cut off. If you've made it larger, your footage may appear to have black bars or need to be scaled up. We will cover how to fix this next.
Method 2: Scale Clips to a New Resolution in Premiere Pro
If you import clips that don’t match your project resolution (e.g., a 720p clip in a 1080p sequence) and won’t fill the frame correctly, you can change the resolution in Premiere Pro by scaling them automatically. For example, if you change a 4K sequence to a 1080p sequence, your clips will appear "zoomed in." Conversely, if you change from 1080p to 4K, your clips will look small with large black borders.
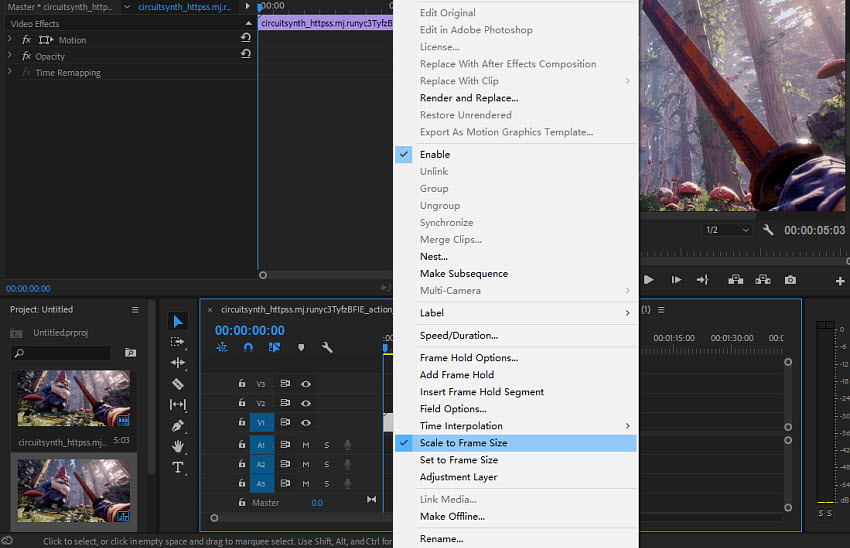
Step 1. In your timeline, select all the clips that need to be resized. You can use Ctrl+A (or Cmd+A on Mac) to select all clips. Right-click on any of the selected clips.
Step 2. With the clip selected, select Scale to Frame Size. This option will automatically adjust each clip's scale to fit the entire frame of your new sequence resolution. Premiere Pro automatically calculates the correct scaling percentage to make each selected clip fit perfectly within the new sequence dimensions. For example, if a 4K clip (3840x2160) is in a 1080p sequence (1920x1080), its scale will be set to 50% to fit the frame perfectly.
Alternative: "Set to Frame Size": This option is similar but works differently. Scale to Frame Size will change the clip's scale property (e.g., from 100% to 54%), while Set to Frame Size will set a hidden scale property. Scale to Frame Size is generally preferred because it gives you more control over the visible scale property in the Effect Controls panel.
Method 3: Change Resolution in Premiere Pro Export Settings
Sometimes you don't need to change the resolution of your entire project. Instead, you can change the video resolution in Premiere Pro by just exporting your final video in a different resolution that you want. The Export Settings window allows you to do this quickly without altering your core sequence.
Step 1. After you edit the video, click File on the top menu and select Export > Media.
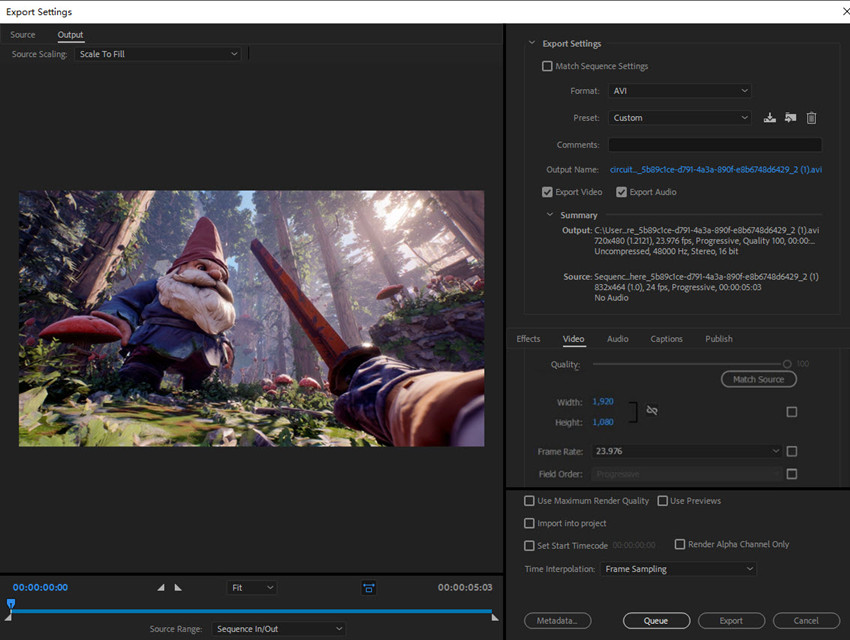
Step 2. In the Export Settings dialog box, under the Video tab, you will see a Frame Size section.
- Enter New Dimensions: Uncheck the "Match Source" box next to Frame Size. Change the video to a desired resolution (e.g., 1080x1920 for a vertical video).
- Confirm Changes: You will see a warning that this may affect the aspect ratio. Click OK.
- Export: Continue with your export as usual.
Premiere Pro Change Resolution but Doesn’t Improve Quality
When you change a video's resolution in Premiere Pro, especially by upscaling a low-resolution video (like 720p) to a higher one (like 1080p or 4K), you are not improving the video's quality.
The result of this process is that:
- The image becomes blurry and soft.More tips for fix blurry clips in Premiere Pro >>
- Any existing noise, grain, or compression artifacts become larger and more noticeable.
- The video looks unprofessional, as there is a clear lack of sharpness and fine detail.
In short, Premiere Pro's function is for matching dimensions, not for improving quality. To truly enhance a video's resolution and restore lost detail, you need a dedicated AI upscaling tool that uses machine learning to intelligently generate new pixels and fill in the blanks.
Change Resolution and Enhance Video Quality with AI
Unlike Premiere Pro’s manual scaling, Aiarty Video Enhancer uses AI algorithms to upscale and restore videos. It doesn’t just resize — it actually reconstructs missing details for sharper, cleaner output.
- Change video resolution from low to high, like 480P to 720P, 1080P, and 4K with new, high-quality pixels.
- Remove noise, grain, blur, pixelated artifacts from videos for crisp and sharp high-resolution videos.
- Change video resolution size to 16:9, 1:1, 9:16, 4:3, etc. for different platforms.
- Remove audio noise, correct colors, fix interlaced issues, and more.
- Change video resolutions in a batch, fast speed and one-click workflow.
How to Change Video Resolution in Premiere Pro Alternative?
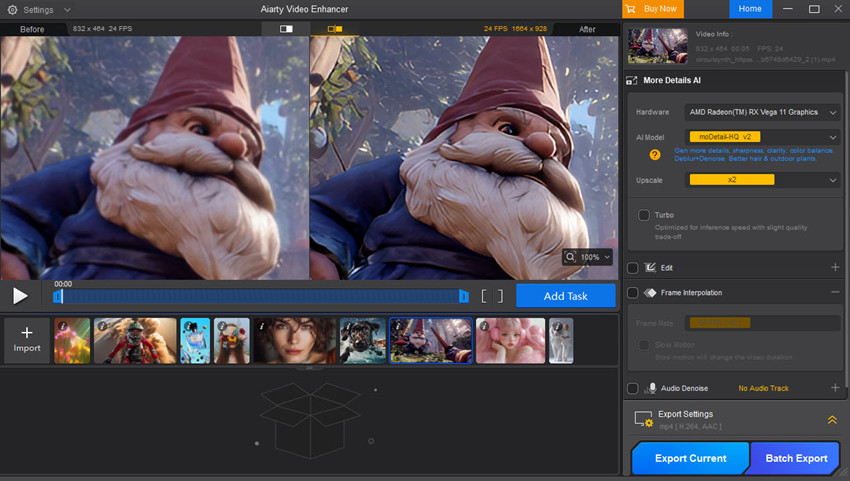
Step 1. Download and install the software. Launch the application. You can simply drag and drop your video file(s) into the main interface. Aiarty supports a wide range of video formats.
Step 2. Then go to the right panel and locate AI Model. Based on the type of your video, choose an AI model for the resolution adjustment process.
For example, moDetail-HQ v2 is ideal for enhancing fine details in clear footage, Smooth-HQ v2 provides a natural and subtle restoration by balancing denoising and deblurring, while superVideo vHQ is the most powerful option for tackling challenging footage with heavy grain, low-light conditions, or high compression.
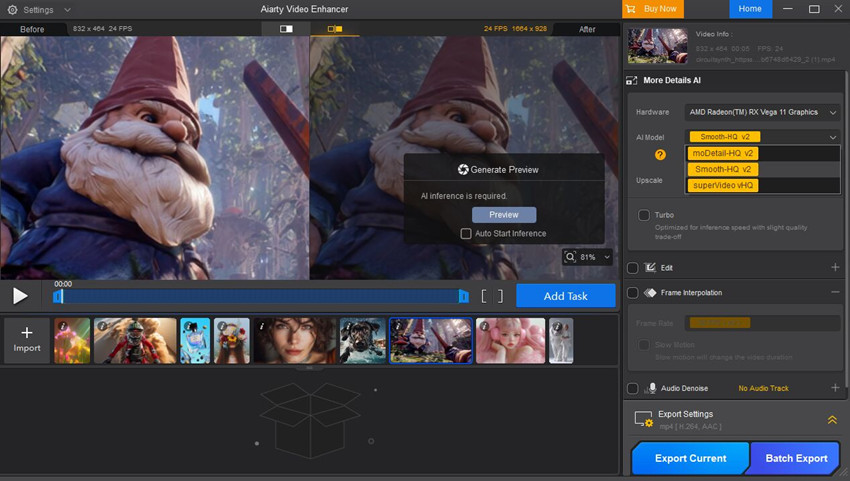
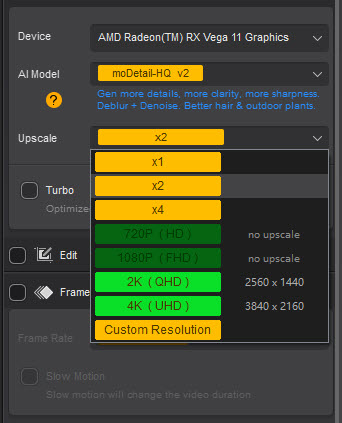
Step 3. To change video resolution with this Premiere Pro, click Upscale and you can choose from predefined scales like 2x or 4x, or change resolution to 1080P, 4K. You can also enter a custom resolution manually.
Step 4. Before you commit to the full export, you can use the built-in preview feature to see a side-by-side comparison of the original video and the enhanced version. This allows you to fine-tune your settings. Then click Export Current or Batch Export to save the video.
In Summary
Changing resolution in Premiere Pro is straightforward once you know where to look—whether it’s through sequence settings, scaling clips, or adjusting export settings. These methods are perfect when you need your project to fit specific platform requirements or aspect ratios. However, it’s important to remember that simply changing resolution in Premiere Pro does not actually improve the quality of a low-resolution video.
If your goal is not just to resize but to enhance, you’ll need an AI-powered solution. Tools like Aiarty Video Enhancer can upscale old or low-quality footage to 1080p or 4K, reduce noise, sharpen details, and deliver professional results far beyond what Premiere Pro alone can achieve. In short, use Premiere Pro to change resolution, but turn to AI enhancement if you want to truly upgrade video quality.
To speed up your editing workflow, you can also resort to these AI plugins for Premiere Pro.
 FAQs
FAQs
You can change the resolution of a video in Premiere Pro by adjusting the Sequence Settings. Go to the Sequence menu > Sequence Settings, then choose your desired resolution from the frame size options. You can also modify the resolution during export by going to File > Export > Media, where you’ll find custom settings for width, height, and aspect ratio.
To change your video to 1920x1080 (Full HD), open the Sequence Settings and set the frame size to 1920 horizontal and 1080 vertical pixels. If your original footage doesn’t match this size, you may also need to scale the clips using the Effect Controls > Scale option so that they fit the new frame without black borders.
To convert your video from 1080p to 4K, open the Sequence Settings and change the Frame Size from 1920x1080 to 3840x2160. You can then right-click on your 1080p clips in the timeline and select Scale to Frame Size to make them fill the new 4K dimensions. It's important to remember that while this process changes the resolution, it does not actually improve the video quality; it simply stretches the existing pixels, which may result in a blurry or soft-looking image.
While you can change the sequence settings and export at 4K resolution, this will not improve the quality of your video, because Premiere Pro's built-in scaling is not designed to generate new visual information.
You May Also Like
This post was written by Ashley Brown, a videographer turned AI explorer. As an associate writer at Digiarty Software, she dives into the latest AI-powered tools for video enhancement and content creation, offering practical insights and unbiased commentary. Accuracy confirmed by Abby Poole.