You finish an important shoot, transfer the footage to your computer, hit play, and your heart sinks. The subject is soft, faces lack definition, fine details are lost, and nothing looks “usable.” It’s the kind of moment that makes you wonder if all your effort was wasted.
Take a breath. The situation isn’t hopeless.
As someone who has spent a decade in post-production fixing hundreds of blurry or soft-focus clips, I can tell you that most footage can be salvaged. The real key to fix out of focus video is choosing the right method.
- Try Premiere Pro’s built-in sharpening and enhancement tools first (step below)
- If you still want real clarity and detail, the fastest way is to use AI, especially Aiarty Video Enhancer, which often delivers a clean, natural-looking image in one click.
To give you a sense of what’s possible:
Download Aiarty Video Enhancer Free to Restore Sharpness Instantly!
Now that you know the fastest route to restore clarity, let’s walk through the Premiere Pro fix first, so you can tackle minor blur and soft-focus footage manually.
How to Fix Out-of-Focus Video in Premiere Pro (Step-by-Step)
Premiere Pro can enhance slightly soft, mildly blurry, or low-resolution footage. The goal is to sharpen what’s already there, not create detail from scratch. With careful adjustments, you can restore mid-range clarity and make soft footage appear cleaner, and upscale video resolution in Premiere Pro.
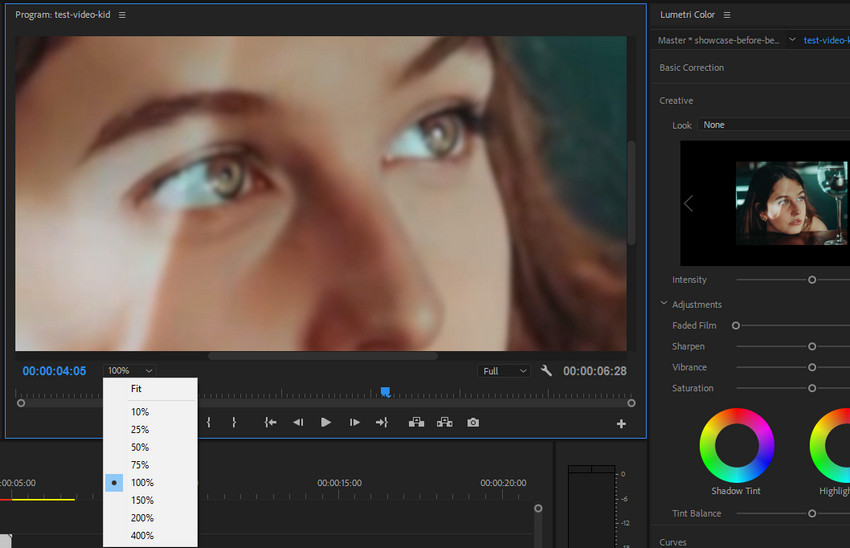
Step 1. Zoom in to Assess the Blur
Start by opening your clip in Premiere Pro and viewing it at 100% or 200% magnification. This close-up view lets you judge exactly how blurry or soft your footage is. Ask yourself:
- Are the edges slightly soft but still recognizable?
- Are facial features blending into one another?
- Are textures, like hair or fabric, losing definition?
This quick assessment is crucial. It helps you determine how much a Premiere Pro blurry video fix can realistically improve the clip before applying any effects. Understanding the severity of blur ensures you choose the right sharpening intensity and avoid over-processing.
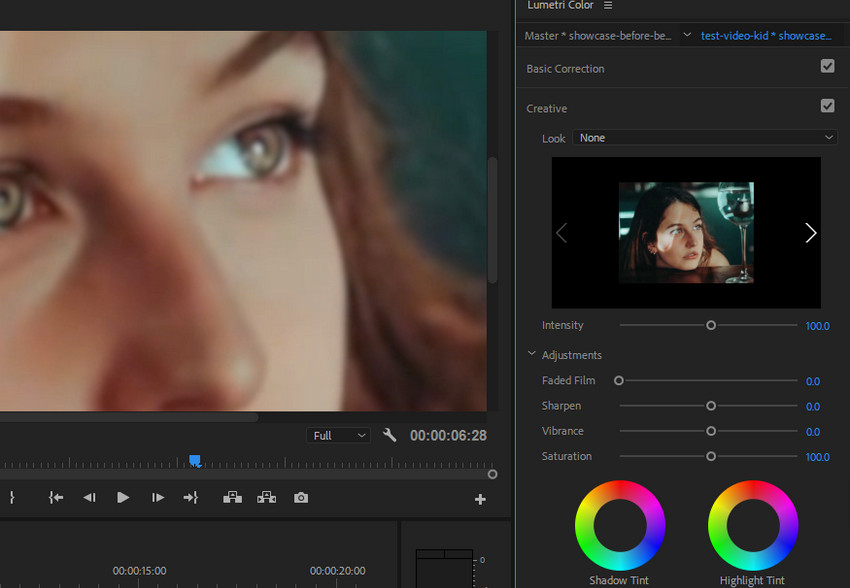
Step 2. Use the Basic Correction Panel
Navigate to Color > Basic Correction. Focus on these two essential sliders:
- Clarity: boosts mid-tone contrast and enhances local texture, helping soft areas pop
- Sharpen: increases micro-sharpness along edges, giving your footage a more defined look
Adjust both sliders slowly and incrementally, constantly monitoring the changes in your preview. Too much clarity can introduce unwanted noise, while excessive sharpening may create halos or glowing edges. Gentle, step-by-step adjustments usually yield the most natural results and prevent your video from looking over-processed.
This step is especially helpful for learning how to sharpen blurry video in Premiere Pro without damaging the natural look of your footage.
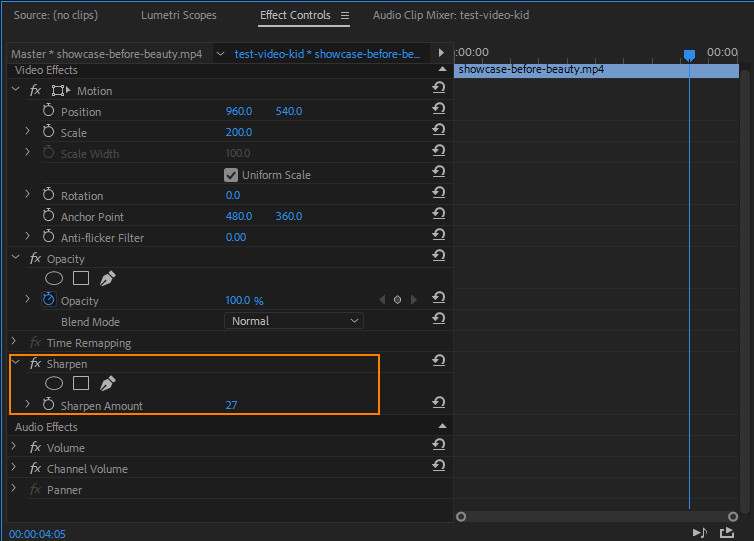
Step 3. Apply the “Sharpen” Effect for Finer Control
For more precise control, search for Sharpen in the Effects panel and apply it to your clip. Then tweak the following:
- Amount: 10–40, depending on how subtle or strong you want the sharpening to be
- Edges: continuously monitor edges and stop adjusting if halos or unnatural glow appear
This step allows you to fine-tune the details and is particularly effective for enhancing facial features, textures, and mid-range details without affecting the overall natural look.
Also see: Fix out of focus videos via Premiere Pro resolution enhancement
Step 4. Use “Unsharp Mask” for Advanced, Natural-Looking Sharpness
If you need more advanced and customizable sharpening, apply Unsharp Mask from the Effects panel. This effect gives you deeper control over how detail is enhanced, allowing for a more natural and refined result.
- Amount: controls overall strength; start low (50–100) and adjust gradually
- Radius: defines how wide the sharpening effect spreads; smaller values maintain natural edges, larger values can introduce halos
- Threshold: tells Premiere which areas to sharpen; increasing it helps protect skin tones and smoother surfaces from unwanted noise
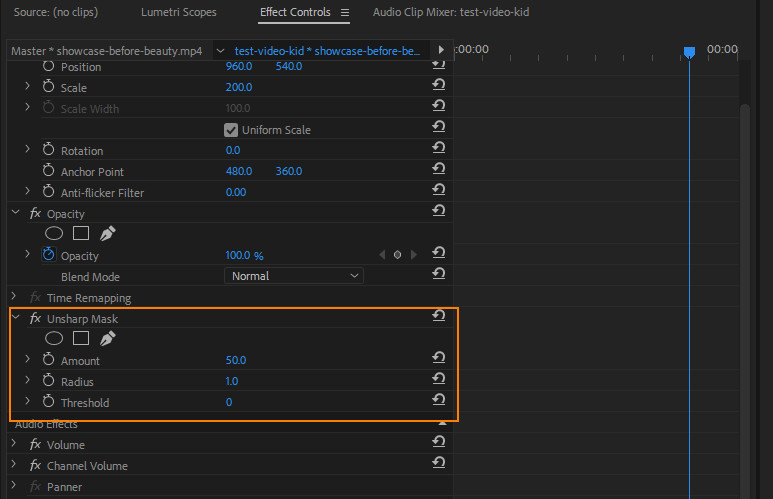
Unsharp Mask is ideal when you want crisp detail without making your footage look digitally overprocessed. It offers a balanced, professional-level sharpness that works especially well for interviews, product shots, or any clip requiring subtle enhancement.
Step 5. High Pass for Natural Detail Enhancement (Optional)
Advanced editors can use the High Pass technique to enhance perceived detail more subtly:
- Duplicate your video layer.
- Apply High Pass to the top layer.
- Set the layer’s blend mode to Overlay or Soft Light.
- Adjust the opacity until the sharpening looks natural.
High Pass helps restore micro-textures and fine details that basic sharpening might miss, all while avoiding heavy digital artifacts that can make footage look artificial.
Fixing Blurry Video in Premiere Pro: Strengths and Limitations
From above, we can find that Premiere Pro is excellent for soft, slightly out of focus, or mildly blurry video footages. Its built-in controls allow you to make targeted adjustments, bringing out more definition without over-processing your clips. Specifically, Premiere Pro excels at:
- Fixing soft or slightly out-of-focus footage – Ideal for clips where edges are slightly soft but the overall composition is still usable.
- Enhancing mid-range textures and details – Helps boost the visibility of subtle elements like fabric patterns, background textures, add grain for cinematic look or small objects without introducing unnatural artifacts.
- Controlled, subtle sharpening – Allows you to refine edges and contours carefully, giving a more defined look while maintaining a natural appearance.
These strengths make Premiere Pro the go-to option for minor corrections and gradual improvements. However, it’s important to understand its limitations: if your footage has lost finer details or appears noticeably soft, manual adjustments can only do so much. This is where AI-powered tools shine to recover clarity of blurry footage.
Using AI to Rebuild Texture and Achieve True Clarity
AI video enhancement has become the go-to solution for creators who want real clarity, sharpness, and texture restoration without spending hours adjusting sliders manually. Unlike traditional sharpening tools, modern AI video enhancers doesn’t just enhance edges; it analyzes patterns, predicts missing details, and intelligently rebuilds them in a natural-looking way, giving your footage a polished, professional appearance.
Among the many options available, Aiarty Video Enhancer stands out for its speed, intuitive workflow, and consistent results. It’s perfect for video editors, vloggers, content creators, or anyone dealing with soft, blurry, or low-resolution footage who wants clean, crisp video without complicated settings.
Key Features & Benifits of Aiarty Video Enhancer
- Fixes soft, out-of-focus, or slightly blurry footage: intelligently restores clarity and texture that manual adjustments in Premiere Pro cannot achieve.
- Enhances low-resolution and pixelated clips: including social media–compressed videos, action cam, drone, and travel footage.
- Removes noise and smooths compression artifacts: delivering clean, natural-looking visuals without harsh edges.
- Upscales videos to HD/4K: improving resolution while maintaining detail and sharpness.
- One-click AI enhancement: simple workflow with no editing skills required, saving time and producing professional results.
How Aiarty Video Enhancer Works to Unblur Videos
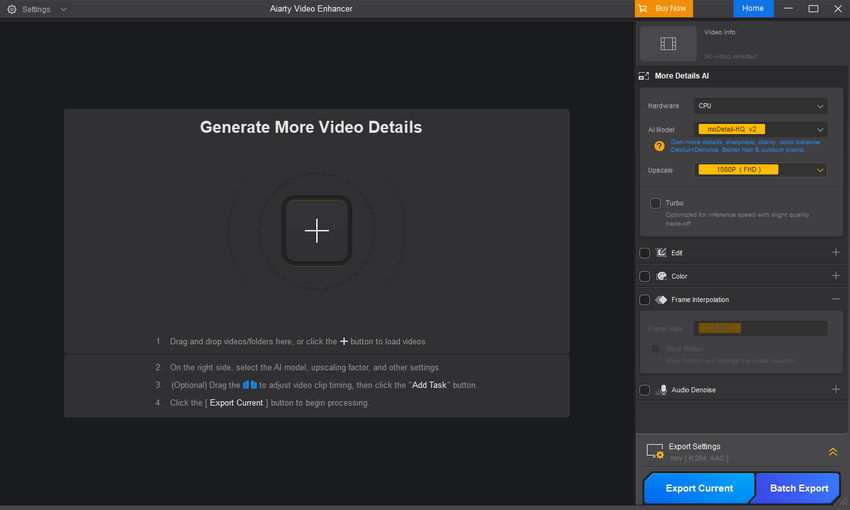
Step 1: Download, install, and launch Aiarty. Simply drag and drop your video files into the main interface. Most common formats are supported.
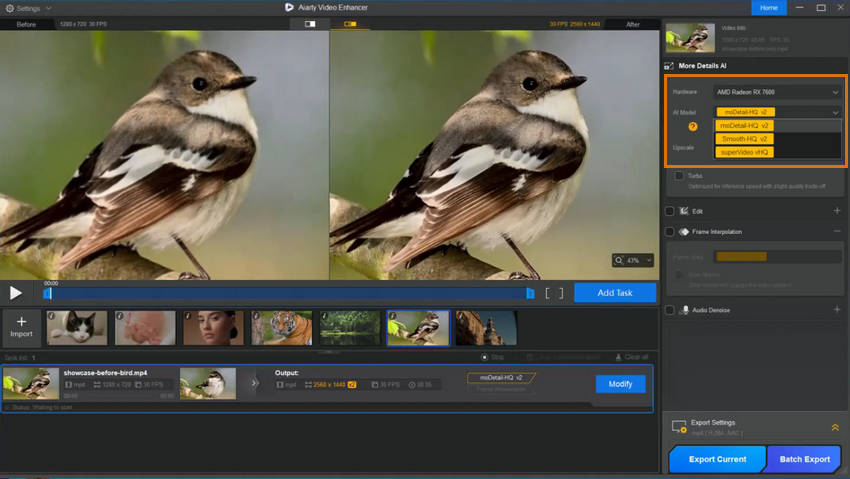
Step 2: On the right panel, select an AI model based on your footage:
- moDetail-HQ v2 for enhancing fine details in clear clips.
- Smooth-HQ v2 for natural restoration with balanced denoising and deblurring.
- superVideo vHQ for challenging footage, including low-light, heavy grain, or high compression.
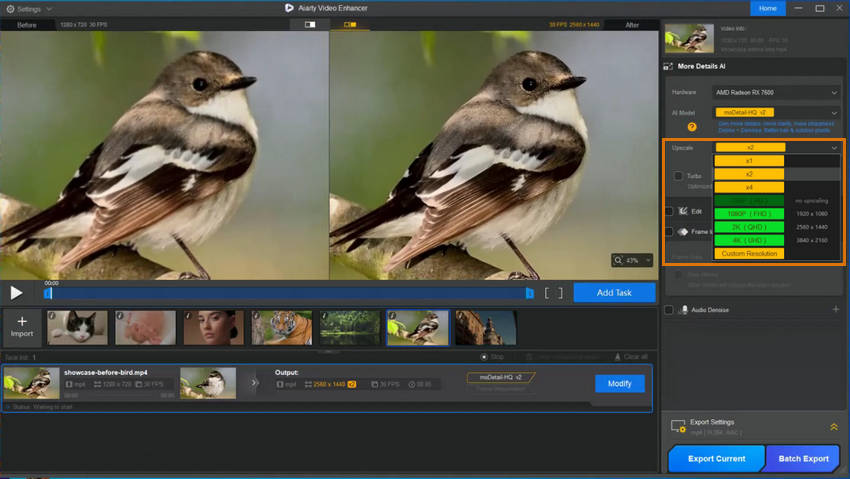
Step 3: Click Upscale and choose a predefined scale (2x, 4x) or set a custom resolution (e.g., 1080p, 4K). The software automatically handles unblurring and denoising in the background.
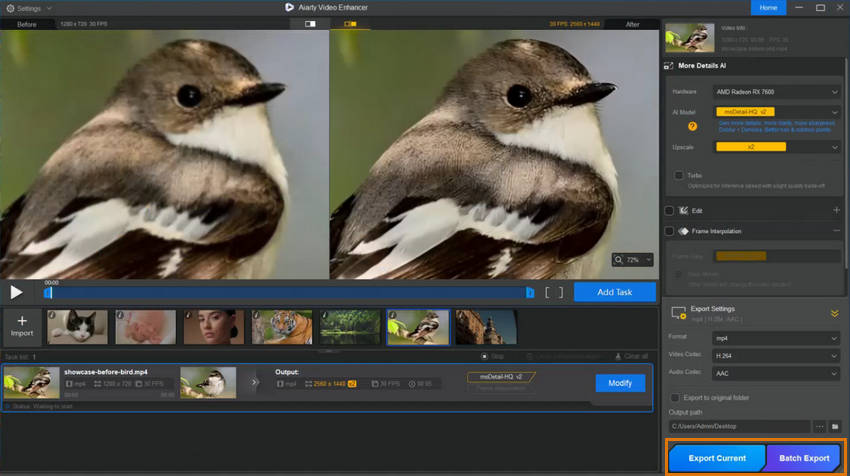
Step 4: Preview the enhanced video side-by-side with the original. Adjust AI model, Strength, or color settings if needed, then click Export Current or Batch Export to save your unblurred video.
Why Your Video Looks Blurry or Pixelated
Even with AI or Premiere Pro fixes, understanding the root cause of blur helps you optimize results and choose the right tool. Common causes include:
- Focus errors: lens locked onto the wrong subject.
- Camera shake: handheld movement softens details.
- Low-resolution capture: insufficient pixels reduce clarity.
- Compression artifacts: social media or app compression introduces pixelation.
By identifying the root cause of blur, such as focus errors, camera shake, low resolution, or compression artifacts, you can determine whether a Premiere Pro blurry video fix is sufficient or if full AI video enhancement is the better choice. Understanding the cause also helps prevent similar issues in future shoots.
Conclusion: Choose the Right Tool for Your Footage
Choosing the right method to fix blurry or soft-focus footage depends on your clip’s needs. Premiere Pro works well for minor softness or slightly out-of-focus shots, improving edges and mid-range textures. For faster, more noticeable results, especially when you need crisp, detailed, and natural-looking footage, Aiarty Video Enhancer intelligently restores textures and sharpness in one step.
For tight deadlines or important clips, starting with AI enhancement is often the most efficient approach. This ensures a high-quality base that can be seamlessly imported back into Premiere Pro for color grading, final edits, or motion graphics.
Try enhancing just one clip! You’ll see the difference instantly and understand why AI can elevate your footage beyond manual adjustments.
 FAQ about Fixing Blurry or Out-of-Focus Video
Yes, but it depends on the severity. Slightly soft or mildly out-of-focus footage can be improved using Premiere Pro’s sharpening and clarity tools. For easier but still good quality, AI tools like Aiarty Video Enhancer can intelligently restore textures and enhance sharpness, producing a much clearer and natural-looking video.
Video can appear blurry in Premiere Pro for several reasons, including focus errors during shooting, camera shake, low-resolution footage, or compression artifacts from social media or other apps. Understanding the cause helps determine whether a simple Premiere Pro fix is sufficient or if AI enhancement is needed for full clarity.
Sharpening can create noise or halo effects if applied too aggressively. Using gentle adjustments in Premiere Pro usually avoids extreme artifacts, but for cleaner, natural results, AI enhancement tools like Aiarty Video Enhancer can improve sharpness and detail without producing harsh edges or unwanted noise.
You May Also Like
This post was written by Ashley Brown, a videographer turned AI explorer. As an associate writer at Digiarty Software, she dives into the latest AI-powered tools for video enhancement and content creation, offering practical insights and unbiased commentary. Accuracy confirmed by Abby Poole.