


8 Best Open Source AI Video Upscalers (Free & Offline Tools)



Not everyone has the budget for high-end AI video upscalers. If you've ever browsed Reddit, GitHub, or video editing forums, you've probably come across people asking the same question: "Are there any good open-source AI video upscaler?"
The answer is yes. Several open-source projects offer AI-powered video upscaling and enhancement capabilities without requiring a paid subscription. Some are designed specifically for anime content, while others aim for general video enhancement. But how effective are they in practice? And what kinds of trade-offs come with using them?
This article walks you through some of the most popular free open-source AI video upscalers and enhancers available today, including what they do well, where they fall short, and what to expect during setup and use.
Quick Verdict: 2026 Open-Source Video Upscaler Comparison Matrix
To help you skip the guesswork on GitHub, we have benchmarked the top 8 open-source video upscaling software. You can quickly filter them by your operating system, technical skill level, and specific video types:
To evaluate these tools fairly, I tested them on several common video enhancement scenarios, including low-resolution footage, compressed web videos, and animation clips. The reviews below focus on real-world usability as well as output quality.
Popular Free Open-Source AI Video Upscaler/Enhancer
While many open-source projects share the same foundational AI models under the hood, their performance, feature sets, and user experiences vary wildly. Below is our comprehensive, real-world breakdown of the top free tools available today.
Video2X
Supported platforms: Windows (fully supported), Linux (limited support)
Core Backends Supported: Real-ESRGAN, Waifu2x, Real-CUGAN, RIFE (Interpolation)
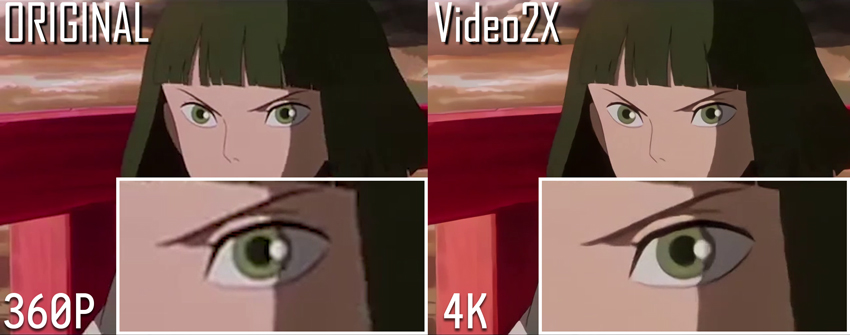
Video2X is a popular open-source tool that upscales videos by extracting individual frames, enlarging them with AI-powered image upscalers, and then reconstructing a high-resolution video using those processed frames.
The process involves several stages:
- Frame Extraction: Video2X first uses FFmpeg to split the video into individual frames and an audio file.
- Frame Upscaling: Each frame is then upscaled using one of the supported AI models like waifu2x, SRMD, or Anime4KCPP. The upscaling models are customizable, allowing users to choose the one that best suits the type of content (e.g., anime vs. real-life footage).
- Video Reconstruction: After the frames are processed, FFmpeg reassembles the upscaled frames and the original audio back into a final high-resolution video.
The process can be slow, especially when processing long videos or when GPU acceleration is not available.
For advanced users who are comfortable with scripting, it's possible to manually write a simple batch or bash script to automate this process, including splitting and merging the video, for even more customization.
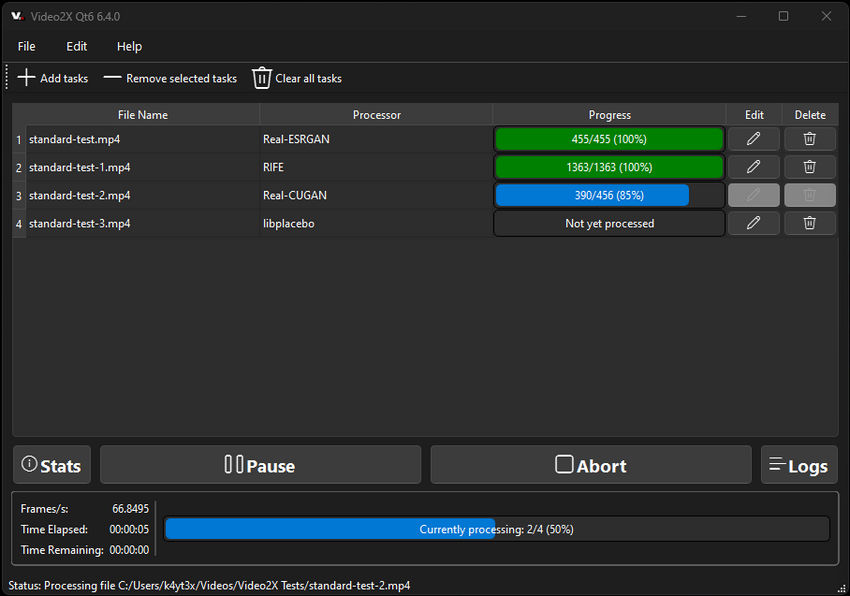
A simple graphical interface is available for Windows users, while Linux users will need to rely on command-line operation.
- Supports multiple AI backends to suit different types of content
- Offers a Windows GUI that simplifies usage for non-technical users
- Batch processing supported for long videos or entire folders
- Free and open-source with no feature restrictions or watermarks
- Processing is slow without GPU acceleration; NVIDIA GPU is strongly recommended
- Audio is not processed along with video and must be reattached separately
- Installation and model configuration can be confusing for beginners
- Linux support is limited and requires manual setup
- This tool doesn't run natively on macOS
Installation & How to Use:
1. Build the Video2X project on your computer
- Check how to build Video2X on Windows: https://docs.video2x.org/building/windows.html
- Check how to build the Qt6 GUI of Video2X on Windows: https://docs.video2x.org/building/windows-qt6.html
- Check how to build Video2X on Linux: https://docs.video2x.org/building/linux.html
2. Download and install Video2X
To run Video2X smoothly, your system needs to meet the following minimum hardware requirements.
CPU
- The precompiled binaries require CPUs with AVX2 support.
- Intel: Haswell (Q2 2013) or newer
- AMD: Excavator (Q2 2015) or newer
GPU
- The GPU must support Vulkan.
- NVIDIA: Kepler (GTX 600 series, Q2 2012) or newer
- AMD: GCN 1.0 (Radeon HD 7000 series, Q1 2012) or newer
- Intel: HD Graphics 4000 (Q2 2012) or newer
Tip: If your computer doesn't have a powerful GPU, you can still use Video2X for free on Google Colab. Google provides access to high-performance GPUs like the NVIDIA T4, L4, or A100, which you can use for up to 12 hours per session.
To install on Windows (Command-line version)
You can grab the latest precompiled release from GitHub. Here's how to install it into your local user directory:
Once extracted, add %LOCALAPPDATA%\Programs\video2x to your system's environment variables for easy access.
To install Windows Qt6 GUI
If you prefer a graphical interface, the Qt6 version of Video2X provides a cleaner experience. Download the installer file—video2x-qt6-windows-amd64-installer.exe—from the releases page, then double-click to launch it.
The setup wizard will guide you through the installation process. You can select the install path and decide whether to create a desktop shortcut.
To install on Linux
Linux users should follow the instructions in the official Linux installation guide.
3. Run the Video2X
You can run Video2X either via command line or through its GUI (on Windows).
To use the command line, refer to the CLI documentation. You'll be able to define input and output paths, AI model such as realesrgan, output option, and more.
Example command:
To use the GUI, just launch Video2X Qt6. Load your video, configure settings such as GPU backend, processing mode, and filters, then click the Run button to start upscaling.
You may also like: In-depth review of Video2X >>
Real-ESRGAN
Supported platforms: Windows, Linux, macOS
Core Backends Supported: Real-ESRGAN, ESRGAN (Available in both pure PyTorch environments and lightweight NCNN Vulkan implementations).
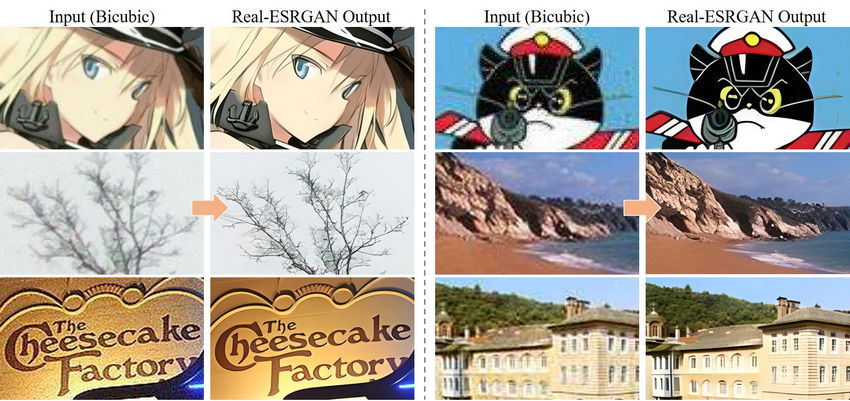
Real-ESRGAN is a widely used free open-source AI image and video upscaler developed by the team behind ESRGAN. Built on the PyTorch framework, it offers high-quality image and video upscaling using pre-trained generative adversarial networks (GANs). Although it's originally designed for single image super-resolution, Real-ESRGAN can also be applied to videos by processing frame-by-frame, making it a strong choice for restoring low-resolution or compressed video content.
It performs especially well on real-world scenes — such as landscapes, faces, or low-quality smartphone footage — and is known for its ability to restore fine details while reducing noise and compression artifacts.
- State-of-the-art image enhancement quality, especially for real-world photos and videos
- Multiple pre-trained models available (general, anime, face restoration, etc.)
- Actively maintained and backed by a strong research team
- Can be scripted or integrated into custom video workflows
- No built-in GUI; requires command-line use or manual scripting
- Needs frame extraction and recombination for video use (not automated)
- Requires Python environment and basic familiarity with PyTorch
- Processing can be slow on CPU; GPU is highly recommended for practical use
Installation & How to Use:
1. Install Python and dependencies
- Make sure Python 3.7 or later is installed
- Clone the repo:
- Install required packages
cd Real-ESRGAN
# We use BasicSR for both training and inference
pip install basicsr
# facexlib and gfpgan are for face enhancement
pip install facexlib
pip install gfpgan
pip install -r requirements.txt
python setup.py develop
2. Download pre-trained models
The project supports various models:
- RealESRGAN_x4plus (general use)
- RealESRGAN_x4plus_anime_6B (anime images)
- realesr-general-x4v3 (for compressed images)
Download the desired .pth model files from the GitHub release or provided links.
3. Prepare your video (frame extraction)
Use FFmpeg to extract frames from your input video:
4. Run Real-ESRGAN on extracted frames
Example command (for 4x upscaling):
5. Recombine the frames into a video
Use FFmpeg again:
6. (Optional) Add audio back from the original video
Real-ESRGAN is best suited for users comfortable with Python and command-line tools, or those who want to integrate high-quality upscaling into automated pipelines. While it's more technical to set up than GUI-based options, the visual results often speak for themselves — especially when restoring detail in blurry or low-res footage.
Tip: Just like Video2X, Real-ESRGAN can also run on Google Colab.
Waifu2x Extension GUI
Supported platform: Windows
Core Backends Supported: Waifu2x (NCNN/Caffe), Real-ESRGAN, Real-CUGAN, SRMD, Anime4K.
Waifu2x Extension GUI is a user-friendly, Windows-only desktop application that wraps several AI upscalers — including waifu2x, Real-ESRGAN, and Anime4K — into a single graphical interface. Originally designed for anime-style images and videos, it has since expanded to support real-world content with additional model options. It’s widely appreciated for being easy to install and use, with no command-line operations required.
Unlike many open-source tools, Waifu2x Extension GUI is built for convenience: it handles frame extraction, upscaling, video reconstruction, and even audio syncing — all within the same interface. This makes it one of the most beginner-friendly options available for AI-based video enhancement on Windows.

- All-in-one GUI that supports image, GIF, and video upscaling
- Includes multiple AI backends (waifu2x-ncnn-vulkan, Real-ESRGAN, Anime4K, SRMD)
- Built-in support for video/audio muxing — no FFmpeg command-line needed
- Offers batch processing and advanced settings for experienced users
- No Python or external dependencies required
- Windows only — no support for macOS or Linux
- Processing can be time-consuming on low-end GPUs
- Model options and update frequency depend on developer maintenance
- Slightly heavier installer (~1.5 GB due to bundled models and dependencies)
Installation & How to Use:
1. Download the installer
Go to the project's GitHub or Gitee release page: https://github.com/AaronFeng753/Waifu2x-Extension-GUI. Choose the latest .exe version (e.g., Waifu2x-Extension-GUI-v...-Installer.exe).
2. Install and launch the program
Run the installer. Once completed, open the application from the desktop shortcut or Start Menu.
3. Load your video
Drag and drop your video file into the program, or click "Add Files" and select your input.
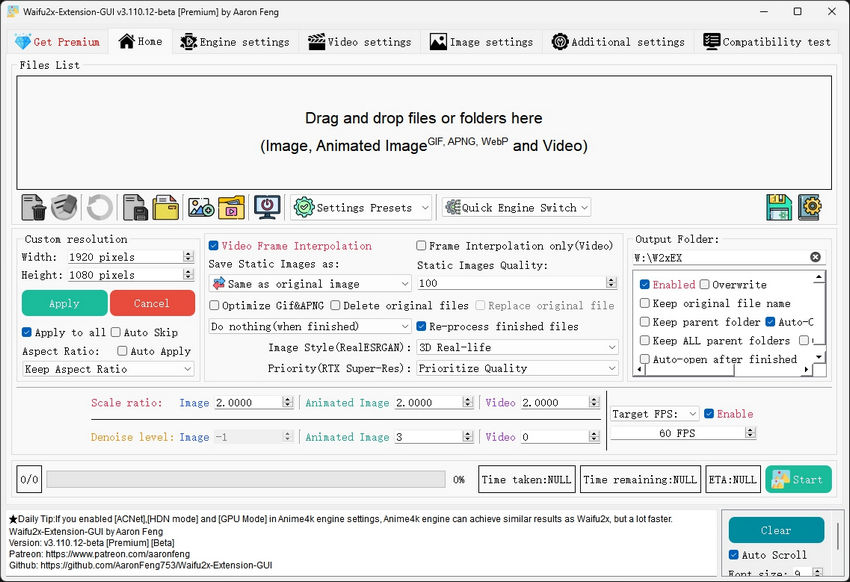
4. Choose upscaling settings
- Select AI model (e.g., Real-ESRGAN, waifu2x-ncnn-vulkan, or Anime4KCPP)
- Set output resolution multiplier (e.g., 2× or 4×)
- Optional: apply denoising, frame interpolation, or artifact reduction
5. Start processing
Click the "Start" button. The app will handle everything automatically: extract frames, upscale, rebuild the video, and sync the audio.
6. Access the output
The upscaled video will be saved in the specified output folder, ready to use or upload.
Waifu2x Extension GUI is ideal for users who want solid AI upscaling results without touching code or setting up complex environments. While it's less customizable than script-based tools, it offers a polished out-of-the-box experience that's hard to beat — especially for anime and low-resolution web videos.
REAL Video Enhancer
Supported platforms: Windows, Linux, macOS
Core Backends Supported: Real-ESRGAN (for resolution upscaling) seamlessly paired with RIFE (Real-Time Intermediate Flow Estimation) for AI frame interpolation.
REAL Video Enhancer is an all-in-one desktop application designed for AI-powered video enhancement, including frame interpolation and upscaling. It was created as a modern, cross-platform alternative to older software like Flowframes, offering a user-friendly experience without the need for command-line knowledge.
The application leverages cutting-edge AI models, such as RIFE for video interpolation and Real-ESRGAN for upscaling. It uses highly optimized inference engines like TensorRT and NCNN to maximize performance, especially on modern GPUs. Unlike many GUI tools, REAL Video Enhancer supports all major desktop operating systems, making it a versatile choice for a wide range of users.
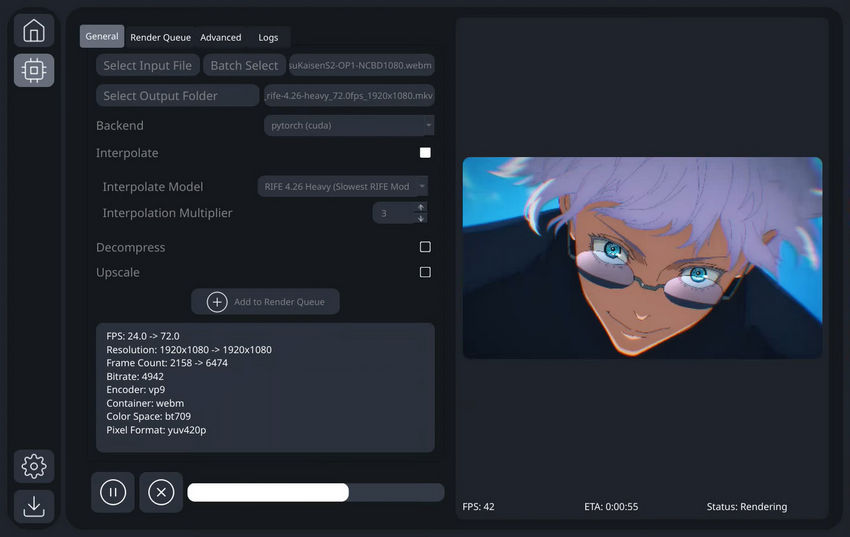
- Cross-platform support, available on Windows, Linux, and macOS.
- Highly optimized, using TensorRT and NCNN backends for superior performance on supported hardware.
- Comprehensive features, integrating frame interpolation (RIFE), upscaling (Real-ESRGAN), and video decompression into a single interface.
- User-friendly GUI, providing a simple and intuitive interface for a straightforward workflow.
- Includes advanced features like Discord RPC integration, scene change detection, and a real-time preview of the rendered frame.
- Resource-intensive, requiring a powerful GPU with at least 8 GB of VRAM and 16 GB of RAM for optimal performance.
- Larger download size, with the TensorRT version potentially reaching up to 16 GB due to bundled models and dependencies.
- Specific hardware requirements, as optimal performance is tied to specific GPUs and operating systems that fully support the TensorRT backend.
Installation & How to Use
1. Download the application
Go to the official project page on GitHub: https://github.com/TNTwise/REAL-Video-Enhancer/releases/tag/RVE-2.3.6.
Download the appropriate version for your operating system (Windows .exe, Linux .flatpak, or macOS .dmg).
2. Install and launch
Run the downloaded installer. Follow the prompts to complete the installation. Once finished, launch the application from your desktop or applications folder.
3. Load Your Video File
In the "General" tab, click "Select Input File" or "Batch Select" to import the video(s) you want to process.
4. Configure Processing Settings
- Backend: Choose a suitable backend, such as pytorch (cuda), to utilize your GPU's power.
- Interpolate: Check this box to enable frame interpolation.
- Interpolate Model: Select a model for frame interpolation, like RIFE 4.26 Heavy.
- Interpolation Multiplier: Set the interpolation factor, for example, 3, which will increase the video's frame rate by three times.
- Decompress: Check this box to decompress the video.
- Upscale: Check this box to enable upscaling and select the corresponding model.
5. Add to Render Queue
Once you have configured all your settings, click "Add to Render Queue". You can then manage your pending tasks in the "Render Queue" tab.
6. Start Processing
Click the play button (►) at the bottom to begin the processing task.
REAL Video Enhancer's intuitive GUI makes complex video enhancement operations simple, allowing even beginners to get started with ease.
SeedVR2
Core Backends Supported: One-Step Diffusion Transformer (Swin-MMDiT backbone) utilizing Diffusion Adversarial Post-Training (DAPT) for generative detail recovery.
Supported platforms: Windows, Linux, macOS (requires a Python environment or ComfyUI)
SeedVR2 is the latest open-source video and image restoration model released by the ByteDance team. Unlike traditional GAN-based tools such as Real-ESRGAN, SeedVR2 is built on a diffusion-based (Diffusion Transformer) architecture. Through an innovative technique called One-step Adversarial Post-Training, it overcomes the classic drawback of diffusion models—slow generation speed.
As a result, SeedVR2 combines the powerful “hallucination” ability of diffusion models—especially effective at reconstructing extremely blurry textures, text, and faces—with exceptionally fast inference. Denoising and upscaling are completed in a single step. For users who demand the highest possible visual quality while preserving rich details, SeedVR2 is one of the most cutting-edge open-source solutions available today. It is typically used as a ComfyUI plugin or run directly via Python.
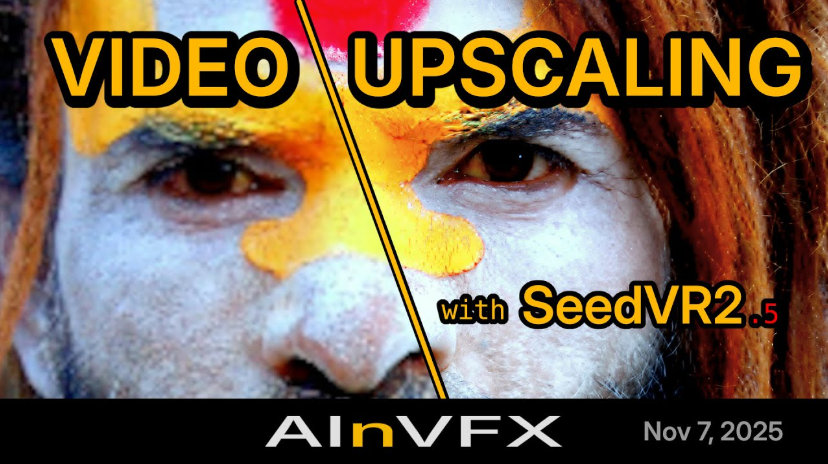
- Powered by diffusion models, SeedVR2 can redraw highly realistic details and often outperforms traditional GAN models when restoring severely blurred or low-resolution videos.
- Unlike conventional diffusion models that require dozens of denoising steps, SeedVR2 completes the process in just one step, delivering a massive speed boost.
- Uses adaptive resolution techniques, avoiding the fixed input size limitations found in some other models.
- The same model architecture supports both video restoration and image super-resolution.
- Despite the reduced number of inference steps, SeedVR2 is still a large Transformer-based model and requires substantial VRAM, especially for 4K video processing.
- It is primarily used via ComfyUI workflows or the command line, with no standalone, one-click consumer-friendly interface.
- Requires configuring Python, PyTorch, and related dependencies, which may be challenging for beginners.
Installation & How to Use
Currently, the easiest way to use SeedVR2 is through ComfyUI. Below are the steps for installing and running it with ComfyUI:
1. Install ComfyUI
If you haven’t installed ComfyUI yet, download and set it up from its GitHub repository. ComfyUI is a powerful node-based GUI for AI image and video processing.
2. Install the SeedVR2 Custom Node
It is recommended to install via ComfyUI Manager:
- Open the ComfyUI interface and click “Manager.”
- Click “Install Custom Nodes.”
- Search for “ComfyUI-SeedVR2_VideoUpscaler” (usually maintained by numz or a similar developer).
- Click Install and restart ComfyUI.
3. Download the Models
After installation, the required model files are often downloaded automatically. If manual download is needed, visit the ByteDance-Seed/SeedVR2 repository on Hugging Face and place the model files into ComfyUI/models/checkpoints or the directory specified by the plugin.
4. Load the Workflow
- In ComfyUI, load a SeedVR2 example workflow (typically provided as a JSON file in the plugin folder, or searchable online as “SeedVR2 ComfyUI workflow”).
- Point the “Load Video” node to your local video file.
- Click “Queue Prompt” to start processing.
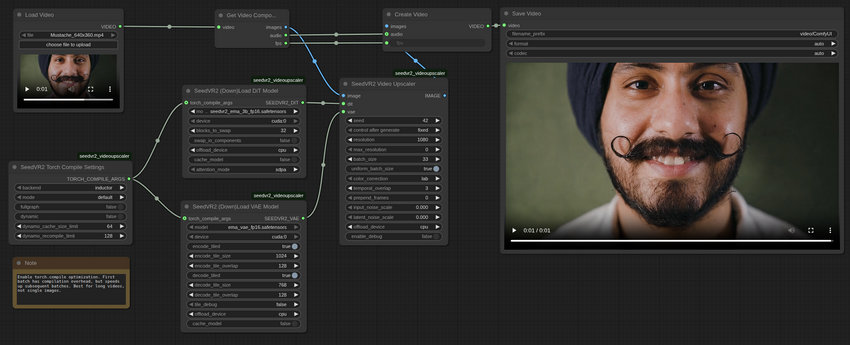
5. (Optional) Command-Line Usage
For developers, SeedVR2 can also be run directly from the official GitHub repository:
cd SeedVR
pip install -r requirements.txt
python inference_seedvr2.py --input your_video.mp4 --output result.mp4
chaiNNer
Supported platforms: Windows, Linux, macOS
Core Backends Supported: Framework-agnostic node system supporting PyTorch, NCNN, and ONNX architectures (Fully compatible with custom user-trained ESRGAN, Real-ESRGAN, SCUNet, SwinIR, and DAT models).
chaiNNer is an extremely powerful open-source node-based image processing GUI. Beyond image workflows, its flexible node system also makes it highly efficient for video upscaling and enhancement tasks. Unlike traditional "one-click" tools, chaiNNer allows users to build fully customized pipelines by connecting functional nodes such as video loading, model selection, upscaling, and exporting.
It integrates multiple mainstream AI upscaling algorithms, including Real-ESRGAN, ESRGAN, SwinIR, and HAT. Thanks to its high level of customization and modularity, chaiNNer is widely regarded by advanced users as one of the most versatile open-source solutions for video restoration and enhancement.
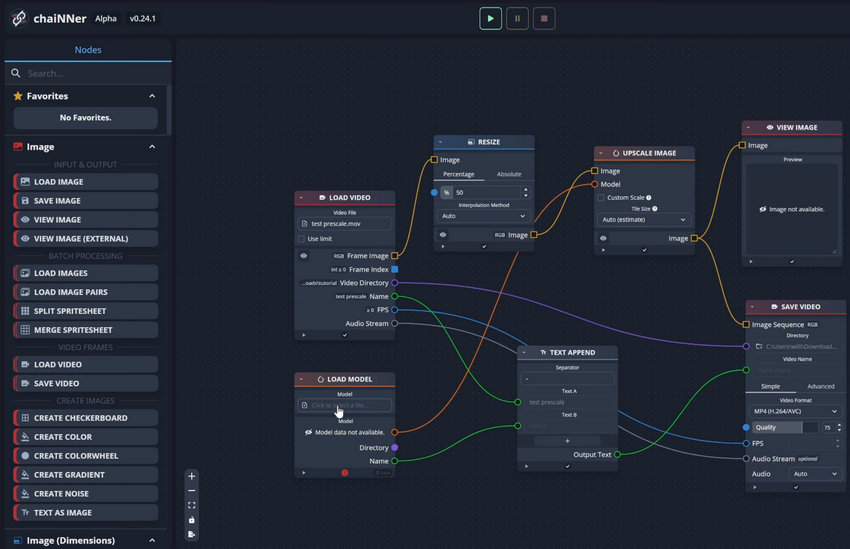
- Node-based workflow provides clear logic and allows unlimited stacking of filters, color correction, and multiple upscaling models.
- Supports nearly all mainstream open-source AI models and allows importing custom .pth or .onnx models.
- Cross-platform compatibility with native support for Windows, macOS, and Linux, along with hardware acceleration for NVIDIA, AMD, and Intel GPUs.
- Offers a full suite of image and video processing features, including background removal, auto-cropping, and color space conversion.
- Steep learning curve, especially for beginners unfamiliar with node-based workflows.
- Initial setup can be somewhat complex, requiring manual installation of dependencies such as Python and model files.
- High resource consumption when building long and complex node chains, especially in terms of VRAM and system memory.
Installation & How to Use
chaiNNer simplifies the video upscaling process through its visual workspace. Here is how to set up a basic video enhancement workflow:
1. Download and Install chaiNNer
Visit the official GitHub repository or website to download the installer for your OS. Upon first launch, chaiNNer will offer to install necessary dependencies (Python/PyTorch); it is highly recommended to allow the app to handle this automatically.
2. Load the Video and AI Model
Start by right-clicking in the workspace to add nodes, or drag them from the sidebar:
- Add a "Load Video" node and select your source file.
- Add a "Load Model" node and point it to a compatible AI model file (e.g., a Real-ESRGAN .pth file).
3. Build the Upscaling Chain
Connect the nodes to define the logic:
- Connect the Image output of the "Load Video" node to the Image input of an "Upscale Image" node.
- Connect the Model output of your "Load Model" node to the Model input of the upscale node.
- Add a "Save Video" node. Connect the upscaled image output to it, and also connect the Audio output from the "Load Video" node to "Save Video" to ensure your sound is preserved.
4. Execute the Process
Set your desired output format (e.g., MP4 or MOV) and codec in the "Save Video" node. Click the "Run" button (play icon) at the top of the interface. chaiNNer will process the video frame-by-frame and reassemble it with the original audio.
5. (Optional) Batch Processing
For processing multiple videos, you can use the "Iterator" nodes or the "Batch Manager" to apply the same visual workflow to an entire folder of video files.
Anime4K
Supported platforms: Windows, macOS, Linux (via video players or custom scripts)
Core Backends Supported: Custom lightweight CNNs (Convolutional Neural Networks) translated directly into HLSL/GLSL Shaders for real-time media player injection.
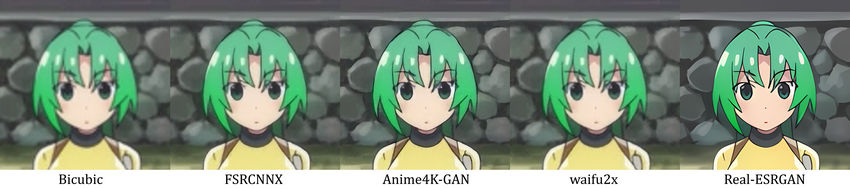
Anime4K is a lightweight, open-source video upscaling algorithm specifically designed for anime and line-art content. Unlike other tools that rely on deep learning or GAN models, Anime4K uses efficient OpenCL or Vulkan shaders that run directly on your GPU. This makes it fast, real-time, and suitable even for low-end hardware.
Rather than extracting and reassembling video frames, Anime4K is typically used within video players like MPV or VLC via shader scripts. It can also be applied offline using FFmpeg filters or command-line tools, but its biggest strength lies in real-time playback enhancement — making old anime or low-res web videos look cleaner and sharper instantly.
- Real-time enhancement with almost no delay
- Extremely lightweight — works on integrated GPUs
- Great for anime, cartoons, and line-art-style content
- Works inside MPV, VLC, or with custom scripts — no separate frame extraction needed
- Cross-platform support
- Not suitable for photographic or real-world video content
- No graphical interface or packaged installer
- Requires manual configuration to integrate with video players
- Output quality isn’t as sharp or detailed as deep learning-based upscalers
Installation & How to Use:
Option 1: Real-time playback with MPV
- Download MPV player from: https://mpv.io/
- Clone or download the Anime4K repository: https://github.com/bloc97/Anime4K
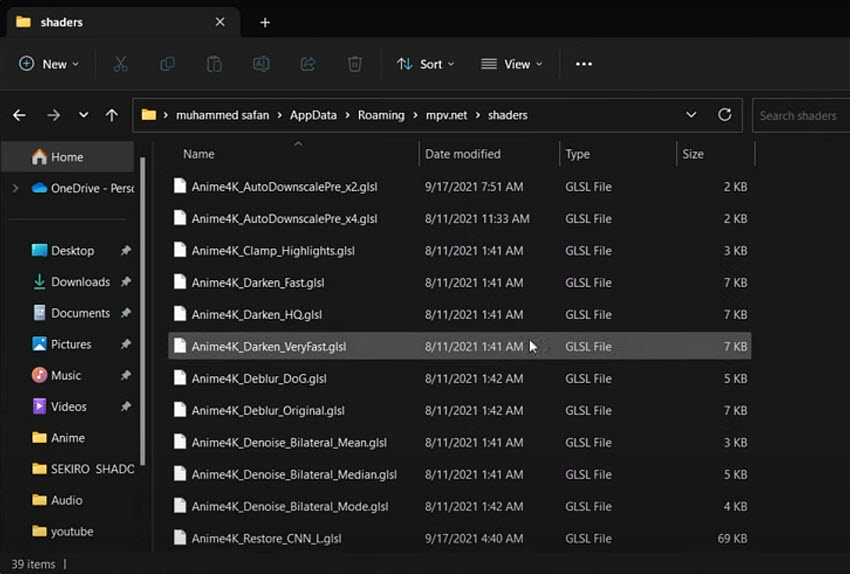
- Place the shader files (e.g., Anime4K_Clamp_Hybrid.glsl) in MPV's shaders folder.
- Edit mpv.conf to activate the shader: glsl-shaders="~~/shaders/Anime4K_Clamp_Hybrid.glsl"
- Open your video with MPV, and the enhancement will apply in real time.
Also read: How to Use Anime4K with MPV, Pros, Cons, Features >>
Option 2: Offline processing with FFmpeg (Advanced users)
Some forks (like Anime4KCPP) provide ways to run Anime4K filters on video files directly, but this requires compiling the tool or using specific FFmpeg builds with shader support — not beginner-friendly.
Anime4K is best suited for anime fans or anyone who wants instant visual improvement for low-res animated content. It doesn't offer the deep restoration capabilities of AI models like Real-ESRGAN or Video2X, but its speed and simplicity make it an excellent choice for playback or lightweight enhancement.
As you can see, open-source video enhancers come in many forms — from user-friendly GUIs like Waifu2x Extension GUI to lightweight shader-based solutions like Anime4K.
While these tools are powerful and cost nothing to use, they also come with certain trade-offs that might be frustrating for beginners or even experienced users.
In the next section, we'll look at some of the most common challenges people face when working with these open-source solutions.
QualityScaler
Supported platforms: Windows 10/11 (Linux via Wine/Proton or source code)
Core Backends Supported: Real-ESRGAN, Real-CUGAN, BSRGAN, SAFMN (Heavily optimized for cross-hardware compatibility via DirectML/Vulkan).
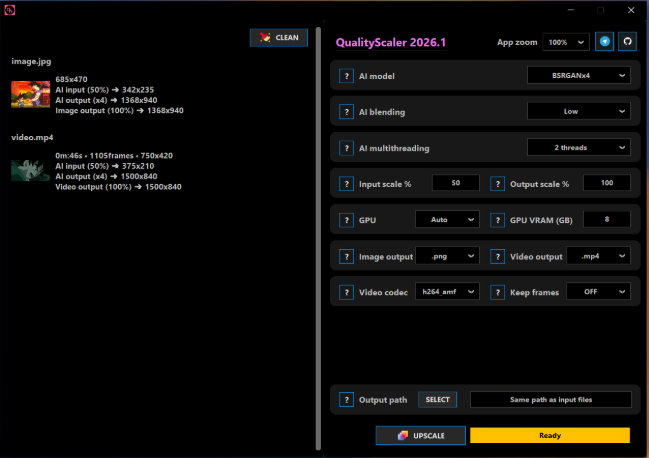
QualityScaler is a Windows-based AI upscaling GUI application developed by Djdefrag. Unlike command-line tools, it provides a user-friendly interface to run powerful AI models like BSRGAN and Real-ESRGAN. It is built on DirectML, making it highly compatible with virtually any modern GPU (AMD, Intel, and Nvidia) without requiring complex CUDA setups.
While the project is open-source (hosted on GitHub), it operates on a "freemium" model for convenience: the pre-compiled, easy-to-use executable is a paid product on platforms like Itch.io and Steam ($7+), whereas the source code is free for developers who know how to run Python scripts.
- Includes "Stop & Resume" for long video upscaling tasks and creates a restore point if the app crashes.
- Runs completely offline; no data is sent to the cloud.
- The "download and run" .exe version costs money. The free route requires manual installation via Python source code.
- Designed primarily for Windows. Linux and macOS users must use compatibility layers or run the Python code directly, which can be buggy.
- As a Python-based application, it can sometimes be slower than optimized C++ implementations of the same algorithms.
Installation & How to Use:
There are two ways to use QualityScaler: the Easy Way (Paid) and the Developer Way (Free).
Option 1: The Easy Way (Paid Executable)
Ideal for users who want a simple installer without technical hassle.
- Purchase: Visit Djdefrag’s Itch.io page or Steam and purchase QualityScaler (approx. $7 USD).
- Install: Download and run the installer (.exe).
- Run: Open the app, drag and drop your video, select a model (e.g., Real-ESRGAN-x4-plus), and click "Start".
Option 2: The Developer Way (Free via GitHub)
Ideal for users comfortable with Python and command lines.
1. Install Prerequisites: Ensure you have Python (version 3.10 or newer) and Git installed on your Windows PC.
2. Clone the Repository:
git clone https://github.com/Djdefrag/QualityScaler.git
cd QualityScaler
3. Install Dependencies: Run the following command to install required libraries:
pip install -r requirements.txt
Note: You may also need to manually download the AI models and ffmpeg.exe and place them in the specific folders (/AI-onnx and /Assets) as detailed in the README.
4. Launch: Run the application using Python:
python QualityScaler.py
What to Check Before Choosing an Open-Source Video Upscaler
Open-source video upscalers can be cost-effective and flexible, but the experience varies by project. Before installing one, consider how it handles video files, what hardware it needs, and whether its license fits your intended use.
Does It Process Video Directly?
Some projects provide a complete video-processing interface, while others focus on image models that can be applied to video frames. If the tool does not manage video input and output itself, you may need FFmpeg or another wrapper to extract frames, rebuild the video, and preserve its audio. Real-time shaders are another category: they can enhance playback without necessarily producing an enhanced video file.
What Hardware and Setup Does It Require?
A tool may support several operating systems but still depend on a specific inference backend, GPU architecture, or software environment. Check the current documentation for GPU support, VRAM requirements, model downloads, and installation steps. If you are new to AI video processing, a maintained GUI release may be easier to use than a command-line or node-based workflow.
Is It Free, Open Source, and Actively Maintained?
These are separate questions. A project may publish its source code while charging for a prebuilt application, and an open-source license may impose conditions on redistribution or commercial use. Check the license file, the terms of any packaged build, and the latest release or repository activity before relying on a tool for ongoing work.
Will It Improve Your Type of Footage?
Anime, live-action video, heavily compressed clips, and noisy archival footage can respond differently to the same model. Upscaling increases output dimensions, but it cannot reliably recover every detail lost in the original recording. Test a short representative clip first, then inspect faces, fine textures, motion, and compression artifacts at the intended viewing size.
Open-Source Video Upscalers vs. Commercial Software
Open-source tools are a strong choice if you want to avoid license fees, experiment with different models, or build a customized processing workflow. The trade-off is that setup and maintenance can take time, particularly when a project relies on external models, scripts, or hardware-specific backends.
A commercial desktop enhancer offers a different approach: it packages video processing, model selection, preview, and export into a more integrated interface. This can be useful when you want to enhance multiple clips without assembling the workflow yourself. However, commercial software comes with licensing costs, and its results still depend on the source footage, model, and settings.
Aiarty Video Enhancer is one option for users who prefer an integrated desktop workflow on Windows or macOS. It supports AI upscaling, denoising, deblurring, frame interpolation, color adjustments, and batch processing. It is proprietary software, not an open-source alternative, so it is best considered when convenience and an integrated workflow matter more to you than access to source code.
The choice is not simply between better and worse image quality. It is between different levels of control, setup effort, cost, and workflow integration.
Feature Comparison: Aiarty Video Enhancer vs. Open-Source Video Enhancers
The open-source tools covered in this guide vary widely in purpose and usability. Some are complete video-processing solutions, while others are model frameworks, workflow builders, or real-time playback filters.
To keep the comparison practical, we've focused on Video2X, Real-ESRGAN, and Waifu2x. These are among the most established open-source projects for AI-based video upscaling and are commonly used to generate enhanced video output.
Anime4K is not included because it is primarily designed for real-time playback enhancement rather than video export. Other tools such as chaiNNer serve different roles in the workflow and are therefore less suitable for a direct feature-by-feature comparison.
How to Use Aiarty Video Enhancer to Upscale/Enhance Your Videos
Getting started with Aiarty Video Enhancer is straightforward and requires no prior video editing knowledge. Just follow these simple steps to enhance your videos smoothly:
Step 1: Download and install Aiarty Video Enhancer
Click the button below to download and install Aiarty Video Enhancer on your PC or Mac. The installation process is straightforward and requires no additional dependencies or environment setup.
Step 2: Import your video
Open the program and drag your video file into the main workspace.
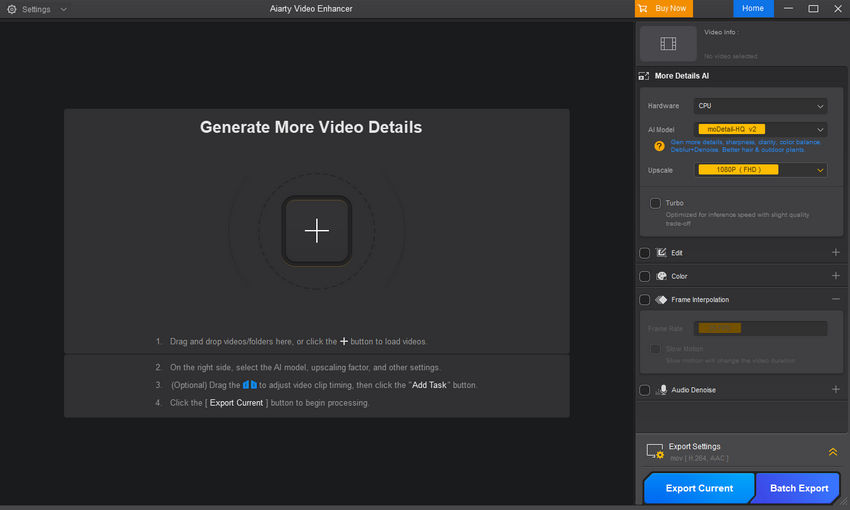
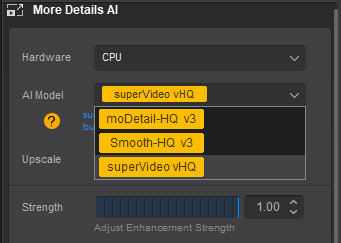
Step 3: Select an AI model that matches your footage
Aiarty provides specialized models for different scenarios. From the AI Model dropdown:
- More Detail-HQ v3: Choose this for videos with plenty of fine detail. It enhances and sharpens textures while maintaining balanced natural colors.
- Smooth-HQ v3: It smooths out imperfections and creates a polished look without over-processing.
- SuperVideo vHQ: Use this for very dark or low-light videos to remove heavy noise and recover hidden details.
Step 4: Choose your desired upscaling option
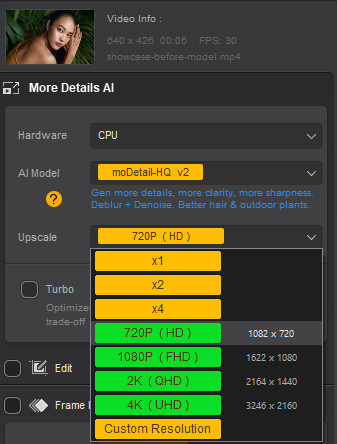
Under the Upscale menu, select the resolution that fits your footage and goals.
Tips:
- For many videos, choosing a higher option such as ×4 or 4K delivers an immediate improvement in clarity and detail.
- In some situations, however, upscaling in stages (for example, ×2 followed by another ×2) can produce cleaner and more stable results than jumping straight to ×4 or 4K, especially when working with heavily compressed or older footage.
- If your source video is already high resolution and you mainly want to reduce noise or fix minor blur, selecting ×1 allows you to enhance image quality without increasing the output resolution.
Step 5: Preview the result and fine-tune if needed
Click the Preview button to see a short sample of how the enhanced video will look before exporting.
In my test, I chose 2x upscaling, going from 1280x720 to 2560x1440. As you can see in the screenshot below, the video preview looks excellent.
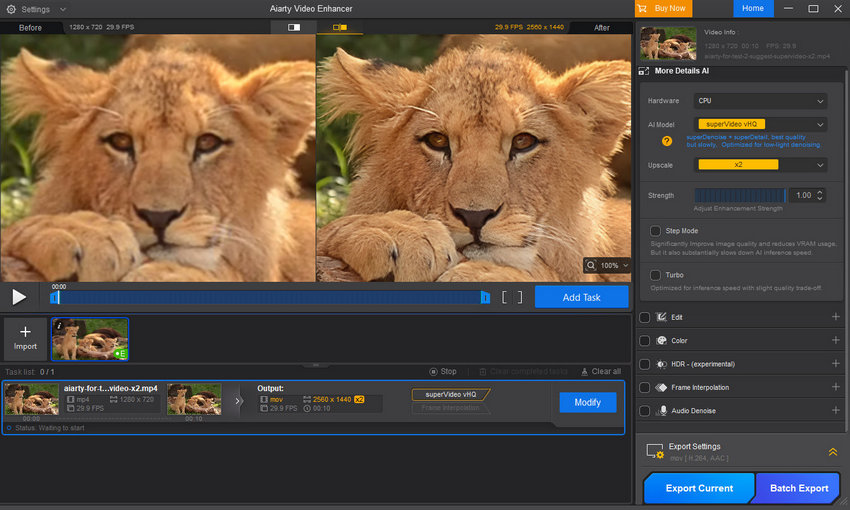
If the preview doesn’t meet your expectations, you can refine the result using the following adjustments:
- Switch to a different AI model to better match your footage type.
- Try another upscaling option, such as step-by-step scaling instead of a single large jump.
- Reduce the enhancement strength if the image appears over-sharpened or unnatural.
- Enable Step Mode to further improve visual quality while significantly reducing VRAM usage (note that this may slow down AI processing).
- Adjust colors if needed by expanding the Color panel and enabling Restore Color or fine-tuning temperature, tint, exposure, contrast, and other parameters.
Step 6: Export the enhanced video
If the preview meets your expectations, add the task to the queue and select either "Export Current" for a single video or "Batch Export" to process multiple videos at once.
Real-World Examples
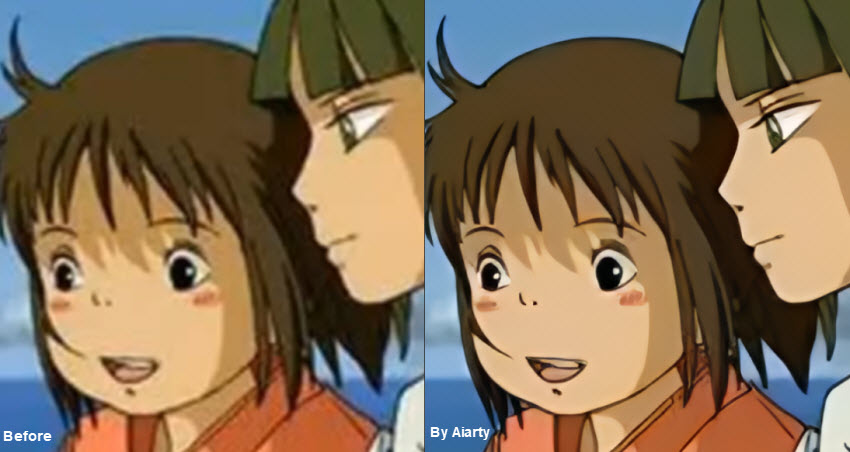
To show the kinds of results you can expect, we tested Aiarty Video Enhancer on both noisy archival footage and anime content.
Old recording footage: The source clip contains heavy grain and color noise, which are common issues in older recordings. After enhancement, the footage appears cleaner and details become easier to distinguish.



Anime footage: This video was upscaled from 1190×724 to 2380×1448. The enhanced version shows sharper line work and fewer visible compression artifacts.
Still images can only show part of the result. The video below provides a closer look at Aiarty Video Enhancer in action, including the workflow and the quality improvements achieved on real footage.
Conclusion
The right open-source video upscaler depends on your footage and how you want to work. Video2X is worth considering if you want a video-oriented workflow with multiple AI backends. Real-ESRGAN is useful for users who want to build a custom upscaling pipeline, while Waifu2x Extension GUI is a practical option for Windows users working with anime and other stylized content. Anime4K is better suited to real-time anime playback than to a conventional video export workflow.
Before choosing, verify the project's current release, license, supported hardware, and installation requirements. Then test a short clip that resembles your actual footage. Pay attention not only to sharpness, but also to texture, motion consistency, and artifacts. Increasing resolution does not guarantee that the result will look more natural.
If you prefer a more integrated desktop workflow with built-in video enhancement and export tools, a commercial application such as Aiarty Video Enhancer may be worth considering. It is not open source, so the decision comes down to whether convenience and workflow integration justify the cost for your needs.
 FAQs
The best open source AI video upscaler depends on your needs and technical experience. Tools like Video2X, Real-ESRGAN, and Waifu2x are among the most popular options available on GitHub. Video2X is widely considered one of the most powerful solutions because it supports multiple AI models and can upscale videos to higher resolutions with good detail recovery.
Yes, some open source AI video upscalers provide graphical user interfaces (GUI), although many projects still rely on command-line tools. For example, Video2X offers a GUI version that allows users to upscale videos without manually entering commands. There are also community-built interfaces for tools like Real-ESRGAN and Waifu2x that simplify the process.
However, GUI versions of open source upscalers may still require downloading dependencies or installing additional libraries. As a result, they may not be as straightforward as commercial desktop video enhancer software.
Yes, there are several free AI video upscalers available. Many open source projects such as Video2X and Waifu2x allow users to upscale videos using AI models at no cost. These tools can improve video resolution, reduce noise, and enhance details, especially when used with a compatible GPU.
In addition to open source tools, some AI video enhancement software also offers free trials or limited free versions, which may provide a simpler setup and faster processing compared with open source solutions.
Yes, you can. Open-source tools like Video2X, chaiNNer, and Waifu2x Extension GUI provide professional-grade AI upscaling without the cost of commercial software. These tools leverage powerful models such as Real-ESRGAN to increase resolution from 1080p to 4K or higher, though they often require more technical setup than paid alternatives.
Many free open-source enhancers are specifically designed to handle compression artifacts. Models like Real-ESRGAN and SeedVR2 use deep learning to guess lost details and smooth out pixelation or blocking caused by heavy compression, resulting in a cleaner, sharper image that significantly improves overall visual quality.
There is no single best tool for every situation, but Video2X is often considered one of the most capable free open-source video enhancers because it supports multiple AI upscaling engines and complete video processing workflows. For anime content, Waifu2x and Anime4K remain popular choices, while Real-ESRGAN is widely used for restoring details in low-quality footage.
Video2X is generally the more versatile option. It supports multiple AI models, processes full videos, and offers more control over output settings. Waifu2x Extension GUI is easier to use and includes a graphical interface, making it a good choice for beginners. If you need maximum flexibility and support for different enhancement models, Video2X is usually the stronger option. If ease of use is your priority, Waifu2x Extension GUI may be a better fit.
Some of the most widely used open-source super-resolution models in 2026 include Real-ESRGAN, SeedVR2, SwinIR, and BSRGAN. Each model has different strengths. Real-ESRGAN is known for general-purpose restoration, SeedVR2 focuses on video enhancement and temporal consistency, while SwinIR and BSRGAN are commonly used in research projects and custom AI workflows.
The processing speed of any video upscaler depends heavily on your hardware. Among free options, Anime4K is known for its lightweight design and real-time performance, while Waifu2x Extension GUI offers GPU acceleration for faster processing. Tools based on Real-ESRGAN can also be relatively fast when paired with a modern NVIDIA GPU, although higher-quality settings typically increase processing time.
Yes. Several open-source video upscalers support macOS, including chaiNNer, Real-ESRGAN, Anime4K, and Real-Video-Enhancer. Compatibility and setup requirements vary by project. Some tools provide graphical interfaces, while others require additional configuration or command-line operations. Mac users looking for the easiest experience may prefer options with a built-in GUI, such as Real-Video-Enhancer.
You May Also Like


This post was written by Brenda Peng who is a seasoned editor at Digiarty Software who loves turning ordinary photos into extraordinary works of art. With AI assistance for brainstorming and drafting, the post is reviewed for accuracy by our expert Abby Poole for her expertise in this field.
