How to Denoise Grainy Video in Premiere Pro (2026 Guide)
When you're working with low-light footage or older video clips, unwanted noise and grain can be a serious distraction. Many video editors turn to Premiere Pro for noise reduction, hoping to clean up their footage without sacrificing too much detail.
In this article, we’ll walk through three practical ways to denoise video in Premiere Pro - using the hidden built-in VR De-Noise effect, the quick Median filter, and the industry-standard Neat Video plugin. Whether you are looking for a free native fix or a Hollywood-grade solution, we've got you covered. Now, let’s get started.
Method 1: Denoise Video with Premiere Pro's Hidden Gem — VR De-Noise Effect
While Premiere Pro doesn’t offer a dedicated "video denoiser" under its standard effects category, it hides a powerful denoising tool inside its VR toolkit: VR De-Noise. Don't let the name scare you off; this effect works incredibly well on regular, non-VR footage, and it is completely free to use.
Follow these steps to clean up your footage natively:
Step 1: Add your footage to the Timeline
Open your Premiere Pro project and drag your grainy or low-light video clip into the timeline. Make sure you are in the Effects or Editing workspace.
Step 2: Find and apply the VR De-Noise effect
Go to the Effects panel and type "VR De-Noise" into the search bar. You will find it under: Video Effects > Immersive Video > VR De-Noise. Drag and drop this effect onto your video clip.

Step 3: Adjust critical settings for regular 2D video (Crucial Step)
Select your clip and open the Effect Controls panel. Find the VR De-Noise settings. Uncheck the "Auto VR Properties" box. Then, change the Frame Layout from its default to Monoscopic. This forces the algorithm to treat your footage as a standard flat video rather than a 360-degree sphere.

Step 4: Fine-tune the denoising parameters
Now, adjust the sliders to clean up the image:
- Noise Level: Set this based on how aggressive the grain is in your video.
- Denoise Amount: Controls how much denoising is applied. Avoid cranking this too high, or your video will look overly smooth and "plastic." Find a sweet spot where the grain disappears but natural textures remain.
Method 2: Denoise Video with Premiere Pro's Median Effect
Median effect works by averaging neighboring pixels, which helps reduce visual noise. While not as advanced as dedicated plugins, it’s free and built into Premiere Pro, making it a quick option for basic noise reduction.
Here’s how to apply the Median effect step by step:
Step 1: Import Your Footage into Premiere Pro
Open your project or create a new one, then drag your noisy video clip into the timeline. Make sure you’re working in the Editing workspace so you have easy access to the Effects panel.
Step 2: Find the Median Effect
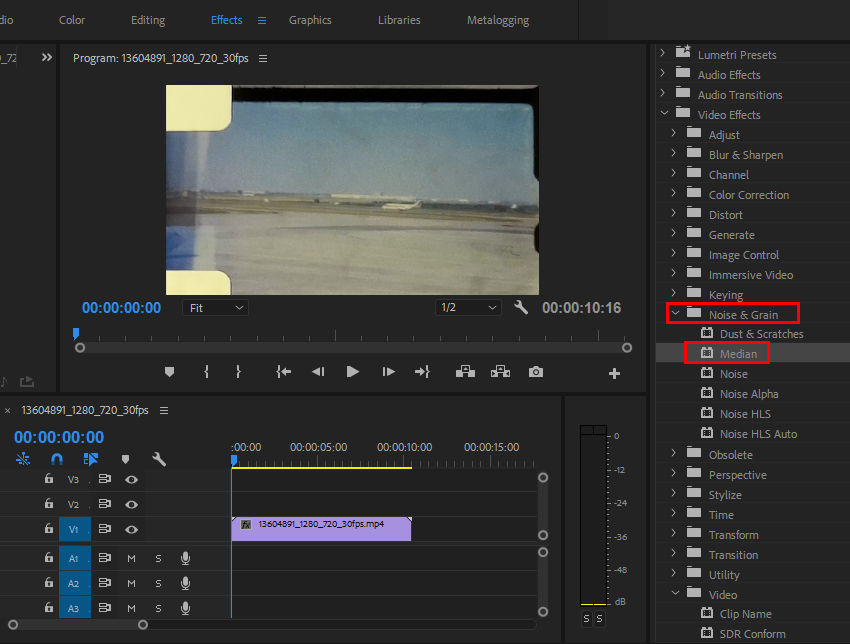
In the Effects panel, type "Median" into the search bar. You’ll find it under: Video Effects > Noise & Grain > Median. Now simply drag the effect onto your video clip in the timeline.
Step 3: Adjust the Radius Value
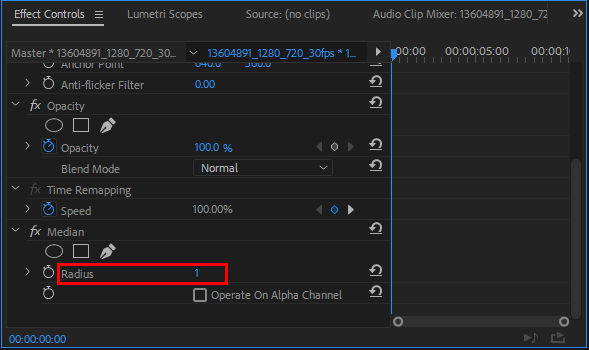
Once the effect is applied, go to the Effect Controls panel with the clip selected.
You’ll see a " Radius" slider. This determines how aggressively the effect smooths the image.
- Start with a low value like 2–3.
- Increase gradually to see much noise is reduced.
- Be careful: higher values may soften the image too much and blur important details.
Learn More: How to Fix Out of Focus, Blurry, or Pixelated Video in Premiere Pro
Step 4: Use Masks to Apply Median Selectively (Optional)
If the noise is only present in specific parts of the image (like shadows), you don’t need to apply the effect to the whole frame.
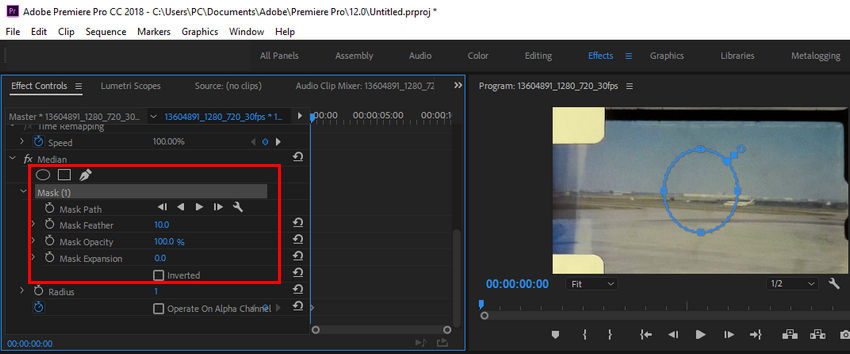
Under the Median effect in the Effect Controls panel:
- Click the Ellipse, Rectangle, or Pen mask tools to isolate areas.
- You can also feather the mask for a smoother transition.
- Animate the mask if the noisy area moves during the clip.
Step 5: Fine-Tune and Preview
Play back the clip and toggle the effect on and off to compare results. You may need to balance between noise reduction and image sharpness, depending on your footage.
Method 3: Denoise Video in Premiere Pro Using the Neat Video Plugin
For more advanced and effective noise reduction, many professionals turn to Neat Video, a powerful third-party plugin designed specifically to clean up grainy or noisy footage. Unlike the basic Median effect, Neat Video uses sophisticated algorithms to analyze and reduce noise without overly softening the image. It works particularly well with low-light or high ISO footage.
Here’s how to use Neat Video in Premiere Pro step by step:
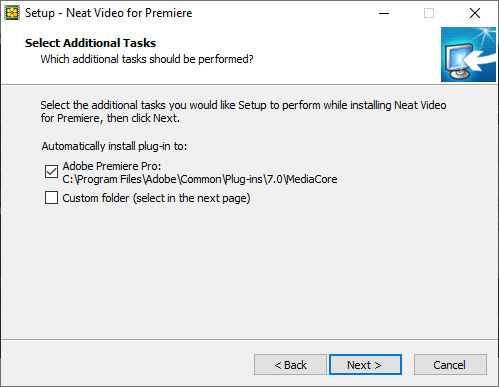
Step 1: Install the Neat Video Plugin
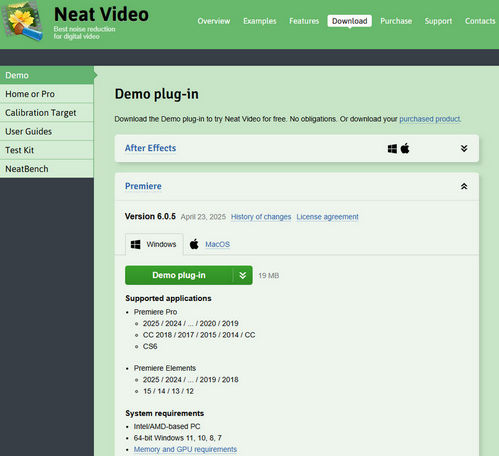
First, you’ll need to install the plugin. Head over to Neat Video download page and download the version that matches your operating system and Premiere Pro build.
After running the installer and completing the setup, restart Premiere Pro so the plugin becomes available within your effects library.
Step 2: Apply Neat Video to Your Footage
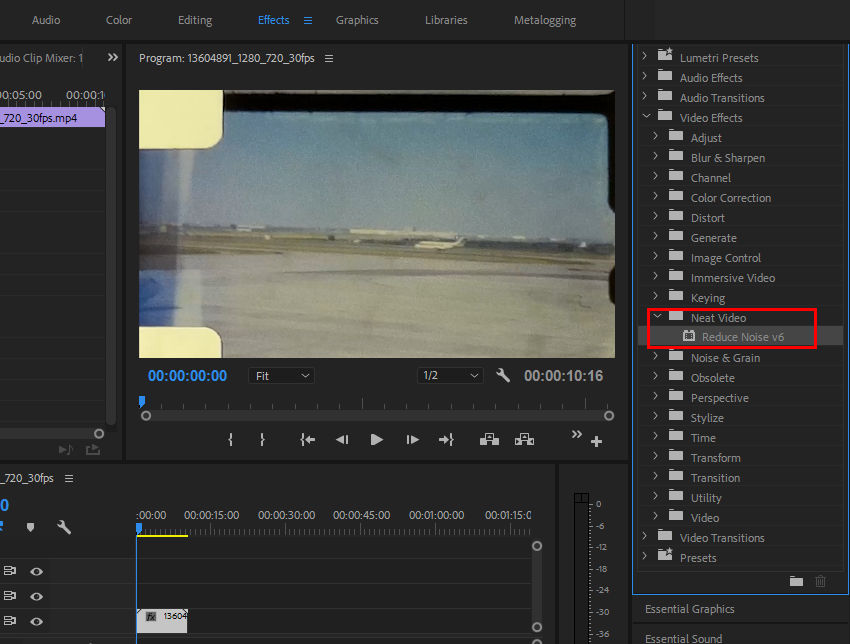
With Premiere Pro open, import your noisy video clip into the timeline. Then, go to the Effects panel and search for “Reduce Noise vX” under Video Effects > Neat Video. Drag this effect onto your clip.
Also see: How to denoise in After Effects >>
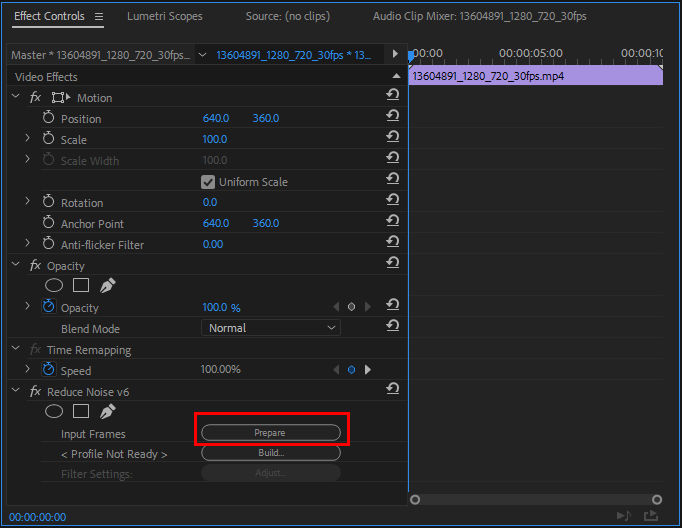
Once applied, you’ll see the plugin listed in the Effect Controls panel.
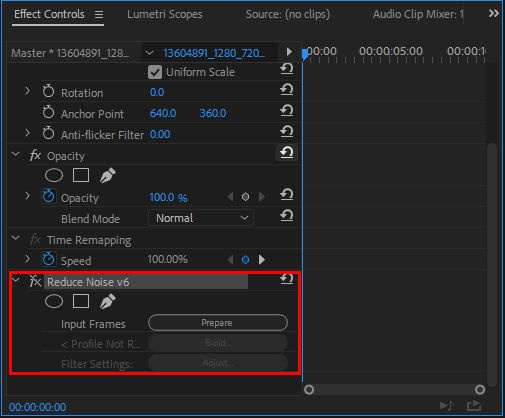
Step 3: Launch the Plugin Interface
Click the "Prepare" and "Build" button in the Effect Controls panel to launch the Neat Video interface. This opens a separate window where the actual noise analysis and filtering are performed. It’s where the real work begins.
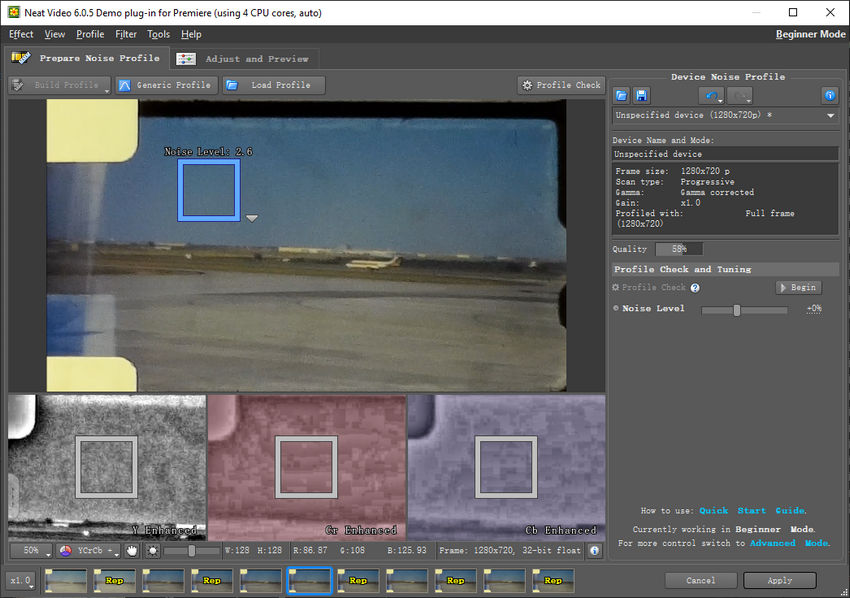
Step 4: Build a Noise Profile
In the Neat Video interface, you’ll need to select an area of your frame that contains only noise - ideally a flat surface with no detail, like a wall or shadowed area. Use your cursor to highlight that region. Once selected, click the "Auto Profile" button. Neat Video will then analyze the sample and generate a custom noise profile tailored to your footage.
Step 5: Adjust Noise Reduction Settings
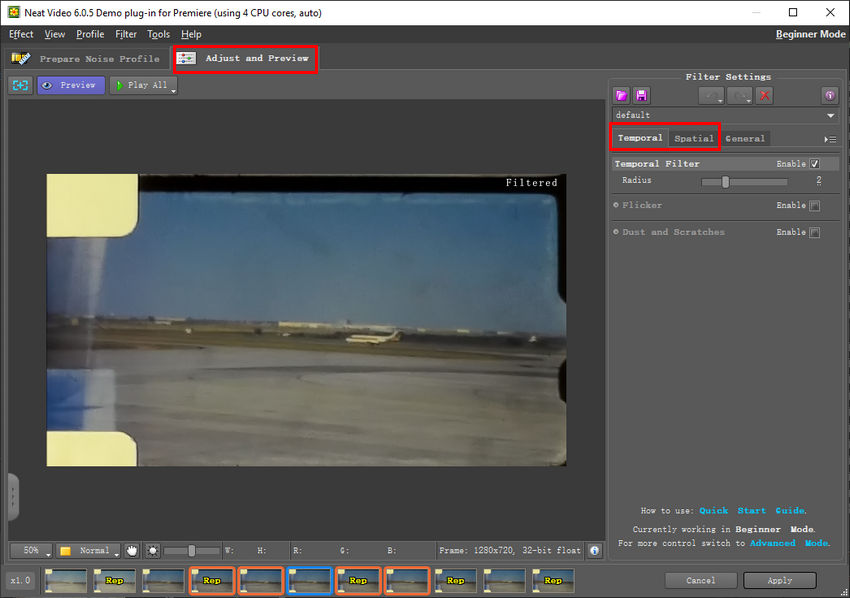
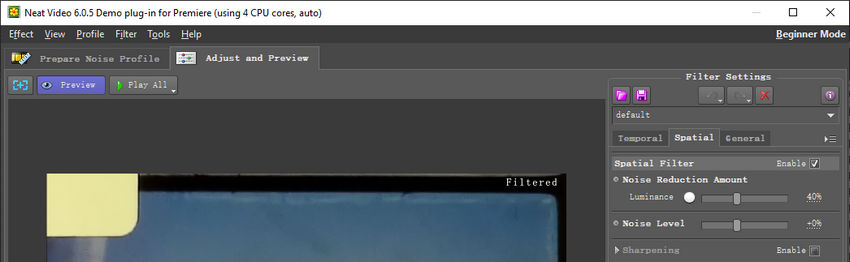
Once the noise profile is built, switch to the Adjust and Preview tab, this is where all the fine-tuning happens. Neat Video uses two core filters: Spatial and Temporal.
The Spatial filter targets noise within a single frame, like color blotches or sensor grain. You can adjust its strength using the Radius and Noise Reduction Amount sliders. Increasing the radius leads to stronger noise removal, but be cautious - too much will soften image details.
The Temporal filter compares multiple frames to suppress flickering or motion-based noise. Its strength is also controlled via a Radius setting (which determines how many frames before and after are analyzed) and a separate reduction slider. This filter is especially effective for video shot in low light or with compression artifacts.
Step 6: Apply the Filter and Return to Premiere Pro
Once you’re satisfied with the preview, click “Apply” to close the Neat Video window. Back in Premiere Pro, the effect will now be active on your clip. Be aware that Neat Video is demanding on your hardware, so playback may be slow until you render the sequence.
Neat Video offers far more control and better results than basic built-in effects, especially for problematic footage. However, it does come with a cost (both in price and performance). In the next section, we’ll show you a simpler alternative that requires no technical setup and works automatically — ideal for users who just want clean video without the complexity.
See also: Neat Video vs Topaz Video AI: Which Video Denoiser Performs Better?
Bonus: An Easier Alternative —Denoise Video with AI Tool
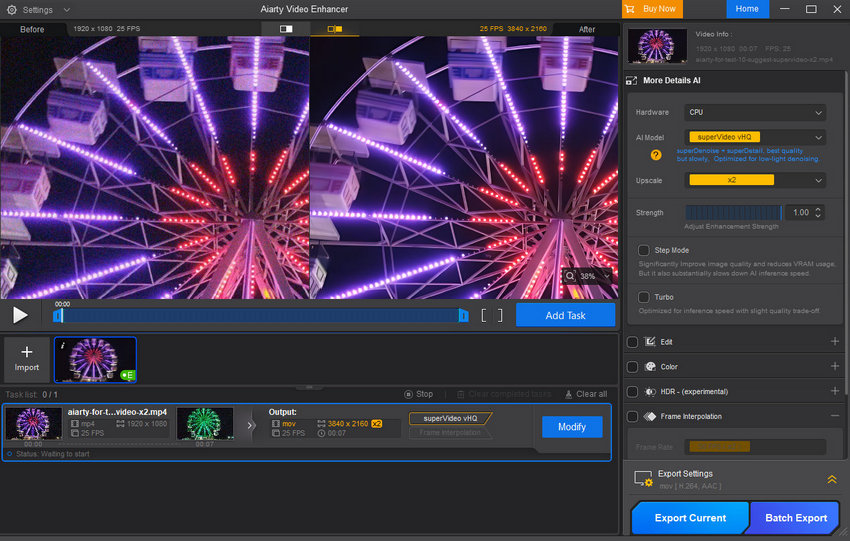
If you're not ready to dive into manual plugins or spend time adjusting filters frame by frame, Aiarty Video Enhancer offers a much simpler approach. It uses AI-powered algorithms to automatically detect and reduce noise in videos — no need to build noise profiles, tweak settings, or install third-party plugins. Everything is handled with just a few clicks.
Here's how Aiarty Video Enhancer works.
Step 1: Launch the Software and Import Your Video
Open Aiarty Video Enhancer on your computer, and then click + button to add the noisy footage you want to clean up. The software supports a wide range of formats, so you won’t need to worry about compatibility.
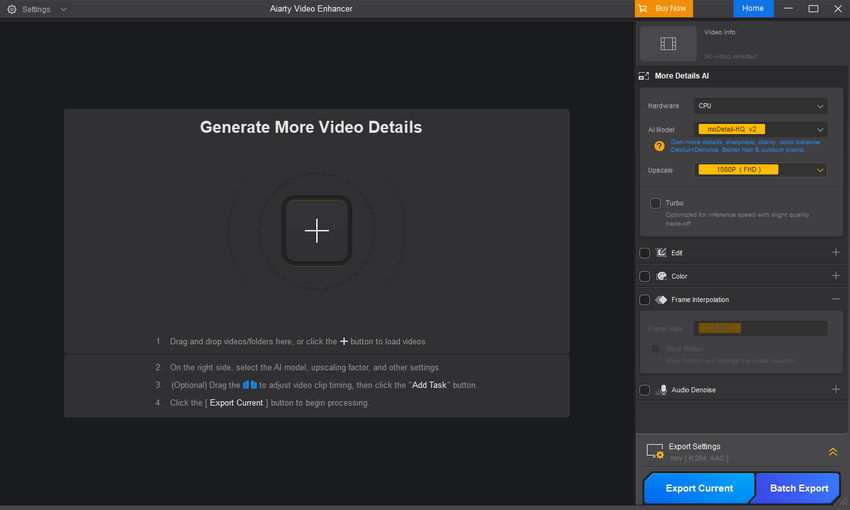
Step 2: Choose an AI Model
Click the AI Model dropdown to select the one that best suits your footage. There are three models available, each designed for different video types. All models are powered by built-in denoise algorithms that automatically analyze and clean up noise while preserving details and edges.
Step 3: Adjust Upscale Settings
Click the Upscale dropdown to choose your desired output resolution. To keep the original resolution while applying noise reduction, select x1. If you want to upscale, simply pick the resolution that suits your needs.
Step 4: Preview and Export
Click Preview to load the selected AI model and begin inference. Once the denoised result is ready, you can review the preview. If the denoising feels too strong or you want to retain some natural grain, simply adjust the Strength slider to the left (less denoising) or right (stronger denoising) until you’re satisfied.
If you're happy with the result, click Add Task, then hit Export Current to begin processing.
Compared to manual methods in Premiere Pro, Aiarty Video Enhancer is fast, user-friendly, and doesn’t require any editing experience. It's a great choice if you’re looking for clean, polished footage without spending extra time on technical adjustments.
If you prefer a video tutorial, check out this YouTube guide.
 FAQs about Noise Reduction in Premiere Pro
Yes. Premiere Pro includes the Median effect, which can reduce grain by blending pixel values. While not specifically designed for denoising, it works well in many situations when combined with masks and keyframes.
Neat Video offers a free demo version with functional limitations, such as watermarked output and restricted resolution. To unlock full features, you need to purchase a license.
Yes, both the Median effect and plugins like Neat Video support 4K footage. However, denoising high-resolution video requires more system resources and may slow down preview and rendering times.
Grain is often intentional and comes from film or sensor textures, adding a stylistic look. Noise, on the other hand, is unwanted visual distortion typically caused by low-light shooting or heavy compression.
It depends entirely on your budget and quality requirements. If you want a fast, free, and native solution, Premiere Pro's built-in VR De-Noise is your best bet. If you are working on a high-end commercial project and have the budget, the Neat Video plugin is the industry gold standard. However, if you want to skip tedious manual slider adjustments altogether, using an external AI tool like Aiarty Video Enhancer offers the best balance of automatic detail restoration and flawless noise removal.
Fixing heavy low-light noise usually requires a combined approach:
- Apply the VR De-Noise effect first to eliminate high-frequency digital artifacts.
- Open the Lumetri Color panel and slightly lower the Blacks or Shadows. By "crushing" the shadows a bit, you hide the noise lurking in the darkest corners of your image.
- If the noise is only visible in specific dark areas, use the Mask tool on your denoiser effect to apply it only to those shadows, leaving your bright, sharp subjects untouched.
Yes and no. It depends on whether you are denoising audio or video:
- For Audio: Yes. Premiere Pro features a powerful AI-driven tool called Enhance Speech (located in the Essential Sound panel). Powered by Adobe Sensei AI, it automatically removes heavy background noise and echoes from dialogue, making poorly recorded audio sound like it was made in a professional studio.
- For Video: No. As of now, Premiere Pro does not have a native AI video denoiser to automatically clean up grainy or low-light video footage. Its built-in video filters (like VR De-Noise and Median) still rely on traditional, manual slider-based algorithms.
If you want true, one-click AI video denoising that uses deep learning to eliminate visual grain while intelligently reconstructing lost details, you will need to look outside of Premiere's native toolset. Dedicated external software like Aiarty Video Enhancer or premium third-party plugins are required to achieve automated, AI-powered video noise reduction.
You May Also Like
This post was written by Brenda Peng who is a seasoned editor at Digiarty Software who loves turning ordinary photos into extraordinary works of art. With AI assistance for brainstorming and drafting, the post is reviewed for accuracy by our expert Abby Poole for her expertise in this field.