Nothing ruins a great video faster than poor audio. Background noise—like wind ghost, mic hiss, fan hum, or traffic outside—can quickly distract your viewers and make your content feel less professional. If you're editing in Adobe Premiere Pro, the good news is there are built-in tools to help you clean things up without needing extra plugins or software.
In this guide, we'll walk you through three simple ways to reduce or remove background noise in Premiere Pro. From quick fixes using the Essential Sound panel to more hands-on control with built-in effects, you'll learn how to get cleaner, clearer audio in just a few steps.
💡 Limitations of Premiere Pro for Background Noise Removal:
- Setting up noise reduction in Premiere Pro can be complicated, with multiple parameters to adjust and fine-tune.
- The built-in effects are not always consistent in reducing noise, especially for complex audio tracks.
- Overusing noise reduction may compromise voice clarity, making the audio sound unnatural.
- Real-time previews can be laggy when applying more advanced effects, causing delays in workflow.
Want a Simpler, Faster Alternative to Clean Audio?
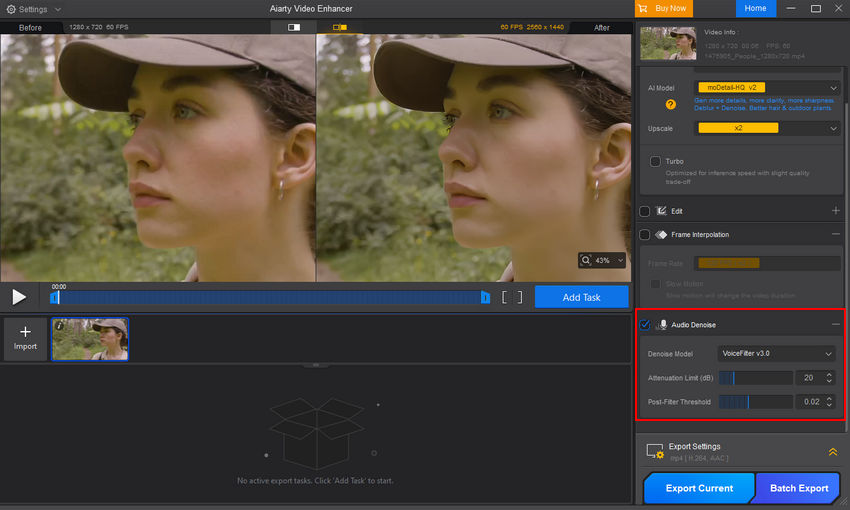
Aiarty Video Enhancer offers an intuitive, one-click solution to remove background noise from your videos without the need for complex settings. Simply upload your clip, select Denoise model, and let Aiarty automatically clean up the audio for you, while also enhancing video quality. It's the perfect tool for creators who want high-quality results without the hassle of professional editing software.
Download Aiarty Video Enhancer to Clean Up Your Audio in Seconds:
Method 1: Remove Background Noise Using the Essential Sound Panel (Beginners)
This is one of the most beginner-friendly ways to clean up audio in Premiere Pro. The Essential Sound panel offers quick tools for reducing noise and reverb—ideal for interviews, vlogs, voiceovers, and other dialogue-heavy content.
Who is this for: Anyone using Premiere Pro CC 2017 or newer, especially creators who want a fast, no-fuss solution to clean up basic background noise without diving into complex effect settings.
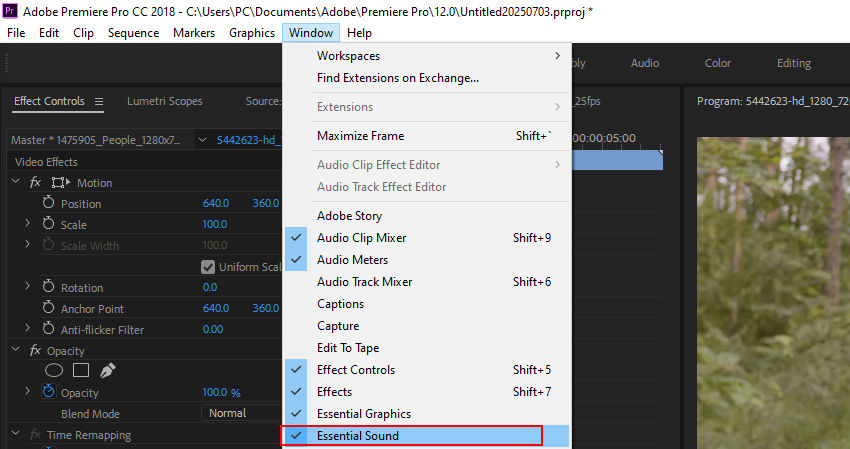
Step 1: Open the Essential Sound panel
Go to the top menu and click Window > Essential Sound. This opens a dedicated panel—usually on the right side of your workspace—designed to simplify common audio editing tasks.
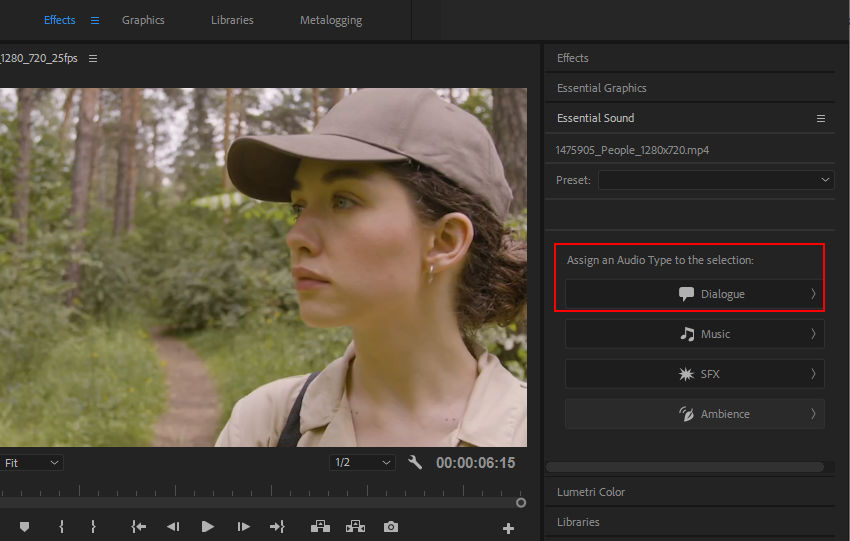
Step 2: Select your audio clip and tag it as "Dialogue"
Click the audio clip in your timeline that you want to clean up. Then, in the Essential Sound panel, click the "Dialogue" button. This labels your clip as spoken word and unlocks tools meant specifically for voices.
Step 3: Enable noise reduction
Scroll down in the panel to the section labeled "Repair". Then, you'll see two switches: Reduce Noise and Reduce Reverb.
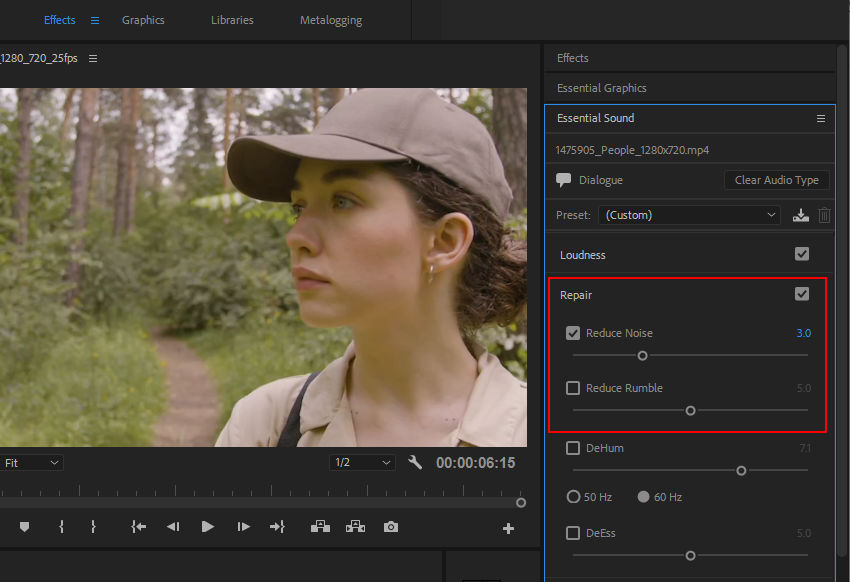
Toggle on Reduce Noise, and a slider will appear. Start with the slider at around 3 or 4. Move it higher if the background noise is still noticeable, but don't overdo it—too much reduction can make the voice sound unnatural or "watery".
Step 4: (Optional) Use Reduce Reverb if the voice sounds echoey
If the voice was recorded in a large or empty room, try turning on Reduce Reverb as well. This can help smooth out that hollow, echoing quality and make the audio sound more focused.
Step 5: Play back and fine-tune
Hit play and listen to your changes. Adjust the sliders as needed. The panel applies changes in real time, so you can hear the difference instantly without needing to render.
Also see: How to Remove White Noise from Audio: 4 Easy Methods
Method 2: Apply the DeNoiser (Obsolete) Effect
If your version of Premiere Pro uses DeNoiser (Obsolete) instead of the newer DeNoise, you can still reduce background noise effectively, but with a slightly different workflow. While DeNoiser is an older tool, it remains a reliable option for cleaning up audio, especially in versions before CC 2017.
Who is this for: Users with older versions (Premiere Pro CC 2015 and Later) or those who prefer the older DeNoiser (Obsolete) effect. It's great for fine-tuning specific types of background noise.
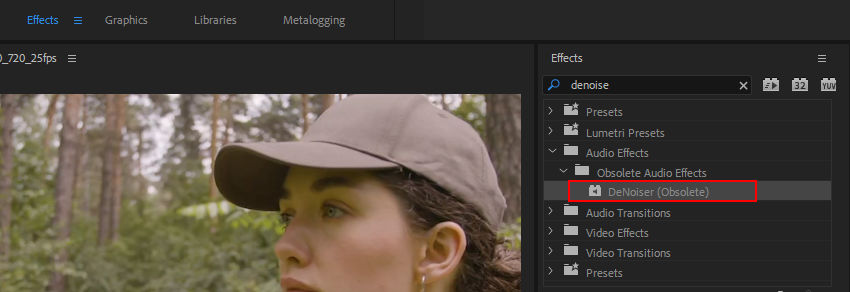
Step 1: Locate and Apply DeNoiser (Obsolete)
Open the Effects panel (Window > Effects). In the search bar, type DeNoiser (Obsolete). Under the Audio Effects category, you'll find DeNoiser (Obsolete). Then, you should drag and drop it onto your audio clip in the timeline.
Step 2: Open the Effect Controls Panel
Once the effect is applied, go to the Effect Controls panel (Window > Effect Controls). Here you'll see DeNoiser (Obsolete) listed under the Audio Effects section. The effect offers several options, including:
- Bypass: Toggle this to enable or disable the effect for quick comparison.
- Custom Setup: You can click the Edit button next to it to access the noise reduction settings.
- Individual Parameters: This section contains Reduction, Freeze, and Offset.

Step 3: Adjust Individual Parameters for Noise Reduction
Individual Parameters section gives you full control over how much noise is reduced while keeping your audio sounding natural.
- Reduction: This slider controls how much background noise is removed from your audio. You’re suggested to start with -12 dB and adjust based on how much noise you want to eliminate. Increasing the Reduction value will remove more noise, but be careful not to set it too high, as it can distort the voice and make it sound unnatural.
- Offset: The Offset slider helps adjust the balance between noise reduction and the quality of the original audio. A lower offset keeps more of the natural sound, while a higher offset reduces more noise, but it can make the audio sound less natural or too processed. You can start with a moderate setting and tweak it until you find the right balance for your audio.
- Freeze: The Freeze option is used to lock in a specific noise profile, which is useful if the background noise is consistent throughout the clip. Turn on Freeze to hold the noise profile at a specific point, ensuring the reduction remains consistent across the entire clip. If the noise level changes or fluctuates, you may want to toggle Freeze off and let the effect adapt to new noise levels.
Step 4: Preview and Fine-Tune the Settings
Once you've adjusted the Reduction, Offset, and Freeze settings, it’s time to preview the changes and make sure they’re working as expected. Play back your clip and listen closely. Ideally, the background noise should be reduced without making the voice sound too "processed" or unnatural.
If you find that the voice sounds a bit too hollow or robotic, you can slightly decrease the Reduction value. On the other hand, if some of the background noise is still noticeable, you may need to increase the Reduction slightly.
It's always a good idea to use the Bypass option to quickly toggle the effect on and off. This gives you a side-by-side comparison of the audio with and without the noise reduction, so you can better judge if the changes are improving the sound.
Step 5: Final Adjustments and Export
Once you're happy with the adjustments, take a moment to make any final tweaks. Listen again to the entire clip and check for any areas that might need a little more attention. If everything sounds good, you're ready to move on with your project.
When you're confident in your settings, you can proceed with the rest of your editing or export the audio. The noise reduction is now applied and you can continue working with a cleaner, clearer sound.
Also see: Best software to remove background noise (real-time and post-processing)
Tip: After applying noise reduction, always give your audio one final listen. If you've removed too much noise, it can make the voice sound unnatural. If you’re unsure, it's a good idea to save a backup of your original clip, so you can always go back if needed.
Method 3: Using Adaptive Noise Reduction (Advanced Users)
Adaptive Noise Reduction in Premiere Pro is a powerful tool for users who need precise control over their noise reduction process. It's particularly useful when dealing with different types of noise or when cleaning up multiple segments of a clip with varying noise levels. This tool provides detailed parameters that can be adjusted for more sophisticated noise reduction.
Who is this for: This method is ideal for advanced users who are comfortable with detailed audio settings. It's perfect for handling varying noise patterns in longer clips, such as interviews, podcasts, or footage recorded in noisy environments.
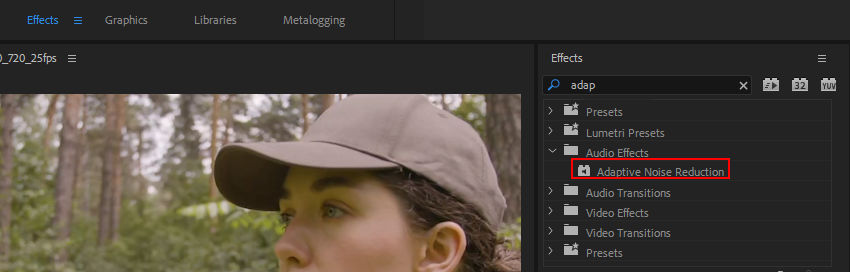
Step 1: Apply the Adaptive Noise Reduction Effect
Open the Effects panel (Window > Effects), and search for Adaptive Noise Reduction under Audio Effects. Drag and drop the effect onto your audio clip in the timeline.
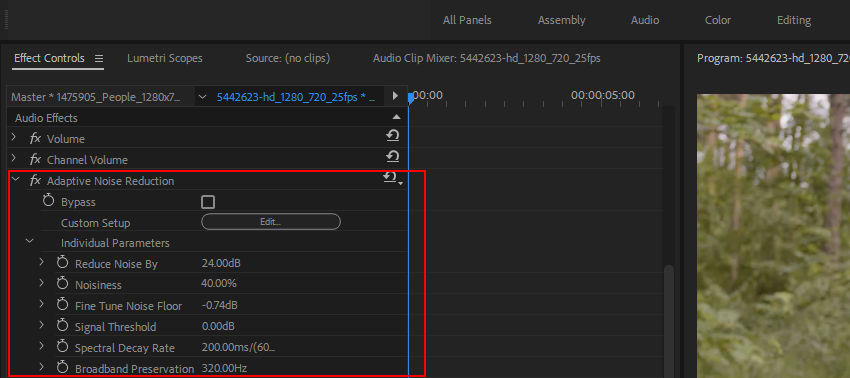
Step 2: Adjust the Effect Controls
After applying the effect, go to the Effect Controls panel (Window > Effect Controls). Next, click the Edit button next to Custom Setup.
This will open a new window where you'll see various presets you can choose from, including Default, Heavy Noise Reduction, Light Noise Reduction, and Dereverb Single Source.

Additionally, you can manually adjust the following Individual Parameters:
- Reduce Noise by: Controls how much noise is reduced from the audio. Start around -12 dB and adjust based on your needs. Increasing this value will remove more noise, but be careful not to overdo it, as this can distort the original audio.
- Noisiness: Determines how aggressively the tool reduces noise. Higher values target more prominent noises, while lower values preserve more of the original audio signal.
- Fine Tune Noise Floor: Adjusts the threshold at which noise is reduced. Lower values target quieter, subtler noises, while higher values focus on louder sounds.
- Signal Threshold: Controls the level at which the effect starts to reduce noise. Increasing this setting makes the effect less sensitive to quieter signals.
- Spectral Decay Rate: Defines how quickly the noise is reduced across the frequency spectrum. A faster decay results in more abrupt noise removal, while a slower decay creates a smoother, more gradual reduction.
- Broadband Preservation: Helps maintain important frequencies, ensuring that key elements of the signal (like voice or music) aren't overly affected by the noise reduction.
- FFT Size: Controls the frequency resolution of the noise reduction. Larger values provide better resolution but may cause playback delay, especially with complex or high-quality audio.
Step 3: Preview and Fine-Tune
After making your adjustments, hit Play in the timeline to preview the effect. Listen for both the reduction of noise and the quality of the audio. If the voice sounds too "processed" or muffled, consider lowering the Reduce Noise by value or adjusting the Signal Threshold.
If the audio still has noticeable background noise, increase the Reduce Noise by value. You can also adjust the Spectral Decay Rate to create a smoother or more aggressive transition in the noise reduction.
Step 4: Finalize and Export
Once you're satisfied with the noise reduction, make any final tweaks and proceed with the rest of your editing or export the audio with the noise reduction applied.
Tip: Be aware that Adaptive Noise Reduction can introduce lag, especially with larger FFT Size settings. It's best to apply this effect and make adjustments before final export to avoid delays during playback or editing.
How to Prevent Background Noise in Future Recordings
While post-production can help eliminate most background noise, the best approach is to prevent noise from being recorded in the first place. By following a few simple techniques and using the right equipment, you can significantly improve your audio quality and reduce the amount of noise that needs to be removed during editing. Here are some tips to help you prevent background noise in future recordings.
1. Use a High-Quality Microphone
Investing in a quality microphone is the first step in preventing background noise. Specifically, using directional microphones (such as cardioid or supercardioid) will help capture sound from a specific direction, minimizing unwanted noise from other sources. Compared to omnidirectional microphones, directional mics perform much better in noisy environments.
2. Record in a Quiet Environment
The environment in which you record plays a huge role in audio quality. Try to record in a quiet room or a soundproof space. Avoid recording near windows, busy streets, or electronic devices. If external noise cannot be avoided, consider using soundproofing materials (such as foam panels or curtains) to reduce echo and outside noise.
3. Use a Pop Filter or Windscreen
Adding a pop filter or windscreen to your microphone will help reduce plosives (popping sounds from "P" or "B" sounds) and wind noise, which is especially important when recording outdoors or in windy conditions. These accessories create a barrier that softens or diffuses harsh sounds.
4. Adjust Gain and Sensitivity Settings
Many recording devices allow you to adjust input gain and sensitivity. If the gain is set too high, it will amplify background noise along with the main audio. Lowering the gain to an appropriate level will help avoid picking up unnecessary sounds, such as hums or rustling.
5. Record in a Controlled Space
If possible, record in a soundproof recording booth or a controlled environment. Even at home, using soundproofing materials (such as foam panels, carpets, and heavy curtains) can help isolate the sound, making it cleaner and reducing the amount of external noise.
6. Use Noise-Canceling Headphones During Recording
Wearing noise-canceling headphones while recording can help you identify unwanted noises in real-time. These headphones will block out external sounds, allowing you to focus on the recording and adjust as needed.
7. Close All Unnecessary Background Devices
Turn off any unnecessary electronic devices that could contribute to noise, especially those that produce fan sounds or electrical interference, such as air conditioners or computer fans. Also, put your phone on silent or turn it off to avoid interruptions during the recording.
Tip: Plan Ahead and Test Your Setup
Before starting a full recording session, always do a short test recording. This will help ensure that your setup is working properly and that there is no background noise. By listening to your test, you can spot any potential issues early and adjust your microphone or environment before recording the full session.
By following these tips, you can greatly reduce background noise and improve the overall quality of your recordings, making post-production easier and more efficient. Preventing noise at the source is the best way to achieve clean, professional audio recordings. For auto silence detection and filter words removal, you can check out tools like FireCut in the list of AI-plugins for Premiere.
You May Also Like
This post was written by Brenda Peng who is a seasoned editor at Digiarty Software who loves turning ordinary photos into extraordinary works of art. With AI assistance for brainstorming and drafting, the post is reviewed for accuracy by our expert Abby Poole for her expertise in this field.