Upscale Video in Premiere Pro: Why It Still Looks Blurry (+ Better Method)
Quick Answer: Premiere Pro can upscale video, but it does NOT restore lost detail. That’s why exports often look blurry — even at higher resolution. To actually improve quality, you need AI-based upscaling tools.
Premiere Pro can upscale video, but higher resolution doesn’t always translate into better quality. Even in 2026, many upscaled exports still look soft or slightly blurry once you hit export. If you search for “Premiere Pro upscale video”, most guides suggest the same workflow: adjust the sequence, scale the clip, export, and hope the result holds up. What’s usually missing is an honest look at the trade-offs.
While Premiere Pro can increase resolution, it isn’t designed to recover lost detail. As a result, edges can lose definition, text may appear fuzzy, and noise often becomes more noticeable after scaling.
This guide looks at what Premiere Pro can realistically improve in 2026, where its limits start to show, and whether AI-based upscaling actually delivers a visible quality upgrade, or just another workaround.
This happens because Premiere Pro AI upscale does not actually exist in the sense of true detail reconstruction. It relies on traditional scaling rather than AI-based enhancement.
Core limitation: Premiere Pro is designed for editing, not reconstruction. Even when resolution is increased, fine details cannot be restored, especially in low-resolution or heavily compressed footage.
Result: The image becomes larger, but not clearer.
This is why many creators switch to dedicated AI video enhancers that work outside the timeline and focus on rebuilding missing textures instead of simply enlarging pixels.
Compared to Premiere Pro, AI upscaling tools improve results by:
- Reconstructing texture instead of stretching pixels
- Reducing noise first before sharpening
- Supporting batch processing without complex timelines
Aiarty Video Enhancer is one example of this approach, built specifically for restoring detail rather than simple video editing.
Try Aiarty Video Enhancer to see how AI restores real detail in seconds—no complex timeline required.
How to Upscale Video in Premiere Pro (Overview)
Supersample & Sequence Upscaling: What Native Upscaling Really Does
The first method utilizes Premiere Pro’s native features, particularly supersampling through manual sequence adjustments and motion interpolation via Optical Flow. This is the most direct way to upscale in Premiere Pro without third-party tools.
Supersampling involves rendering your footage at a higher resolution than the original, effectively capturing more image data before scaling it down or up. This technique can reduce aliasing and produce a sharper, cleaner result when upscaling. Meanwhile, Optical Flow is an advanced frame interpolation method that analyzes the motion between frames to create smooth transitions and reduce artifacts during scaling or frame rate changes. Together, these techniques help Premiere Pro deliver better quality results when you upscale video Premiere Pro natively.
- Built into Adobe Premiere Pro, so no additional plugins are needed.
- Simple and direct for minor resolution increases.
- Long render times, especially for 4K/8K output.
- High GPU usage that may slow down or crash older systems.
- Upscaled output often lacks fine edge sharpness.
How to Upscale 720p to 1080p in Premiere Pro
Step 1:Create a new sequence of 1080p, then import your 720p footage and drag and drop it to the timeline.
Step 2: Right-click your video clip and choose “Set to Frame Size” to make it fit proportionally within the sequence.
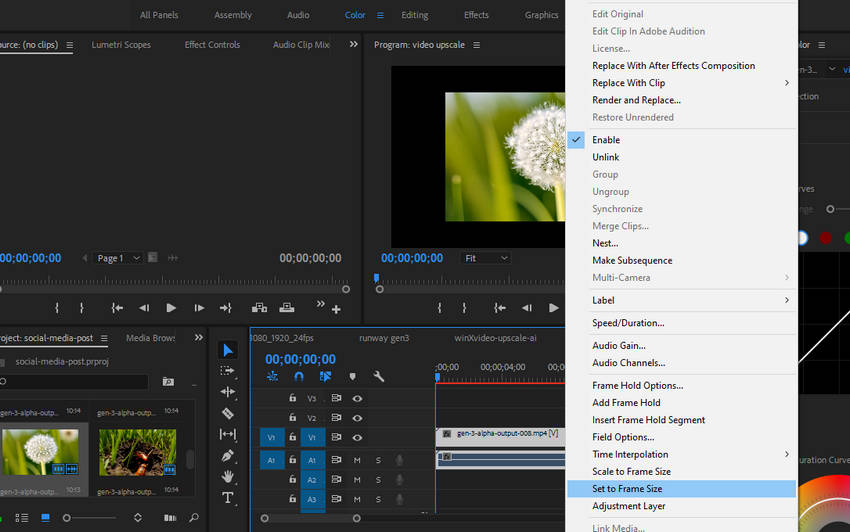
Step 3: Go to the top menu and select Sequence > Sequence Settings.
Step 4: Increase the frame size to your desired resolution (e.g., from 1920x1080 to 3840x2160). Here is a detailed guide on how to change resolutions in Premiere Pro >>
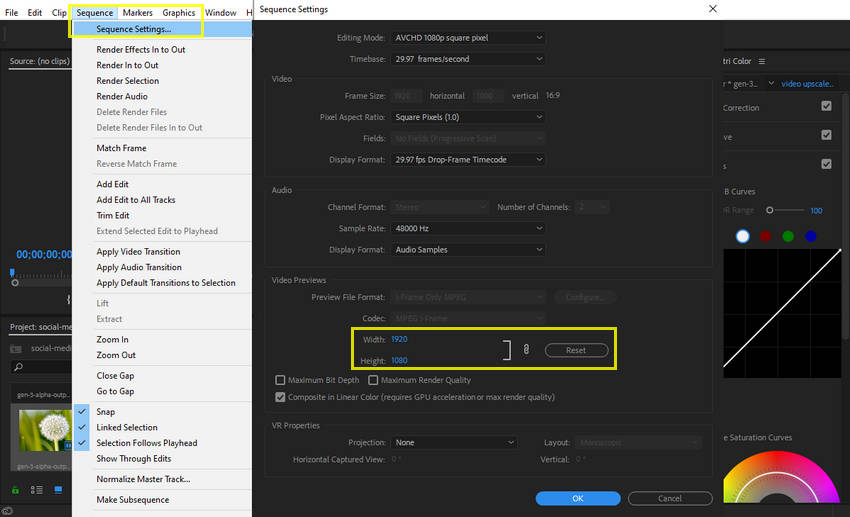
Step 5: Click OK and confirm any prompts to scale existing clips.
Step 6: Right-click the clip again, choose Time Interpolation > Optical Flow for smoother motion.
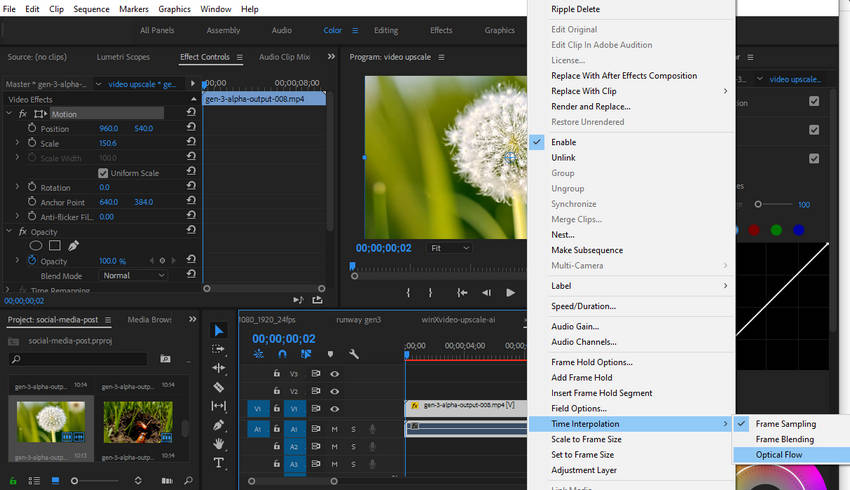
Step 7: Render the sequence with Render In to Out to preview the upscaled version. This works, but it won’t actually improve detail.
This method can upscale 720p to 1080p in Premiere Pro, but it won’t actually improve detail or restore lost texture.
💬 Feedback: Scaling up video to a higher resolution makes it blurry. -- r/premiere Reddit.com
Scaling a lower-resolution video (e.6., 1366x768px) to a higher-resolution sequence (e.g., 1920x1080px) in Premiere Pro often results in blurriness and quality loss, even after export. This is because Premiere struggles to "invent" the necessary pixel data as effectively as some other software (like Photoshop, especially with options like Nearest Neighbor interpolation). You're noticing artifacts like blurry text with white outlines, indicating a significant drop in visual fidelity.
Neat Video Upscaling: Does “AI” Inside Premiere Pro Make a Visible Difference?
If you're looking to Premiere Pro AI upscale video while improving clarity and reducing visual noise, the Neat Video plugin is a powerful option worth considering. Although it’s primarily designed as a noise reduction tool, Neat Video’s sophisticated algorithms also enhance sharpness and detail, making it highly effective for cleaning up and improving low-resolution footage.
By combining noise reduction with subtle sharpening, this plugin can significantly elevate the perceived quality of your upscaled videos, making it a popular choice among professional editors who want cleaner, crisper results within the Premiere Pro workflow.
- Excellent noise reduction and detail enhancement.
- Ideal for restoring older or compressed footage.
- Can be combined with sequence scaling for even better results.
- Requires a paid license (starting from $75+).
- Has a complex interface with a significant learning curve.
- Increases render times significantly.
How to Upscale Video in Premiere Pro using Neat Video Plugin?
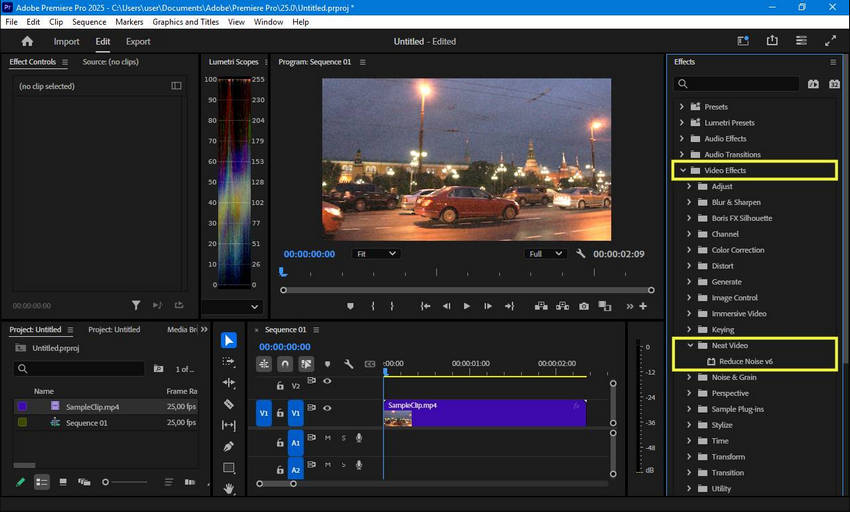
Step 1: Install the Neat Video plugin and restart Adobe Premiere Pro.
Step 2: Import your footage and drag it into the timeline.
Step 3: Apply Neat Video (Reduce Noise v6) from the Effects Panel to your clip.
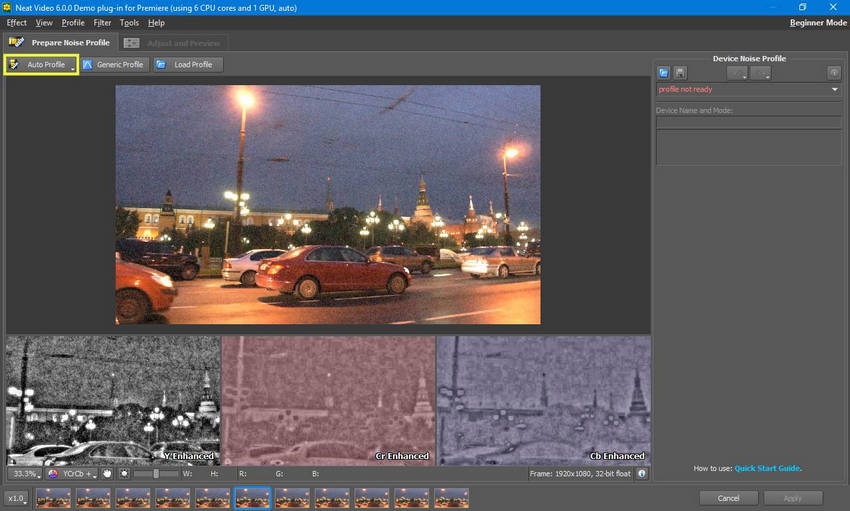
Step 4: In the Effect Controls tab, open Neat Video and click Prepare Profile to open Neat Video plug-in window.

Step 5: To effectively reduce noise in your clip, Neat Video requires a noise profile. You can quickly generate this profile using the Auto Profile function. Neat Video will automatically find an area without details and will analyze noise in that area to build a new noise profile.
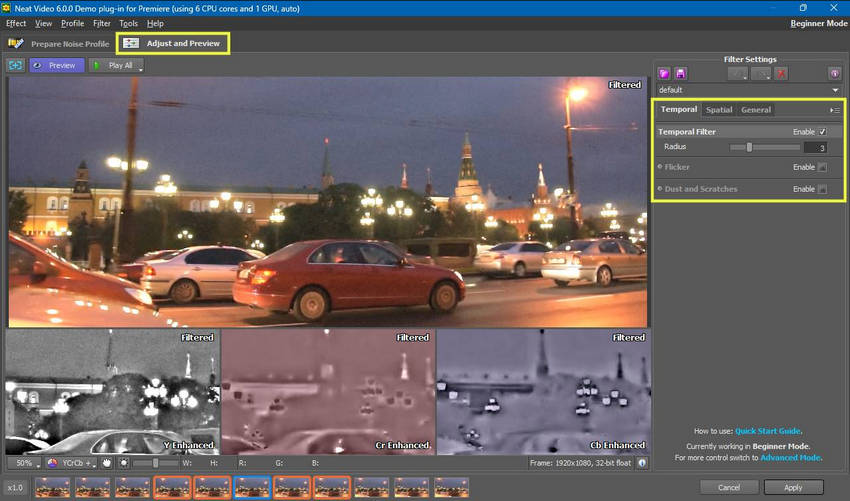
Step 6: Switch to the Filter Settings tab to see Neat Video's default noise reduction applied, then fine-tune the filter settings, such as the Temporal Filter > Radius, to achieve your desired level of noise reduction.
Step 7: Combine this with the supersampling method from Method 1 to finalize your upscale.
💬 Feedback: Premiere won't prepare frames for Neat Video -- Adobe Community
Premiere Pro is preventing Neat Video from preparing frames, displaying an incorrect message about settings not being at full resolution. Even when the "Filter Settings: Adjust" option unlocks, clicking it results in an error. Updating to version 25.2.3 hasn't resolved the issue.
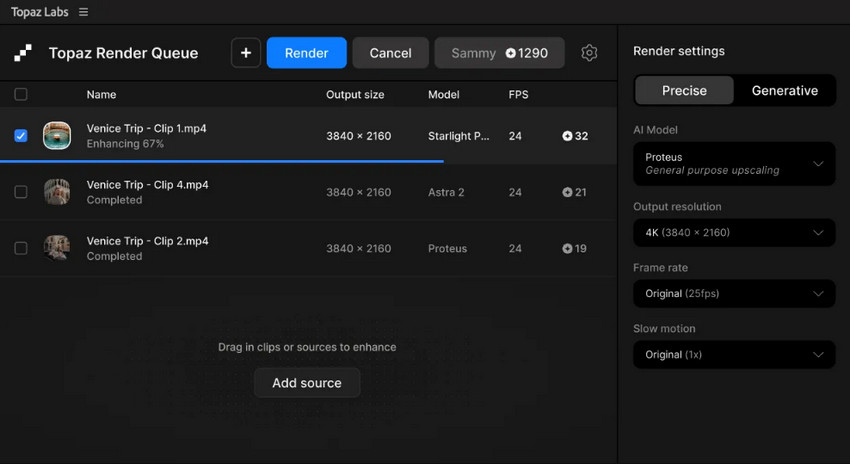
Topaz Panel: Upscaling Video in Premiere Pro with Cloud-Based AI Processing
If you're looking for a Premiere Pro AI upscale workflow with stronger generative detail recovery, the Topaz Labs for Premiere Panel provides a cloud-connected solution that integrates with your editing environment.
Unlike traditional Premiere Pro effects, the Topaz Panel does not process footage directly inside the timeline. Instead, it sends your selected clips to Topaz’s external AI system for cloud-based upscaling, denoising, and enhancement, then returns the processed result back into Premiere Pro for editing.
- High-quality AI upscaling with strong detail reconstruction.
- Seamless integration with Premiere Pro via UXP panel.
- Access to multiple specialized AI models for different scenarios.
- Relies on cloud processing, requiring upload and download steps.
- May involve credit-based usage depending on plan.
- Performance depends on network speed and queue availability.
How to Upscale Video in Premiere Pro using Topaz Panel?
Step 1: Install the Topaz Labs for Premiere Panel from the official Topaz website and restart Adobe Premiere Pro.
Step 2: Open the panel inside Premiere Pro and sign in to your Topaz account.
Step 3: Select the clip you want to enhance and import it to the TopazLabs processing queue.
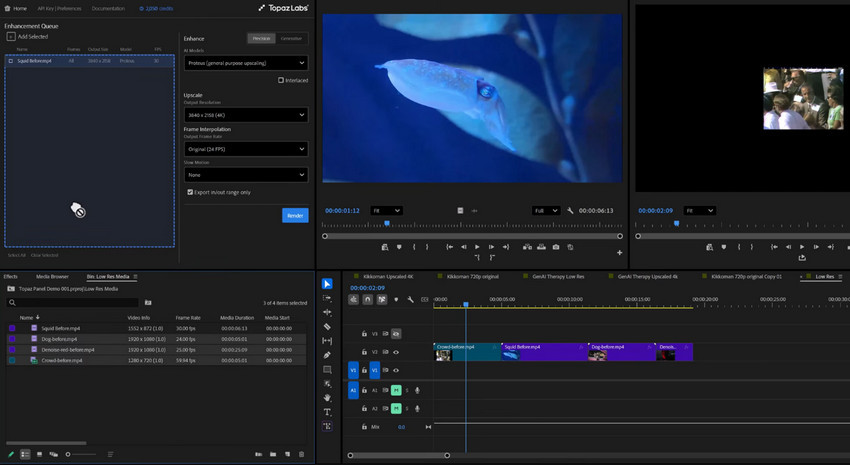
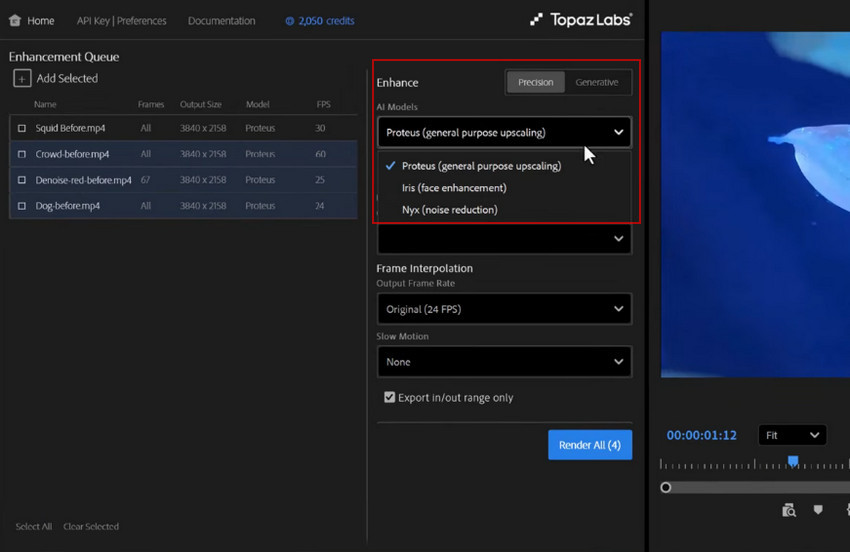
Step 4: Choose your preferred AI model (upscale, denoise, or restore) depending on the footage type.
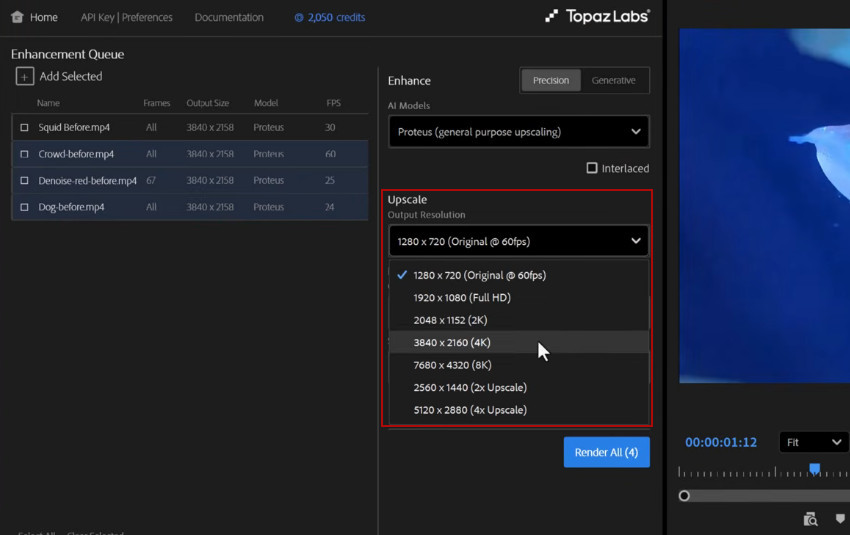
Step 5: Select the output resolution that you want upscale your video to.
Step 6: Click Apply All to start processing. The clip will be uploaded, enhanced in the cloud, and then returned to your project automatically.
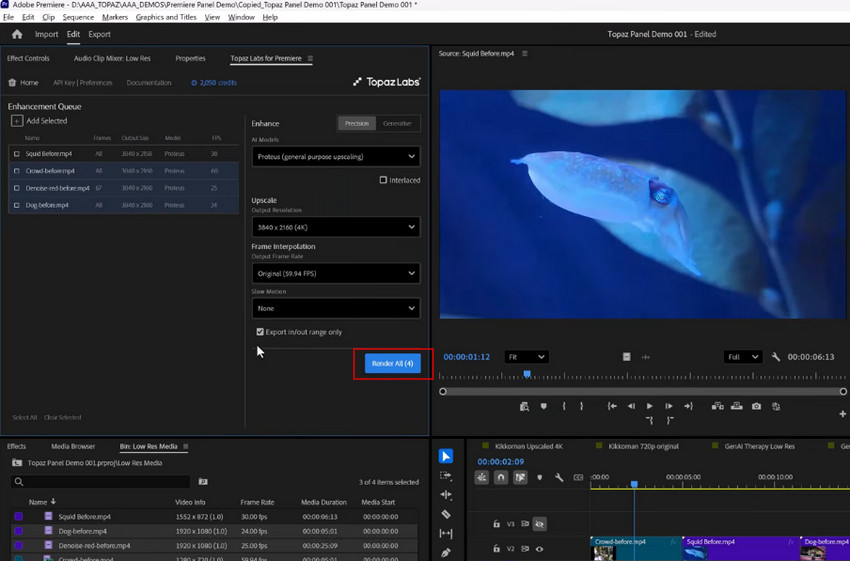
Step 7: Import the enhanced clip back into your timeline and continue editing in Premiere Pro.
💬 Note: Many users report confusion when using the Topaz Panel for the first time due to its cloud-based workflow and upload processing model.
Common issues include upload delays, processing queues, and uncertainty about where the enhancement is applied inside the Premiere Pro timeline.
After Effects Upscaling: How Far Can Adobe’s Workflow Go Before Quality Plateaus?
If you already use Adobe’s suite, another effective solution is to send your clip from Premiere Pro to After Effects and use the Detail-preserving Upscale effect. This method offers fine-grained control over scaling and enhances edge sharpness through a dedicated effect.
The Detail-preserving Upscale effect is specifically designed for enlarging video footage while retaining as much image clarity as possible. It allows you to adjust sharpness, reduce noise, and scale content with precision—ideal for cases where edge definition and minimal distortion are critical. Compared to basic resizing tools, this effect analyzes the image at a pixel level to intelligently retain detail, making it a more refined solution for those who want higher-quality results directly within Adobe’s ecosystem.
- Offers high control over upscaling parameters.
- Produces clean edges with minimal distortion.
- Integrated within the Adobe suite for a seamless workflow.
- Requires an After Effects license and installation.
- Adds time and complexity to the overall workflow.
- Not ideal for batch or quick processing of multiple clips.
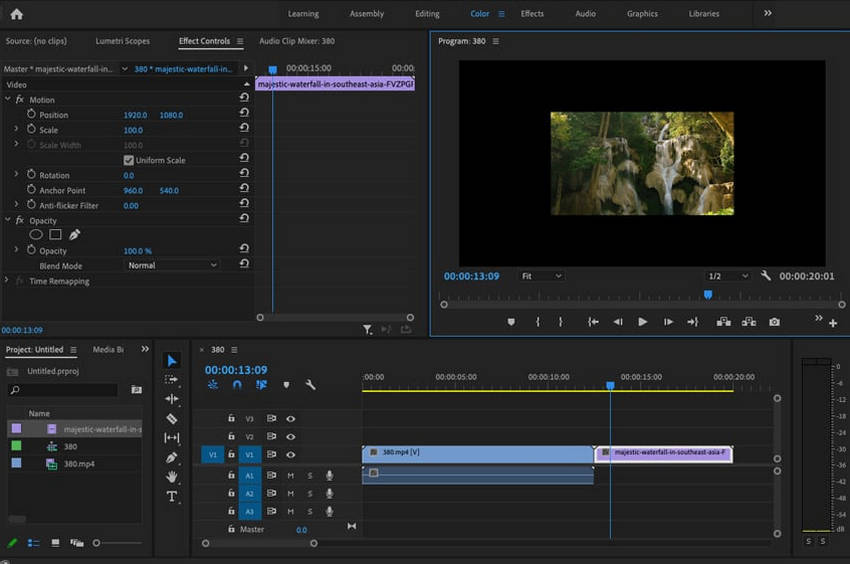
How to Upscale 1080p to 4K in Premiere Pro Using Detail Preserving Upscale?
Step 1: In Premiere Pro, create a sequence of 4K resolution and import your 1080p video clip that you want to upscale. It’s easy to see this 1080p clip doesn’t cover the canvas in our 4K project.
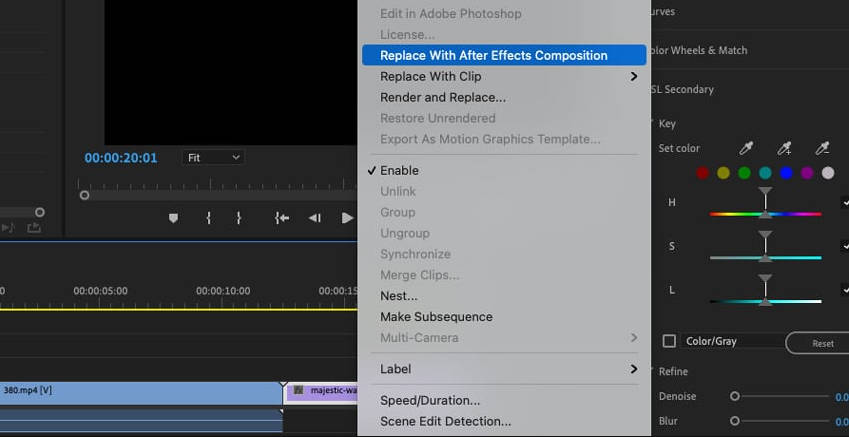
Step 2: Right-click the clip and choose Replace with After Effects Composition. Once your footage is sent to After Effects, you'll be prompted to save your project. Simply give it a name and choose a location to save the After Effects project file.
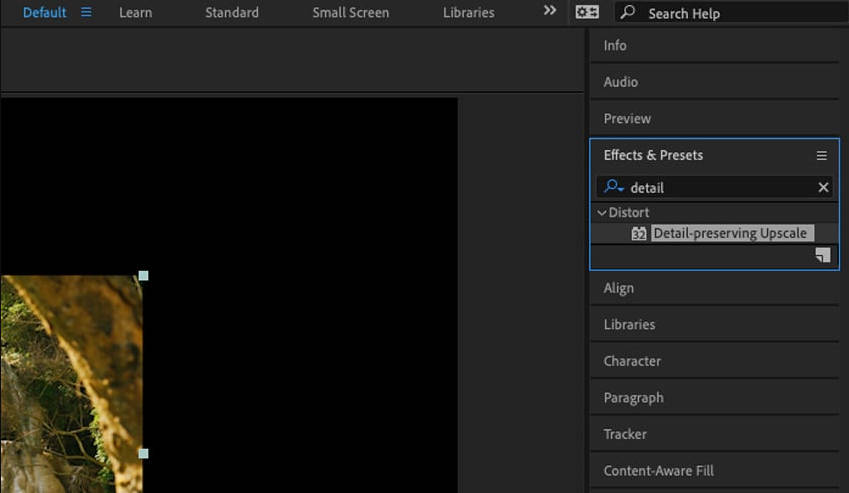
Step 3:In the Effects & Presets panel, search for Detail-preserving Upscale, then double-click it to apply it to your active clip.
Step 4: On the Effect Controls panel, click Fit to Comp Width to upscale your footage to the canvas width. You can also precisely adjust the Scale to make the clip even larger. Experiment with the Detail slider, often increasing it beyond the default 50% to preserve more detail; it's an art, not a science, so tweak it until you like how your footage looks.
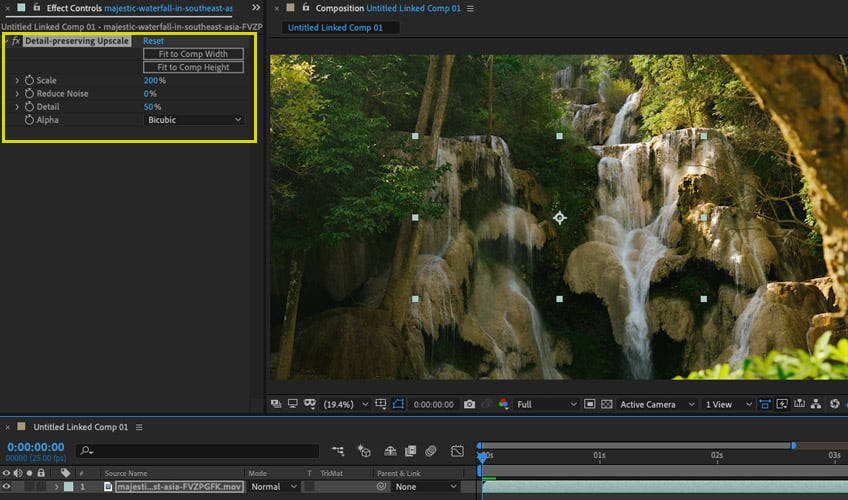
Step 6: Save and return to Premiere Pro to see the updated clip.
💬 Feedback: AE details preserving upscale, long render time and massive file size is this normal? -- r/AfterEffects Reddit.com
Upscaling 20 minutes of 1080p footage to 4K can indeed lead to incredibly long render times (exceeding 10 hours even on high-end hardware like an i7-12700k and RTX 3080) and absurdly large file sizes (over 100GB). While some increase is expected, this level of output size for a 20-minute video isn't typical for efficient archiving. You'll likely need to adjust your export settings to manage file size for storage.
Which Premiere Pro Upscaling Method Works Best?
Each Premiere Pro upscaling method works best in different situations. Some are quick and convenient for small resolution changes, while others offer more control but require additional steps or software. Understanding when to use each approach can help you avoid unnecessary processing time while getting the best possible results from your footage.
- Supersample & Sequence Upscaling – Best for quick resolution adjustments.
If you simply need to scale footage slightly (for example, 720p to 1080p), Premiere Pro’s built-in sequence scaling works fine. It’s fast and requires no extra tools, but detail improvement is limited. - Neat Video Upscaling – Best for noisy or compressed footage.
Neat Video can significantly improve perceived quality by reducing noise and sharpening textures before scaling. However, it mainly cleans the image rather than reconstructing missing detail. - After Effects Detail-Preserving Upscale – Best for maximum control.
Sending clips to After Effects allows more precise scaling with the Detail-Preserving Upscale effect. The results are often cleaner than basic scaling, but the workflow is slower and less practical for large projects.
In practice, Premiere Pro upscaling methods can slightly improve how footage looks, but they still rely on traditional scaling techniques rather than true enhancement.
Can Premiere Pro Do AI Upscaling? (Short Answer: Not Really)
It only enlarges existing pixels without rebuilding missing details, so results are limited when the source video is low resolution, heavily compressed, or lacks fine texture.
That’s where AI-based upscaling starts to make a noticeable difference, as it reconstructs textures and details instead of simply enlarging the image.
Why Your Upscaled Video Still Looks Worse After Export
At first glance, everything seems fine. Inside the timeline, your footage looks sharper, cleaner, and properly scaled. But once you export the video, the result often tells a different story.
Here’s what typically happens:
- Looks sharp in timeline → turns soft after export: What you preview isn’t always what gets rendered. Compression and scaling during export often reduce edge clarity.
- Noise becomes more visible, not less: Upscaling doesn’t remove noise, it enlarges it. Grain and compression artifacts become more obvious at higher resolutions.
- Text and fine details start to break apart: Small elements like subtitles, UI, or distant objects lose definition and appear fuzzy or slightly distorted.
- “Higher resolution” but no real detail improvement: The video is technically bigger, but not actually clearer. You’re stretching pixels, not adding information.
This happens because Premiere Pro focuses on resizing frames, not rebuilding missing detail. So even if the workflow looks correct, the final output often reaches a quality ceiling very quickly.
At this point, adding more tweaks like Optical Flow, sharpening, plugins, usually leads to longer render times without meaningful improvement. That’s why many editors eventually hit the same conclusion: the limitation isn’t the workflow, it’s the method itself.
To actually improve clarity (not just resolution), you need a different approach—one that can reconstruct textures, reduce noise before scaling, and preserve fine details during enlargement. This is exactly where AI-based upscaling starts to make a visible difference.
👉 Fix blurry upscaling instantly with Aiarty Video Enhancer.
How to Actually Improve Video Quality (Not Just Increase Resolution)
If Premiere Pro only resizes pixels, the real question is: how do you actually make a video look clearer?
The key difference is how the video is processed. Premiere Pro stretches existing pixels, which is why exports often look softer or noisier. AI upscaling, on the other hand, attempts to rebuild missing detail before scaling.
Tools like Aiarty Video Enhancer take this approach by automatically handling denoising, deblurring, and detail restoration— so the result looks clearer, not just higher in resolution.
Instead of stacking effects or tweaking settings, you get a faster workflow and visibly better quality, especially when working with low-resolution or compressed footage.
Still unsure how AI upscaling works in practice? Here’s a quick guide on how to upscale video step by step.
What You Can Actually Improve with AI Upscaling:
- Sharper video, not just bigger: Upscale to 4K with real detail, not stretched pixels.
- Remove noise before it grows: Automatically clean noise and grain from low-quality footage.
- Fix blur and soft edges: Restore sharpness lost to motion blur or focus issues.
- Recover natural color and lighting: Fix dark, faded, or flat-looking footage.
- Better contrast with HDR: Upgrade SDR to HDR with richer tones and less banding.
- Auto-optimized for different scenes: No complex setup for faces, landscapes, or low light.
- Instant preview before export: See results and switch models in real time.
- Faster batch processing: Upscale multiple videos with up to 3× speed.
- Extremely fast upscaling with full batch processing support.
- Automatically removes noise and restores incredible clarity.
- No manual tuning or complex technical setup required.
- AI-trained models expertly enhance texture and edge detail.
- Requires a separate software download.
- Limited editing capabilities compared to Premiere Pro.
How to Upscale Video to 4K with High Quality in Aiarty Video Enhancer
Step 1: Open Aiarty Video Enhancer and drag your video file(s) into the workspace. If you haven’t installed it on your computer yet, please download the installation package here.
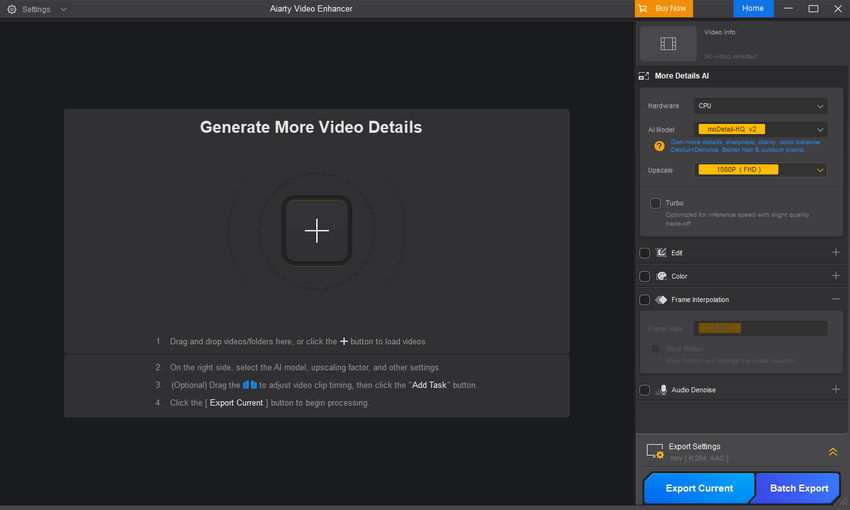
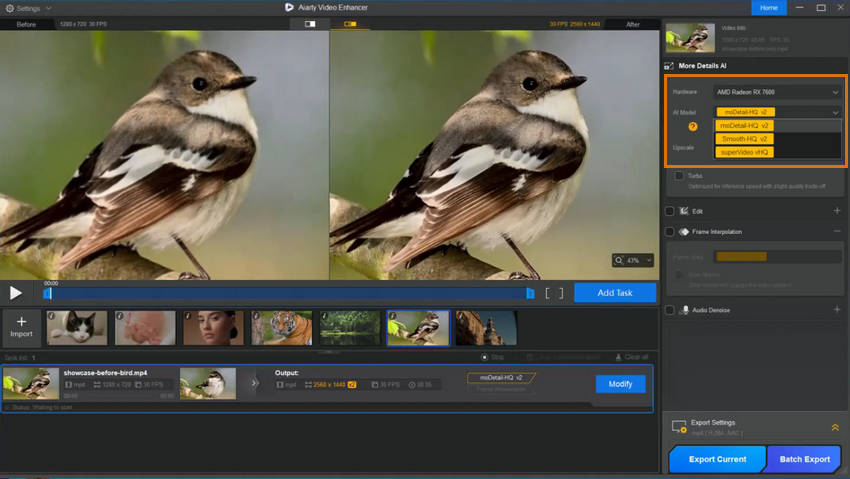
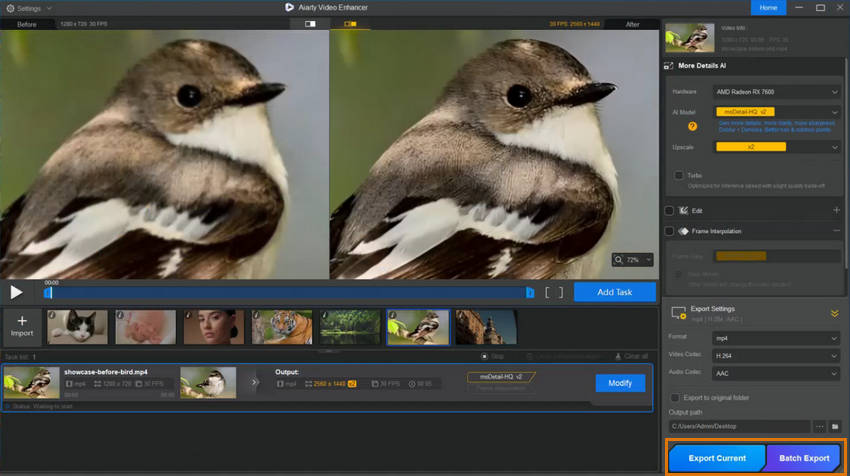
Step 2: Choose an AI model tailored to your footage:
- moDetail-HQ v2: Combines Diffusion and GAN techniques to deblur and denoise with precision—great for hair, plants, and well-lit nature scenes. Supports 1×, 2×, and 4× upscaling.
- Smooth-HQ v2: Delivers naturally smooth enhancements, ideal for faces, interiors, and general-use footage.
- superVideo vHQ: Built for dark or underexposed video, like nighttime landscapes or cityscapes. Offers elite noise reduction (2× only).
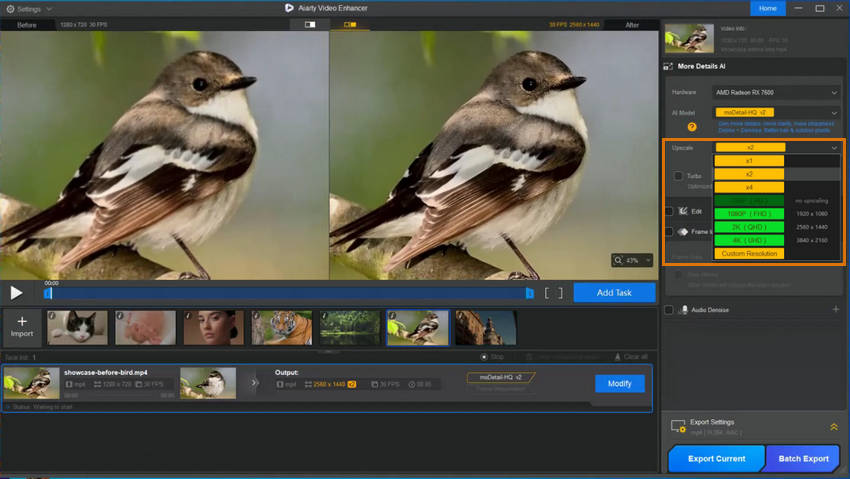
Step 3: Set the upscale resolution via the Upscale dropdown (e.g., 3840×2160 for 4K or select 2×/4×).
Step 4: Hit Preview to check the result. Aiarty quickly loads and infers the model, giving you a real-time comparison. Don’t like it? Try another model instantly.

Step 5: Optionally, you can fine-tune the color like temperature, tint, white balance, contrast, exposure, etc. or remaster SDR to HDR 10-bit for immersive visuals if needed.
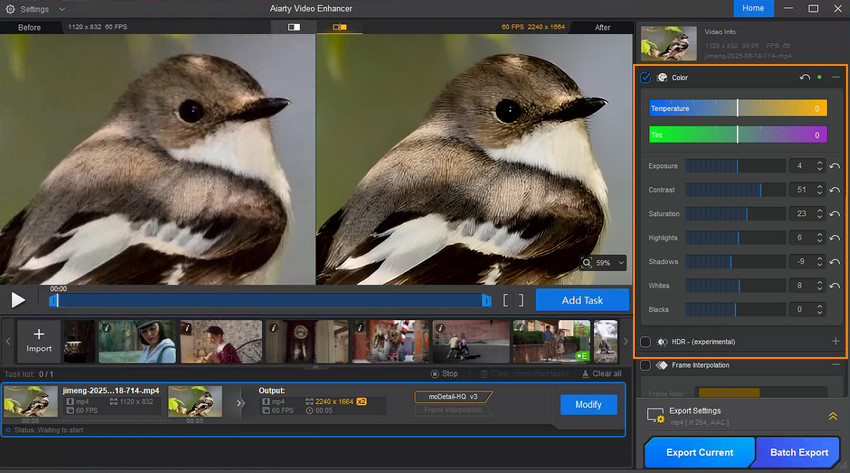
Step 6: Once satisfied, click Add Task to queue it. Then choose:
- Export Current for single clips
- Batch Export to process multiple videos at once
Aiarty’s GPU optimization enables blazing-fast rendering. For instance, using an RTX 5090 and moDetail-HQ, it achieved 21.7 FPS (1080p → 4K), and with Turbo Mode, performance jumped to 31.3 FPS. Competing tools rarely exceed 7 FPS under similar conditions.
💬 Feedback: Impressive Quality, Effortless Simplicity, and Blazing Fast!
I am very impressed. It achieved better sharpness and denoise than other tools I use for video. I really like simple user interface that is easy to use. I just want it to work and don't want ton of sliders I have to change. I like the turbo mode which makes processing faster.
Premiere Pro vs Aiarty Video Upscaling Comparison Table
To put its performance into perspective, here’s a comparison of render times across different methods:
When comparing ease of use, render speed, batch processing, and final output quality, Aiarty Video Enhancer clearly outperforms traditional Premiere Pro upscaling methods. While tools like Neat Video and Detail Preserving Upscale can deliver improvements, they often require complex setup and longer render times. For users who prioritize both efficiency and high-quality results—especially when working with multiple videos—Aiarty Video Enhancer remains the smarter and more reliable choice.
Final Verdict:
- Premiere Pro focuses on simple resizing rather than restoring details
- Aiarty Video Enhancer reconstructs real image details using AI enhancement
If your goal is real quality improvement—not just increasing resolution. AI upscaling is the only method that consistently delivers noticeable results.
Ready to upscale your videos effortlessly? Try Aiarty Video Enhancer now and experience AI-powered clarity.
 FAQs
FAQs
Yes, Premiere Pro can upscale 1080p to 4K using sequence settings and Optical Flow, or by sending the clip to After Effects for detail-preserving upscale. However, render times can be long, and edge sharpness may be limited.
Combining native sequence scaling with Neat Video or After Effects gives better results, but AI tools like Aiarty Video Enhancer deliver faster, sharper, and more consistent outcomes.
Yes, Premiere Pro allows 720p to 1080p scaling through its sequence settings, but quality is often limited. Aiarty can enhance and restore detail in low-resolution footage using AI algorithms.
Upscaling improves resolution but not always visual detail. AI tools simulate realistic texture and fill in lost data to enhance perceived quality beyond simple pixel stretching.
In DaVinci Resolve, you can upscale by setting a higher timeline resolution (like 4K) and enabling the “Scale image to fit” or “Scale image to fill” option in your clip inspector. For better quality, use the "Super Scale" feature under the clip's settings — it applies AI-like enhancement for cleaner results.
Yes, Aiarty Video Enhancer provides a much faster alternative with batch processing, automatic denoising, and intelligent detail recovery.
You May Also Like
This post was written by Brenda Peng who is a seasoned editor at Digiarty Software who loves turning ordinary photos into extraordinary works of art. With AI assistance for brainstorming and drafting, the post is reviewed for accuracy by our expert Abby Poole for her expertise in this field.