Best 3 Ways to Convert 720p to 1080p (AI-Powered, No Quality Loss)
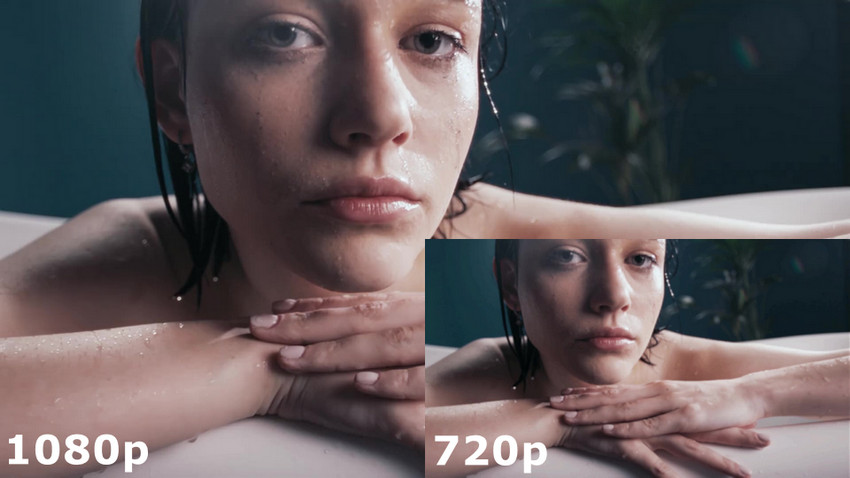
720p was once the standard for HD video, but in today’s world of high-resolution screens and sharper expectations, it often feels outdated. When played on larger displays or shared on modern platforms, 720p footage can look soft, grainy, and lacking in detail. Upgrading these videos to 1080p can make them noticeably clearer and more enjoyable to watch — especially if the process goes beyond simply stretching pixels.
There are several ways to upscale 720p to 1080p. Some involve professional editing software, others rely on online tools, and a few video enhancers take advantage of AI technology to intelligently restore lost detail and fix common quality issues like blur, noise, and compression artifacts. In this article, we’ll explore the most reliable methods and help you choose the right one.
Method 1: Upscale 720p to 1080p with Aiarty Video Enhancer
If you're looking for a simple and effective way to upscale 720p videos to 1080p — without diving into complex software or spending hours fine-tuning settings — Aiarty Video Enhancer is a great place to start.
It’s a desktop tool that uses AI to do more than just increase resolution. Instead of stretching pixels, Aiarty analyzes each frame to rebuild fine details, reduce noise, fix blurry areas, and remove compression artifacts. The result is a sharper, cleaner, and more natural-looking video that feels like true 1080p — not just a larger version of 720p.
But Aiarty doesn’t stop at upscaling. It also includes a range of intelligent enhancement tools that give you even more control over how your video looks and sounds:
- Adjust Color: Fine-tune exposure, contrast, saturation, and more to bring dull footage back to life.
- Frame Interpolation: Smooth out motion or double your frame rate for more cinematic playback.
- Create Slow-Motion Video: Generate realistic slow-motion effects without choppy frames or stutter.
- Denoise Audio: Clean up background hiss, hum, or environmental noise for clearer, more professional sound.
- Deinterlace Video: Fix interlaced lines in old or recorded footage to make it crisp and modern.
- SDR to HDR Conversion: Intelligently convert SDR 8-bit content to HDR 10-bit video to achieve smoother color gradients and more realistic tones.
- Rotate, Flip, and Crop: Quickly fix orientation issues or trim out unwanted edges before exporting.
Together, these tools make Aiarty not just an AI upscaler, but a complete video enhancement solution for creators, editors, and anyone who wants to turn ordinary clips into high-quality visuals.
How to Use Aiarty Video Enhancer to Upscale from 720p to 1080p
Step 1: Download and install Aiarty Video Enhancer on your computer.
Then follow the steps below or this YouTube video to learn how to upscale video with Aiarty Video Enhancer.
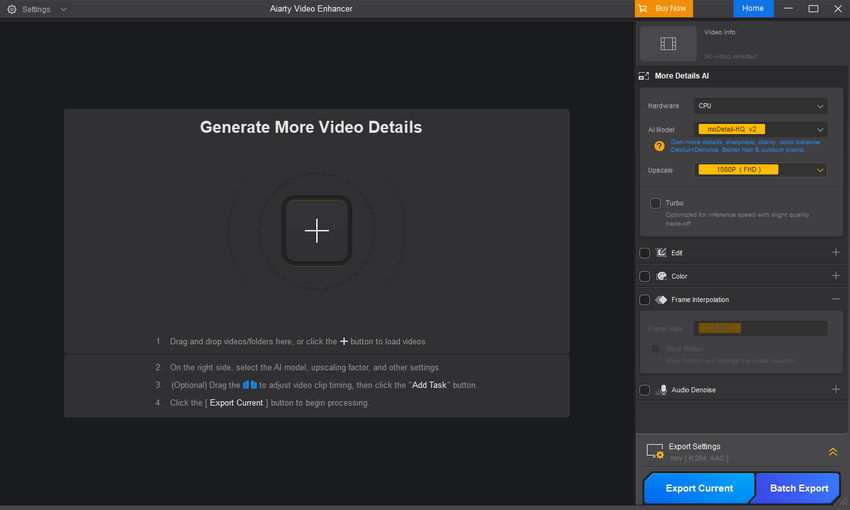
Step 2: Launch Aiarty Video Enhancer and drag your 720p video into the workspace.
Tips: You can import multiple videos at once for batch processing.
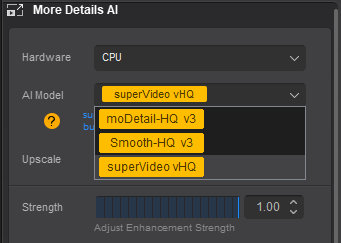
Step 3: Open the AI Model drop-down menu and choose a model that best suits your video content.
Selecting the correct AI model is critical for achieving the highest quality upscaling from 720p to 1080p. Aiarty offers specialized models designed to target specific video flaws and content types. Use the guide below to choose the model that best suits your source footage:
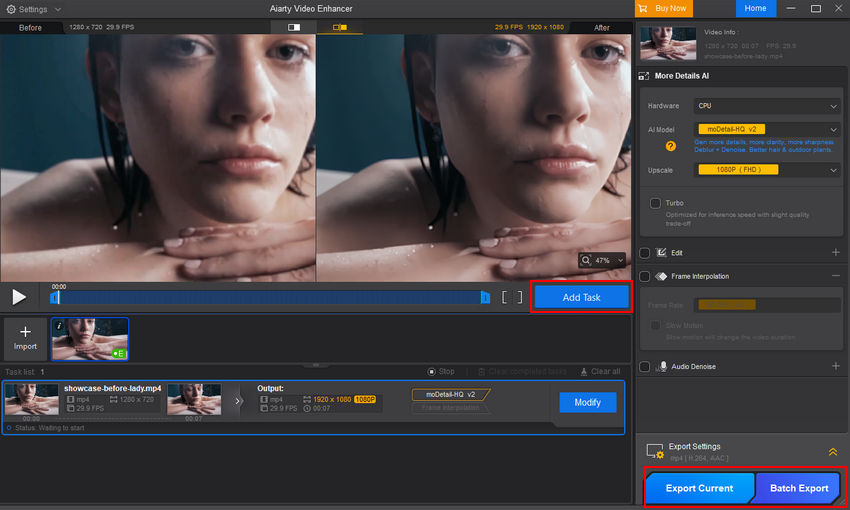
Step 4: Go to the Upscale drop-down and select 1080P (FHD) as your target resolution.
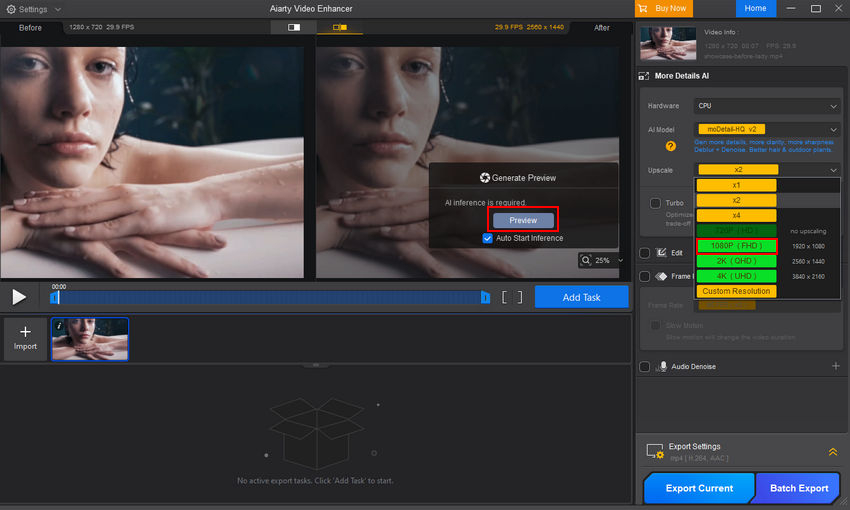
Step 5: Click the Preview button to generate a preview of the enhancement.
Step 6: Review the result. If you're satisfied, click Add Task, then choose either Export Current or Batch Export to export your video in crisp 1080p.
You don’t need any video editing experience — Aiarty Video Enhancer handles the complex enhancement work for you.
Note: Processing time will vary depending on your hardware, model selection, and whether Turbo Mode is enabled. On a mid-range GPU like the RTX 3060 Ti or RTX 4060, Aiarty processes 720p to 1080p upscaling at an estimated speed of 13–14 frames per second using the moDetail-HQ v2 or Smooth-HQ v2 model. The SuperVideo vHQ model, which prioritizes visual quality, runs at around 4–5 fps.
To give you a sense of real-world performance, upscaling a 1-minute 720p video (at 30fps) to 1080p typically takes:
- ~2 to 2.5 minutes with moDetail or Smooth model
- ~6 to 7 minutes with SuperVideo model
This is significantly faster than many other AI-based upscaling tools. With Aiarty, you get a strong balance of speed and quality.
Want to see how Aiarty performs in a real-world example?
Below is a showcase of a 720p video upscaled to 1080p using Aiarty Video Enhancer. You’ll see how the AI not only increases resolution, but also sharpens soft details, reduces noise, and brings the overall image closer to what you'd expect from native Full HD. It's a clear before-and-after comparison that shows what smart upscaling can really do.
Method 2: Convert 720p to 1080p Online
If you don’t want to install software or just need a quick solution, using an online video upscaler can be a convenient option. These tools usually run directly in your browser, require no setup, and are beginner-friendly.
That said, most online upscalers come with some trade-offs. During testing, we found that many platforms don’t let you choose 1080p as a specific output resolution. Instead, they typically offer fixed upscale ratios like 2x or 4x, which may push your video beyond 1080p or leave you guessing what the final resolution will be. Some tools also limit file size, supported formats, or watermark the result unless you pay for premium access.
Among the tools we tested, HDconvert.com was one of the few that allowed for more precise control. You can upload a 720p video and manually select 1080p (Full HD) as the target resolution. The steps are easy to follow, and you don’t need to register to get started.
How to Upscale 720p to 1080p Online with HDConvert.com
Here’s a quick walkthrough of how to use HDConvert.com to upscale your video to 1080p:
Step 1: Visit the official website: hdconvert.com
Step 2: Click "CONVERT VIDEO RIGHT NOW", then select "CONVERT HD VIDEO".

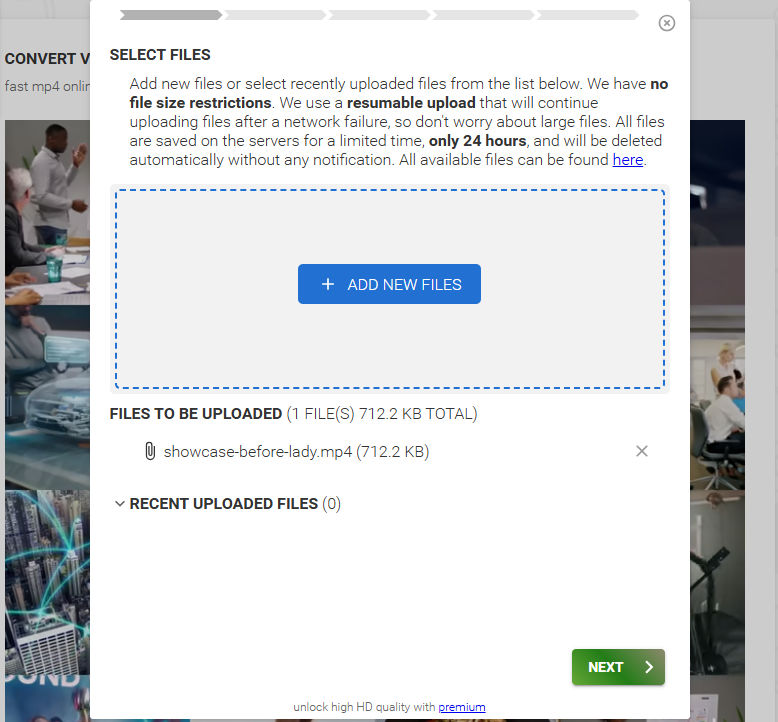
Step 3: Click "ADD NEW FILES" to upload your 720p video.
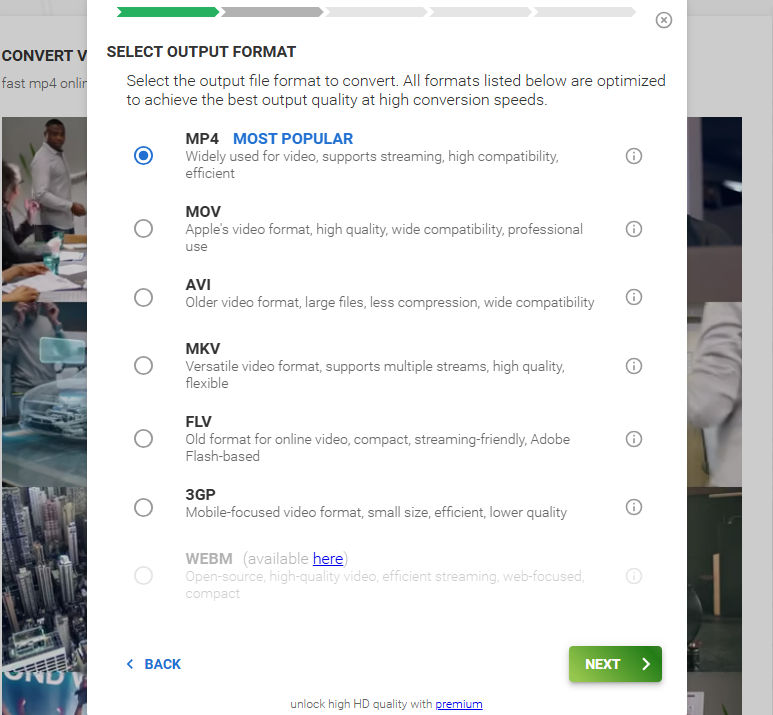
Step 4: Choose your preferred output format (e.g., MP4).
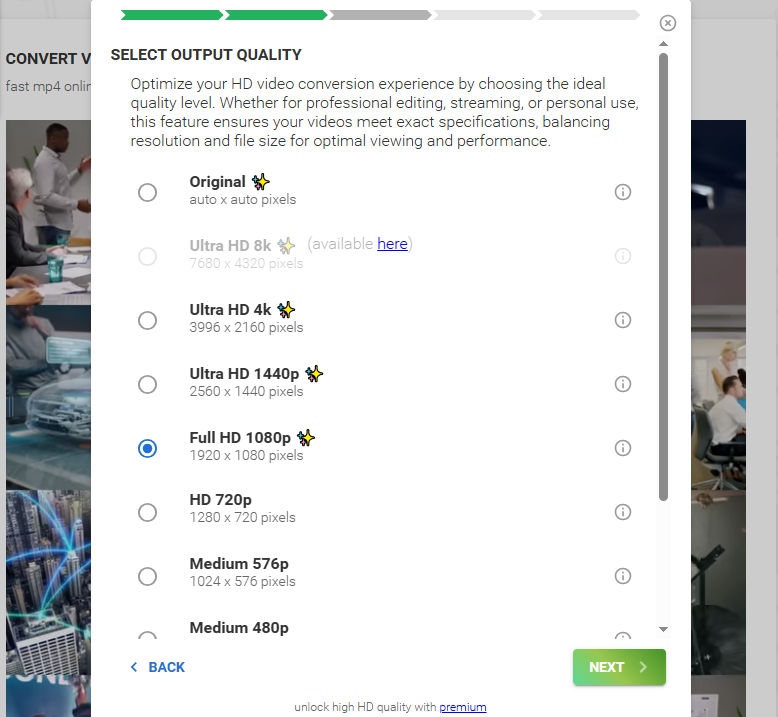
Step 5: Under quality settings, select FULL HD 1080P as the target resolution.
Step 6 (Optional): Adjust additional settings if needed, such as bitrate, codec, or audio options.
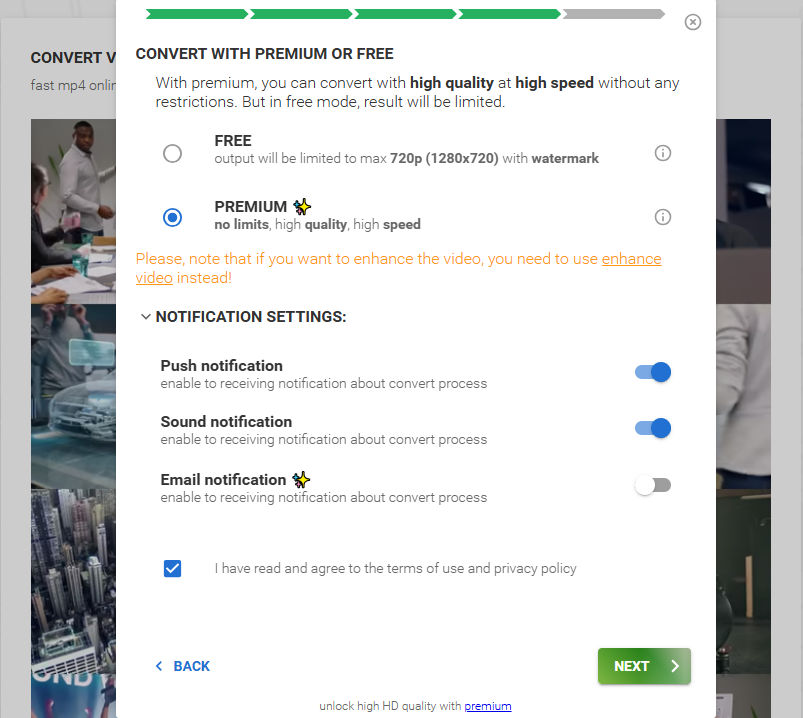
Step 7: Choose whether to convert with FREE or PREMIUM:
- FREE: Output is limited to 720p and includes a watermark.
- PREMIUM: Unlocks 1080p+, removes watermark, and speeds up processing.
Step 8: Wait for the upload and conversion to complete. Once finished, click "DOWNLOAD" to save the video to your device.

Note: While HDConvert.com is convenient and browser-based, it comes with some limitations. You’ll need to upgrade to the premium plan to actually export in 1080p without watermarks. Additionally, it doesn’t offer intelligent enhancement features like deblurring, denoising, or artifact removal—so if your 720p footage is already compressed or blurry, don’t expect major quality improvements beyond the resolution increase.
Method 3: Convert 720p to 1080p with Premiere Pro
If you already have Adobe Premiere Pro installed — or you're comfortable with professional editing tools — it’s also possible to upscale a 720p video to 1080p manually. This method gives you more control over the scaling process, letting you adjust sharpness, reduce noise, and fine-tune output settings to suit your needs.
How to Use Premiere Pro to Upscale from 720p to 1080p
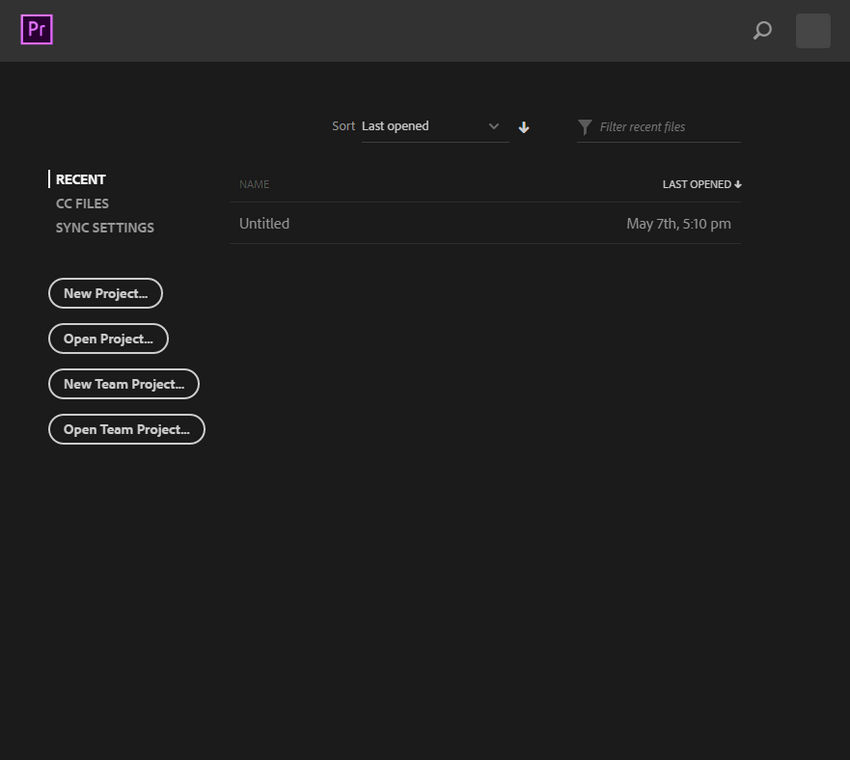
Step 1: Open Premiere Pro and create a new project.
Step 2: Go to File > Import and bring in your 720p video.
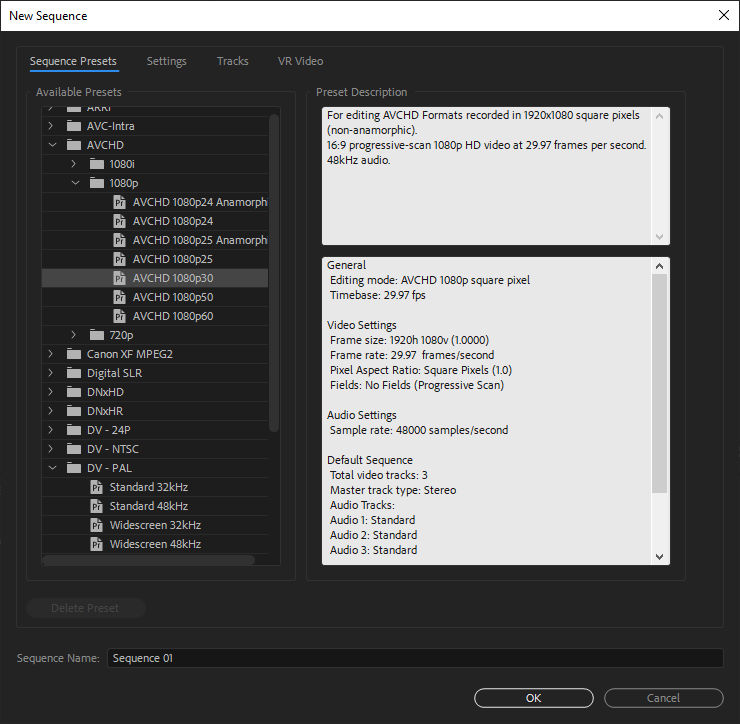
Step 3: Create a new sequence manually by going to File > New > Sequence.
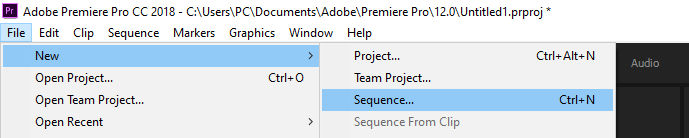
Then choose a 1080p preset (1920×1080) under a format like "Digital SLR > 1080p" or "AVCHD > 1080p24".
Alternatively, you can right-click your video clip in the Project panel and choose "New Sequence from Clip." This creates a sequence that matches the video’s original 720p resolution. In that case, go to Sequence > Sequence Settings and manually change the frame size to 1920×1080.
Step 4: Drag your 720p video into the timeline. If it doesn’t auto-scale, right-click the clip and choose Set to Frame Size or Scale to Frame Size.
Step 5 (Optional): To improve the visual quality, you can apply effects like:
- Unsharp Mask (to sharpen details),
- Lumetri Color (for color correction),
- Noise Reduction (via third-party plugins or built-in tools).
Step 6: Once you’re happy with the result, go to File > Export > Media, select your output format (e.g., H.264), and export the final 1080p version.
Note: Premiere Pro offers more customization than most online or automatic video upscalers, but it also requires manual tweaking and basic editing experience. Additionally, Premiere Pro doesn’t use AI for upscaling — it simply interpolates pixels, so the visual improvement is limited. You’ll get the correct resolution, but not necessarily more detail. Also, it's subscription-based software, which may not be ideal for users seeking a free or fast solution.
Which Method Is Right for You? A Quick Comparison
Still deciding which method works best for your needs? Here’s a side-by-side comparison of Aiarty Video Enhancer, an online upscaler (HDConvert.com), and Adobe Premiere Pro. This table breaks down their key differences in control, quality, ease of use, and performance.
720p vs 1080p: What’s the Difference?
Now that you know how to upscale, let’s quickly compare 720p and 1080p to see what you actually gain in resolution and visual clarity.
In simple terms, 1080p packs more than twice the pixel information of 720p. This means finer detail, smoother edges, and a generally more lifelike image — especially noticeable on screens larger than 24 inches.
However, 1080p files also require more storage space and higher bandwidth to stream smoothly. That’s why upscaling 720p to 1080p with AI enhancement is important — it ensures you’re not just enlarging pixels, but also restoring missing detail to match the higher resolution.
Why Is 720p Bad Now?
When 720p first appeared in the mid-2000s, it was a huge step up from standard definition (480p) and quickly became the HD standard for TVs, YouTube, and early smartphones. But in 2025, 720p often feels soft and underwhelming — here’s why:
Modern Screens Have Higher Pixel Density
Most laptops, smartphones, and TVs today offer Full HD (1080p) or higher resolutions like 2K, 4K, or even 8K. On these displays, a 720p video has to be upscaled automatically, often resulting in visible blur or pixelation.
Streaming Platforms Prioritize Higher Resolutions
Services like Netflix, YouTube, and Disney+ are optimized for 1080p or higher. Many platforms even categorize 720p as "SD" (Standard Definition) now, which can hurt viewer perception.
Visual Expectations Have Increased
As audiences get used to sharper, crisper visuals, 720p footage — especially in fast action scenes or detailed textures — can look flat and lack fine detail.
Compression Artifacts Are More Obvious
With streaming bitrates dropping to save bandwidth, lower-resolution videos like 720p suffer more from blocking, noise, and edge softness.
Bottom line: 720p isn’t "bad" for casual viewing on small screens, but compared to 1080p or higher, it no longer meets modern quality expectations — especially for professional, commercial, or content creation purposes.
Is 1080p Good Enough for a 4K TV?
Yes — 1080p can still look good on a 4K TV, but it depends on viewing distance, screen size, and the quality of the upscaling. On smaller 4K TVs (under 50 inches) and when viewed from several feet away, most people won’t notice a huge difference between native 4K and well-upscaled 1080p.
However, if you sit closer, use a large 4K screen, or watch high-motion content like sports, native 4K will look noticeably sharper. In these cases, upscaling 1080p to 4K with AI-powered tools can improve detail and reduce softness compared to standard TV upscaling.
 FAQs
FAQs
To upscale without noticeable quality loss, you’ll need more than just resolution interpolation. Tools like Aiarty Video Enhancer use AI to intelligently restore detail, reduce noise, and sharpen blurry frames during the upscaling process. This leads to a clearer and more natural-looking 1080p result than traditional resampling methods.
It’s hard to find a software or online tool that lets you upscale videos to 1080p for free without adding a watermark. Most platforms — including HDConvert.com and Aiarty Video Enhancer — offer free trials but require a paid plan to export watermark-free results. If you're looking for clean, high-quality output, upgrading to the full version is usually the way to go.
Yes, especially on larger screens or when you’re viewing the video up close. 1080p offers about twice the pixel count of 720p, resulting in sharper edges, better detail, and smoother gradients. That said, the difference may be less noticeable on smaller displays like phones. Upscaling with AI can make the jump from 720p to 1080p even more visually significant.
Pretty easy in FCP. Just select your project in the browser, go to the Inspector, and change the Project Properties (Resolution) from 720p to 1080p. Final Cut will automatically upscale your existing clips to fit the new resolution.
Yes, you can. Simply open your existing project, click the Modify button next to the resolution setting, and switch it to 1080p. Your timeline and edits will remain intact — only the project resolution changes.
Most modern TVs have a built-in upscaler that automatically converts 720p input to 1080p or even 4K for display. If you want better control or quality, you can use an external video upscaler device or play the enhanced video processed by software like Aiarty Video Enhancer.
You May Also Like
This post was written by Brenda Peng who is a seasoned editor at Digiarty Software who loves turning ordinary photos into extraordinary works of art. With AI assistance for brainstorming and drafting, the post is reviewed for accuracy by our expert Abby Poole for her expertise in this field.