1080p still looks good on smaller screens, but once you watch it on a modern 4K TV, monitor, or YouTube player, the limitations become obvious: soft textures, blurry edges, compression artifacts, and missing detail. The good news is that AI video upscaling has improved dramatically. Modern AI models can recover texture, reduce noise, and reconstruct visual detail far beyond what traditional resizing methods can do.
In this guide, we tested different methods to upscale 1080p videos to 4K and compared the results side by side. We’ll also show how to convert 1080p footage into sharper, cleaner 4K using the best AI video upscaler.
Can You Really Upscale 1080p to Native 4K?
Not exactly.
AI upscaling cannot magically recreate every missing pixel from a true native 4K source. However, advanced AI models can intelligently predict textures, sharpen edges, reduce compression artifacts, and restore fine details that appear lost in the original footage.
That’s why AI upscaling often looks dramatically better than standard resizing.
Traditional upscaling methods simply stretch pixels. AI models analyze patterns frame by frame and generate more realistic visual detail.
For example:
In our testing, AI upscaling produced noticeably cleaner hair detail, sharper facial textures, and reduced macro-blocking compared to conventional enlargement.
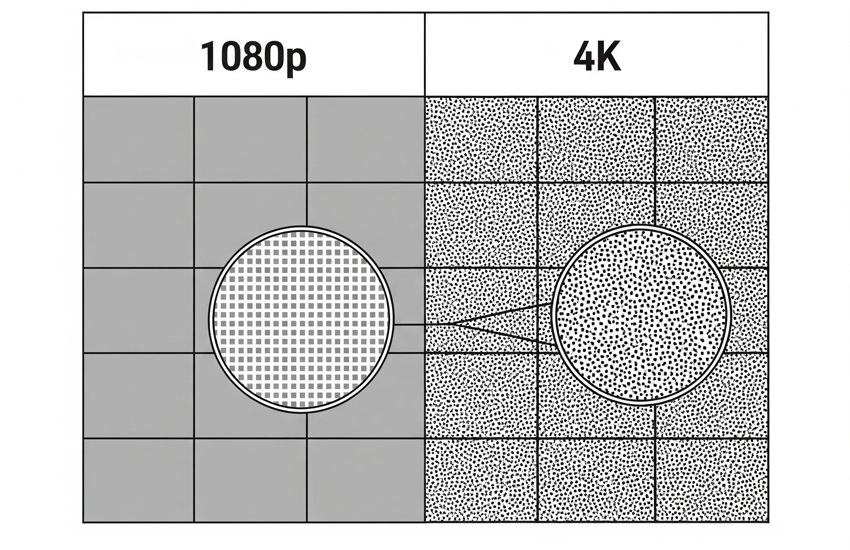
Why 1080p Videos Often Look Bad on 4K Screens
When a 1080p video is displayed on a 4K screen, the display must fill four times as many pixels. This often introduces:
- blurry textures
- soft edges
- compression artifacts
- banding
- ringing
- low-light noise
The problem becomes even worse with:
- old movies
- downloaded YouTube videos
- compressed MP4 clips
- smartphone footage
- screen recordings
AI enhancement helps by reconstructing missing detail instead of simply enlarging existing pixels.
AI Upscaling vs Traditional Upscaling
Most standard video editors use interpolation methods like bicubic or bilinear scaling. These methods increase resolution mathematically, but they cannot restore lost detail. AI upscaling works differently. Instead of stretching pixels, AI models are trained on massive datasets to recognize patterns like:
- skin texture
- hair strands
- fabric detail
- architectural edges
- film grain
- anime linework
As a result, AI-generated 4K footage often appears significantly cleaner and more natural.
Best Way to Upscale 1080p to 4K
After testing several workflows, we found that AI-powered enhancement delivers the best balance between quality, speed, and artifact reduction. Aiarty Video Enhancer is one of the easiest tools we tested for converting 1080p footage into cleaner 4K output.
Unlike basic upscalers that merely stretch pixels, Aiarty uses advanced hybrid AI models combining Diffusion and GAN techniques to automatically remove blur, reduce noise, eliminate artifacts, and generate intricate details throughout the upscaling process. This ensures your videos not only become larger but also clearer, sharper, and more vibrant—often resembling footage originally captured in 4K.
The process is streamlined and user-friendly: simply import your 1080p video, choose from tailored AI models optimized for different content types, and select your desired 4K output. Leveraging fast GPU acceleration, Aiarty meticulously refines each frame. New features such as HDR 10-bit conversion enhance color depth and dynamic range, while Strength Control lets you adjust enhancement intensity to suit your creative vision. Real-time preview allows you to fine-tune settings before exporting a perfectly upscaled 4K video ready for high-resolution displays or professional use.
Real Test: Upscaling a Compressed 1080p Video to 4K
To evaluate the results, we tested a heavily compressed 1080p MP4 clip:
Source Video:
Test System:
What We Noticed Before Upscaling
The original clip showed:
- blurry hair detail
- muddy textures
- macro-blocking
- noisy shadows
- compression ringing around edges
After AI Upscaling to 4K
After processing with Aiarty Video Enhancer:
- edges appeared cleaner
- facial textures looked more natural
- low-light noise was reduced
- background details became sharper
- compression artifacts were less noticeable
The improvement was especially visible on foliage, skin texture, and distant architectural detail.
How to Upscale 1080p Video to 4K with AI
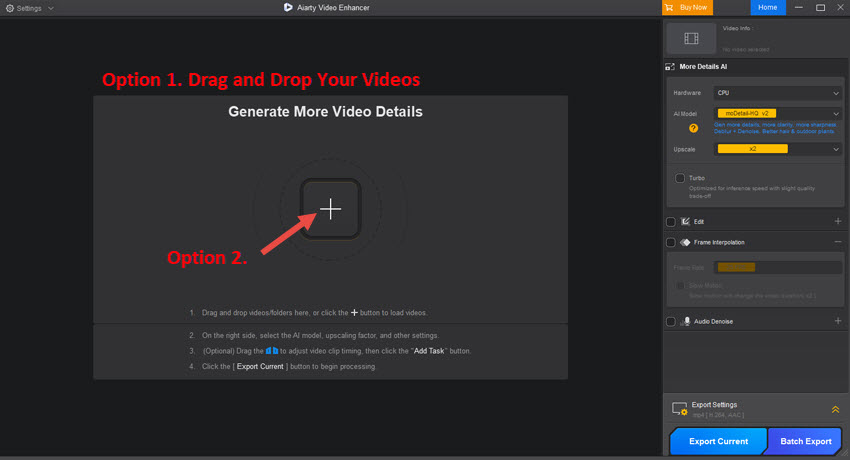
Step 1. Import Your Video
First, download and install Aiarty Video Enhancer on your computer, then launch the program. Once open, click the "+" button to browse and import your 1080p video. For convenience, you can also drag and drop one or more files directly into the interface for batch processing.
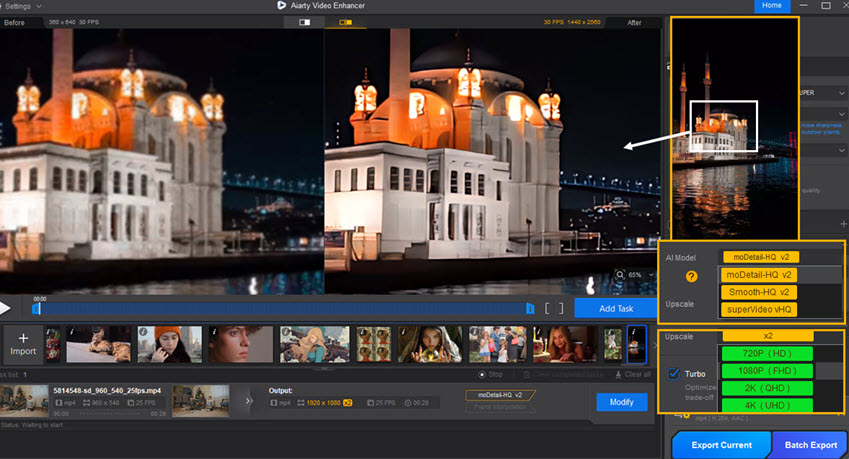
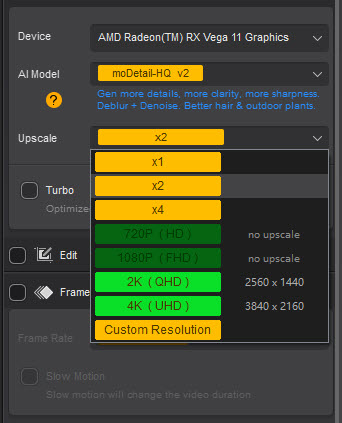
Step 2. Choose Your AI Upscaling Model
With your 1080p video selected, direct your attention to the right-hand panel where Aiarty provides several AI models, each optimized for different types of footage:
- moDetail-HQ v3: This model is perfect for intricate details like hair, plants, and bright daylight scenes. It utilizes a combination of Diffusion and GAN to precisely deblur and denoise, supporting 1x, 2x, and 4x upscaling.
- Smooth-HQ v3: For a more natural and smooth appearance, especially suitable for indoor lighting, faces, and general footage with minor imperfections, choose this Diffusion-based model.
- superVideo vHQ: If you're dealing with extremely dark footage, such as night skies or cityscapes, this model offers top-tier denoising and quality (available for 2x upscaling only).
Select the model that best matches your video's content; you can always experiment with different models later if needed.
Step 3. Select 4K Output
Next, in the "Upscale" section, simply choose 4K (UHD) as your desired output resolution.
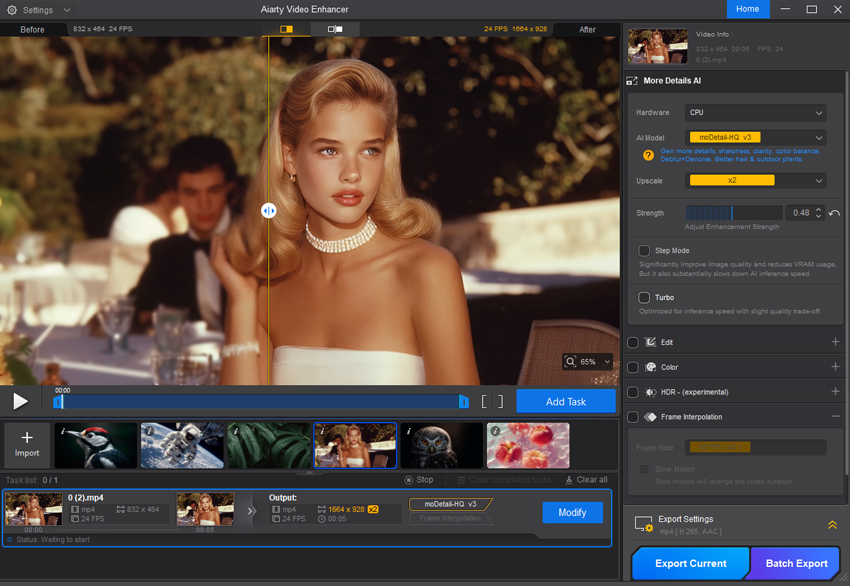
Step 4. Preview and Export
Finally, click the "Preview" button in the preview window. Aiarty will quickly load the upscaled video, typically in just a few seconds, thanks to its rapid model loading and optimized processing speed. Once you're happy with the results, you can either click "Export Current" to save your single upscaled video or "Batch Export" if you're processing multiple videos simultaneously.

Upscale 1080p to 4K in Adobe Premiere
While AI-powered tools like Aiarty Video Enhancer offer superior results for upscaling, it's also possible to increase the resolution of your 1080p content to 4K using more traditional methods, primarily through professional video editing software. These methods, while less sophisticated in their pixel generation compared to AI, can still be useful for certain workflows or if you don't require the advanced detail recovery AI provides.
Most modern video editing suites, such as Adobe Premiere Pro, allow you to place lower-resolution footage into a higher-resolution timeline. When you export, the software will render the 1080p video at your chosen 4K output resolution.
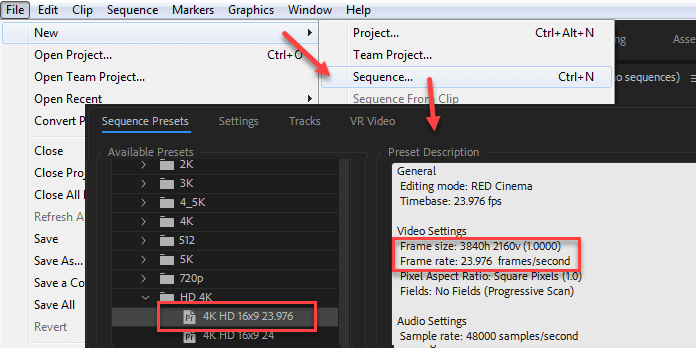
Step 1: Set Up Your 4K Project
Start by creating a new sequence in Premiere Pro. Make sure to set its dimensions to 3840 pixels wide by 2160 pixels high (which is 4K UHD). This is your new, larger canvas.
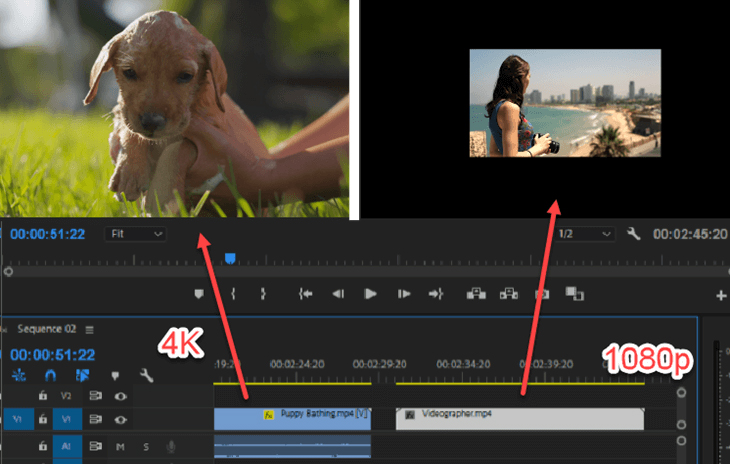
Step 2: Bring in Your 1080p Video
Import your 1080p video into your project, then drag it onto your new 4K timeline. You'll notice it looks smaller because it doesn't fill the entire 4K frame.
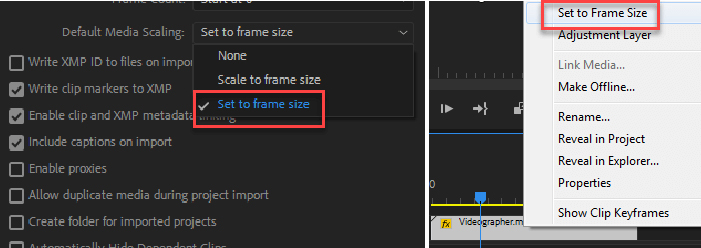
Step 3: Make It Fit the Frame
Right-click on the 1080p video clip in your timeline. From the menu that pops up, select "Set to Frame Size." Premiere Pro will automatically enlarge your video to fill the 4K sequence.
Step 4: Export as 4K
Once your video is scaled, go to File > Export > Media. In the export settings, choose a 4K output format and ensure the resolution is set to 3840 x 2160. Adjust your quality settings as needed, then click "Export."
That's it! Premiere Pro will upscale your 1080p video into a 4K file. Keep in mind this method stretches the pixels, so it won't add new details like AI upscaling, but it's effective for resolution conversion within your editing workflow.
 FAQs
FAQs
With traditional upscaling, you generally won't gain new quality or detail, and the image can indeed appear softer or blurrier. However, with AI-powered upscaling, the goal is precisely to minimize quality loss and even enhance it. AI models generate new pixel data, reduce noise, and sharpen details, leading to a significantly better outcome that often looks much closer to native 4K.
The best way to upscale 1080p to 4K for optimal quality and detail enhancement is undoubtedly through dedicated AI-powered video upscaling software. These tools go beyond simple pixel stretching, intelligently generating new data, reducing noise, and eliminating artifacts. For a superior and efficient experience, we highly recommend Aiarty Video Enhancer. It stands out for its ability to automatically and intelligently remove blur, reduce noise, eliminate artifacts, and generate intricate details, making your upscaled 4K videos look incredibly sharp and natural.
This post was written by Brenda Peng who is a seasoned editor at Digiarty Software who loves turning ordinary photos into extraordinary works of art. With AI assistance for brainstorming and drafting, the post is reviewed for accuracy by our expert Abby Poole for her expertise in this field.