Best HandBrake Quality Settings (Copy & Use)
- Encoder: H.265 (HEVC)
- RF Value: 18 (1080p) / 16 (4K)
- Frame Rate: Same as Source + CFR
- Resolution: Keep Original
- Preset: Slow
These settings help preserve the best possible quality during compression while keeping file sizes manageable. If the video still looks a bit soft after all this, it’s probably not your settings — it’s just HandBrake hitting its ceiling. That’s usually when people start looking at AI video enhancers to actually improve quality.
You can use the “best” HandBrake settings and still end up with a video that looks softer, blurrier, or less detailed than expected. This usually happens when the source footage is already compressed, noisy, low-resolution, or affected by motion blur.
In this guide, you’ll learn:
- The best HandBrake settings for high-quality exports.
- How RF values, encoders, and presets actually affect quality.
- Why videos sometimes still look blurry after compression.
- When AI enhancement may help improve low-quality footage.
How HandBrake Affects Video Quality
HandBrake improves storage efficiency by re-encoding video files, but compression always involves some level of quality loss. The final output quality mainly depends on how aggressively the video is compressed and the condition of the original source footage.
- Bitrate – lower bitrates reduce file size but can remove fine details.
- Codec (H.264, H.265, AV1) – newer codecs compress more efficiently while preserving quality.
- Resolution and scaling – downscaling reduces clarity and texture detail.
- Frame rate – mismatched frame rates may introduce stutter or motion artifacts.
Even with optimized settings, HandBrake cannot fully restore details already lost in blurry, noisy, or heavily compressed videos. Its primary goal is preserving quality during compression rather than enhancing the source footage itself.
Hot Search: Why Is My Video Quality So Bad & Fix It from Recording to Post
Best HandBrake Quality Settings for High-Quality Output
Here’s exactly how to set HandBrake for the best balance between size and quality. Follow these settings to ensure you get the clearest possible video.
1. Choose the Right Video Encoder
The video encoder determines how HandBrake compresses your footage, balancing file size, quality, and playback compatibility. Choosing the right codec is one of the most important steps to achieve the best video quality.
Recommended codec: H.265 (HEVC)
This is the most efficient modern codec supported by HandBrake. It can reduce file size by up to 50% compared to H.264 while maintaining the same visual quality. HEVC is ideal if you’re targeting 4K or HDR content, or simply want to save storage space without sacrificing clarity.
Alternative: H.264 (AVC)
Still widely used and highly compatible with older devices, browsers, and editing software. If you’re exporting for general playback, streaming, or social platforms that don’t fully support HEVC, H.264 remains a safe and stable choice.

If you’re uploading to YouTube, Vimeo, or social media, both H.264 and H.265 work well. However, H.265 offers smaller file sizes and slightly better sharpness, especially for high-resolution footage. Just make sure your playback device or platform supports it. Otherwise, stick with H.264 for guaranteed compatibility.
Does HandBrake Support AV1?
Yes — HandBrake supports AV1, but it’s often misunderstood. AV1 improves compression efficiency, not visual detail, so it won’t fix blurry or low-quality source footage.
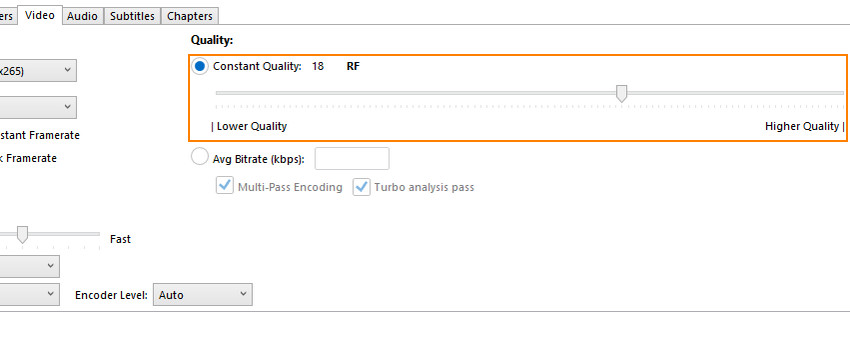
2. Adjust Constant Quality (RF) Value
HandBrake’s Constant Quality setting, expressed as an RF (Rate Factor) value, controls how much compression is applied. Lower numbers mean higher quality and larger files, while higher numbers mean more compression and smaller files.
What RF Value Should You Actually Use?
For most users, RF 18–20 is the sweet spot for preserving quality without generating excessively large files. Lower RF values improve clarity and texture retention, but file sizes increase rapidly.
It’s also important to understand that lowering the RF value cannot restore details already lost in the source video. If your footage already looks blurry, compressed, or noisy before encoding, even RF 16 may still look soft after export.
3. Optimize Frame Rate Settings
Frame rate (FPS) defines how smooth your video playback looks. Using the wrong setting can create stutter or motion blur.
- Use “Same as Source” to preserve the original motion.
- Set “Constant Frame Rate (CFR)” for stable playback — especially if you’re editing or uploading to YouTube or social media.
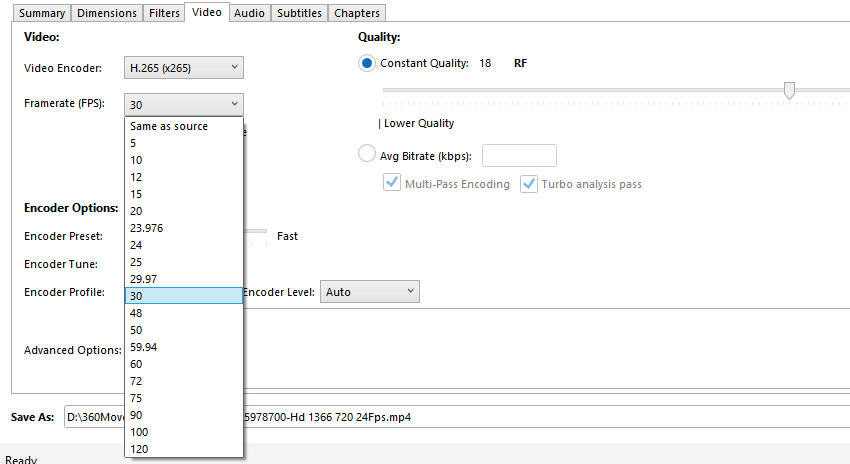
Pro Tip: Avoid forcing 60 fps if your footage was recorded at 30 fps. It won’t improve quality and may introduce unwanted artifacts.
4. Keep Original Resolution (Avoid Downscaling)
Resizing your video can drastically reduce clarity. Unless you need a specific output resolution (e.g., converting 4K to 1080p), keep the “Same as Source” resolution. If your original video is already low-resolution, upscaling won’t help in HandBrake — it will only make it look softer.
For true 4K or 8K upscaling, you’ll need an AI tool like Aiarty Video Enhancer, which can intelligently reconstruct lost details while increasing resolution.

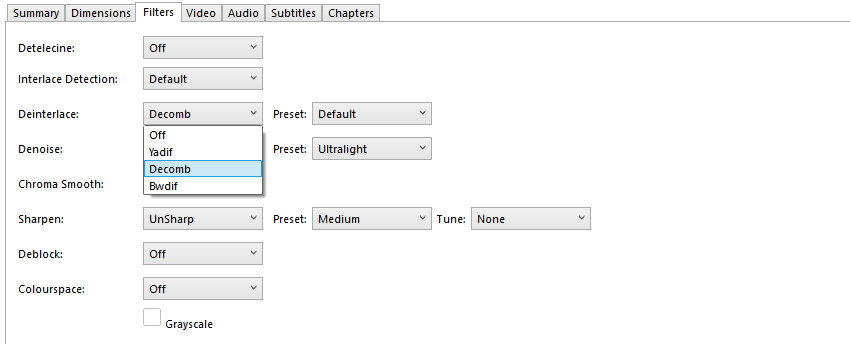
5. Enable High-Quality Filtering and Deinterlacing
Older or interlaced footage often shows visible scan lines or flicker. HandBrake includes filters that can smooth these out:
- Deinterlace: Turn on if your source is from DVD, VHS, or broadcast recordings. It will help you to deinterlace video effortlessly.
- Denoise: Apply mild settings to reduce grain, sensor noise, or unwanted background artifacts from your footage. Be careful not to overdo it, as excessive denoising can soften textures and blur fine details.
- Sharpen (Unsharp Mask): Use sparingly to recover edge definition after denoising.
If you’re working with old or heavily compressed footage, apply only minimal filters in HandBrake to avoid losing additional details. Then, use Aiarty Video Enhancer to handle the real restoration work — its AI algorithms can intelligently remove noise, sharpen soft edges, and upscale resolution, transforming dull or blurry clips into crisp, vibrant videos that look professionally remastered.
6. Set Presets for Quality and Speed Balance
HandBrake offers several built-in presets under the encoder settings. They control how aggressively the software compresses your video.
- Slower presets = better quality, larger files
- Faster presets = smaller files, reduced sharpness
Recommended preset:
Use “Slow” or “Medium” for most projects. These provide an excellent balance of encoding speed and preserved detail.
If you’re editing cinematic footage or want maximum sharpness, go for the “Slower” preset. It analyzes more frames for smoother results, especially in motion-heavy scenes.
7. Fine-Tune Audio and Subtitles (Optional)
Though most users focus on visuals, proper audio encoding also affects perceived quality.
- Codec: AAC (High-quality and widely supported)
- Bitrate: 160–192 kbps for stereo; 320 kbps for music-heavy or surround tracks
- Sample rate: Match source (usually 48 kHz)
Always preview audio levels before final export to avoid clipping or distortion.
Best HandBrake Settings for Different Scenarios
Different types of videos require slightly different HandBrake settings. A setup that works well for movies may not be ideal for TikTok clips, gameplay recordings, or anime content. Here are some recommended HandBrake quality settings based on real-world use cases.
Best HandBrake Settings for TikTok
TikTok videos are heavily compressed after upload, so preserving as much detail as possible before exporting is important.
- Encoder: H.264 or H.265
- RF Value: 18–20
- Frame Rate: Same as Source + CFR
- Resolution: 1080x1920 for vertical videos
- Preset: Slow
If your TikTok uploads still appear blurry after compression, the issue is usually platform recompression rather than HandBrake itself.
Best HandBrake Settings for YouTube
YouTube applies aggressive recompression to uploaded videos, especially at lower resolutions.
- Encoder: H.265 (HEVC)
- RF Value: 18 for 1080p, 16–18 for 4K
- Frame Rate: Same as Source
- Preset: Slow or Slower
- Resolution: Keep Original
Uploading higher bitrate or 4K exports often helps YouTube preserve more detail during processing.
Best HandBrake Settings for 1080p Videos
For standard HD videos, the goal is usually balancing file size and visual quality.
- Encoder: H.265
- RF Value: 18–20
- Preset: Medium or Slow
- Audio: AAC 192–320 kbps
RF 18 is often considered visually lossless for most 1080p content.
Best HandBrake Settings for 4K Videos
4K footage contains significantly more detail and benefits from more conservative compression settings.
- Encoder: H.265 (10-bit if supported)
- RF Value: 16–18
- Preset: Slow or Slower
- Resolution: Keep Original 4K
Avoid unnecessary downscaling if you want to preserve texture and sharpness.
Best HandBrake Settings for Anime
Anime often contains flat colors, sharp edges, and fast motion, which can produce banding or artifacts if compressed too heavily.
- Encoder: H.265
- RF Value: 17–19
- Preset: Slow
- Denoise: Off or very light
Lower RF values usually help preserve line art and reduce visible compression artifacts.
Best HandBrake Settings for Gameplay and OBS Recordings
Gameplay recordings often include fast motion, particle effects, and dark scenes that can break down during compression.
- Encoder: H.265
- RF Value: 18–20
- Frame Rate: Same as Source (60 FPS if recorded at 60 FPS)
- Preset: Slow
If gameplay footage still looks blurry after encoding, compression artifacts and motion blur from the original recording may already be baked into the source video.
Limitations of HandBrake: When “Best” Still Isn’t Perfect
Even with the right HandBrake quality settings, there’s one hard limit you can’t get around: HandBrake can only control how much quality you lose — it can’t add quality that isn’t already there.
- Blurry or low-resolution sources — HandBrake can’t restore missing details or true sharpness.
- Heavily compressed videos — existing artifacts and blockiness remain after re-encoding.
- Low-light or noisy footage — encoding often makes grain and noise more visible.
- Upscaling limitations — HandBrake can resize video, but it can’t intelligently upscale video quality or recover texture.
In short, HandBrake is a compression tool, not a restoration tool. When real quality improvement is needed, AI enhancement software becomes the natural next step. Tools like Aiarty Video Enhancer analyze each frame to reduce artifacts, sharpen edges, restore textures, and upscale footage — delivering results HandBrake alone can’t achieve.
When AI Video Enhancement Can Help
HandBrake is excellent for compressing and converting videos while preserving as much quality as possible. However, some visual problems cannot be fully fixed through encoding settings alone.
If the original footage already contains blur, compression artifacts, low resolution, or heavy noise, lowering the RF value or using slower presets may only provide limited improvement. In these situations, AI-based video enhancement tools can sometimes help restore clarity after compression.
- Upscaling old 720p or 1080p videos to higher resolutions
- Reducing compression artifacts from TikTok, YouTube, or screen recordings
- Cleaning up grainy low-light footage
- Improving sharpness in blurry or soft-looking videos
Some creators use HandBrake first for efficient compression, then apply AI enhancement afterward if additional restoration or sharpening is needed.
For example, tools like Aiarty Video Enhancer use AI models to analyze video frames and improve detail, reduce noise, and upscale footage beyond what standard encoding settings can achieve.
If your video still looks soft after using the recommended HandBrake settings above, the limitation may come from the source footage itself rather than the encoder configuration.
How to Enhance and Upscale Video with Aiarty Video Enhancer
Step 1. Import Your Video
Install and open Aiarty Video Enhancer and drag and drop to add the video you want to upscale and enhance.
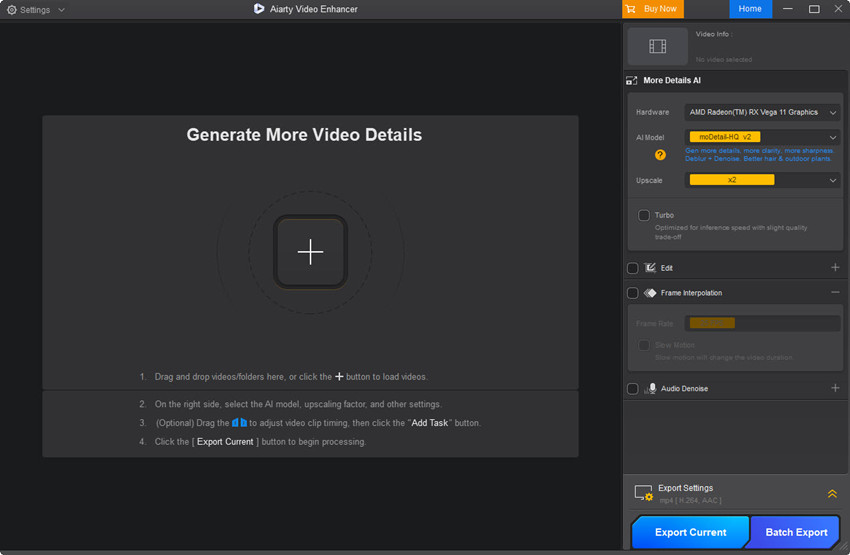
Step 2. Select AI Model
Aiarty offers three AI models tailored for different video types. Choose the one that best fits your footage. moreDeatil-HQ v2 for details, sharpness, and clarity; Smooth-HQ v2 for faithful and smooth fixing; and superVideo vHQ for grainy, low-light, and blurry clips.

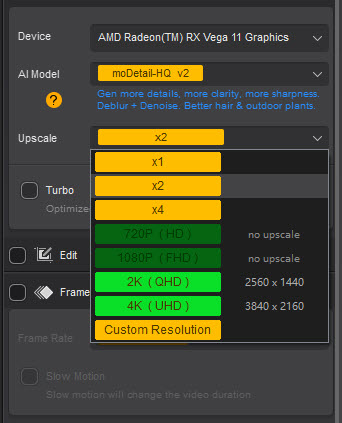
Step 3. Specify Upscale Options
You can select a scaling factor (e.g., 2x, 4x), choose a preset resolution (720p, 1080p, 2K, 4K), or enter a custom resolution.
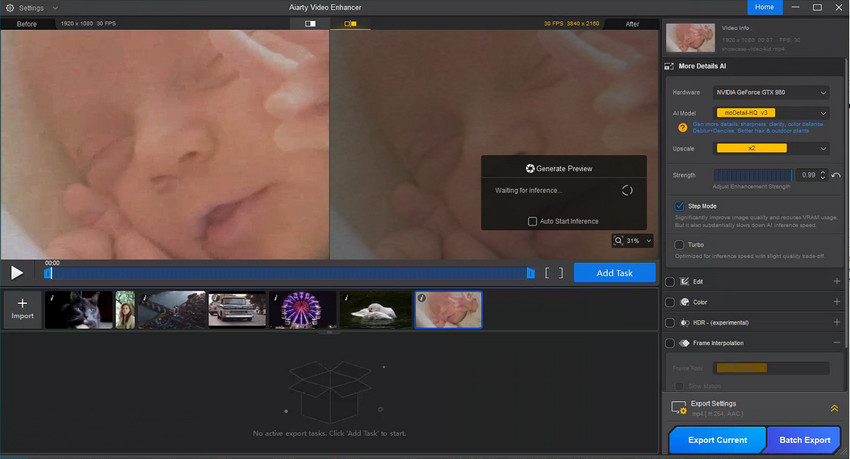
Step 4. Preview the Results
After settings are applied, click the Preview button. Aiarty will generate a preview allowing you to compare the original and enhanced versions side by side.
Step 5. Export the Final Video
To start processing, click Add Task and then Export Current once the settings are correct. The upscaling process then automatically enhances the video quality by deblurring, reducing noise, removing artifacts, and restoring details.
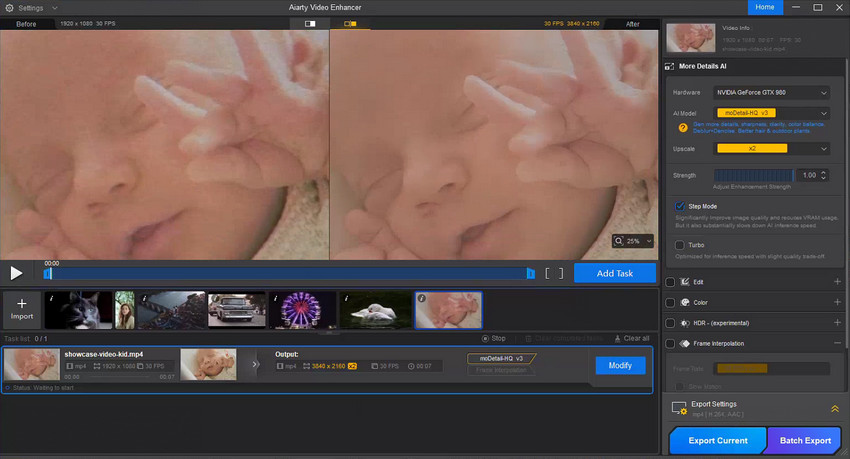
The provided example shows the result of using Aiarty Video Enhancer to upscale a video from 1080p to 4K, highlighting the noticeable gain in quality, resulting in a cleaner and sharper picture.
Conclusion
HandBrake is a fantastic tool for anyone who wants to compress and convert videos efficiently — but it reaches its limit when true quality restoration is needed. For creators who care about every pixel, Aiarty Video Enhancer offers that missing piece: AI-driven enhancement that sharpens, denoises, and upscales your footage far beyond what manual settings can achieve.
Use HandBrake for file management and Aiarty Video Enhancer for quality perfection — a winning combination for professional-looking videos every time.
Ready to make your compressed videos look crystal clear again? Try Aiarty Video Enhancer and experience how AI can transform your footage.
 Frequently Asked Questions
For most videos, an RF value between 18–20 offers the best balance between visual quality and file size in HandBrake. Lower RF values preserve more detail but create much larger files. For 4K videos, many users prefer RF 16–18 for better texture retention and reduced compression artifacts.
In many cases, RF 18 is considered visually lossless, especially for 1080p videos viewed on standard screens. Most viewers will not notice visible quality loss compared to the original source. However, the actual result still depends on the source footage, bitrate, motion, and compression level.
Videos may look blurry after HandBrake compression if the RF value is too high, the bitrate is too low, or the source footage is already compressed or low quality. Downscaling, aggressive denoise filters, and social media recompression can also reduce sharpness and texture detail.
For most 1080p videos, the “Slow” preset provides an excellent balance between compression efficiency and image quality. If encoding speed is less important, the “Slower” preset can preserve slightly more detail, especially in high-motion scenes.
H.265 (HEVC) offers better compression efficiency and smaller file sizes while maintaining similar visual quality compared to H.264. However, H.264 remains more widely compatible with older devices, browsers, and editing software. H.265 is generally better for 4K and high-quality exports, while H.264 is safer for maximum compatibility.
You May Also Like
This post was written by Brenda Peng who is a seasoned editor at Digiarty Software who loves turning ordinary photos into extraordinary works of art. With AI assistance for brainstorming and drafting, the post is reviewed for accuracy by our expert Abby Poole for her expertise in this field.