If you're seeing horizontal comb-like lines, jagged edges during motion, or flickering in old videos, your footage is probably interlaced. This commonly happens with VHS tapes, DVDs, MiniDV camcorders, TV broadcasts, and 1080i recordings.
Fortunately, you can remove these artifacts through deinterlacing, converting interlaced footage into smooth progressive video that's compatible with modern TVs, phones, YouTube, and video editors.
In this guide, you'll learn:
- What deinterlacing actually does
- How to tell whether your video needs it
- The best ways to deinterlace video using VLC, HandBrake, Topaz, or AI tools
- Which method produces the highest-quality results
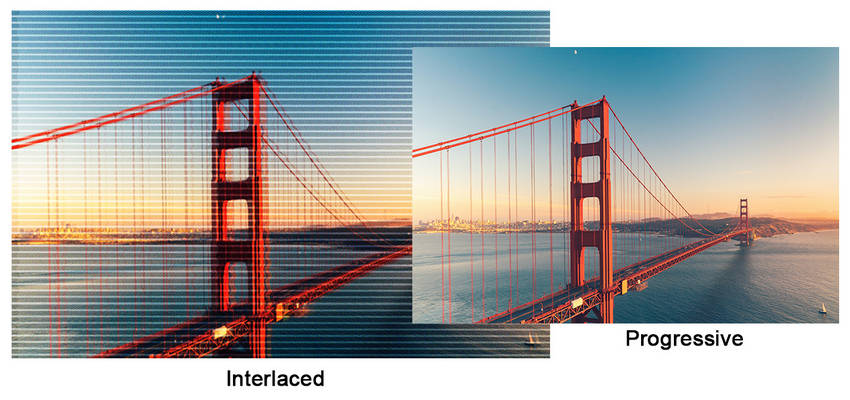
What Is Interlaced Video and Why Deinterlace?
Understanding Interlaced vs. Progressive Video
Before diving into the deinterlace video process, it's important to understand the difference between interlaced and progressive video.
- Interlaced video stores each frame as two alternating fields, reducing bandwidth but introducing visible artifacts during motion.
- Progressive video displays every frame in full, providing cleaner motion and better compatibility with modern displays.
Why You Should Deinterlace Video
Modern displays are progressive by default, meaning interlaced content looks bad — think jagged lines, flickering edges, and comb-like artifacts. Deinterlacing removes these issues by reconstructing full progressive frames. This improves:
- Visual clarity
- Playback smoothness
- Compatibility with platforms like YouTube, Vimeo, or TikTok
- The ability to upscale old footage to HD or even 4K
Deinterlacing doesn't magically improve video quality, but it removes artifacts that prevent modern displays from rendering footage correctly. Once deinterlaced, videos can be further enhanced through AI upscaling, denoising, or restoration.
Deinterlace vs. Decomb vs. Inverse Telecine
Different methods are designed for different types of footage. Choosing the right one helps preserve quality while removing interlacing artifacts.
- Deinterlace: Best for videos that are fully interlaced, such as VHS tapes, DVDs, and 1080i broadcasts.
- Decomb: Ideal for mixed footage, as it only deinterlaces frames that actually contain combing artifacts.
- Inverse Telecine: Used for film content converted to NTSC, restoring the original progressive frame rate.
- AI Deinterlacing: AI-powered tools can remove interlacing while also reducing noise, restoring details, and improving overall video quality.
If you're unsure which method to choose, Decomb is usually the safest option for mixed sources, while Deinterlace works best for videos that are entirely interlaced.
How Do You Know If a Video Needs Deinterlacing?
Not every video requires deinterlacing. In fact, applying it to progressive footage may slightly reduce sharpness. Here are several signs that your video is interlaced:
- Horizontal comb-like lines around moving objects
- Jagged edges during motion
- Captured from VHS, MiniDV, Hi8, or DVD >> More for VHS restoration
- Recorded in 480i, 576i, or 1080i
- Broadcast TV recordings
If you're unsure, play the video frame by frame. If moving objects appear split into alternating horizontal lines, the video is interlaced.
Best Tools to Deinterlace Video (With Step-by-Step Guides)
VLC Media Player (Best Free Option for Playback)
Overview: VLC Media Player is a free and open-source multimedia player that supports almost all video formats without requiring additional codecs. While it does not provide permanent video editing or export features, it includes a built-in deinterlace video function for real-time playback.
This makes VLC useful for watching older interlaced footage such as 1080i broadcasts, DVDs, and VHS recordings without visible combing artifacts. However, the effect only applies during playback and does not modify the original video file.
What is Deinterlace in VLC?
Deinterlacing in VLC is a real-time playback filter that converts interlaced video into a progressive display. It removes combing artifacts caused by alternating scan lines in older formats like 1080i or DVD content, improving viewing clarity without changing the source file.
For most users, Yadif provides the best balance between sharpness and motion, making it the recommended default option for VLC deinterlacing.
- Completely free and open-source with no ads
- Supports real-time deinterlace video playback
- Works across Windows, macOS, Linux, and mobile devices
- Lightweight with minimal system requirements
- Supports nearly all video formats without extra codecs
- Deinterlacing is playback-only (no export function)
- Quality depends on selected mode and is limited compared to AI tools
- Not suitable for professional video restoration or editing
How to Deinterlace Video in VLC Media Player:
Step 1: Download and Install VLC
If you haven’t installed VLC yet, visit the official VLC website and download the latest version for your operating system (Windows, macOS, Linux, or mobile). Installation is quick and straightforward.
Step 2: Open Your Interlaced Video in VLC
Launch VLC Media Player. Click “Media” in the top menu and select “Open File” to load the video you want to play. You can also drag and drop the file into VLC’s window.
Step 3: Enable Deinterlacing
Once the video starts playing, go to the top menu bar, click “Video”, hover over “Deinterlace”, and select “On”. This immediately applies deinterlacing to your current playback session.
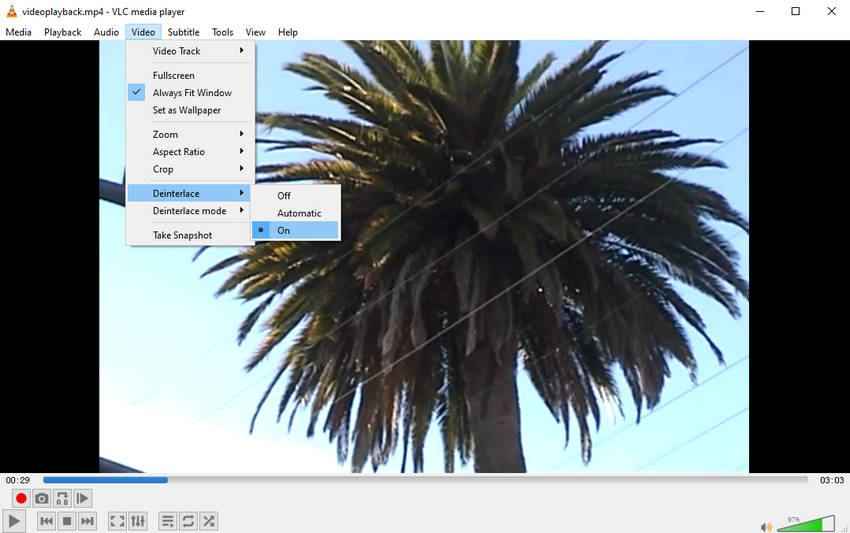
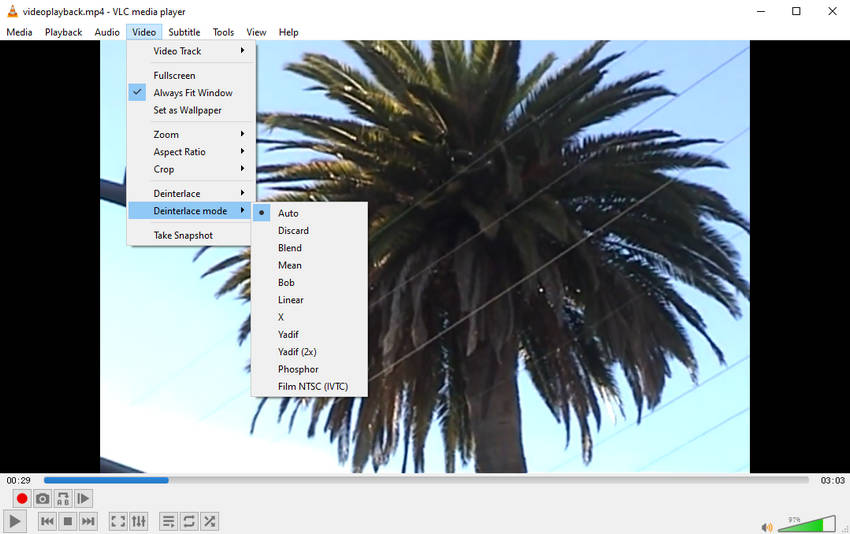
Step 4: Choose a Deinterlacing Mode
While still under the “Video” menu, navigate to “Deinterlace Mode”. You will see several options like Blend, Linear, Yadif, and others. For the best results, select “Yadif”, as it offers better motion handling and produces smoother output than the basic Blend mode.
Step 5: Optional – Set Deinterlacing as Default
If you often play interlaced videos, you can set deinterlacing to be enabled by default. Go to “Tools” in the top menu, select “Preferences”, then click “Video”. Under the “Deinterlacing” dropdown, choose “On”, and set the default mode (e.g., Yadif). Click “Save” to apply this for all future videos.
Step 6: Enjoy Smooth Playback
Your video should now play without the distracting interlacing artifacts. Note that this change is only for playback — the video file itself remains unchanged.
Hot Search: How to Upscale Video in VLC - A Complete Guide
HandBrake (Best Free Tool for Basic Deinterlacing)
Overview: HandBrake is a free, open-source video transcoder that supports video conversion, compression, and basic filtering features, including deinterlace video processing. It does not use AI-based enhancement, but provides reliable traditional filters to reduce interlacing artifacts with best quality settings.
It is widely used for batch video conversion and simple restoration tasks. The built-in Deinterlace and Decomb filters help remove combing effects in interlaced footage such as DVDs, camcorders, and 1080i broadcasts. However, results are limited compared to AI tools like Aiarty or Topaz.
- Completely free and open-source software
- Cross-platform support (Windows, macOS, Linux)
- Supports batch processing
- Lightweight and stable performance
- Includes basic deinterlacing filters (Deinterlace & Decomb)
- No AI-powered enhancement or restoration
- Limited quality compared to modern tools
- Not suitable for complex restoration workflows
How to Deinterlace Video with HandBrake:
Step 1: Import Your Video
Open HandBrake and load your interlaced video file for processing.
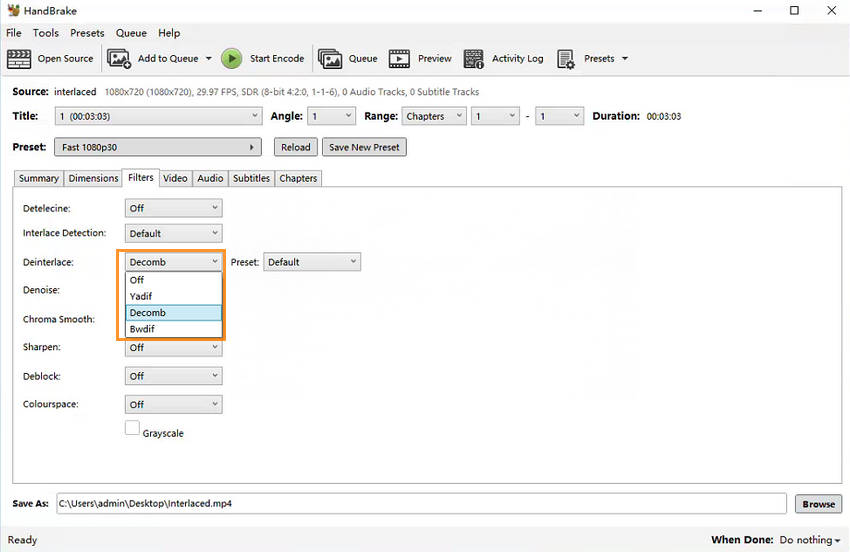
Step 2: Enable Deinterlace or Decomb
Go to the Filters tab and select either Deinterlace or Decomb depending on your source type.
Step 3: Start Encoding
Choose output settings and click Start Encode to apply deinterlacing and export the processed video.
When should you use Decomb instead of Deinterlace?
Use Decomb if only some scenes contain interlacing artifacts, as it applies deinterlacing dynamically only where needed. Use Deinterlace when the entire video is interlaced, such as full 1080i broadcasts or DVD sources.
Aiarty Video Enhancer (Best for Beginners and High-Quality Deinterlacing)
Overview: Aiarty Video Enhancer is an AI-powered video enhancement tool designed to simplify complex restoration tasks such as deinterlacing, upscaling, noise reduction, and detail recovery. Instead of requiring manual tuning, it uses advanced AI models to automatically analyze and enhance video frames in one click.
It is especially effective for restoring older or interlaced footage, including VHS tapes, DVDs, 1080i broadcast videos, and low-resolution camcorder recordings. With GPU acceleration and optimized AI models, Aiarty can upscale videos up to 4K while preserving natural details and reducing artifacts.

Best For:
- Old VHS tapes and analog video digitization
- DVD and SD video restoration
- 1080i interlaced broadcast footage deinterlacing
- Camcorder recordings with motion blur or noise
- Low-resolution or compressed archive videos
When to Choose Aiarty Video Enhancer:
Choose Aiarty Video Enhancer when you need a fast, beginner-friendly solution to convert interlaced or low-quality videos into clean, progressive, high-resolution output. It is ideal for users who want one-click enhancement without manually adjusting complex editing parameters.
- One-click deinterlacing combined with AI-powered 4K upscaling
- Supports batch processing for multiple videos
- Fast GPU-accelerated processing with optimized AI models
- Beginner-friendly interface with minimal learning curve
- AI restores details while removing noise and interlacing artifacts
- Free trial exports only 120 seconds with watermark
- Full features require a paid license
How to Deinterlace Video with Aiarty Video Enhancer:
Step 1: Import Your Video
Launch Aiarty Video Enhancer and drag your interlaced video (VHS, DVD, or 1080i footage) into the workspace.
Step 2: Enable Deinterlacing
Choose an AI model optimized for detail recovery (such as moDetail-HQ v3) and target resolution to enhance clarity, and then turn on Force Deinterlace to remove interlacing artifacts.

Step 3: Export Enhanced Video
Click Export Current to generate a clean, progressive, and upscaled video (up to 4K).
Topaz Video AI (Best for Ultimate Quality)
Overview: Topaz Video AI is a professional AI video enhancement tool designed for users who prioritize maximum output quality over simplicity. It delivers industry-leading results in deinterlacing, upscaling, frame interpolation, and noise reduction, making it a top choice for restoring complex interlaced footage from DVDs, 1080i broadcasts, and legacy cameras.
For deinterlacing specifically, Topaz Video AI uses the Dione Interlaced Robust AI model, which reconstructs progressive frames with high accuracy while preserving fine motion details and texture consistency. It can also enhance motion smoothness by doubling frame rates, making it suitable for professional video restoration and post-production workflows.
When to Choose Topaz Video AI:
- Professional video restoration and film remastering
- High-quality deinterlacing of complex 1080i or archival footage
- Projects requiring maximum detail recovery and visual fidelity
- Users with high-end GPUs who prioritize output quality over speed
When NOT to Choose Topaz Video AI:
- If you are a beginner looking for a one-click workflow
- If you need fast processing on low-end or mid-range hardware
- If you prioritize simplicity and automation over fine-tuning
- If you only need basic upscaling or quick enhancement
- Industry-leading AI deinterlacing quality with Dione Interlaced Robust model
- Exceptional detail reconstruction and motion accuracy
- Supports frame interpolation and upscaling up to 8K
- Flexible control over frame rate and output quality
- Strong performance for professional restoration workflows
- Requires powerful GPU (NVIDIA recommended)
- Higher cost compared to beginner-friendly tools
- Slower processing on high-resolution or complex videos
- Steeper learning curve for new users
How Topaz Video AI Works for Deinterlacing:
Step 1: Select AI Model (Dione Interlaced Robust)
Choose Dione Interlaced Robust, the dedicated AI model for converting interlaced footage into clean progressive video while preserving motion accuracy and fine details.
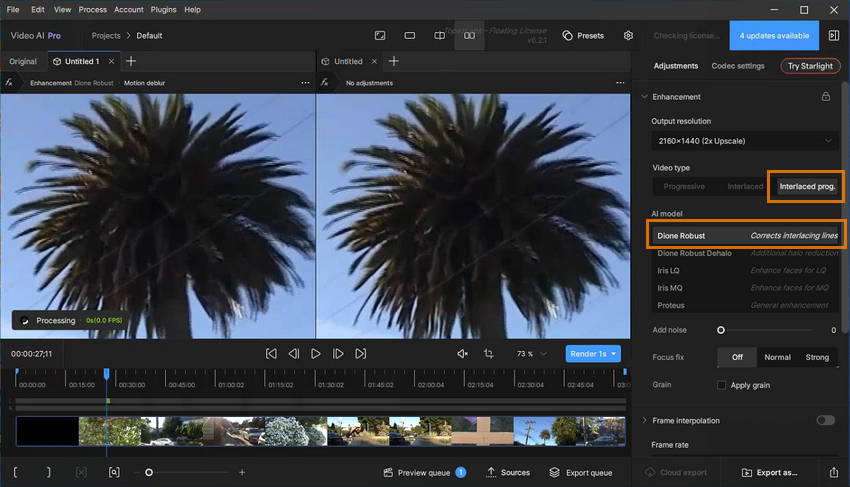
Step 2: Configure Output Quality
Set your target resolution (1080p, 4K, or 8K) and choose whether to maintain original frame rate or enable frame interpolation for smoother motion.
Step 3: Process and Generate Output
Start the AI processing workflow. Topaz will automatically remove interlacing artifacts, reconstruct frames, and upscale the video to the selected quality level.
Real-World Deinterlacing Results: Tool Comparison
Now that we've explored the features, pros, and cons of each tool, let’s look at how they perform in real-world scenarios. We tested all tools using the same interlaced footage to compare output quality, usability, and final visual results.
Quick Comparison Table
You can clearly see that each tool serves a different purpose — from simple playback to professional-grade AI restoration.
Which Deinterlacing Method Produces the Best Results?
To better understand the real difference, we tested all four tools using the same interlaced frame from landscape video featuring a coconut tree.
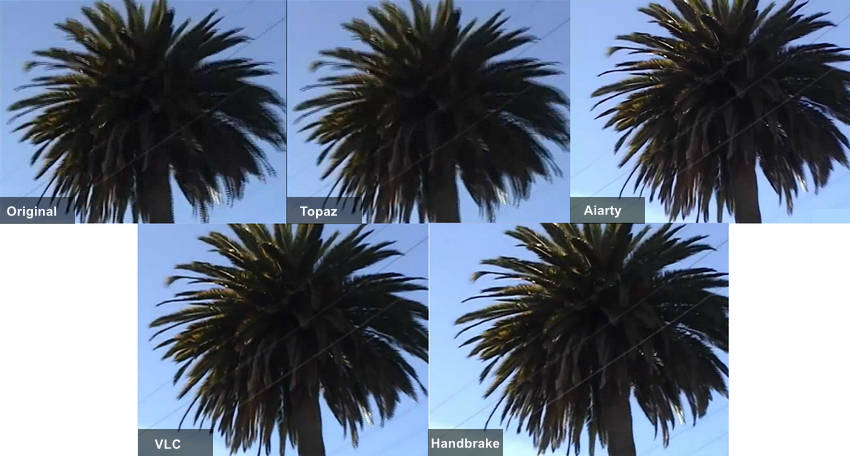
Notice the jagged edges on the leaves in VLC and HandBrake outputs, which are typical artifacts of traditional deinterlacing methods. In contrast, Topaz significantly reduces these artifacts, while Aiarty delivers a cleaner and more balanced result with faster processing and smoother details.
- Aiarty Video Enhancer delivers fast, clean, and stable 4K results, making it ideal for everyday users and batch processing.
- Topaz Video AI produces the highest visual fidelity, especially for professional restoration work, but requires more processing power.
- VLC Media Player improves playback only and does not export processed video.
- HandBrake provides a basic free solution but lacks AI-level detail reconstruction.
Key takeaway: Aiarty is the best balance of speed and quality, Topaz is the most accurate but resource-heavy, while VLC and HandBrake are limited to basic or playback-only use cases.
Common Deinterlacing Mistakes
Even with the right tools, many users still get poor results because of a few common workflow mistakes. These issues can reduce video quality, introduce artifacts, or completely undo the benefits of deinterlacing.
Here are the most common deinterlacing mistakes you should avoid:
- Deinterlacing progressive video unnecessarily: Applying deinterlacing to already progressive footage can soften details and reduce overall sharpness without any benefit.
- Using Blend instead of Yadif: The Blend mode is outdated and often produces ghosting. Yadif provides significantly better motion handling and sharper results.
- Forgetting field order: Incorrect field order settings can cause jittery motion, combing artifacts, or uneven frame reconstruction.
- Applying AI enhancement before deinterlacing: Enhancing interlaced footage first can amplify artifacts, making it harder for AI tools to reconstruct clean frames later.
- Upscaling interlaced video first: Scaling interlaced footage before deinterlacing often locks in artifacts and reduces final output quality.
Key takeaway: Always deinterlace first, then enhance or upscale. This ensures the cleanest possible input for AI or traditional processing tools.
Conclusion: Choosing the Right Deinterlacing Tool
Deinterlacing is an essential step for restoring older video formats like VHS, DVDs, and 1080i broadcasts into clean progressive footage. While we’ve already compared real-world results, the key takeaway is that each tool serves a different purpose depending on your workflow and quality expectations.
Final Recommendation:
- Aiarty Video Enhancer → Best overall balance of quality, speed, and ease of use
- Topaz Video AI → Best for professional-grade maximum quality
- VLC Media Player → Best for free playback-only use
- HandBrake → Best for basic free deinterlacing and conversion
Ready to restore your interlaced videos?
If you want a fast, AI-powered solution that delivers clean results without complicated settings, you can start with Aiarty Video Enhancer below.
For most users, starting with Aiarty is the most practical way to achieve high-quality deinterlacing without dealing with complex settings or long rendering times.
 FAQs
FAQs
Deinterlacing is the process of converting interlaced video (like 1080i or DVD) into a progressive format by removing combing artifacts and reconstructing full frames for smoother playback.
Only enable deinterlacing if you are watching interlaced videos such as 1080i broadcasts or DVDs. For progressive videos, it is better to keep it off or set to automatic.
Yadif is the best overall mode because it provides the best balance between sharpness and motion. Bob is smoother but less sharp, while Blend and Linear are older and less recommended.
Deinterlace applies a fixed filter to all frames, while Decomb intelligently detects interlaced frames and applies processing only when needed, resulting in better quality for mixed content.
Yes. HandBrake can permanently deinterlace videos using filters like Deinterlace or Decomb during encoding. However, results are based on traditional algorithms and do not include AI enhancement.
Yes, but only for interlaced footage. It removes combing artifacts and improves playback clarity. However, it does not add new detail unless combined with AI-based enhancement tools.
Yes. AI tools can further enhance deinterlaced videos by restoring details, reducing noise, and upscaling resolution. Tools like Aiarty Video Enhancer are designed for this combined workflow.
Yes. YouTube automatically converts interlaced uploads into progressive playback formats. However, results may vary depending on the original quality and encoding of the video.
You May Also Like
This post was written by Brenda Peng who is a seasoned editor at Digiarty Software who loves turning ordinary photos into extraordinary works of art. With AI assistance for brainstorming and drafting, the post is reviewed for accuracy by our expert Abby Poole for her expertise in this field.