Many users search for ways to upscale videos in VLC, hoping to make old 480p or 720p videos look sharper on modern displays. The short answer is: yes and no.
VLC can improve how a video looks during playback through rendering engines, filters, and hardware acceleration. However, it cannot truly recreate missing details or permanently convert a low-resolution video into a high-quality 4K file. For true video upscaling, you'll need either NVIDIA RTX Video Super Resolution (VSR) or dedicated AI video enhancement software.
In this guide, we'll explain what VLC can and cannot do; how to improve video quality in VLC; how to enable RTX Video Super Resolution and how AI upscaling compares with VLC.
VLC vs RTX VSR vs AI Video Upscaling at a Glance
This table provides a quick overview of how VLC, RTX Video Super Resolution, and AI video upscaling differ in real-world usage, especially for users deciding between playback enhancement and full video restoration.
Unlike VLC and RTX Video Super Resolution, which are focused on real-time playback enhancement, Aiarty Video Enhancer is built for full video restoration—using AI to upscale SD or HD footage up to 4K while reconstructing missing details, reducing noise, and improving overall clarity.
Ready to go beyond playback enhancement? Download Aiarty for full AI video upscaling.
How to Improve Video Playback Quality in VLC
Although VLC cannot truly upscale a video to a higher resolution, it does include several settings that can improve how videos look during playback. By adjusting rendering options, enabling filters, and using hardware acceleration, you may notice sharper edges, smoother playback, and better overall image quality.
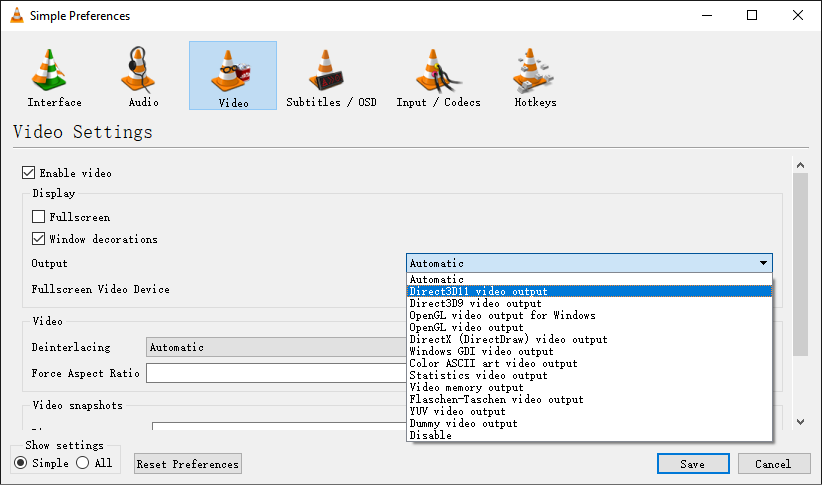
1. Change the Video Output Module
VLC supports multiple rendering engines, including OpenGL and Direct3D11. Switching from the default automatic mode to a dedicated output module can improve color accuracy, reduce visual artifacts, and provide smoother playback on some systems.
To change it, go to Tools > Preferences > Video and select OpenGL or Direct3D11 from the Output menu. Restart VLC after saving your settings.
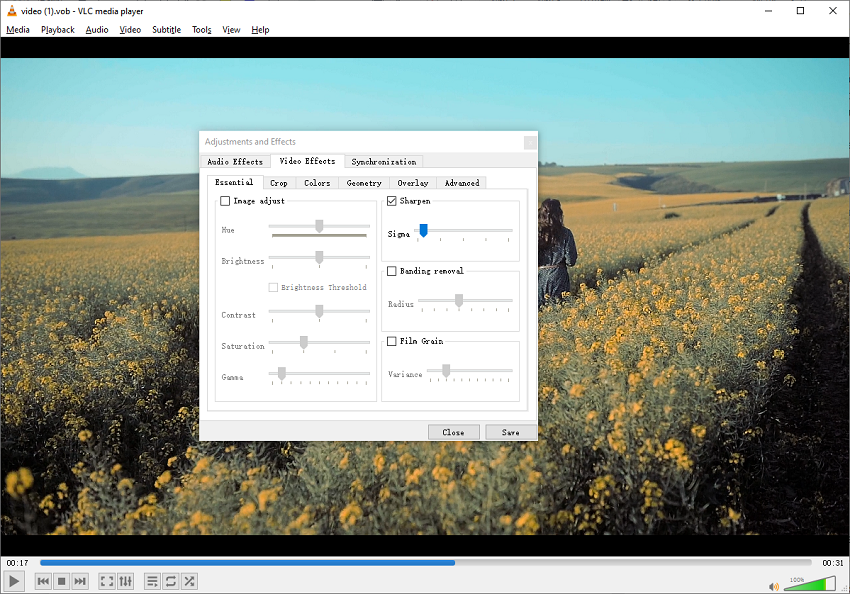
2. Use VLC Video Filters
VLC includes several built-in video filters that can improve perceived image quality. The Sharpen filter can make edges appear clearer, while adjustments such as Contrast, Brightness, and Gamma can help compensate for flat or faded footage.
To access these options, open Tools > Effects and Filters > Video Effects. Start with small adjustments, as excessive sharpening may introduce halos or make noise more visible.
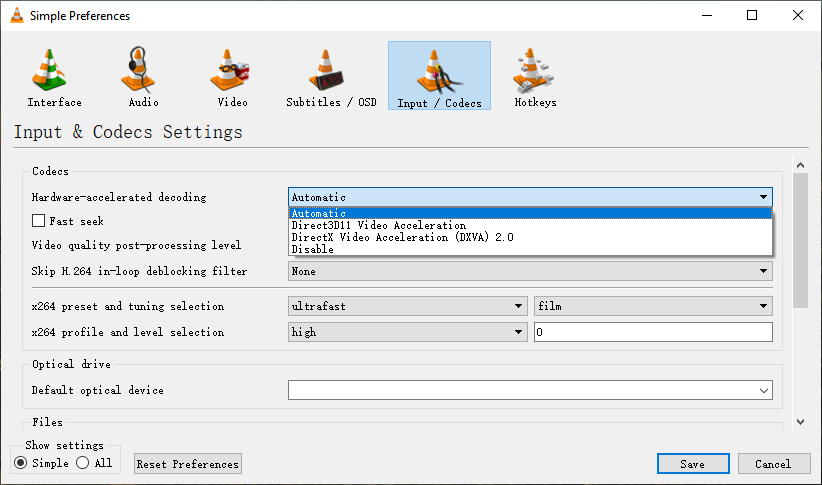
3. Enable Hardware Acceleration
Hardware acceleration allows VLC to use your GPU for video decoding instead of relying entirely on the CPU. This can improve playback performance, reduce dropped frames, and provide a smoother viewing experience, especially for HD and 4K videos.
To enable it, go to Tools > Preferences > Input/Codecs and set Hardware-accelerated decoding to Automatic.
Hot search: how to upscale videos to HD/4K in FFmpeg
Important: These settings improve playback quality only. They do not add new detail, permanently increase video resolution, or create a true 4K video file. For AI-powered upscaling, continue to the RTX Video Super Resolution and dedicated AI upscaling methods below.
Upscale Videos in VLC Using RTX Video Super Resolution
If you're after true, jaw-dropping video upscaling, it's time to talk about NVIDIA's RTX Video Super Resolution (VSR) - the AI-powered feature that's been making headlines since its debut.
So, what exactly is RTX Video Super Resolution? In a nutshell, it’s an AI-powered enhancement feature that improves low-resolution video playback in real time, making older or heavily compressed content look significantly sharper and more detailed—even approaching near-4K clarity in some cases.
What Is RTX Video Super Resolution and How It Works
RTX Video Super Resolution enhances video by analyzing each frame and using AI models running on NVIDIA Tensor Cores to restore missing detail that would normally be lost during compression. Instead of simply enlarging pixels, it reconstructs edges, textures, and fine structures based on learned patterns from high-quality video data.
This results in noticeably cleaner playback for streaming content, especially when watching low-bitrate YouTube videos, older recordings, or heavily compressed media. The improvement is most visible in areas like facial details, text clarity, and background textures, where traditional scaling methods typically fail.
Compared to VLC’s built-in video filters and standard upscaling methods, RTX VSR delivers a more natural enhancement by reducing artifacts without introducing the overly sharpened or artificial look that basic filters often produce.
How to Enable RTX VSR in VLC
RTX VSR support works with VLC (version 3.0.19 and above) on Windows 10 and Windows 11, provided you have compatible NVIDIA RTX hardware and updated drivers.
- GPU: NVIDIA RTX 30-series, 40-series, or newer supported RTX GPUs
- OS: Windows 10 / Windows 11
- Drivers: Latest NVIDIA Game Ready or Studio Drivers
Steps to enable RTX VSR in VLC:
- Update VLC and NVIDIA drivers to the latest versions to ensure full compatibility.
- Enable RTX Video Enhancement in NVIDIA Control Panel:
- Right-click your desktop and open NVIDIA Control Panel.
- Navigate to Adjust video image settings.
- Find RTX Video Enhancement and enable Super Resolution.
- Select a quality level from 1 to 4 based on your performance preference.
- Open VLC and play any supported video. RTX VSR runs automatically in the background during playback.
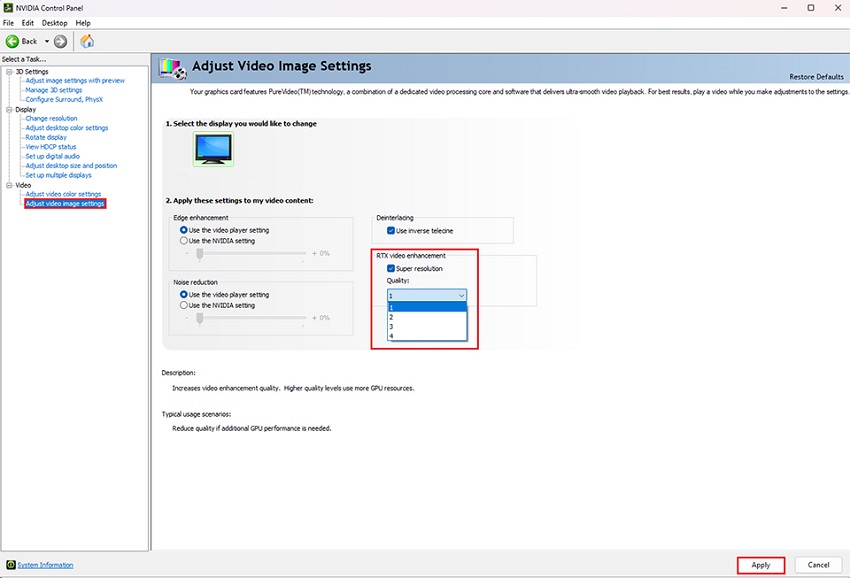
Once enabled, RTX VSR automatically applies real-time enhancement during playback. Users can also adjust quality levels from 1 to 4 to balance performance and visual clarity. Lower levels prioritize smoother playback with reduced GPU usage, while higher levels deliver stronger AI-driven detail reconstruction for sharper output on high-resolution displays.
Limitations of RTX Video Super Resolution
RTX VSR is effective for real-time enhancement, but it has several technical limitations:
- Real-time processing limit: It enhances existing frames but cannot reconstruct missing visual information from heavily degraded sources
- Restoration ceiling: It is not designed for full video restoration or professional-grade upscaling
- Performance trade-off: Higher settings may increase GPU usage, power consumption, and heat output
Because of these constraints, RTX VSR works best as a playback enhancement tool rather than a full video restoration solution.
For users without NVIDIA RTX GPUs, VLC still offers basic video upscaling filters, and some AMD GPU drivers also include video enhancement features through Radeon Image Sharpening or driver-level scaling options. However, these solutions are mostly based on traditional sharpening and interpolation techniques. While they can slightly improve clarity, they do not reconstruct missing details or reduce compression artifacts like AI-based upscaling.
In comparison, AI video upscaling tools go beyond these limitations by analyzing each frame and rebuilding textures, making them more suitable for restoring low-resolution or heavily compressed footage.
When VLC and RTX VSR Are Not Enough
While VLC filters, AMD enhancements, and RTX Video Super Resolution can improve playback quality, they are still limited to real-time processing and can only enhance existing details rather than fully restore lost visual information in low-quality or heavily compressed videos.
For situations where more advanced restoration is needed, Aiarty Video Enhancer provides an AI-powered upscaling solution that goes beyond playback enhancement by reconstructing missing detail and improving overall video quality frame by frame.
Ready to move beyond VLC and real-time enhancement? Download it to restore your videos with full AI upscaling instead of simple playback improvement.
Why Aiarty Video Enhancer stands out from VLC and RTX VSR:
- True AI restoration: Unlike VLC filters or RTX real-time enhancement, Aiarty rebuilds missing details with neural networks instead of just sharpening existing pixels.
- Offline high-quality upscaling: Processes videos frame-by-frame, delivering permanent 4K output instead of temporary playback improvement.
- Cleaner results in real-world footage: Especially effective for old, blurry, or compressed videos where VLC or RTX VSR can only slightly improve clarity.
- All-in-one enhancement pipeline: Combines upscaling, denoising, color correction, and frame enhancement in a single workflow instead of separate tools.
- More control, better results: Designed for users who need higher-quality output than real-time solutions like VLC playback enhancement can provide.
How to Use Aiarty Video Enhancer for True, High-quality Upscaling
Step 1. Load your video(s) into Aiarty Video Enhancer. Simply drag and drop video file(s), or an entire folder into the main interface.
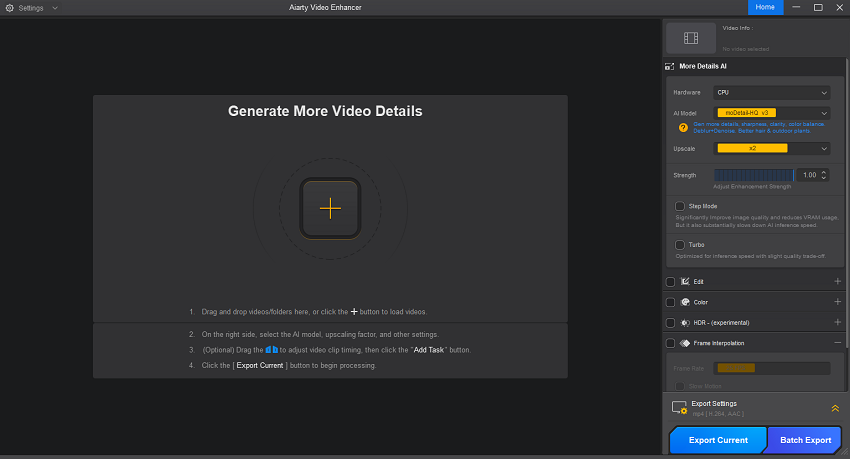
Step 2. Choose the video file you want to process. Once selected, you will see the video in the preview window.
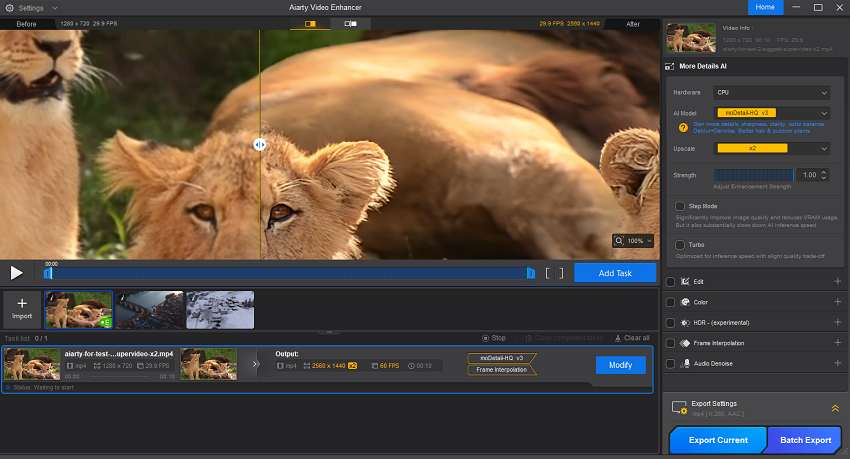
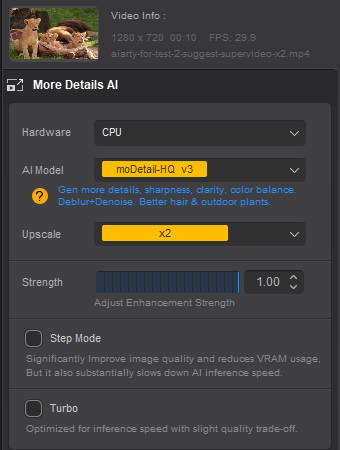
Step 3. Now go to the right panel to choose the options of Hardware, AI Model, Upscale, and more, for whether your GPU or CPU is used for the upcaling work, which AI model is applied, what resolution you prefer your original video file being upscaled to, etc.
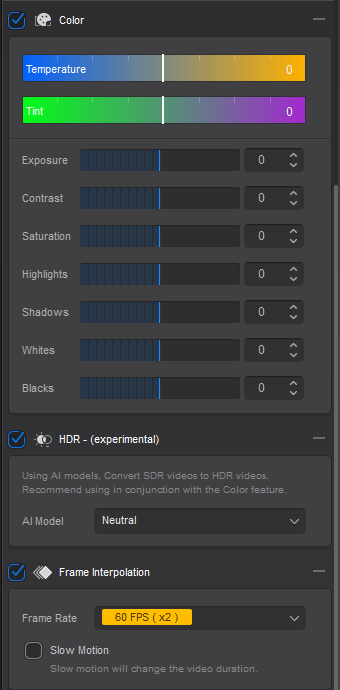
Step 4. Apply color correction, HDR enhancement, and FPS improvement. This step leverages the Color, HDR, and features to enhance the color fidelity of your upscaled video:
Color: Access the panel to address common flaws in older or low-quality footage:
- Fix Fades: Adjust Exposure and Contrast to revive a faded or washed-out image.
- Correct Casts: Use Temperature and Tint to neutralize distracting color casts (like overly yellow indoor lighting or blue outdoor shadows).
HDR: Check the box to enable this feature. The AI will analyze the 8-bit color of your source footage and convert it to a 10-bit HDR output profile. This dramatically expands the color range and contrast, ensuring the final upscaled 4K video is not only sharper but also more vibrant, cinematic, and free of color banding.
Frame Interpolation: Use this feature if you need to bump the frame rate from 30 FPS to 60 FPS for smoother motion.
Step 5. After you finish all settings, now you can simply click on the Export Current button to start the job.
FAQs
1. Does VLC actually increase the resolution of a video file?
Technically, no. Standard VLC settings only improve the playback experience (how the video looks on your screen) using filters like sharpening and de-noising. It does not "re-write" the video file to a higher resolution (e.g., turning a 720p file into a permanent 4K file) unless you use the "Convert/Save" feature with specific filters, which most users find less effective than dedicated AI upscaling software.
2. How do I enable NVIDIA RTX Video Super Resolution (VSR) in VLC?
This is a popular question for users with modern GPUs. To do this, you generally need:
- An NVIDIA RTX 30 or 40-series graphics card.
- The latest NVIDIA drivers and VLC version 3.0.19 or higher.
- To enable it, you must go to the NVIDIA Control Panel > Adjust video image settings > RTX video enhancement and check "Super resolution." Then, in VLC, ensure the Output module is set to Direct3D11.
3. Why does my video look "washed out" or "grainy" after applying VLC filters?
This happens because VLC's basic filters (like "Sharpen") are mathematical overlays, not intelligent AI. If the "Sharpen" slider is set too high, it creates "halos" around objects and makes film grain look like digital noise. Users often ask how to balance these settings to get a clearer picture without making it look artificial.
4. Can VLC upscale SD (480p) content to 4K smoothly?
Users often ask this when trying to watch old DVDs or home movies on large 4K monitors. While VLC can "stretch" the video to fit the screen and use Bicubic or Lanczos scaling to smooth the edges, it cannot "invent" the missing detail. For a significant jump from SD to 4K, most forums recommend dedicated AI enhancers (like the one mentioned on the page you found).
5. What are the best VLC settings for "high-quality" playback?
This is the most common "how-to" query. The consensus for "best" manual settings usually involves:
- Changing the Output Module to OpenGL or Direct3D11.
- Enabling Hardware-accelerated decoding.
- Increasing the File Caching (ms) to 1000 or higher to prevent stuttering on high-resolution files.
- Setting the Deinterlacing mode to "Automatic" to fix "comb" lines in older videos.
6. How can I reduce stuttering or lag in VLC playback?
Increasing file caching and network caching can help smooth playback, especially for high-bitrate or high-resolution videos. Higher cache values allow VLC to preload more data before playback, reducing stutter.
7. Do VLC threads improve performance for high-resolution videos?
Yes. VLC can use multiple CPU threads for decoding, and increasing the thread count (e.g., matching your CPU cores) can improve playback smoothness for 4K or upscaled videos.
Conclusion
Upscaling your videos doesn't have to be complicated or expensive. With VLC, you already have a powerful set of tools at your fingertips for improving playback quality - whether you're tweaking output modules, enabling hardware acceleration, or experimenting with video filters for a sharper, more vibrant look.
And if you're ready to take things up a notch, technologies like NVIDIA RTX Video Super Resolution and dedicated AI upscaling software such as Aiarty Video Enhancer open the door to truly stunning results, bringing new life to even your oldest, grainiest footage.
Remember, the best results come from a mix of smart settings, the right hardware, and a willingness to experiment. Whether you're reliving family memories, working on creative projects, or just want your favorite movies to look their best on a modern screen, VLC and today's AI upscaling solutions make it easier than ever to enjoy crisp, clear video at home.
You May Also Like
This post was written by Brenda Peng who is a seasoned editor at Digiarty Software who loves turning ordinary photos into extraordinary works of art. With AI assistance for brainstorming and drafting, the post is reviewed for accuracy by our expert Abby Poole for her expertise in this field.