Neat Video Denoiser - How This $250 Plugin Saves Noisy Footage
“How to reduce noise using Neat Video but only in a section of a video?”
“What is the Neat Video Noise reduction workflow?”
We’ve all been there: you’re reviewing your cinematic masterpiece when suddenly—grainy shadows, chroma noise dancing like static confetti, and ISO noise so thick you could sculpt it. When it comes to dealing with noisy videos, one name that keeps popping up in Reddit threads, YouTube comments, and similar forums: Neat Video Denoiser.
Neat Video isn't just another noise reduction tool; it's often hailed as a savior for noisy footage, trusted by seasoned video editors and desperate YouTubers alike. However, as a plugin, Neat video noise reduction is not as straightforward. No worries. Here we will share the full guide on how to use Neat Video to reduce noise.
What Is Neat Video?
Neat Video is a noise reduction plugin designed for major video editing software like Adobe Premiere Pro, Final Cut Pro, DaVinci Resolve, After Effects, and 20 more. Based on advanced noise-profiling algorithms, it uses advanced temporal (across multiple frames) and spatial (frame-by-frame) noise filtering to detect and remove video noise without significantly damaging detail.
Main features:
- Its advanced algorithms can clean up grainy, low-light, or high-ISO footage without detail loss.
- The temporal noise filter to analyze multiple frames to accurately identify and reduce temporal noise (random fluctuations over time).
- The spatial noise filter to reduces noise within individual frames across various frequencies and color channels.
- Its noise profiling can build a custom noise profile of the noise present in your video clip, allowing for accurate and effective noise reduction.
- It supports CUDA and OpenCL to speed up Neat video noise reduction.
- There is a Real-time preview of before after footage for fine-tune settings.
It’s able to remove different types of noise, such as:
- Random Grain Noise: The most common noise and grain, often seen in low-light conditions.
- Fixed Pattern Noise: Regular, repeating patterns like sensor noise (e.g., banding, FPN).
- Dust and Scratches: While not strictly noise, Neat Video can help minimize their visibility.
Price: Range from $74.90 (Home) to $249.90 (Pro version) for different editors
How to Reduce Noise/Grain with Neat Video Denoiser?
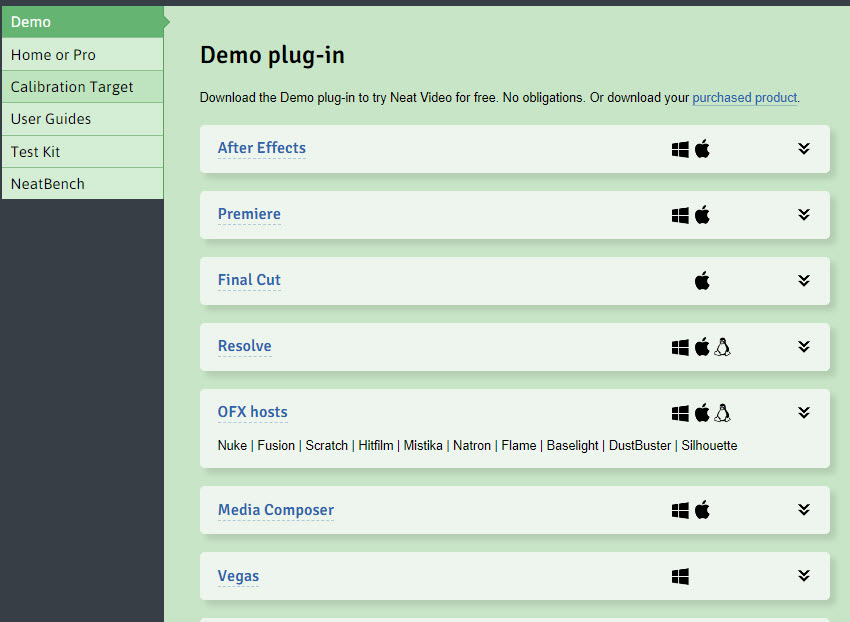
Step 1. Download Neat Video Plugin
To use Neat Video to reduce video noise, you need to first get a video editor. Based on the video editor you have, choose to download the plug-in for your editor from Neat Video’s official site: Make sure you grab the correct plugin for your specific video editor (Premiere Pro, Resolve, Final Cut, etc.).
After downloading, double-click the installer and follow the prompts. The plugin will automatically integrate with your editing software if it's installed properly.
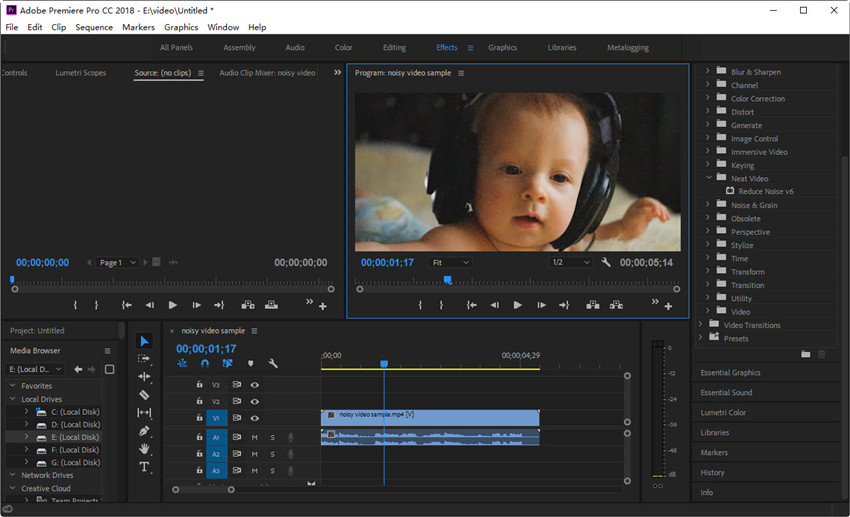
Step 2. Load the Noisy Video
Now open your video editing software. In this guide, we use Premiere Pro as the example. Create a new project and import your noisy/grainy footage. Then drag it to the timeline.
Step 3. Apply Neat Video Effect
In Premiere Pro, go to Effects > Video Effects. From the Video Effects list, you will find Neat Video here. Just drag and drop the "Neat Video v6" (or whatever version you have) effect directly onto your clip on the timeline.
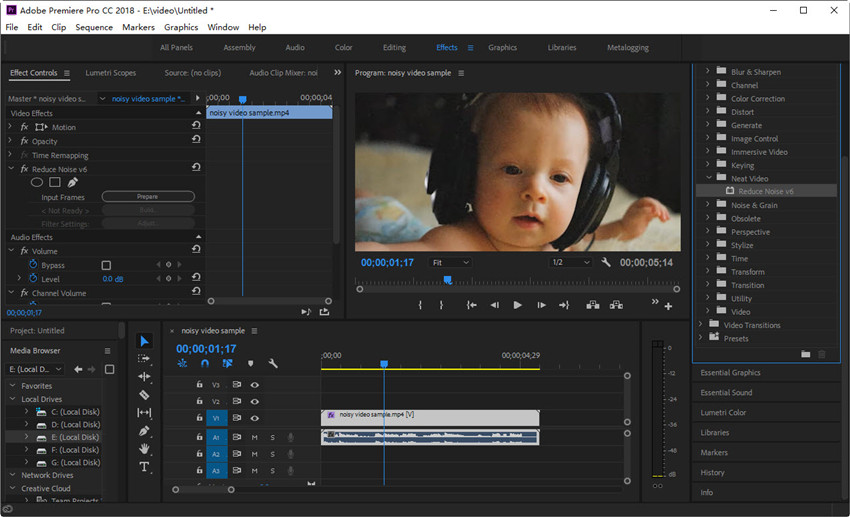
Then in the Effect Controls panel, click on the effect’s Setup button to open the Neat video noise reduction setting window. You can also open it by building input frames.
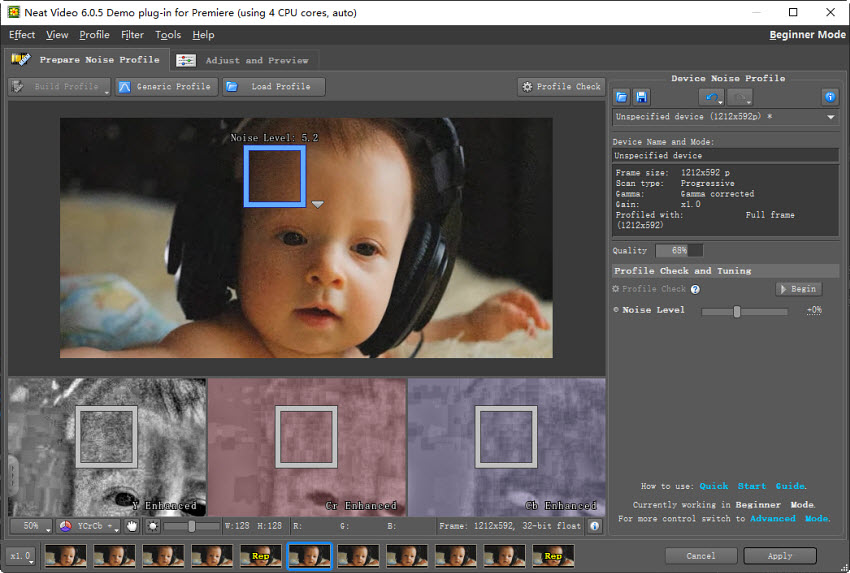
Step 4. Adjust Neat Video Noise Reduction
In the Neat Video noise reduction window, click on the Prepare Noise Profile tab, this is where Neat Video learns what the actual noise in your clip looks like. Choose Auto Profile and Neat Video will select identify a flat area to use as a reference for noise.
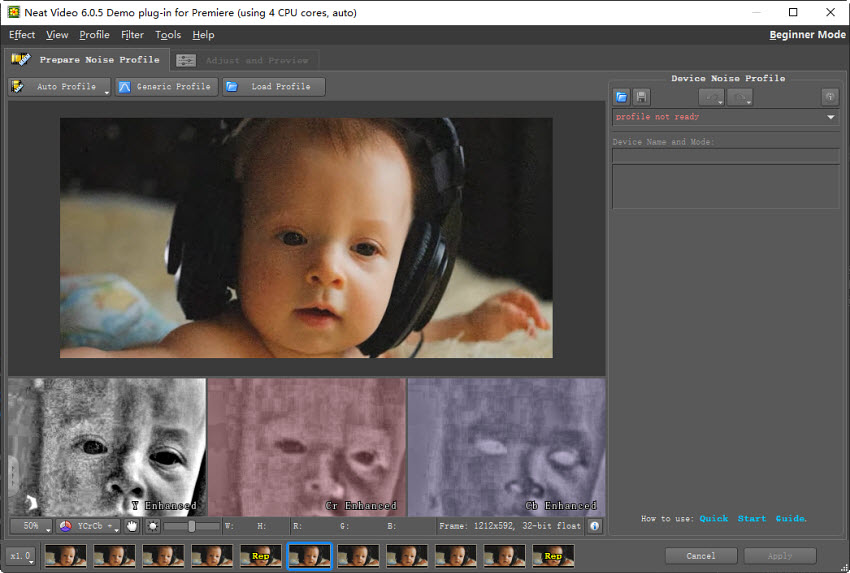
Auto Profile is a good starting point. However, if you're an advanced user, you can manually create profiling for better results.
Here is my workflow below:
- Find the "cleanest" noise area: Look for a small area (maybe 20x20 to 50x50 pixels) in your footage that contains visible noise with minimal detail. Large, flat, featureless areas are ideal (like a clear sky, a solid color wall in the background, or even shadow areas). If you profile an area with subtle textures or details, Neat Video will think that's noise and try to remove it!
- Draw the rectangle manually: Click and drag to draw a precise rectangle around that clean noise patch you found.
- Hit "Auto Profile": After you select the area for profiling, click "Auto Profile." Neat Video will analyze that specific patch.
- Check the profile: Look at the generated noise profile. Does it look representative of the noise you see throughout your clip? If not, try profiling a different clean area. You can even add multiple noise samples by drawing more rectangles and hitting "Auto Profile" again.
- Advanced tweaks: If you're dealing with really complex noise (like a mix of grain and fixed pattern noise), you might need to tweak the noise levels for different frequencies (Luma and Chroma) and the spatial/temporal correlation.
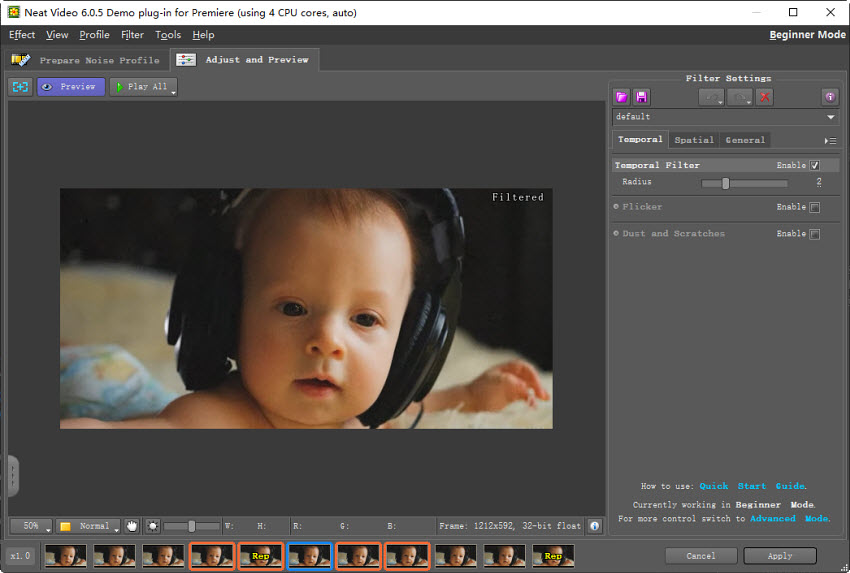
Next, click the Adjust and Preview tab, this is where you tell Neat Video how aggressively to reduce the noise. One the right panel, there are several settings you can tweak.
- Temporal Filter: This is powerful for reducing random grain. Start with a small "Temporal Radius" (like 2 or 3). Increasing this looks at more frames, which can smooth noise better but can also introduce motion blur or ghosting if set too high. My Tip: Watch moving objects carefully as you increase the temporal radius. If they start to look smeary, back it off.
- Spatial Filter: This smooths noise within each frame. Be careful with this one – too much spatial smoothing will make your image look soft and lose detail. I usually keep this relatively low.
Step 5. Export the Video
Once you're happy with how it looks in the Neat Video preview, click "Apply." This applies the Neat Video effect in Premiere Pro.
Back in Premiere Pro, play through your denoised footage to make sure it looks good in the context of your edit. When you're completely satisfied, go to File > Export > Media and export your now beautifully clean video.
Also see: How to denoise with Neat Video in After Effects >>

- Neat Video removes noise with excellent output quality and details.
- The noise profiling system can intelligently target and remove noise in your footage.
- There is a wide array of parameters for fine-tuning the noise reduction process.
- The temporal filter is highly effective at reducing random noise over time, often yielding superior results compared to purely spatial filters.
- It effectively removes random grain, fixed pattern noise, dust and scratches, and even complex noise.
- It seamlessly integrates with various video editing software.
- The noise reduction, especially temporal filtering with a large radius, can be very demanding on your computer's CPU and GPU.
- It needs time and practice to master the manual noise profiling and advanced settings.
- If the noise reduction settings are pushed too aggressively, it can lead to undesirable artifacts.
- The accuracy of the noise profile heavily relies on selecting a truly "clean" noise area. If the selected area contains subtle details, Neat Video can mistake them for noise and remove them.
- Neat Video ranges from $74.90 (Home) to $249.90 (Pro version), and you need to pay extra to a professional editor, which is not cheap either.
What Users Say about the Neat Video Noise Reduction?
Neat Video is undeniably a very powerful tool for removing noise from videos, a fact consistently proven by users across various industries. Setting aside these significant advantages for a moment, let's now focus on what users often point out as important considerations.
- It's honestly a little too good sometimes. I find myself having to add back in some grain so that things don't look too plastic.
- Neat Video is way too aggressive even with low settings. Plastic looks becomes evident quickly.
- Being able to capture a noise print from your specific camera and use it as a starting point in Neat, is fantastic--but it did take me a long time to tweak, trial & error, etc.
- Neat is great - however, I do find the UI too over complicated. I have no idea what any of it does.
- After applying neat video, i noticed that the video was blur and it also it produced ghosts.
- When I apply the Neat Video effect on a clip, the render process just freezes at some random percentage.
- Neat denoiser doesn't work in premiere pro 2023, won't render.
While Neat Video is very powerful in noise reduction, these real-world challenges with Neat Video underscore the desire for solutions that might offer a more streamlined and intuitive approach to achieving clean video, especially for first-time users.
An Easier Way to Reduce Noise than Neat Video
For those who find Neat Video overkill or too complex, here are alternatives to help. Aiarty Video Enhancer, for instance, stands out as a reliable denoiser powered by AI.
Its built-in superDenoise tech is specially optimized for denoising under extreme low-light conditions. Based on Diffusion and GAN tech, it intelligently analyzes video frames to detect and reduce noise—whether it's low-light grain, compression artifacts, or motion-related flickering—while preserving natural detail. The AI algorithms are trained to distinguish between unwanted noise and crucial image details, aiming for a cleaner result without the often-associated loss of sharpness or introduction of artifacts.
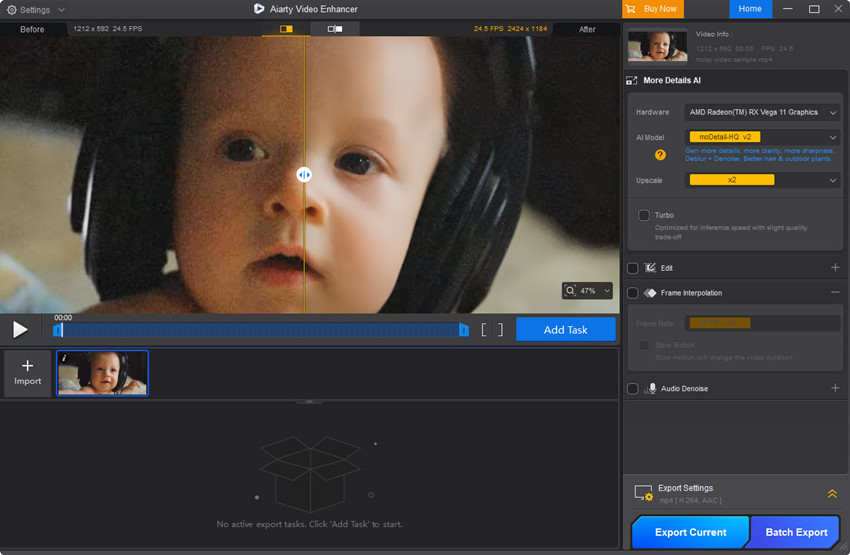
Honestly, having actually used both, I gotta say Aiarty Video Enhancer 's noise removal gives Neat Video a serious run for its money. The picture it spits out feels really natural, all the little details are still there, and sometimes? I swear it even manages to wipe away more of that annoying grain. It's like, the noise just vanishes without taking the good stuff with it.

Check more denoising test examples in this YouTube guide:
Conclusion: Is Neat Video the Right Denoiser for You?
At the end of the day, Neat Video noise reduction remains to be the go-to solution for many to remove noise and grain from videos, especially if you're working with challenging footage containing serious noise and need highly customizable controls. It’s precise, powerful, but not always beginner-friendly. If you're the kind of creator who loves to fine-tune every pixel and doesn’t mind a bit of a learning curve, Neat Video is absolutely worth the effort.
However, if you're a regular user who just wants a simple workflow to rescue some low-light or old videos, you might find Neat Video a bit too much. Many users on forums admit to feeling overwhelmed by the interface or frustrated with rendering glitches in certain NLEs. That’s where lighter, AI-powered alternatives like Aiarty come in—less setup, less tweaking, and a much gentler learning curve. The denoised video quality is also sufficient for the majority of requirements.
In short, Neat Video is brilliant—but not for everyone. Choose it if you crave ultimate control. Skip it if you just want to clean up your footage and get back to creating.
 FAQs
FAQs
The steps using Neat Video to denoise your footage remain remarkably consistent across different video editors. It's generally a straightforward process: first, you apply the Neat Video effect to your clip. Then, you navigate to the Neat Video settings window where you'll create a noise profile tailored to your specific footage, followed by adjusting the noise reduction parameters to your liking. Finally, you preview the result to ensure it meets your needs and then render your clean video.
Based on my personal experience and feedback from various users online, Neat Video often excels in rescuing extremely grainy or problematic shots. Many users report it can effectively handle noise that Resolve's built-in tools struggle with, such as pulsing noise from drones, flicker induced by critical light sources, and very high ISO footage and severely underexposed shots.
That being said, there are also users think that Neat Video can be overly aggressive even at low settings, quickly leading to a "plastic" or artificial look if not meticulously fine-tuned. The process of creating a precise noise profile, while powerful, can also be time-consuming and require significant trial and error.
Resolve's Noise Reduction (NR), on the other hand, while some users feel it has limitations beyond a certain noise threshold, is often praised for delivering more natural-looking results. Many find that with careful adjustments, Resolve Studio NR can achieve excellent noise reduction without the overly smooth appearance sometimes associated with Neat Video.
Neat Video undeniably remains one of the most powerful noise reduction tools on the market, beloved by many for its exceptional quality, precise noise profiling, and extensive customization options. .
However, whether it's the absolute best ultimately boils down to individual user preference. Many less experienced users, for instance, lean towards AI-powered denoisers, and the necessity of using Neat Video in conjunction with larger Non-Linear Editing (NLE) software can feel complex and expensive to them. Of course, when tackling particularly intricate and severe noise issues, Neat Video is undoubtedly one of the top-tier choices available.
External source:
You May Also Like
This post was written by Brenda Peng who is a seasoned editor at Digiarty Software who loves turning ordinary photos into extraordinary works of art. With AI assistance for brainstorming and drafting, the post is reviewed for accuracy by our expert Abby Poole for her expertise in this field.