


Topaz Video is one of the most popular tools to enhance video quality, reduce noise, and upscale videos. However, getting the best results with Topaz Video is not simply a matter of choosing a higher output resolution. The right AI model and settings can make a significant difference in how natural, detailed, and clean the enhanced video looks.
In this guide, we'll show you how to use Topaz Video step by step, explain which models work best for different types of footage, and provide practical settings for common video enhancement and upscaling scenarios.
Whether you're trying to upscale 1080p to 4K, restore an old home video, reduce noise in low-light footage, or improve a heavily compressed clip, this guide will help you choose the right Topaz Video model and settings.
We'll cover the most common questions, including:
- What is the best model to upscale 1080p to 4K in Topaz Video?
- What are the recommended settings for Mac or high-end GPUs?
- Which model works best for old home videos or low-quality footage?
Let's start with the basic workflow and learn the best Topaz Video models and settings for different types of footage.
Key Takeaways
To use Topaz Video, import your video, choose an AI model based on the source quality, set the output resolution, preview, and export. For 1080p to 4K, start with a 2× upscale and fine-tune the settings as needed.
Best Topaz Video Settings at a Glance:
Looking for a More Affordable Topaz Video Alternative?
Topaz Video offers extensive controls, but its subscription pricing and learning curve may not suit everyone. If you prefer a simpler workflow, Aiarty Video Enhancer offers one-click AI video enhancement and upscaling to HD or 4K, with less manual configuration.
💥 For limited time, Aiarty is up to 36% OFF lifetime! 💥
What is Topaz Video AI?
Topaz Video(previous Topaz Video AI) is a powerful and specialized video enhancement software that uses AI to improve video quality. It is a standalone desktop application for both Windows and macOS, trusted by creative professionals and hobbyists for its ability to rescue and revitalize old, low-resolution, or flawed footage.
Key features of Topaz Video:
- Upscale videos: Topaz Video AI can increase video resolution from SD or HD to 4K, 8K, and even up to 16K.
- Denoising and sharpening: The software is highly effective at removing unwanted noise, grain, and visual artifacts from footage, and also sharpen blurry footage and restore lost details.
- Frame interpolation: Topaz Video AI can generate new frames to create smooth, slow-motion effects from standard-speed footage.
- Video stabilization: The stabilization feature uses AI to correct shaky or jittery footage, removing unwanted camera movements and rolling shutter effects.
- Deinterlacing: Convert the footage in interlaced format to a progressive format.
Below let's learn how to use Topaz Video AI to upscale, enhance, and improve video quality.
How to Use Topaz Video Step-by-Step Guide
Before you learn how to use Topaz Video AI, you need to get a license. Topaz Video has moved away from its perpetual license model and is now available exclusively through an annual subscription, priced at $25 per month. It's important to note that once you subscribe to Topaz Video, you can't cancel the subscription in the annual commitment, meaning that you have to pay $299 in total for the year.
If Topaz Video is too expensive for you, check here:
>> Topaz Video AI cracks free download
>>Topaz Video AI latest discounts & giveaways
Step 1. Load in the source video
Tips: before you start to install Topaz Video AI, make sure you have a decent GPU (NVIDIA RTX series or Apple Silicon preferred). A higher GPU will make Topaz Video Enhance AI faster.
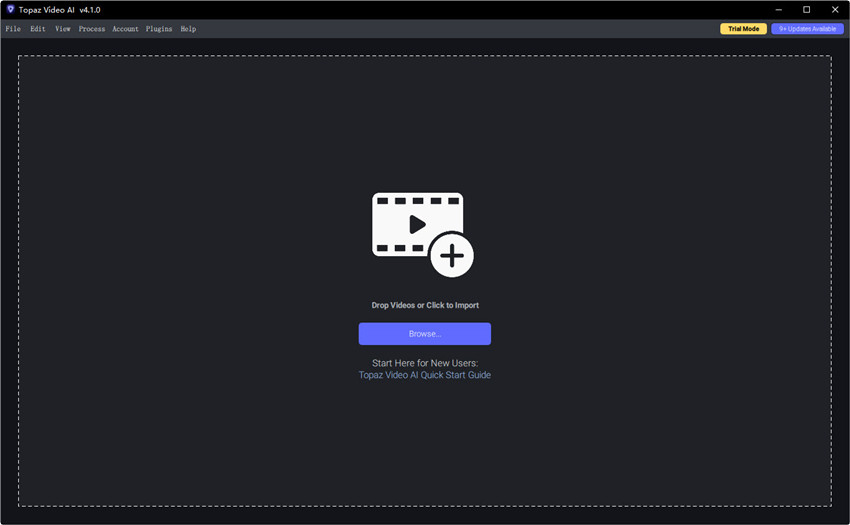
Download Topaz Video AI from its website and install it. Then open it. Click Browse Video to load the source video or videos. You can also do it by simply dragging and dropping.
If your footage was captured in a RAW or other high-quality acquisition format, preserve that quality throughout the workflow. Avoid unnecessarily converting the footage to a heavily compressed H.264/H.265 file before AI enhancement.
Step 2. Choose the Right Topaz Video model
With the videos loaded into Topaz Video AI, you need to go to the right section to adjust the settings for upscaling and enhancement.
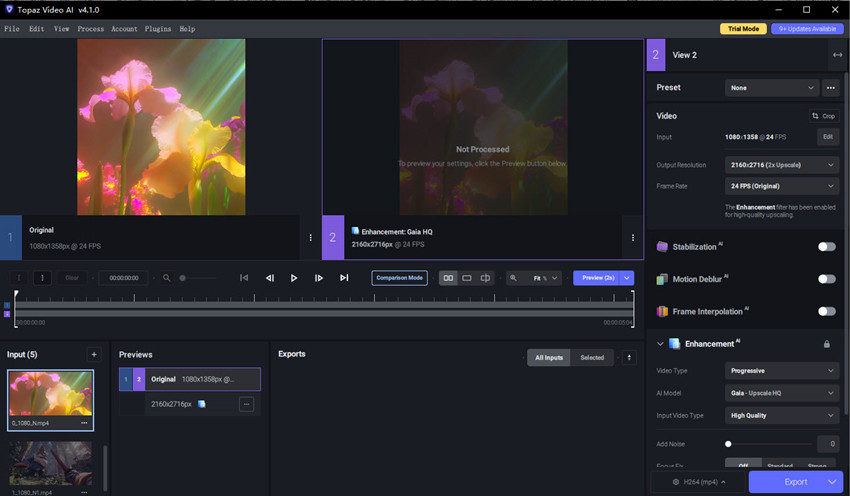
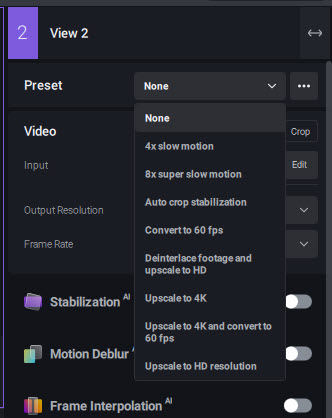
If you are new to Topaz Video, the Preset options can provide a useful starting point. A preset can automatically configure an appropriate combination of enhancement options, model, and output settings.
For more control, switch to manual settings and adjust the individual enhancement parameters.
Topaz Video provides different models designed for different types of footage. Rather than looking for one universal “best” model, choose the model according to the main problem you are trying to solve.
For example, a clean 1080p video that needs a 4K upscale is very different from a noisy 480p home video. Likewise, footage with soft faces may benefit from a different model than animation or computer-generated footage.
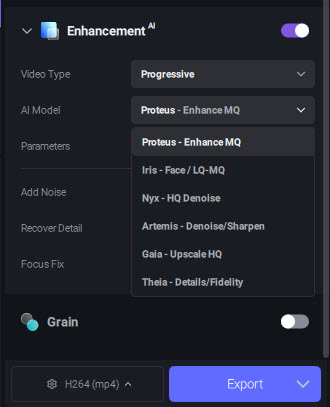
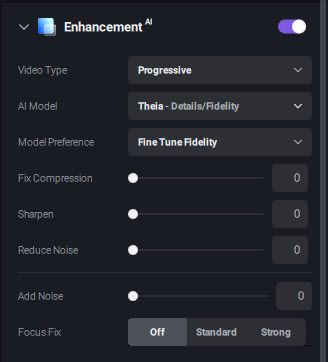
There may be specific settings under Topaz Video AI models. Based on the AI model you choose, you may need to move the sliders (e.g., under Proteus) to fine-tune the amount of sharpening, deblur, denoise, and other artifacts removal.
Step 3. Choose the upscaling resolution
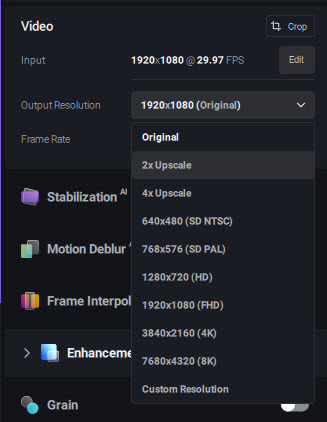
To use Topaz Video to upscale videos, go to the Output Resolution section and choose a desired resolution from the preset list(e.g., from 480p to 1080p, or 1080p to 4K). You can also enter a custom resolution based on your needs.
Note that a larger output does not automatically mean a better result. For example, converting heavily damaged 480p footage directly to 4K requires the AI to reconstruct substantially more information than a 480p-to-1080p conversion. The larger the upscale, the more important it becomes to check for invented textures, halos, excessive sharpening, and other artifacts.
For relatively clean 1080p footage, 1080p → 4K is a practical starting point because it is a controlled 2x upscale.
For severely degraded footage, consider whether 1080p is already sufficient for the intended viewing or delivery platform.
Step 4. Preview the enhanced video
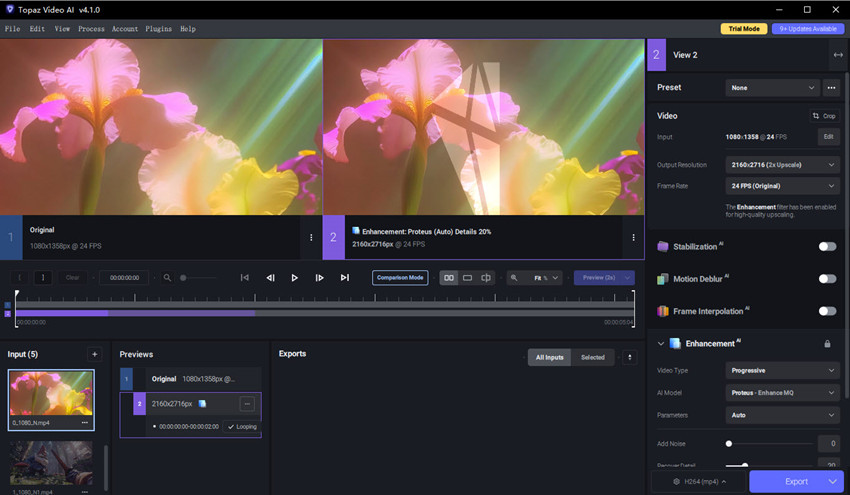
Once you've applied your chosen settings in Topaz Video Enhance, use the built-in preview pane to check your results. You can move the preview window around to see different parts of the video and use the side-by-side or split-screen view to compare the original and enhanced versions. You can try different Topaz Video AI models and settings to see which enhance and upscale with the best quality.
Step 5. Adjust output settings
Finally, select your output format and begin the export process. For most users, exporting in MP4 H.264 or H.265 strikes a good balance between quality and file size. However, if you need the highest possible fidelity for color grading or post-production, choose ProRes 422 HQ.
After the above steps, click "Save" to begin rendering your enhanced video.
Your GPU has a major impact on processing speed, but actual performance also depends on the model, resolution, source format, frame rate, and other processing options. If you're wondering how to make Topaz Video Enhance AI faster, make sure your system has a strong NVIDIA GPU, enough RAM, and an SSD for smoother performance—otherwise, the export could take hours for longer or 4K+ videos.
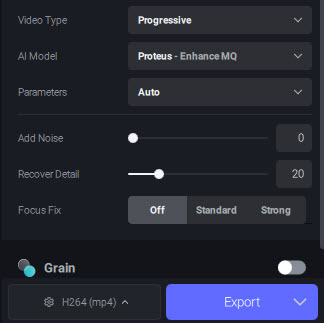
These are pretty much the full guide of how to use Topaz Video AI. As you can see, it’s not difficult to use Topaz Video Enhance to upscale videos. What’s important is choosing the right model and settings is the key to getting great results. You can keep testing different Topaz Video upscale settings until you find what works best, or check the recommended settings below.
Related Search: How to Use Topaz Video in Premiere Pro (Topaz Panel Setup & Workflow)
Best Topaz Video AI Settings for Upscaling and Enhancement
The core of getting the best results from Topaz Video AI lies in making intelligent choices. To save you time and help you achieve superior quality more efficiently, we've compiled a list of user-recommended best practices. These are based on real-world testing for common video types, offering you a shortcut to the ideal settings.
What is the best model for upscaling Topaz video AI? Here are some recommended Topaz Video AI best settings for common video scenarios.
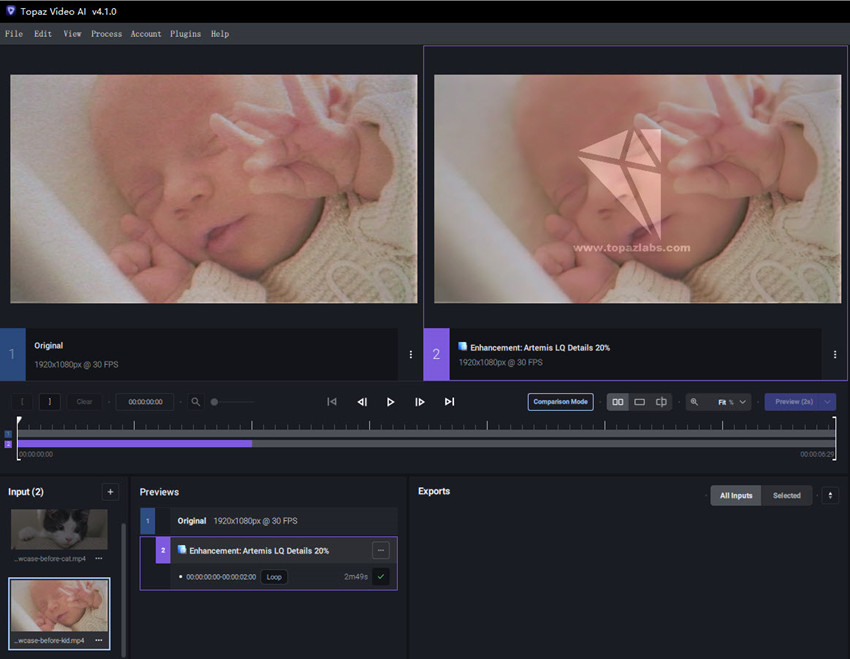
1. Best Topaz Settings for Old, Low-Quality Footage (e.g., VHS, DVDs, 480p Cameras)
Old footage often has several problems at the same time: low resolution, compression artifacts, noise, blur, and missing fine details. The goal is not simply to make the footage sharper. The better result is usually the one that removes distracting artifacts while preserving natural texture and faces.
What is the best setting for low-quality video in Topaz Video AI?
For severely degraded footage, Artemis LQ is a good starting point, while Artemis MQ or HQ may work better when the source is cleaner. If Artemis does not produce enough detail or you need more control, compare the result with Proteus. For particularly low-resolution footage where detail recovery is the main challenge, Starlight Sharp is also worth testing.
Recommended Model:
- Artemis: Choose LQ, MQ, and HQ if your video is severely degraded, has noticeable quality loss, or is relatively cleaner.
- Proteus: Use it when the automatic Artemis result is too soft or too aggressive and you want manual control over sharpening, noise reduction, and detail recovery.
- Starlight Sharp: Consider testing this when the source is extremely low resolution and you need stronger reconstruction of fine details, particularly in difficult subjects such as small faces.
Settings Recommendations:
- Upscale Factor: Start with a 2x upscale (e.g., 480p to 960p, or 720p to 1440p). A single 4x jump can introduce too many artifacts.
- Noise & Grain: Let the AI model handle this automatically. If you find the result is still too noisy, you can try Theia, but be cautious of over-smoothing.
User Workflow Tip:
If the footage looks cleaner but faces start to look overly smooth or artificial, reduce the strength rather than simply increasing sharpening.
For very poor footage, a second pass can sometimes help, but it should not be treated as a default workflow. Only use a second pass when the first pass leaves a specific problem that the second processing stage can address. Running the same enhancement twice does not automatically create more real detail.
2. Best Topaz Settings for High-quality Videos (e.g., 1080P to 4K)
In addition, many users turn to Topaz Video AI to upscale videos from 1080p to 4K. They want to increase the resolution of the HD videos while keeping fidelity and enhancing fine details for a sharp, natural-looking image—something that traditional upscaling methods often struggle with.
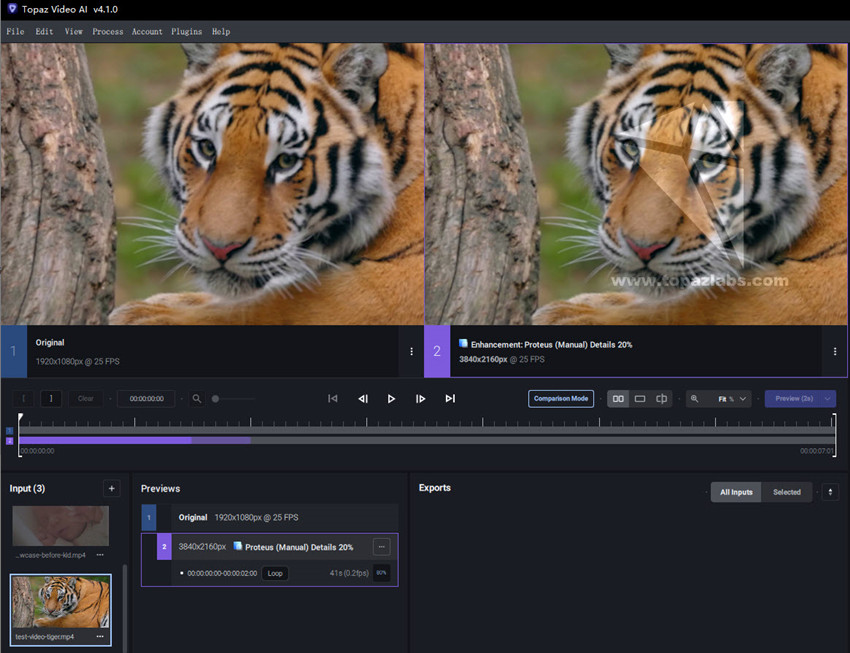
How to use Topaz video AI to upscale high-quality videos with best results, below are the best models and settings:
Recommended Model:
Proteus is the top choice here due to its manual control over settings. Its customizable nature allows you to get a perfect balance of sharpness and detail.
Artemis HQ: Start here when the 1080p source is already relatively clean and you mainly need a natural 4K upscale.
Settings Recommendations:
- Upscale Factor: 2x (1080p to 4K).
- Settings Mode: Start with the automatic settings or model defaults. Switch to Manual in Proteus when you identify a specific problem that needs correction.
- Sharpen: Keep this slider low (e.g., 5-20) to avoid over-sharpening artifacts. The AI's upscaling process will naturally add a bit of sharpness, so you don't need to be aggressive here.
- Recover Details: This is the most critical slider for this type of video. Start with a value around 10-30 and adjust upwards, carefully checking the preview to ensure you're not introducing artifacts from the original source.
- Reduce noise: Keep this at 0 unless you see visible noise in the source.
User Workflow Tip:
For clean 1080p footage, don't assume that making the image dramatically sharper will make the 4K result look better. A useful test is to compare a conservative setting against a stronger setting at 100% magnification.
If the stronger version reveals more texture but also creates halos, artificial skin detail, ringing around objects, or unstable fine textures, the conservative setting is usually the better choice.
3. Best Topaz Settings for Animated Content (e.g., Anime, Cartoons, CGI)
Animated content requires a very different approach. The goal is to preserve clean, crisp lines and solid colors without adding artificial texture or noise. Preserve clean lines and colors while upscaling to a higher resolution.
Recommended Model:
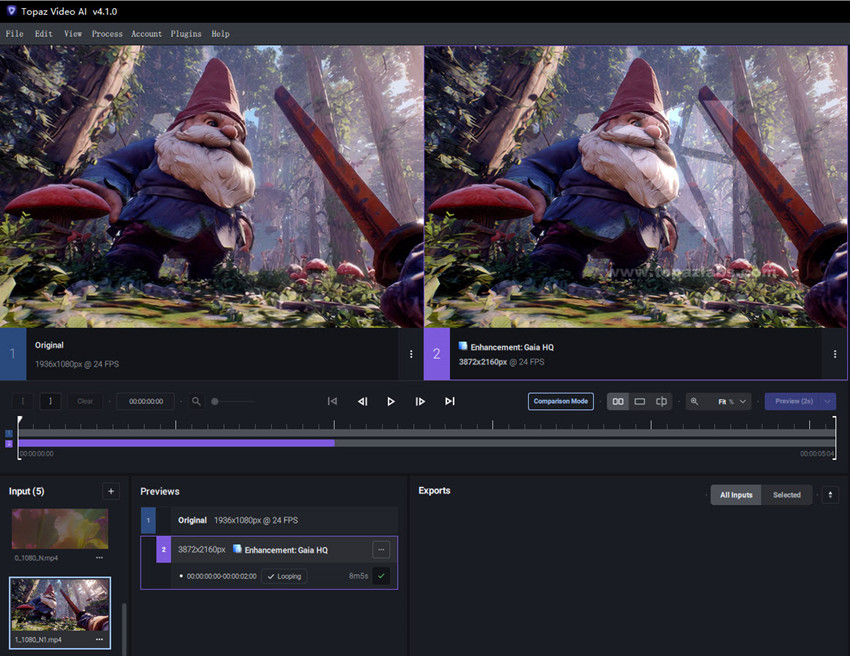
Gaia is the dedicated model for this purpose. It is designed to understand and preserve the characteristics of animated and computer-generated visuals. Gaia is specifically designed for this purpose. It avoids adding new detail and focuses on keeping lines crisp and colors solid.
Settings Recommendations:
- Gaia CG: Use this model for classic hand-drawn animation or CGI content.
- Gaia HQ: Can also be used, but Gaia CG is often the preferred choice.
- Denoise & Sharpen: Keep these settings at their default unless your source video has specific issues you need to address. Gaia's primary function is to preserve and upscale, not to heavily alter the image.
User Workflow Tip:
For animated content, line stability can be more important than maximum sharpness. Gaia keeps the original style intact while making the lines super sharp. The other models can make the animation look weird or waxy.
4. Best Topaz Settings for Videos with Camera Shake or Jitter
For footage with camera shake, you'll need to combine enhancement with stabilization.
Recommended Model:
Use the Stabilization feature as a first or second pass. It uses AI to intelligently analyze and correct motion.
Settings Recommendations:
- Model: Use the "Relative to Auto" setting for the stabilization filter.
- Mode: The "Standard" mode works for most cases, but you can try "Smoothest" if the camera shake is severe.
User Workflow Tip:
Separating stabilization from enhancement makes it easier to identify which processing step introduced an unwanted artifact.
Don't automatically choose the strongest stabilization. If the camera movement is only slightly distracting, aggressive stabilization may change the original composition more than necessary.
When Should You Use Topaz Video AI?
Use Topaz Video AI when you need the highest possible video quality and have the hardware to support it.
Best use cases:
- Restoring old or low-quality videos: Topaz Video AI excels at upscaling SD or compressed footage to HD or 4K while recovering lost details.
- Working with noisy or low-light footage; Its AI models can effectively remove noise and improve clarity in difficult lighting conditions.
- Needing advanced control over enhancement; Models like Proteus and Theia allow fine-tuning for sharpening, denoising, and detail recovery.
- Professional or frequent video processing: Ideal for filmmakers, video editors, and archivists who require consistent, high-quality results.
- Using a high-performance computer: Works best with a powerful GPU (e.g., RTX 3080 or higher) and sufficient RAM (16GB–32GB+).
When Should You NOT Use Topaz Video AI?
Topaz Video AI may not be the best choice if your needs are simple or your hardware is limited.
Not ideal for:
- Quick or occasional video fixes: Rendering can take hours, even on powerful machines.
- Users with low or mid-range hardware: The software is resource-intensive and may run very slowly without a dedicated GPU.
- Beginners who want a simple workflow: The interface and model selection can feel complex and require a learning curve.
- Budget-conscious users: The $299/year high upfront cost may not be worth it for light use.
If Topaz Video AI feels too expensive, complex, or hardware-intensive for your needs, you may want to consider a simpler and faster alternative like Aiarty Video Enhancer.
A Cost-Effective Alternative: Try Aiarty Video Enhancer
If you love Topaz-level video enhancement but want to skip the steep learning curve, hardware bottlenecks, and painful $299/year recurring subscription, Aiarty Video Enhancer is worth considering.
Built on a robust training set of over 2.38 million frames of real-world and anime video, Aiarty delivers crisp, professional-grade upscaling, intelligent denoising, and natural detail recovery. It matches Topaz's visual fidelity in most everyday scenarios—giving you a streamlined, one-click workflow at a fraction of the effort and cost.
- Lightning-Fast Turbo Mode: Optimized for local GPU acceleration to process and upscale clips up to 3x faster without locking you into slow render loops.
- One-Click Presets: Tailored AI model automatically handle skin textures, low-light grain, and sharp linework without manual slider juggling.
- No Subscription Trap (Lifetime License): No endless yearly renewals. Own the software for life with free future updates, saving you hundreds of dollars compared to Topaz Video.
Limited-Time Offer: Grab Aiarty Video Enhancer with an exclusive lifetime discount (up to 36% OFF). 30-Day Money-Back Guarantee. Zero risk, total control.
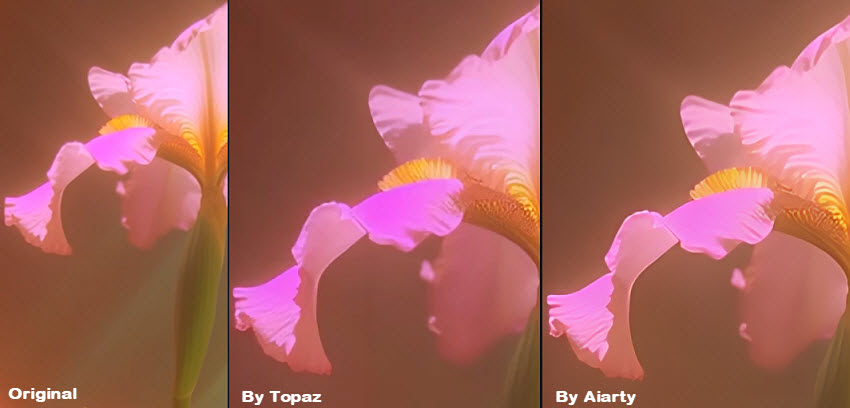
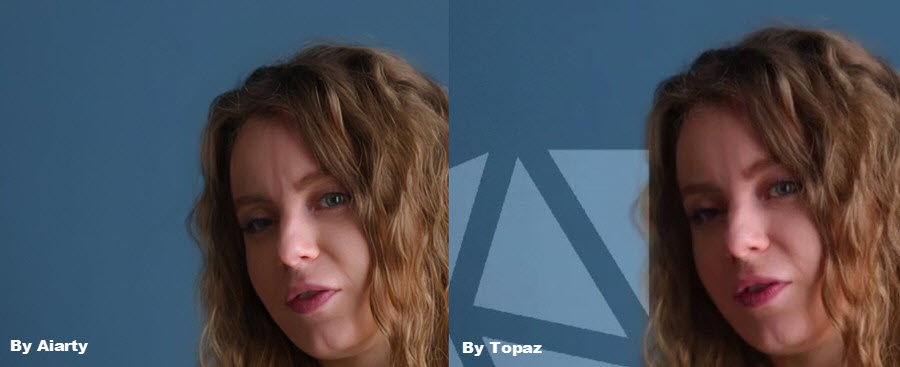
To help you compare the real output, we’ve included two upscaled video snapshots — one processed with Topaz Video AI and the other with Aiarty Video Enhancer. As you can see, both deliver impressive clarity and sharp detail. In fact, Aiarty often holds up just as well, especially in natural texture rendering and noise control.
While Topaz is known for its pro-level results, Aiarty Video Enhancer achieves nearly identical quality at a much more affordable price — making it perfect for everyday users, content creators, or anyone restoring home videos. You can download it now and test it yourself, no steep learning curve required.
Check more Topaz Video AI alternatives (free options included) >>
Conclusion
Topaz Video AI is the most popular tool for upscaling and enhancing video content. It's easy to master the steps on how to use Topaz Video AI to enhance or upscale. That said, the settings are key to get best results. So after you invest money, you will also need to invest time exploring the best Topaz Video AI settings for your video.
For casual users who want an easier and more budget-friendly option without sacrificing output quality, they can try Aiarty Video Enhancer. It delivers impressive results with fewer technical steps—ideal for everyday upscaling and restoration tasks.
 FAQs
FAQs
No, Topaz Video AI is not free. Instead, it's quite expensive. However, it offers a free trial with full features, though there is a big watermark on the output video. Plus, there are ways to get Topaz Video AI discounts to save money.
As shown in the Topaz guide above, to upscale videos in Topaz Video AI, just import your video, select an AI model (e.g., Gaia HQ or Artemis), choose your desired output resolution (e.g., 4K), preview the results, then export the enhanced video.
Enhancement is automatic once you choose a preset. You can also manually enable Enhancement in Topaz video AI on the right lower part of the interface.
Use the Gaia HQ or Artemis Low Quality model. Set the output to HD or 4K depending on your needs, and enable features like noise reduction and deinterlacing for better clarity.
You May Also Like


This post was written by Brenda Peng who is a seasoned editor at Digiarty Software who loves turning ordinary photos into extraordinary works of art. With AI assistance for brainstorming and drafting, the post is reviewed for accuracy by our expert Abby Poole for her expertise in this field.
