Summary: These are common signs of video compression artifacts—visual flaws that show up when a file has been overly compressed. Whether you're dealing with banding skies, smeared textures, or noisy shadows, these issues can ruin an otherwise great video. Fortunately, tools like Aiarty Video Enhancer can help.
Have you ever watched a video where the image suddenly turns blocky, the details look smudged, or the colors just seem... off? These aren't glitches or bad editing—they're often the result of video compression artifacts.
Video files can be massive, and to make them easier to stream, share, or store, they’re usually compressed. But that convenience comes at a cost. The more aggressive the compression, the more likely it is to leave behind visible flaws in the image. Whether you're uploading to social media, watching content online, or trying to save space on your device, these artifacts can creep in and seriously affect the viewing experience.
In this article, we'll take a closer look at what video compression artifacts are, why they happen, what different types exist, and—most importantly—how you can reduce or even remove them from your videos.
You can use Aiarty Video Enhancer — an AI-powered tool that intelligently removes blocking, banding, blur, noise, and other compression flaws. Whether your video was damaged during uploading, streaming, or saving, Aiarty can restore clarity, detail, and natural color in just a few clicks.
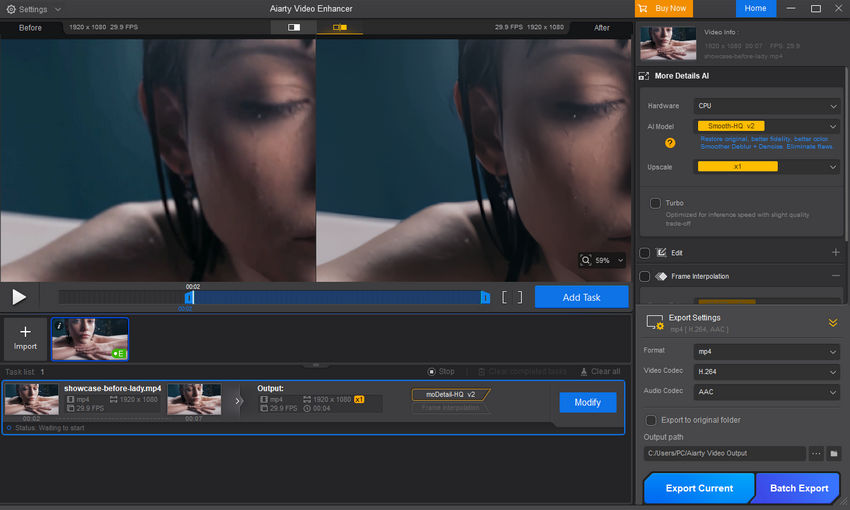
See the Difference Before and After Enhancement
How effectively can Aiarty Video Enhancer fix video compression artifacts? Below is a real example showing the same video frames before and after enhancement.
What Are Video Compression Artifacts?
Video compression artifacts are visual imperfections that show up when a video has been heavily compressed. Instead of a clean, smooth image, you might see blocky patterns, strange color bands, or fuzzy edges. These flaws aren't part of the original footage—they're side effects of the way video data is reduced to save space.
To understand why this happens, it helps to know a bit about how video compression works. Most videos are compressed using "lossy" methods, which means some image information is permanently discarded to make the file smaller. The idea is to remove data that’s less noticeable to the human eye—but when the compression goes too far, those missing details start to show.
In short, compression artifacts are the visible scars left behind by over-compression. They're especially common in low-bitrate videos, re-encoded files, or clips that have been shared and uploaded multiple times.
Common Types of Video Compression Artifacts
Compression artifacts don’t all look the same—they come in different forms depending on how the video was compressed and how much quality was lost. Here are some of the most common types you've probably seen before, with examples to help you recognize them.
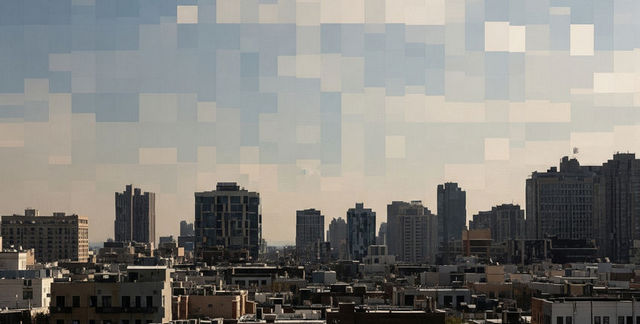
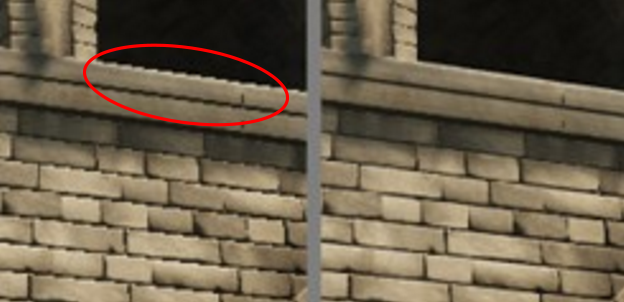
1. Blocking – When the Video Turns into a Grid
You've probably seen this one before. You're watching a video, maybe a landscape or a cloudy sky, and suddenly the image breaks into little squares—almost like someone overlaid a checkerboard on it. This is what’s known as blocking.
It tends to show up when a video has been compressed too much. Most video encoders chop the image into small chunks (called macroblocks), and if there’s not enough data to fill in each chunk properly, you end up with visible seams between them. It's especially obvious in low-detail areas—like skies, shadows, or walls—and gets worse during fast motion or panning shots.
The result? Instead of smooth gradients or soft textures, you're stuck looking at digital bricks. It’s one of the clearest signs that a video has been compressed past its breaking point.
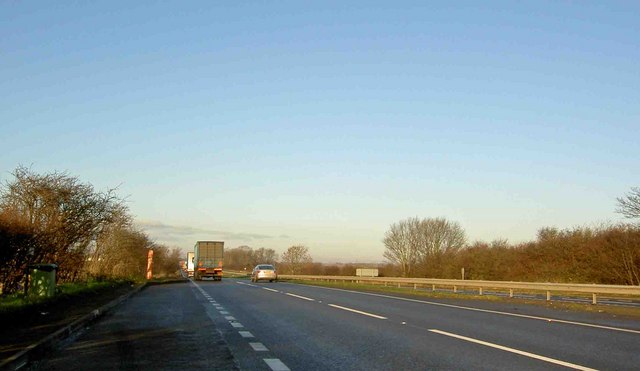
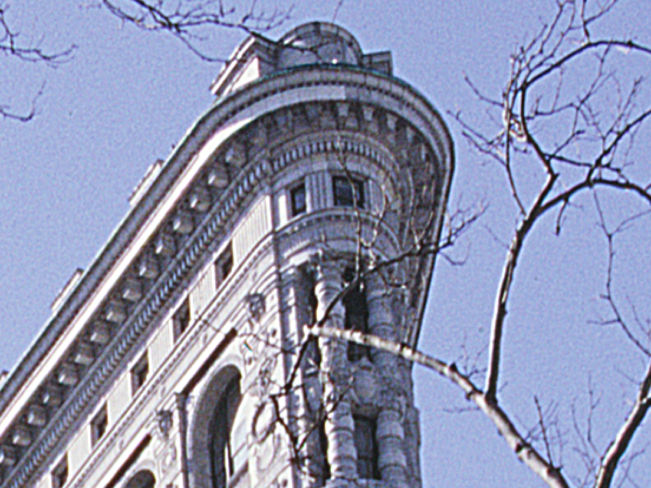
2. Color Banding – The Death of Smooth Gradients
Have you ever seen a sunset in a video that looked like it was made of five big stripes of color instead of one smooth transition from orange to blue? That's color banding.
This image artifact happens when compression reduces the number of available colors or shades in a gradient. Instead of a smooth fade, the image "jumps" between color levels, creating harsh lines or rings. Banding is particularly noticeable in scenes with soft lighting, smoke, fog, or shadows—anywhere that subtle shifts in tone are key to the mood.
It doesn't ruin the video, but it does flatten the visual experience. It's like replacing a watercolored sky with one drawn in crayons.
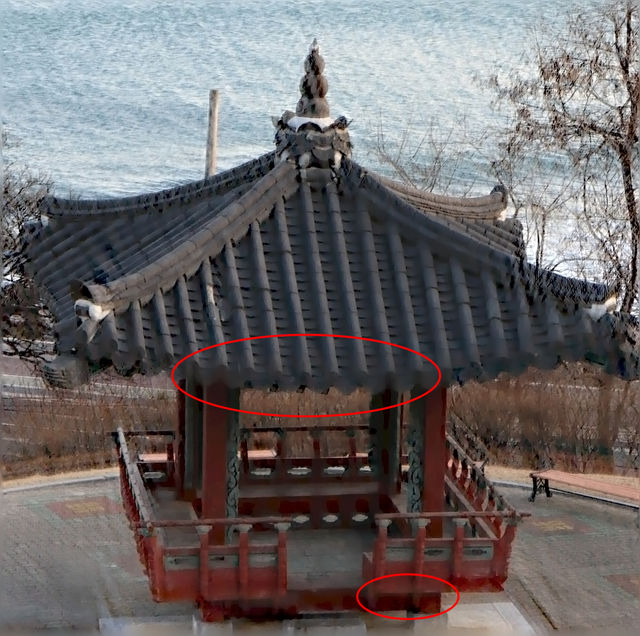
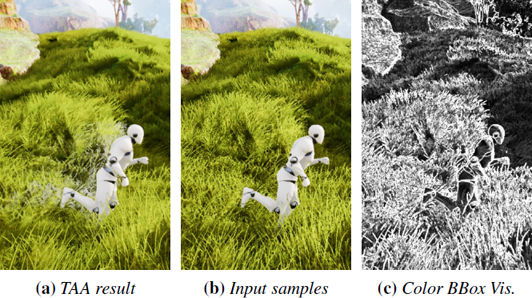
3. Blurring – When Details Just Vanish
You know that disappointing moment when a video looks sharp in the thumbnail but turns out soft and smeary when you hit play? That's compression blur in action.
To reduce file size, encoders often sacrifice fine details—textures like skin, hair, grass, text, or fabric patterns. Instead of crisp outlines, you get vague shapes. Faces lose character, backgrounds lose depth, and everything starts to look a bit like it was filmed through a layer of Vaseline.
You'll see this a lot on platforms that auto-compress uploads, like messaging apps or social media. And while blur might not be as glaring as blocking or banding, it quietly chips away at image quality, making everything feel low-res—even when the resolution says otherwise.
4. Mosquito Noise – The Flickering Swarm Around Edges
This one's trickier to spot, but once you see it, you can’t unsee it. Look around the sharp edges of text, logos, or faces in a compressed video, and you might notice tiny dots or flickers buzzing around the borders. That’s mosquito noise.
It happens because the video encoder struggles to cleanly preserve edges during motion or high contrast. Instead of a crisp boundary, you get noisy interference that looks like static dancing around outlines. It’s named "mosquito noise" because of how it swarms and flickers unpredictably, especially during movement.
You'll often spot it near subtitles, news tickers, or anything with hard edges against a plain background. It’s subtle, but it can be incredibly distracting—like having a swarm of insects hover just outside your vision.
5. Color Bleeding – When Colors Leak Across the Lines
Sometimes, it looks like the colors in your video can’t stay in their lanes. Red lipstick smears beyond the lips. A bright logo spills into the surrounding background. This is called color bleeding.
The root cause? Compression simplifies color data separately from brightness. When there’s too much reduction, the boundaries between colors become less precise, and high-saturation areas (like reds and blues) begin to "bleed" into adjacent zones. It’s especially visible in footage with bold text, graphics, or facial features.
Color bleeding doesn't just look messy—it can distort important details. In product videos, it can misrepresent branding; in tutorials or interviews, it can distract from the message.

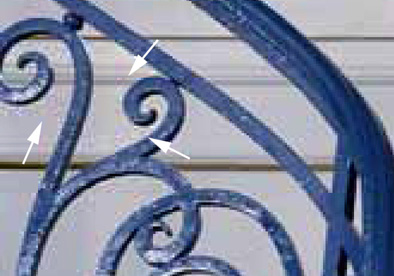
6. Ringing / Haloing – The Unwanted Glow Around Edges
Ever noticed a faint glow or echo-like outline around objects in a video? That’s ringing, also known as haloing.
This artifact usually appears near sharp edges—like text, buildings against the sky, or high-contrast transitions. It looks like someone drew a pale shadow or glow around the object. The culprit is compression filters that try to sharpen or predict edge detail but overshoot, creating false outlines.
You’ll often spot it in older compressed videos, low-quality streams, or footage with lots of sharp graphics. While subtle, halos can make edges look harsh or unnatural, breaking the illusion of realism.
7. Ghosting / Smearing – When Motion Leaves a Trail
Fast-moving scenes sometimes look like the video can’t keep up, leaving behind a faint trail or blur of the previous frame. This is ghosting, sometimes called smearing.
It happens when the encoder doesn’t allocate enough data to keep up with rapid motion, so instead of a clean update each frame, parts of the old image linger. The result looks like a motion trail, almost like a double exposure.
You’ll see this most in sports videos, action scenes, or live streams with quick camera pans. Ghosting makes movement feel sluggish and unnatural—like the video is haunted by its past frame.
8. Posterization – When Images Turn into Paint-by-Numbers
Sometimes compression pushes gradients so far that they stop looking like gradients at all. Instead, areas of smooth color break into large, flat patches—like a digital paint-by-numbers picture. That’s posterization.
It’s similar to color banding but more severe. Instead of just a few visible stripes, whole sections of an image lose their natural shading. Faces can look plastic, skies can look like cartoon backdrops, and subtle lighting effects just disappear.
Posterization usually shows up when videos are saved with very low color depth or compressed aggressively for streaming. The result is an artificial, “flattened” look that drains life out of the picture.

9. Aliasing / Stair-stepping – When Smooth Lines Become Jagged
Ever seen a diagonal line or curve in a video that looks more like a staircase than a smooth edge? That’s aliasing, often nicknamed stair-stepping.
It happens when the video resolution or compression doesn’t provide enough data to accurately represent fine details or angled shapes. Instead of a clean curve, you get jagged edges. Compression can make this worse by discarding subtle edge information.
Aliasing is especially noticeable in animation, text overlays, or architectural footage with lots of straight lines. The effect can make videos feel low-quality, even if the resolution number looks high.
Can You Fix Video Compression Artifacts?
The short answer? Yes—but it depends on the severity of the artifacts and the tools you use.
Once video compression artifacts appear, they're not always easy to remove because some original data has already been lost during compression. Unlike a simple glitch that can be fixed by re-rendering the file, artifacts are baked into the video's pixels. However, modern technology has made it possible to significantly reduce or even eliminate many common artifacts, improving video quality after the fact.
How to Reduce Compression Artifacts
1. Use Higher Bitrate or Less Compression When Encoding
The best way to avoid artifacts is to prevent them in the first place. When exporting or saving videos, try using higher bitrates or codecs that balance compression with quality. This reduces the chances of visible artifacts appearing.
Since H.264 and HEVC (H.265) are the most widely used codecs, optimizing your export settings in your video editor (like Premiere Pro, DaVinci Resolve, or HandBrake) is the best way to prevent artifacts before they happen:
- Increase the Bitrate: If you see macroblocking in dark or fast-moving scenes, your bitrate is too low. For 1080p video at 30fps, aim for at least 10–15 Mbps. For 4K, go for 35–50 Mbps.
- Use 2-Pass VBR (Variable Bitrate): Instead of 1-Pass, choose 2-Pass encoding. The software will analyze the entire video first to allocate more data to complex scenes and less to static ones, drastically reducing artifacts.
- Switch to 10-bit Color Depth: If you are experiencing severe color banding (especially in gradients like skies), export your video using a 10-bit profile instead of 8-bit. This gives the encoder exponentially more color data to smooth out transitions.
Note: While higher bitrates deliver better quality, this isn’t always practical for streaming or sharing where smaller file sizes are needed.
The best way to avoid artifacts is to prevent them in the first place. When exporting or saving videos, try using higher bitrates or codecs that balance compression with quality. This reduces the chances of visible artifacts appearing. However, this isn’t always practical for streaming or sharing where smaller file sizes are needed.
2. Apply Noise Reduction and Sharpening Filters
Video editing software often includes filters to smooth out blocky areas, reduce color banding, or sharpen blurry edges. While these filters can help, they often require careful tuning and may not fully restore the original detail.
3. Upscale and Enhance with AI-Powered Tools
This is where AI video enhancers come into play. Advanced AI-based software like Aiarty Video Enhancer can analyze video frames and intelligently reconstruct lost details, reduce noise, and fix color distortions. These tools don’t just apply generic filters—they learn patterns from millions of images to restore natural textures and edges, often with impressive results.
How to Use Aiarty Video Enhancer to Fix Video Compression Artifacts
Fixing video compression artifacts has never been easier thanks to Aiarty Video Enhancer’s intuitive interface and powerful AI algorithms. Here’s a quick step-by-step guide to help you remove blocking, blurring, color banding, and other compression flaws from your videos:
Step 1: Download and Install Aiarty Video Enhancer
First, click the button below to download and install Aiarty Video Enhancer on your computer. The software supports Windows and macOS and comes with a free trial so you can test its capabilities before committing.
Step 2: Launch the Program and Import Your Video
Open Aiarty Video Enhancer and click the "+" button or drag and drop your compressed video file into the main window. Aiarty supports a wide range of formats, so you won't need to worry about compatibility issues.
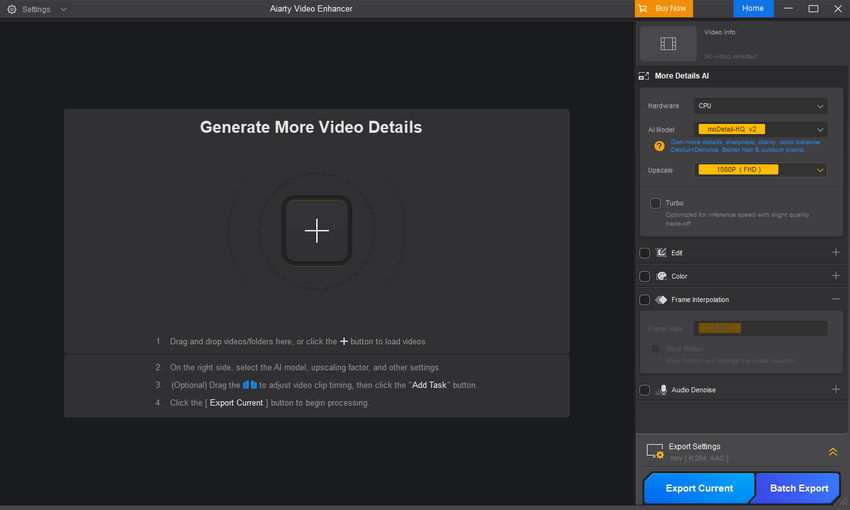
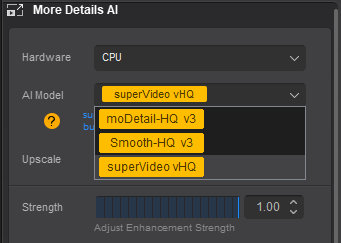
Step 3: Choose the AI Model
Pick the AI model based on the types of compression artifacts in your video and the scene conditions:
- moDetail-HQ v3: Best for fixing blocking and blurring in videos with lots of fine details like hair, foliage, or textured surfaces. Ideal for outdoor daylight scenes, nature footage, and portraits where preserving sharp textures and intricate details matters.
- Smooth-HQ v3: Great for general artifact removal such as mild color banding, slight blurring, and moderate noise. It maintains smooth color gradients and natural textures, making it perfect for indoor scenes, videos with people, or footage with subtle imperfections.
- superVideo vHQ: Designed specifically for heavy noise and mosquito noise in extremely low-light or dark scenes like night skies or dim interiors. It delivers top-notch denoising quality, though it processes more slowly, so choose this when noise reduction is your highest priority.
Step 4: Select Output Resolution and Settings
If you'd like to upscale your video (for example, from 1080p to 4K), Aiarty lets you do so while enhancing quality. Simply open the Upscale drop-down menu and choose your target resolution.
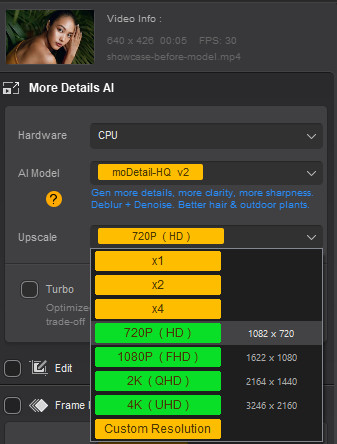
For more control, expand the Export Settings panel to customize the output format, codec, and destination folder.
Step 5: Preview the Results
Before exporting the full video, click the Preview button to generate preview.
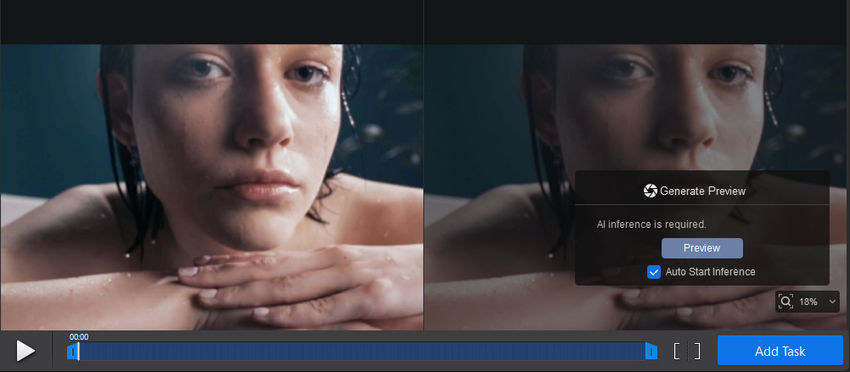
Once the inference is complete, you'll be able to compare the original and enhanced frames side by side to see how well compression artifacts have been removed.
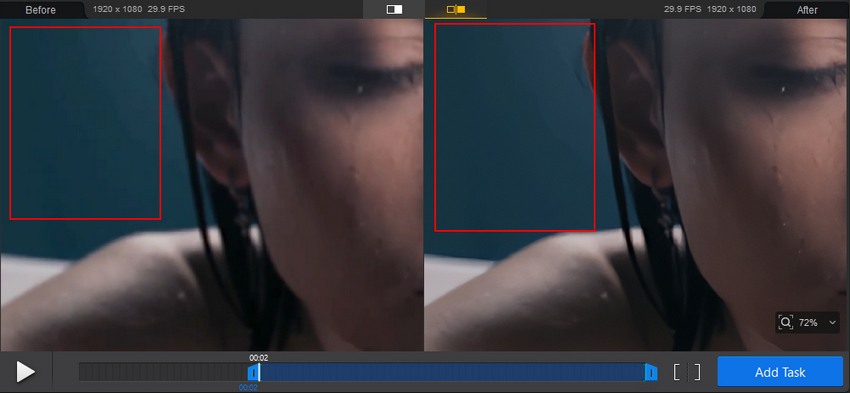
In this example, Aiarty’s artifact removal works impressively well. The "Before" frame shows noticeable blocking artifacts, especially in flat areas, while the "After" frame appears smooth and clean, with the blockiness completely eliminated.
Step 6: Start the Enhancement Process
If you're satisfied with the preview, click Add Task, then hit Export Current to begin processing. Aiarty’s AI engine will automatically analyze each frame, remove compression artifacts, restore lost detail, and enhance overall visual quality.
Now just sit back and let Aiarty do the work. Processing time may vary depending on your hardware and settings.
Final Thoughts
Compression artifacts are visual flaws that show up when a video is overly compressed. Whether it’s blocking, color banding, blurring, mosquito noise, or color bleeding, these artifacts can degrade the viewing experience and reduce professional quality.
Most of them occur during uploading, downloading, or real-time streaming, where video data is compressed to save space or bandwidth. Social media platforms, messaging apps, or online editors often apply aggressive compression automatically.
The best way to avoid compression artifacts is to use higher bitrates, choose better codecs, and avoid multiple rounds of exporting or re-sharing. But what if the damage is already done?
That’s where tools like Aiarty Video Enhancer come in. Instead of trying to mask flaws with basic filters, Aiarty uses advanced AI to analyze each frame, restore lost detail, clean up noise, and bring back natural textures and sharpness.
Give it a try and take control of your video quality.
 Frequently Asked Questions
While preventing compression artifacts during the encoding stage is ideal, fixing them in existing or low-quality downloads requires specialized software.
If you want to completely eliminate macroblocking, mosquito noise, and pixelation without losing image detail, Aiarty Video Enhancer is the ultimate solution. Powered by deep-learning AI models, it doesn't just blur out the flaws; it intelligently reconstructs missing pixels, decompresses the footage, and upscales it to pristine 4K resolution with zero artifacts left behind.
Digital video compression artifacts (like macroblocking, ringing, and color banding) are software-generated errors caused by data loss during encoding or streaming. On the other hand, traditional film artifacts are physical defects found in analog celluloid movies, such as dust, scratches, mold, film grain, and projector flicker. While compression artifacts look blocky or pixelated, traditional film artifacts look organic or gritty.
To determine the root cause, pause the video when the artifact appears:
It’s a File Artifact: If the pixelation, line, or block stays frozen in the exact same spot on the video frame when paused, it is embedded in the video file (likely due to compression or a bad render).
It’s a Hardware/Display Issue: If the artifact disappears, moves, or flickers when you pause the video, or if you notice screen tearing only during fast camera movements, it is likely a hardware issue caused by a faulty HDMI cable, monitor refresh rate mismatch (V-Sync issues), or GPU overheating.
Horizontal or vertical lines in a recording usually stem from two non-compression issues: interlacing or hardware glitches. If you see jagged, comb-like lines during motion, your video is interlaced; you can fix this by enabling "Deinterlacing" in your player or converter.
If a solid, permanent line appears across the entire video, it is usually a sign of a damaged camera sensor, a faulty capture card, or loose cable connections during the recording process.
You May Also Like
This post was written by Brenda Peng who is a seasoned editor at Digiarty Software who loves turning ordinary photos into extraordinary works of art. With AI assistance for brainstorming and drafting, the post is reviewed for accuracy by our expert Abby Poole for her expertise in this field.