Video bitrate shows up everywhere — in export settings, video specs, upload requirements — but most people just leave it on default without thinking twice. Thing is, it’s one of the main reasons why a video can look sharp or turn out disappointingly soft.
Whether you're filming with a phone, editing on your computer, or uploading to a platform that compresses everything to save bandwidth, bitrate quietly controls how much detail your video gets to keep. It affects sharpness, motion clarity, file size — basically, how good or bad your video ends up looking.
So if you've ever wondered why your footage lost its crispness after export, or why two "1080p" videos can look so different, bitrate probably explains it.
Low-bitrate videos often suffer from blurriness, blockiness, and detail loss. Simply increasing the bitrate won't improve existing quality, as original information is already gone. For true enhancement, consider Aiarty Video Enhancer. It uses AI to deblur, remove artifacts, upscale resolution, and interpolate frames, genuinely improving your video's visual appeal.
Click the button below to free download Aiarty Video Enhancer to fix your low-bitrate videos.
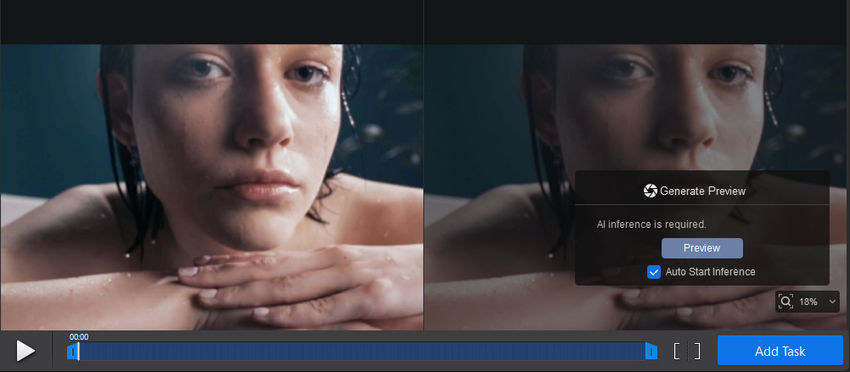
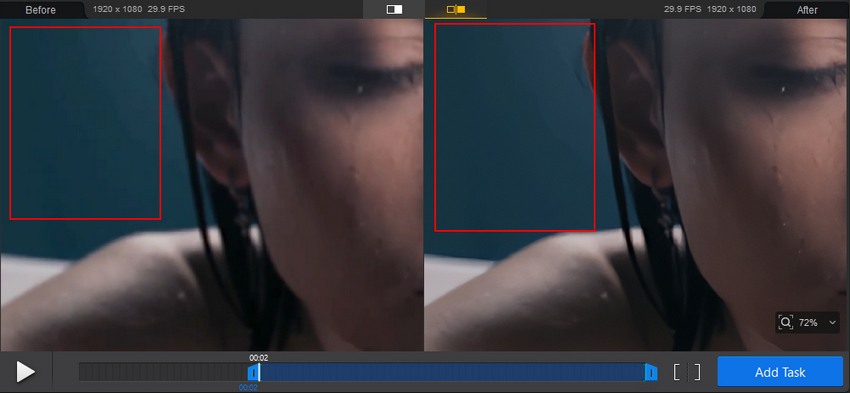
See the Difference Before and After Enhancement
Curious how well Aiarty enhances low-bitrate videos? Below is a real example comparing video frames before and after using Aiarty’s enhancement engine.
What is Video Bitrate and Why It Matters?
Bitrate controls how much data your video is allowed to use per second. Think of it like your video's data allowance — the higher it is, the more detail gets saved. Go too low, and the encoder starts cutting corners to keep the file size down, which usually means lower visual quality.
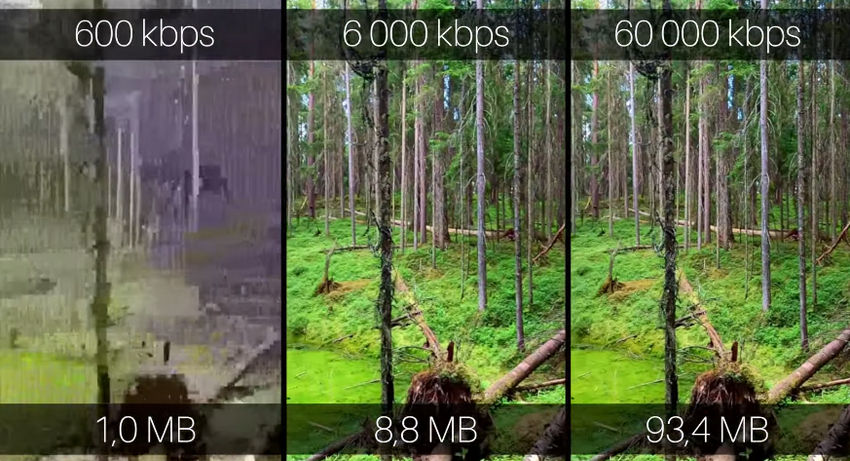
That's when things start to fall apart. You'll notice it in soft edges, chunky motion, muddy backgrounds, or textures that just vanish altogether — especially in scenes with lots of detail, like hair, water, grass, or low-light shots. The resolution might still say 1080p, but it won't look like real 1080p anymore.
Bitrate is measured in kbps or Mbps (thousands or millions of bits per second). A video set at 2000 kbps will look very different from one at 8000 kbps, even if everything else is the same. And yes, platforms like YouTube, Instagram, and TikTok all compress your uploads — which often includes lowering the bitrate.
So even if your footage starts out looking sharp, bad bitrate settings (or automatic compression) can wreck the result later. That's why bitrate matters — not just for professionals, but for anyone who cares how their videos actually look.
Pro Tip: If your footage already looks soft or blocky because of low bitrate, you don’t have to reshoot everything. With Aiarty Video Enhancer, you can use AI to restore lost details, remove compression artifacts, and make your videos look crisp again — even if the bitrate was low to begin with.
Get 15-day free trial license of Aiarty Video Enhancer and give your videos the clarity they deserve.
Watch the video below to see Aiarty Video Enhancer in action.
Is Higher Bitrate Always Better?
It's easy to think that cranking up the bitrate will magically fix all your video quality problems. But it's not that simple.
Sure, higher bitrate usually means more detail and less compression artifacts — but only if the original footage is good to begin with. If the source video was shot in low quality or already badly compressed, pumping up the bitrate won't bring back lost details. It's like trying to sharpen a blurry photo by making the file bigger — you won't get the missing info out of thin air.
Also, higher bitrate means bigger file sizes. That's a trade-off to keep in mind, especially if you're uploading videos or have limited storage or bandwidth. Sometimes, having a smart balance is better than maxing out numbers.
Most streaming platforms apply their own compression anyway, which means your ultra-high bitrate video might get squished down anyway — sometimes to pretty low numbers. So obsessing over insanely high bitrate values often doesn't pay off.
In short: higher bitrate can improve quality — but only up to a point. After that, it's mostly just wasting space.
What's a Good Video Bitrate?
People often ask: "How much bitrate do I really need for my videos?" The honest answer is—it depends on what you want and where you're sharing.
Here's a quick look at common scenarios and recommended bitrate ranges:
Keep in mind, these are just ballpark figures. Uploading a 10,000 kbps 1080p video to Instagram won't guarantee perfect quality, because platforms usually compress videos anyway.
If you want your videos to look their best without ballooning file sizes, aim for the right balance. And if you get stuck with videos that look blocky or blurry because of low bitrate, AI tools can help bring back some lost sharpness.
Video Bitrate Calculator: When You Actually Need It
Most people never touch a bitrate calculator — until they’re forced to.
Maybe you're exporting a 20-minute 4K video and realize the file is way too big to upload. Or you're trying to livestream, and your connection keeps choking. That’s when bitrate suddenly matters, and you start googling how to shrink the file without destroying the quality.
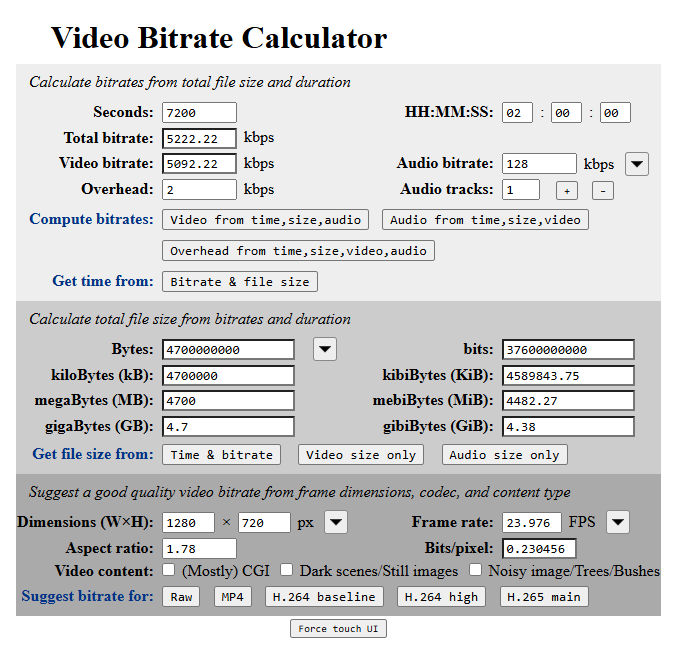
At its core, a bitrate calculator just helps you estimate how big your final video will be — or how much bitrate you can afford if you're targeting a specific file size. The math behind it isn’t that scary. One simple version looks like this:
File size (in megabytes) = (Bitrate in kbps × Duration in seconds) ÷ 8 ÷ 1024
But honestly, most people don't want to do the math. That’s why online bitrate calculators exist — punch in your video length, desired size, and it spits out the bitrate you should aim for.
You can find tons of free ones online with a quick search — tools like BitrateCalc, Omni Calculator, or even online video converters with built-in estimators. They're not fancy, but they get the job done when you're in a pinch.
It's especially useful when:
- You have to upload videos with strict size limits (like email attachments or platform caps)
- You're preparing videos for streaming or cloud sharing
- You need to convert a big file down to a reasonable size without killing the quality
Just keep in mind: the calculator only tells you a number. Whether your video actually looks good at that number depends on what you're shooting, how much movement there is, and what kind of compression you're using.
Video Bitrate Converter: When You Need to Shrink a File
Sometimes, a video looks perfectly fine — it's just way too big. Maybe it's a 4K clip that clocks in at 3GB for three minutes. Or you're trying to upload something, and the platform says "file too large". Either way, adjusting the bitrate is often the fastest way to get things under control.
A bitrate converter — or any video converter with bitrate settings, like HandBrake or VideoProc Converter AI lets you manually lower or raise the bitrate before exporting. This directly affects both file size and visual quality. Go lower, and the file shrinks — but you risk soft edges, blocky compression, or muddy textures. Go higher, and the picture holds up better — but the file gets heavier. But if the original video already looks bad, raising the bitrate won't magically fix it. Garbage in, garbage out.

Is Bitrate the Only Thing That Affects Video Quality?
Bitrate definitely matters — but no, it's not the only thing deciding how good your video looks. Blaming bad quality just on low bitrate is a little unfair.
You could crank the bitrate way up, but if the footage was shaky, overexposed, or just shot badly, it's still going to look rough. Same goes for videos exported with poor settings — the bitrate can't fix everything.
Here are a few other things that seriously affect video quality:
- The encoder: H.264, HEVC, AV1 — some are way more efficient than others. At the same bitrate, results can look totally different.
- Resolution: Just because a video says "1080p" doesn't mean it's true full HD. Some footage is upscaled or soft to begin with.
- Framerate: A video shot at 60fps will look smoother than one at 24fps — especially with motion. Lower framerate + fast action = mess.
- Content complexity: A quiet talking-head video is easy to compress. A crowd scene with tons of motion? Much harder.
- Platform compression: You can set everything perfectly, but once you upload to YouTube, Instagram, or TikTok — their compression kicks in, and things can still go downhill.
So yeah, bitrate is important — but it's just one piece of the puzzle. If your video still looks bad after tweaking it, the issue might be hiding elsewhere.
How to Fix Low-Bitrate Video with AI
Let's be real — once a video's been crushed by low bitrate, there's no magical way to fully bring back what was lost. The fine textures? Gone. The sharp edges? Smoothed out. But if re-shooting isn't an option, and you still want to make it look decent — AI might be your best backup plan.
AI video enhancers like Aiarty Video Enhancer are trained to spot patterns in blurry, blocky, over-compressed footage and "guess" what should be there. They're surprisingly good at:
- Sharpening soft edges
- Reducing blocky artifacts
- Bringing back details like facial features or text
Maybe it's not perfect, but it's way better than just boosting brightness or adding a sharpen filter. In many cases, AI can make a low-quality video look watchable — sometimes even impressive.
Now let's check how Aiarty Video Enhancer fix low-bitrate video with a few clicks.
Step 1. Download and install Aiarty Video Enhancer.
It's lightweight and runs fast, especially on GPU-supported devices.
Step 2. Open the app and import your video.
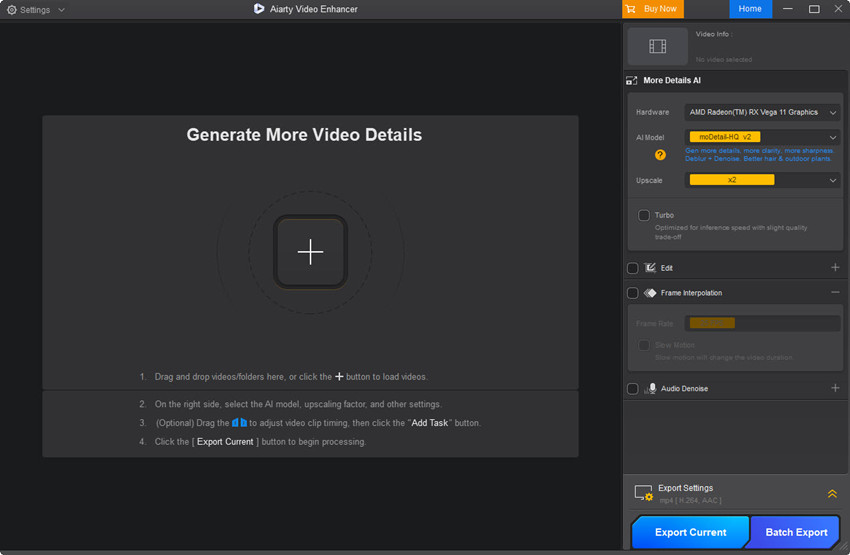
You can drag in one or multiple files — batch processing is fully supported.
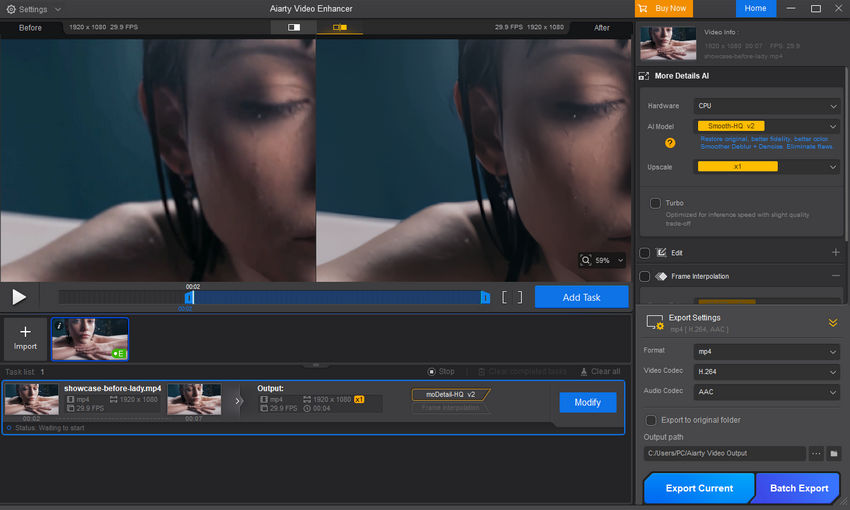
Step 3. Pick an AI model depending on your footage.
Aiarty Video Enhancer provides three advanced AI models to choose.
- moDetail-HQ v2: Great for outdoor scenes, hair, grass, or anything with fine textures.
- smooth-HQ v2: Better for people, faces, indoor lighting — more natural, softer finish.
- superVideo-HQ: Ideal for dark or noisy footage, like night shots or grainy clips.

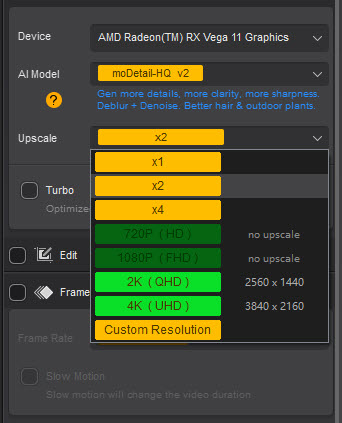
Step 4. Choose your target resolution.
You can choose to keep original resolution by selecting 1x or upscale your video.
Step 5. Preview the result.
Click Preview to see how the AI handles your footage. If it's not quite right, switching models takes just a second.
For example, I imported a video with a bitrate of just 943 kbps (max 1426 kbps), which had obvious blocky artifacts. After running it through Aiarty and using moDetail-HQ v2, the image became noticeably smoother and more refined — a clear upgrade.
Step 6. Export when you're happy with the preview
Click Export Current to save one video, or Batch Export to process multiple files at once.
That's it. No sliders, no technical guesswork — just better-looking video without the hassle.
 FAQs
FAQs
If you're exporting or uploading 1080p video, around 8,000–12,000 kbps at 30fps usually looks solid. For 1080p at 60fps, bump that to about 12,000–18,000 kbps to keep motion smooth and details clear. This range balances quality and file size for most streaming and sharing needs.
For 4K footage at 30fps, aim for about 35,000–45,000 kbps to maintain good quality. If you're working with 4K at 60fps, you'll need more — roughly 50,000–68,000 kbps — since higher frame rates mean more data per second.
720p video generally looks good between 3,000 and 5,000 kbps. For most casual videos at 30fps, this is enough. If you're capturing fast action or 60fps footage, consider pushing closer to 6,000–7,500 kbps.
1440p (or 2.5K) is a sweet spot between 1080p and 4K. For 30fps, something around 16,000–24,000 kbps usually does the trick. If you're working with 1440p at 60fps, plan for 24,000–30,000 kbps to keep things crisp.
Streaming bitrate depends a lot on your internet upload speed and the platform. For popular platforms like Twitch or YouTube:
- 720p at 60fps: around 4,500–6,000 kbps
- 1080p at 60fps: around 6,000–9,000 kbps (Twitch caps at 6,000 kbps, YouTube allows more)
Keep in mind: streaming needs stable upload speed, so don't max out your connection with bitrate.
Recording bitrate is usually set higher than exporting because you want to keep as much detail as possible for editing later. For 1080p at 30fps, recording between 12,000–18,000 kbps is common, while for 1080p at 60fps, recording at 18,000–30,000 kbps (or even higher) is better if your hardware and storage allow. Higher bitrate recordings create bigger files but give you more flexibility in post-production.
You May Also Like
This post was written by Brenda Peng who is a seasoned editor at Digiarty Software who loves turning ordinary photos into extraordinary works of art. With AI assistance for brainstorming and drafting, the post is reviewed for accuracy by our expert Abby Poole for her expertise in this field.