Quick Answer Box: To add grain in Premiere Pro, apply Noise HLS Auto (Effects → Noise & Grain) at 10–20%, or use a film grain overlay with Overlay or Soft Light blending. For best results, first enhance your footage with Aiarty Video Enhancer to remove noise, sharpen details, and upscale resolution before adding grain.
Adding film grain can quickly turn flat digital footage into something cinematic, textured, and atmospheric. Beyond style, grain also masks flaws like banding, noise, or softness, giving your video a more polished look. In Premiere Pro, you can achieve this effect using Noise HLS Auto, film grain overlays, or subtle adjustments in Lumetri Color—each offering different levels of control for your desired style.
In this article, you’ll learn what is film grain, step-by-step how to add grain in Premiere Pro using several approaches, where to get free film grain overlays, how to troubleshoot common issues, and expert tips for best possible result with Aiarty Video Enhancer.
What is Film Grain?
Film grain refers to the tiny, random textures that come from the chemical particles in traditional film stock. When applied to digital footage, it can add depth and richness that mimics the look of classic cinema. Many creators today use the film grain effect in Premiere Pro not just for aesthetics, but also for practical purposes:
- Make digital videos feel more cinematic: Grain introduces organic imperfections that help digital clips resemble footage shot on real film.
- Mask noise and image flaws: Instead of leaving compression artifacts or low-light noise visible, grain blends them into a consistent texture.
- Set a mood or style: Whether you’re going for a vintage, artistic, or atmospheric tone, grain helps convey emotion and storytelling cues.

Adding film grain to low-quality footage can backfire, amplifying blur, jagged edges, digital noise, blocky artifacts, or “snowy” dark areas in nighttime shots. To avoid these issues, enhance your video first with Aiarty Video Enhancer:
- Denoise: Intelligently removes unwanted digital noise, making footage cleaner and smoother with details.
- Deblur: Sharpens soft or handheld shaky footage, restoring fine textures and improving overall clarity for a professional look.
- Upscale up to 4K: convert low-resolution video to HD/4K, generating more natural detail and improving visual depth for larger screens.
- Overall Enhancement: optimizes color, contrast, and clarity to create a polished foundation, ensuring that added film grain looks seamless and cinematic.
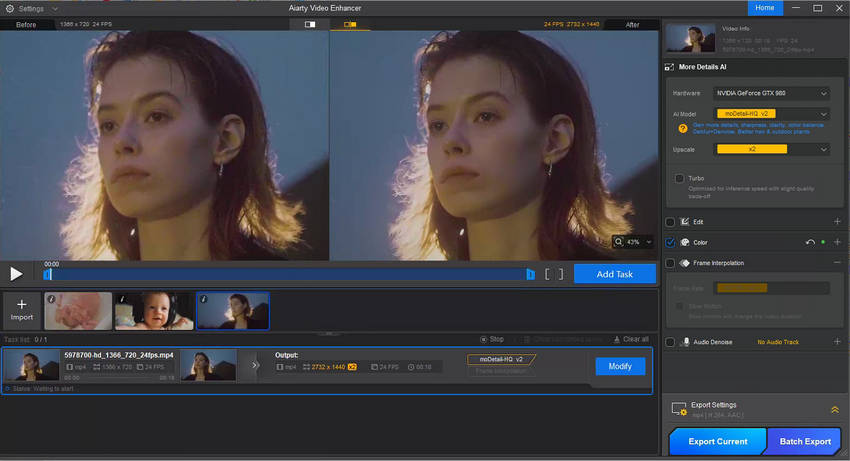
Try Aiarty Video Enhancer to enhance low-quality video and add cinematic clarity in one click.
How to Add Film Grain in Premiere Pro (Step-by-Step)
Grain can transform ordinary footage into a cinematic, textured masterpiece with a professional feel. Premiere Pro offers several ways to add this effect, giving you flexibility depending on your style and workflow. The following three methods provide reliable options for both beginners and experienced editors.
Method 1. Add Grain Using Noise HLS Auto
Premiere Pro’s built-in Noise HLS Auto effect is a quick and effective way to add film-like grain directly to your footage without needing external overlays. It’s ideal for editors who want a uniform, controllable texture and don’t need complex layering or third-party assets. Noise HLS Auto simulates analog film grain, letting you adjust intensity while keeping the color and overall look consistent.
Step 1. Open the Effects panel and navigate to Noise & Grain → Noise HLS Auto.
Step 2. Drag the Noise HLS Auto effect onto the video clip in your timeline. You’ll see the effect applied immediately in the Program Monitor.
Step 3. Tweak settings like Hue, Lightness, Saturation, Grain Size, and Noise Animation. Begin by raising Lightness (around 20% as a starting point) so the grain becomes visible. Then experiment by increasing or decreasing the value, and explore the other parameters to craft unique, creative looks for your video.
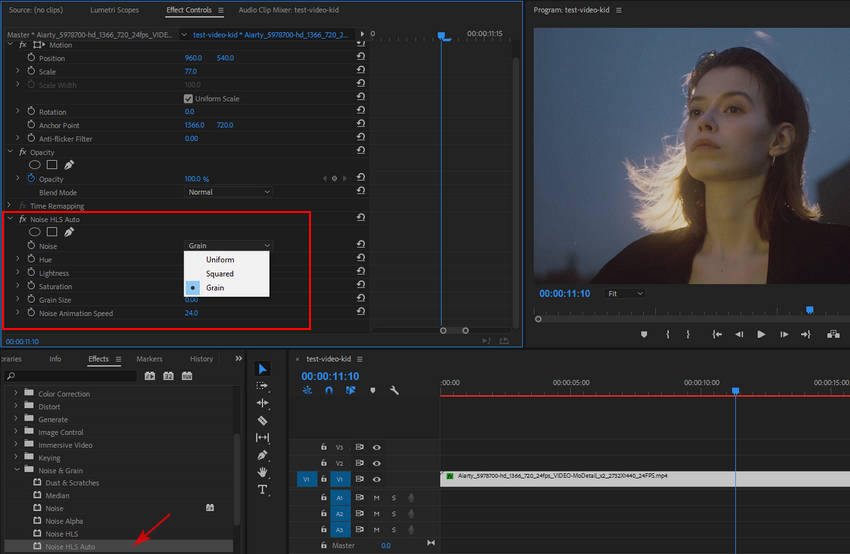
This method is fast, lightweight, and perfect for adding a consistent grain layer, giving your digital footage a clean, cinematic texture.
Method 2. Use a Film Grain Overlay (Free Overlays Included)
For a more authentic, cinematic look, using a film grain overlay gives you greater control over texture and style. Unlike Noise HLS Auto, overlays allow for organic, customizable grain that can be adjusted independently from your footage.
Step 1. Download free film grain overlays from reliable sources such as Pexels, Mixkit, Pixabay, Videvo, or Motion Array. These platforms offer high-quality clips that can be used without cost for personal and commercial projects.
Step 2. Import the overlay into Premiere Pro and place it on a track above your main footage in the timeline. This ensures the grain affects only the visual layer of your video.
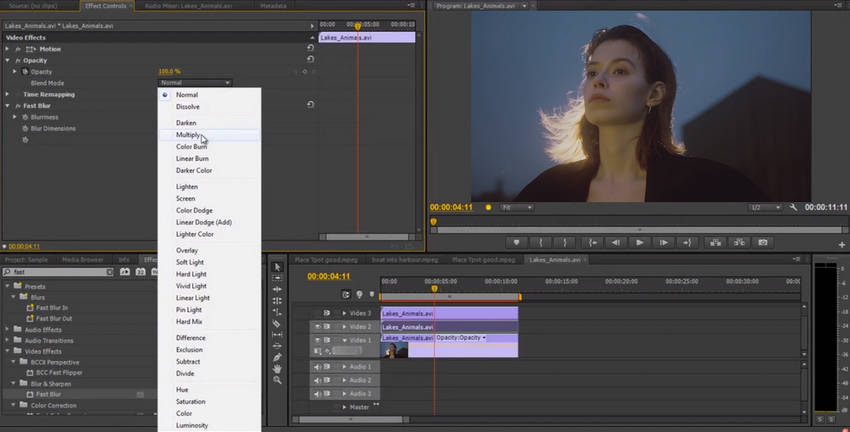
Step 3. Change the blending mode to Overlay or Soft Light for natural integration, then adjust the opacity to control intensity. If your main footage is longer than the overlay clip, loop the overlay to cover the entire duration.
Using overlays lets you achieve a more textured, film-like aesthetic and fine-tune the effect for each scene, giving your video a professional cinematic feel. If you don’t want to adjust grain settings manually, try these ready-made free overlays for film grain to drop cinematic texture straight into your video:
- Free Film Overlay Pack by Motion Array - A versatile collection that includes different grain intensities suitable for subtle or heavy vintage effects.
- 8mm Film Grain Pack from Motion Array - Perfect if you want an authentic retro feel that mimics the look of old 8mm film reels.
- 10 Free 4K Grain Overlays by RP Stock - High-resolution overlays designed for professional projects, ensuring the texture holds up even in 4K editing.
- Free Super 8mm Film Grain by Film Looks - Adds a nostalgic touch with fine grain and flicker, often used in creative storytelling or music videos.
- Old Vintage Film Scratches by Videezy - Goes beyond grain by adding scratches and dust, ideal for achieving a distressed archival film look.
Method 3. Add Subtle Grain with Lumetri Color
For editors seeking precise, fine-tuned control, Lumetri Color offers a subtle way to introduce grain while simultaneously adjusting your color grade. This method is ideal when you want the grain to complement your footage rather than appear as a separate layer.
Step 1. Open the Lumetri Color panel from the Window menu if it’s not already visible.
Step 2. Locate the noise/grain controls within the panel. Adjust the amount of grain to create a delicate, film-like texture without overpowering the image.
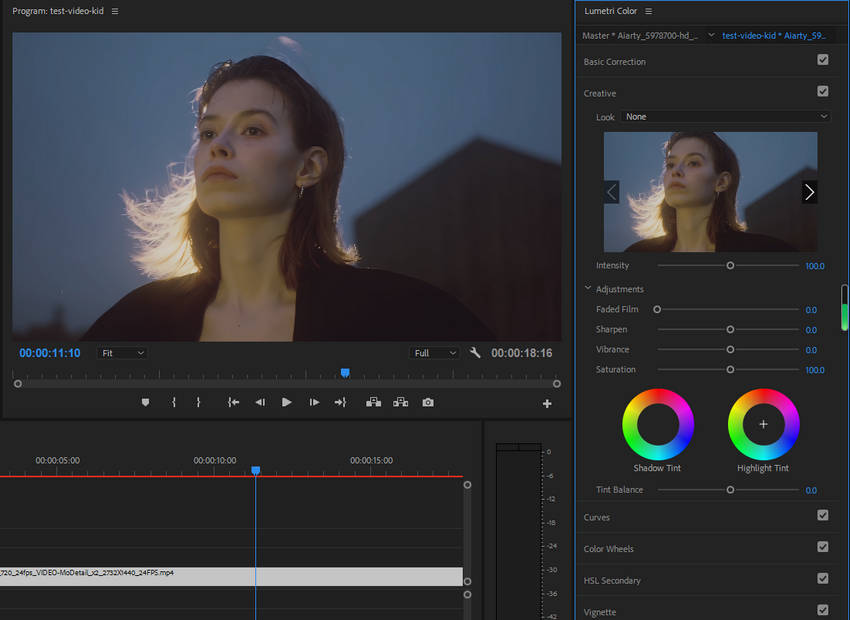
Step 3. Combine this subtle grain with adjustments to contrast, highlights, shadows, and saturation. This ensures the grain blends seamlessly with your overall color grading, giving your footage a cohesive, cinematic appearance.
Using Lumetri Color allows you to add a natural-looking grain effect that enhances the mood and depth of your video while maintaining full creative control over color and texture.
Troubleshooting Common Issues When Adding Film Grain in Premiere Pro
Even with the right settings, adding film grain in Premiere Pro can sometimes produce unexpected results. Here are some common problems and how to fix them:
1. Grain effect not showing
If your grain isn’t appearing on the timeline or in the Program Monitor, check whether Global FX Mute is turned on. Disabling it will allow all applied effects, including grain, to display properly.
2. Overlay flickering
Film grain overlays can flicker if the clip length and overlay length don’t match. To fix this, loop the overlay or apply a slight blur to smooth transitions between repeated frames.
3. Grain too strong after export
If the effect appears harsh in the final video, lower the grain intensity in the effect settings. Another solution is to clean up your footage first, removing existing noise to create a cleaner base for the grain.
These tips address common issues like “grain not working in Premiere Pro” or “film grain looks bad in Premiere Pro”, helping you achieve a subtle, professional, and cinematic texture every time.
For the best results, enhance your footage beforehand with Aiarty Video Enhancer. It removes noise, sharpens details, and upscales resolution, creating a clean, high-quality foundation that makes your film grain look natural and polished.
Check How to Enhance Video Quality Using Aiarty Video Enhancer >>
Best Practices for Adding Film Grain
After addressing common issues like grain not showing, flickering overlays, or overly strong noise, following a few best practices can help your footage look truly cinematic.
- Apply grain lightly – Subtlety is key. Keep the grain intensity around 10–20% so it adds texture without overpowering your video.
- Start with quality footage – Grain works best on high-resolution clips. Low-quality or heavily compressed videos may exaggerate flaws, making the effect look messy.
- Add grain last – Complete all color grading and corrections first. Applying grain afterward ensures it blends seamlessly with your adjusted tones and highlights.
- Check the results carefully – Compare before and after adding grain. Make sure it enhances the cinematic feel without reducing clarity or introducing distractions.
Following these guidelines helps prevent common pitfalls and ensures your grain adds a polished, professional look rather than highlighting flaws in your footage.
Conclusion
Film grain adds texture, depth, and a cinematic feel to your footage. Whether using Noise HLS Auto, overlays, or Lumetri Color, the effect works best when it feels intentional and well-integrated.
Starting with high-quality footage is essential since grain can highlight imperfections in low-resolution or noisy clips. Using Aiarty Video Enhancer beforehand helps remove noise, sharpen details, and upscale resolution, creating a clean foundation for natural, professional-looking grain.
Enhance your footage with Aiarty Video Enhancer before adding grain for the best cinematic results.
 FAQ about Adding Film Grain in Premiere Pro
For most cinematic projects, subtlety is key. Keep the film grain amount around 10–20% to add natural texture without overpowering the footage. Always preview your export to ensure the effect looks consistent across screens.
You can use the built-in Noise HLS Auto effect in Premiere Pro or download free film grain overlays from sites like Pexels, Mixkit, or Pixabay. Import the overlay, place it above your footage, switch the blending mode to Overlay or Soft Light, and adjust opacity to control intensity.
Yes. Mobile editors like CapCut or VN, and online platforms such as Canva, allow you to apply grain filters directly. However, Premiere Pro provides much finer control over strength and blending for a more professional result.
If your footage already looks too noisy, try the Reduce Noise effect or third-party denoise plugins. For cleaner results, preprocess your footage with an AI video enhancer like Aiarty Video Enhancer, which removes noise, restores detail, and prepares your clip for a natural film grain finish later.
You May Also Like
This post was written by Ashley Brown, a videographer turned AI explorer. As an associate writer at Digiarty Software, she dives into the latest AI-powered tools for video enhancement and content creation, offering practical insights and unbiased commentary. Accuracy confirmed by Abby Poole.