Summary: Want your videos to look perfect on YouTube, TikTok, or Instagram? This guide shows you how to easily change aspect ratios in DaVinci Resolve, covering Project Settings, Edit Page, Cut Page, and individual clip tweaks—plus a quick AI-powered aspect ratio cropping option with Aiarty Video Enhancer.
Ever uploaded a video only to find black bars ruining your perfect shot, or your footage stretched in all the wrong ways? You’re not alone. Changing aspect ratio in DaVinci Resolve can feel tricky, especially if you’re aiming for multiple platforms like YouTube, TikTok, and Instagram.
Here’s the good news: Whether you want a widescreen masterpiece, a vertical TikTok clip, or a square Instagram post, this guide covers everything of changing aspect ratio in DaVinci Resolve, from Project Settings to Timeline tweaks, Edit Page adjustments, Cut Page shortcuts, and even AI-powered cropping with Aiarty Video Enhancer. By the end, you’ll have videos perfectly framed for any platform.

What is Aspect Ratio—and Why You Should Care
Aspect ratio is simply the width-to-height ratio of your video, and it plays a huge role in how your content looks on different platforms. Getting it right ensures your footage fits perfectly without awkward black bars, unwanted stretching, or cropped subjects.
Here’s a quick rundown of the most common ratios:
- 16:9 – Standard widescreen, perfect for YouTube and Facebook. This is the classic format for most online videos.
- 9:16 – Vertical videos, ideal for TikTok, Instagram Reels, and other mobile-first platforms.
- 1:1 – Square posts, commonly used for Instagram feed videos where balanced framing is key.
- 4:3 – Classic format, often used for older media, archival footage, or a retro look.
Understanding these ratios is just the first step. Once you know which aspect ratio fits your target platform, the next step is learning how to adjust aspect ratio properly in DaVinci Resolve. Fortunately, whether you’re working with a whole project, a specific timeline, or individual clips, there are clear methods to get your footage looking just right. From Project Settings to Timeline adjustments and clip-level tweaks, you can maintain the perfect framing and ensure your content looks professional across every platform.
How to Change Aspect Ratio in DaVinci Resolve? 4 Ways Here!
Changing your video’s aspect ratio might seem tricky at first, but DaVinci Resolve actually gives you several ways to get it done—whether you’re adjusting an entire project, a specific timeline, or just a single clip. In the sections below, we’ll break down three main methods you can use:
Method 1. Change the Aspect Ratio in the Project Settings Panel
Project Settings are basically your video’s starting point. Changing the aspect ratio in project settings sets the default for your timeline, clips, and the whole project, so everything stays consistent. It’s a huge time-saver, especially if you’re making videos for different platforms like YouTube, TikTok, or Instagram.
Step 1. Open DaVinci Resolve and go to the top menu: File → Project Settings → Master Settings → Timeline Resolution. This is where you control the overall size and ratio of your project.
Step 2. Choose the aspect ratio that fits your platform or desired format:
- 16:9 → 1920x1080 (standard widescreen, perfect for YouTube)
- 9:16 → 1080x1920 (vertical format for TikTok or Instagram Reels)
- 1:1 → 1080x1080 (square videos for Instagram feed posts)

Step 3. Click Save to apply your changes.
Method 2. Change Timeline Aspect Ratio in the Edit Page of DaVinci Resolve
The Edit Page is where most creators spend the bulk of their time, and it’s perfect for making precise adjustments to both your timeline and individual clips.
Step 1. Head over to the Edit Page and locate your timeline in the Media Pool.
Step 2. Right-click on your timeline and choose Timeline Settings. This is where you can customize the timeline independently of your Project Settings.
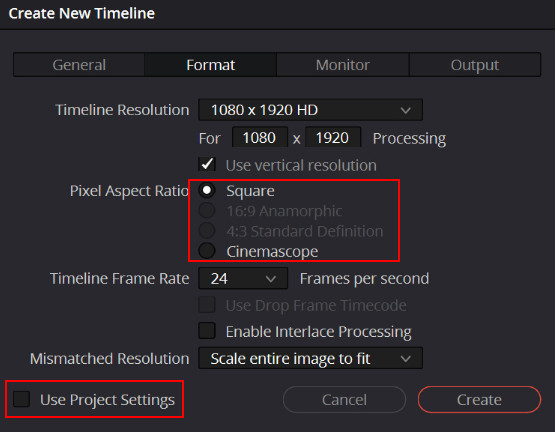
Step 3. Uncheck Use Project Settings so you can set a custom resolution for this timeline. Then, pick the aspect ratio that fits your needs.
Step 4. If your project already has existing timelines or clips, look for Mismatch Resolution and select Scale full frame with crop. This ensures your footage fills the frame properly without stretching or leaving black bars.
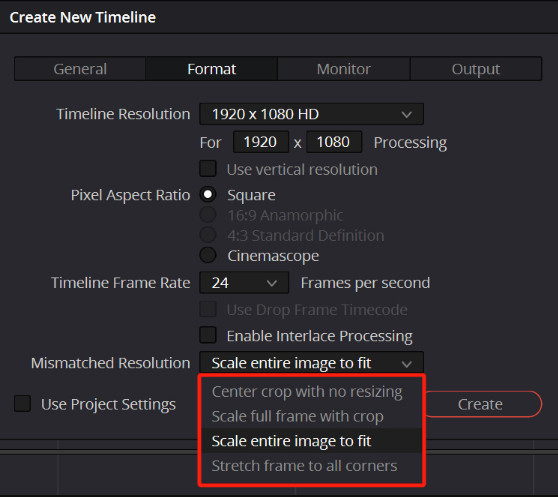
Step 5. Click OK to apply the changes.
Method 3. Change Individual Clip Aspect Ratio in Edit Page
Sometimes you don’t need to adjust the entire timeline—you just want a single clip to fit better into a different aspect ratio. The good news is that DaVinci Resolve makes this easy right from the Edit Page.
Step 1. Select the clip you want to adjust directly in your timeline.
Step 2. Open the Inspector panel, then navigate to Transform → Crop Settings.
Step 3. If you want full control over width and height, uncheck Lock Aspect Ratio.
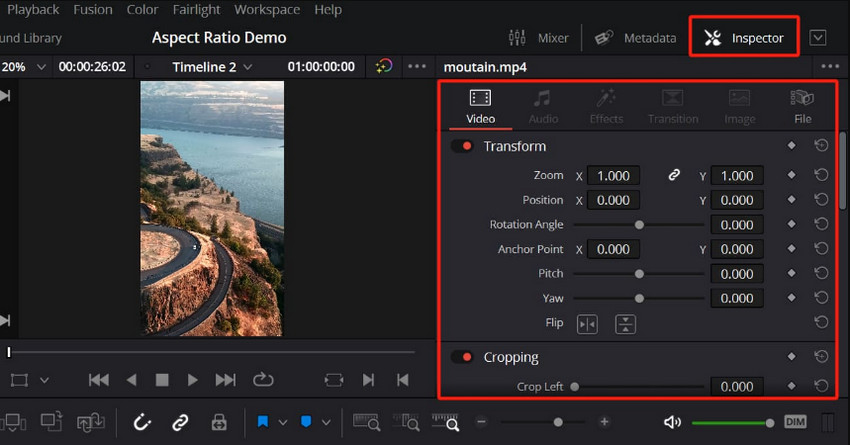
Step 4. Either input custom width and height values or pick from preset aspect ratios to match your platform.
Step 5. Use the Zoom and Position controls to keep your subject perfectly centered and framed.
This method works great when you’re re-purposing content—for example, turning a widescreen YouTube video into a vertical TikTok clip without having to redo the entire project setup.
Method 4. Adjust Video Aspect Ratio in DaVinci Resolve Cut Page
If you’re working on short-form content and need to change aspect ratio in DaVinci Resolve quickly, the Cut Page is your best bet. Unlike the Edit Page, which gives you detailed control, the Cut Page is designed for speed—making it perfect for videos meant for TikTok, Instagram Reels, or YouTube Shorts.
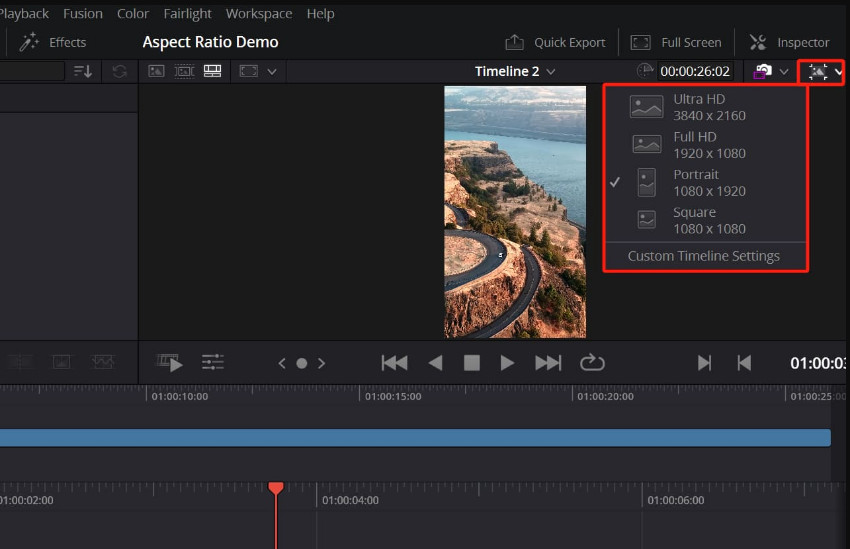
Step 1. Open the Cut Page and head to the Timeline Settings in the top-right corner.
Step 2. From here, select the aspect ratio you want to use. Usually, 16:9 for standard YouTube videos, 9:16 for vertical TikTok or Instagram content and 1:1 for square Instagram posts.
Step 3. Once applied, check your clips in the timeline. If they don’t fit perfectly, open the Inspector and use the Zoom and Position controls to make sure your subject is centered and framed correctly.
Common Issues and Tips When Changing Aspect Ratio in DaVinci Resolve
Even after you’ve set your project, timeline, or clip to the right size, you might run into a few common problems. Don’t worry—these issues are easy to fix once you know what to look for.
1. Black bars around your video
Black bars usually mean your footage doesn’t fit the new frame. Open the Inspector and increase the Zoom, or in Timeline Settings, set Mismatch Resolution → Scale full frame with crop to fill the frame automatically.
2. Footage doesn’t match the new ratio
Switching from widescreen (16:9) to vertical (9:16) often crops part of the frame. To keep your video natural, use Crop instead of stretching, then adjust the Position controls so your subject stays centered.
3. Save time by setting aspect ratio early
If you know your destination—YouTube, TikTok, or Instagram—set the Project or Timeline Settings from the start.
A Smarter Alternative: Change Aspect Ratio with Aiarty Video Enhancer
While DaVinci Resolve gives you powerful manual control over aspect ratios, it also comes with some challenges. Adjusting Project Settings, timelines, and individual clips can be time-consuming, especially if you need to export videos in multiple formats for platforms like YouTube, TikTok, and Instagram. You might also struggle with cropping issues or black bars that break the flow of your video.
That’s where Aiarty Video Enhancer comes in. Instead of spending extra time tweaking settings, this AI-powered tool makes it simple to change aspect ratios while enhancing your video quality at the same time.
Key Features of Aiarty Video Enhancer for Aspect Ratio Adjustment:
- One-click aspect ratio adjustment for YouTube, TikTok, Instagram, Facebook, and more platforms.
- AI smart cropping to keep your subject perfectly centered and avoid awkward off-frame cuts.
- AI quality enhancement tools to sharpen, denoise, restore detail, and upscale blurry video clips.
- Batch processing support to save time when editing and exporting multiple videos at once.
- User-friendly interface design that’s faster, simpler, and easier to use than traditional editors.
How to Change Aspect Ratio Using Aiarty Video Enhancer
Step 1. Download and install Aiarty Video Enhancer (available for Windows and macOS). Import your video by dragging and dropping it into the software.
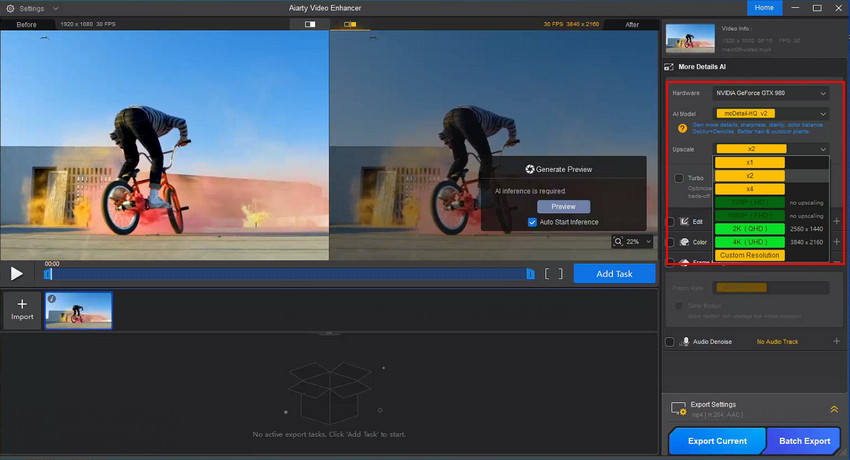
Step 2. From the left panel, choose the AI Model that best fits your video type. For example, select More-Detail GAN v3 for clips that need extra clarity. Then choose an upscale factor for your video as needed.
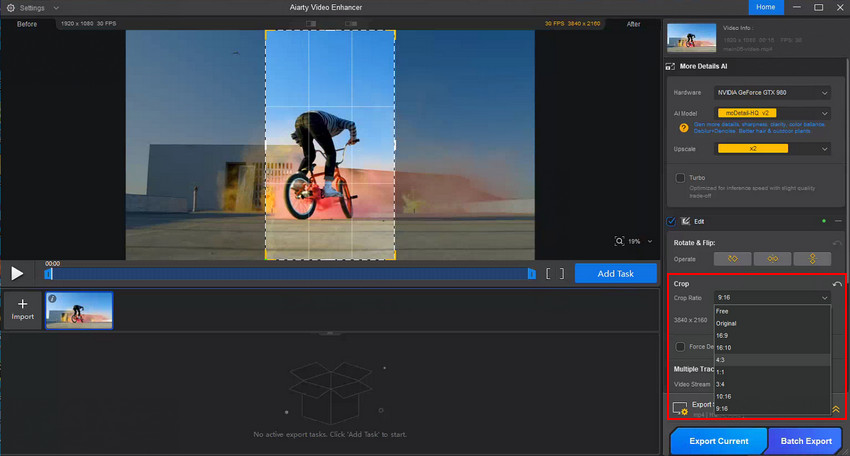
Step 4. Head over to the Edit section, enable it, and click on the Apply Crop button. In the Crop settings, you’ll find a drop-down list with various aspect ratio presets such as 16:9, 16:10, 4:3, 1:1, 3:4, 10:16, and 9:16. Select the one that fits your project best, or enter custom dimensions if you need a specific size.
Step 6. Simply click the Export Current or Batch Export button to save your videos.
Conclusion
Using Project Settings, Edit Page, Cut Page, Timeline adjustments, and Inspector Crop in DaVinci Resolve, you can handle almost any aspect ratio challenge. Whether converting a widescreen YouTube video to a vertical TikTok clip or creating square Instagram posts, these tools let you adjust zoom, position, and crop so your content looks professional on any platform.
For a faster, easier solution, try Aiarty Video Enhancer. It automatically crops and resizes videos to 16:9, 9:16, 1:1, or custom ratios while preserving quality. Perfect for batch processing and saving time, Aiarty makes your videos platform-ready in just a few clicks.
Give it a try and see how effortless video cropping can be!
You May Also Like
This post was written by Ashley Brown, a videographer turned AI explorer. As an associate writer at Digiarty Software, she dives into the latest AI-powered tools for video enhancement and content creation, offering practical insights and unbiased commentary. Accuracy confirmed by Abby Poole.