DaVinci Resolve is a powerful video editing and color grading platform, but laggy timelines, choppy previews, and sluggish playback can halt your creative flow. Often caused by hardware limits, demanding codecs, or project settings—not your skills—these issues can usually be fixed without a new computer. This guide covers common causes and step-by-step solutions to smooth your timeline, and if your exported videos still look soft or lack detail, tools like Aiarty Video Enhancer can help restore and upscale them to professional quality.
Nothing’s more frustrating than choppy playback or dropped frames. DaVinci Resolve often lags because your hardware struggles with high-res or compressed footage, your GPU drivers are outdated, or your project settings push your system too hard. Never mind. Here are fixes to get them smooth again:
- Generate proxy media for lighter, faster editing
- Lower your timeline resolution and proxy settings for snappier previews
- Enable hardware decoding in preferences to offload work to your GPU
- Update your GPU drivers to eliminate performance glitches
- Store footage on a fast SSD for faster read/write speeds
Pro Tip: Smooth playback doesn’t always mean your exported video looks its best. If your final render feels a bit soft, noisy, or lacking detail, tools like Aiarty Video Enhancer can help. You can easily upscale,unblur, and reduce noise in your videos, even in batches—so your final project looks polished and professional without putting extra strain on your computer.
Why Is DaVinci Resolve So Laggy?
Before diving into fixes, it helps to understand why lag happens in the first place. DaVinci Resolve is a demanding program, and several factors—from hardware limits to project settings—can slow it down. Knowing the cause makes it easier to apply the right solution.
How to Tell if DaVinci Resolve Is Lagging
Lag isn’t always obvious. Sometimes playback feels fine until you notice small delays or stutters. Here are the most common signs to watch for:
- Playback drops frames or freezes mid-edit
- Audio becomes unsynced with video
- Timeline scrubbing feels delayed
- Applying effects causes sudden stutters
- Export takes unusually long compared to project length
To confirm the issue, you can check:
- Timeline FPS vs. Playback FPS in the playback menu. >> More for DaVinci Resolve Frame Interpolation
- System resource usage (CPU/GPU/RAM) in Task Manager or Activity Monitor
- Performance differences when using HD vs. 4K footage
Understanding these symptoms helps you pinpoint whether the lag comes from your system, your footage, or project settings—so you can take the most effective next steps.
Common Causes of DaVinci Resolve Laggy Playback
Once you can identify that lag exists, the next step is to understand why it happens. Here are the most frequent culprits:
1. Insufficient Hardware
DaVinci Resolve is GPU-heavy. If your graphics card or RAM isn’t strong enough, lag is almost guaranteed. Knowing this helps you decide whether a software tweak or hardware upgrade is needed.
2. Outdated GPU Drivers
Many users overlook driver updates, but outdated drivers are a surprisingly common cause of playback stutters. Updating them often resolves performance issues immediately.
3. Compressed Footage (H.264/H.265)
These codecs are widely used on cameras and smartphones, but they’re demanding to decode in real time. Working with them directly can cause serious lag.
4. High-Resolution Footage & Effects
Editing 4K or 8K videos with multiple effects places a heavy load on your system. Recognizing this helps you prioritize proxy workflows or timeline adjustments.
5. Slow Storage Drives
Using an external HDD to store footage can create bottlenecks. Moving files to a fast SSD dramatically improves playback performance.
6. Background Processes
Other apps consuming CPU or RAM can worsen lag. Closing unnecessary programs frees resources for smoother editing.
11 Proven Ways to Fix DaVinci Resolve Laggy Playback
Now that you know how to spot lag and its common causes, it’s time to fix it. Here are 11 effective ways to solve DaVinci Resolve playback lag issue:
1. Update GPU Drivers
Outdated graphics drivers are a leading cause of lag. Make sure your GPU drivers are up-to-date via GeForce Experience (Nvidia) or AMD Adrenalin Edition. Updated drivers improve real-time decoding, prevent crashes, and optimize GPU performance for effects and color grading.
2. Enable Hardware Decoding
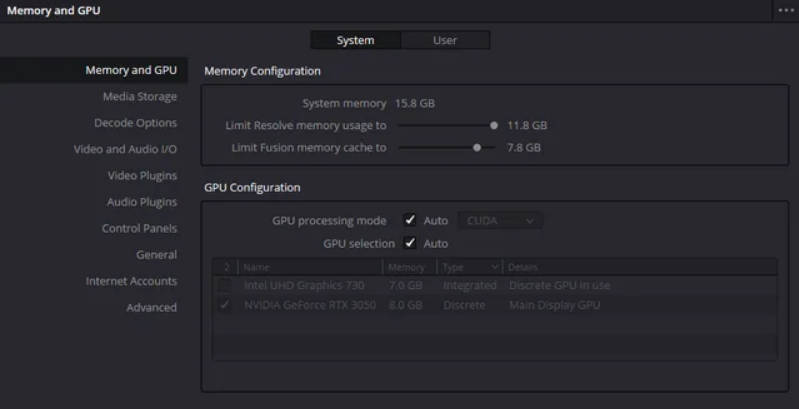
Resolve can offload video decoding to your GPU instead of relying solely on the CPU. In Preferences → Memory and GPU, enable hardware acceleration. This reduces timeline stutter, especially with H.264/H.265 footage, and ensures smoother playback during complex edits.
3. Use Proxy Media
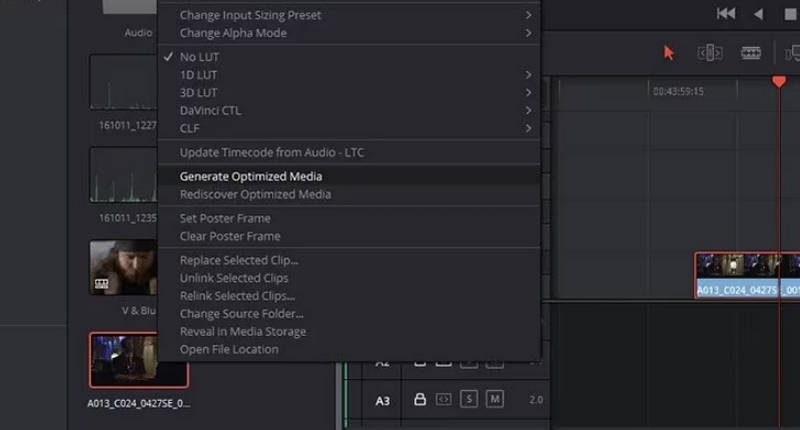
Working with high-resolution footage can overwhelm your system. Right-click your clips in the Media Pool → Generate Proxy Media. This creates smaller, easier-to-edit versions while preserving the original files for export. Proxy media drastically improves responsiveness when scrubbing or applying effects.
4. Lower Timeline Proxy Resolution
Even with proxies, a full-resolution timeline can strain your system. Go to Playback → Timeline Proxy Resolution and set it to Half or Quarter. This only affects the viewer during editing and keeps your export quality intact. You’ll notice much smoother real-time playback.
5. Adjust Playback Settings
Sometimes, lag isn’t just about hardware or footage—it’s about how DaVinci Resolve handles effects, color grades, and timeline settings in real time. By fine-tuning playback options, you can significantly reduce stuttering and make scrubbing smoother, especially on longer or effects-heavy timelines.
Here are the most effective adjustments:
- Temporarily disable heavy effects or Fusion nodes that are not essential while editing
- Turn off Bypass Color Grades to ease GPU load during previews
- Reduce scaling filter quality in preferences for faster redraws
- Match timeline FPS to your source footage for smoother frame handling
Optional Enhancement Tip: Even when playback is smooth, exported videos may sometimes look slightly soft or noisy. If you want to enhance your final output, tools like Aiarty Video Enhancer can help. It allows you to upscale Davinci Resolve videos, sharpen, and reduce noise with minimal effort, so you can achieve a polished, professional look without putting extra strain on your computer.
6. Transcode Footage
H.264/H.265 is widely used but demanding for editing. Transcoding to editing-friendly codecs like ProRes or DNxHR reduces decoding workload and prevents lag when using effects, color grading, or Fusion compositions. This is especially useful for long-form or 4K/8K projects.
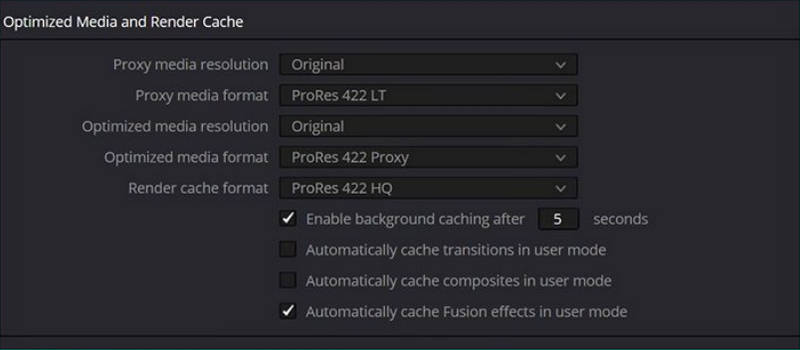
7. Optimize Media & Render Cache
Use Optimize Media in Project Settings to pre-process heavy clips. For intensive timelines with color grades or Fusion effects, enable Render Cache. Resolve pre-renders sections, so playback is smooth without constantly re-rendering effects in real-time.
8. Storage Optimization
Editing from a slow hard drive can bottleneck your workflow. Move your footage to a fast NVMe SSD and avoid editing directly from external HDDs. Fast storage ensures quicker frame loading, reduces stutter, and improves render times.
9. System & OS Tuning
Even with the right hardware and project settings, your operating system can still hold back DaVinci Resolve if it’s not optimized. Small background tasks, outdated software, or poor resource allocation often create bottlenecks that make playback choppy.
To keep your system in top shape:
- Close unnecessary background apps that eat up CPU, RAM, or disk usage while you edit.
- Allocate more memory to Resolve under Preferences → Memory and GPU so it gets priority access to resources.
- Keep your OS and drivers updated, since performance patches and stability fixes can directly improve video editing efficiency.
With a clean, tuned system, Resolve has the breathing room it needs to deliver smoother previews and faster renders.
10. Project Setup Best Practices
A lot of playback lag comes from how your project is set up. Even powerful systems can struggle if the project is unnecessarily complex or mismatched. By keeping your setup lean and consistent, you’ll give Resolve a smoother editing environment.
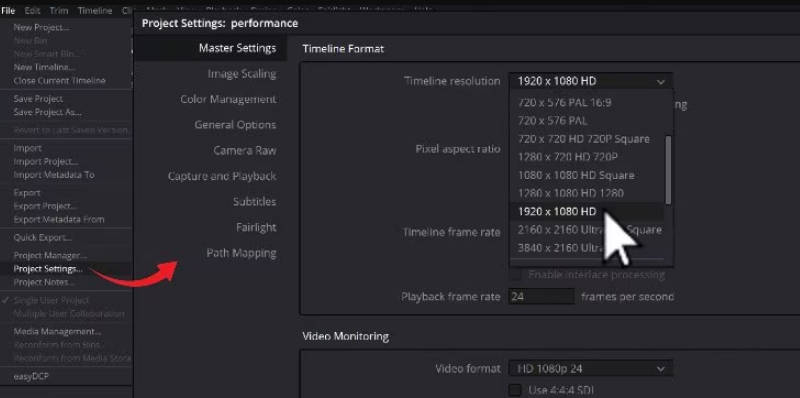
- Keep timeline resolution modest – Editing in 1080p is usually more than enough, even if your final export is 4K or higher. You can always upscale later with AI video upscalers without sacrificing quality.
- Use consistent frame rates – Mixing 24fps, 30fps, and 60fps clips in one timeline forces Resolve to constantly convert frames, which slows playback. Stick to a single frame rate whenever possible.
- Avoid overloaded timelines – Too many effects, color grades, and Fusion clips in a single timeline will bog everything down. Break your project into smaller timelines or sequences to keep performance steady.
11. Hardware Upgrade Path
If you’ve tried every software tweak and Resolve is still stuttering, the issue likely lies with your hardware. DaVinci Resolve is one of the most resource-intensive editors on the market, and sometimes no amount of optimization can fully overcome system limits. That’s when upgrading your gear makes the biggest difference.
- GPU first: Resolve is heavily GPU-dependent
- RAM: 16–32GB recommended, especially for Fusion-heavy projects
- SSD/NVMe storage: Replacing slower drives improves read/write performance
Conclusion
Laggy playback in DaVinci Resolve can be frustrating, but it’s rarely unsolvable. Most issues come down to a mix of hardware strain, compressed footage, or project settings that push the software too hard. By updating your GPU drivers, creating proxy media, lowering playback resolutions, optimizing storage, and fine-tuning your system, you can usually get Resolve running smoothly again.
Still, smooth editing doesn’t always guarantee flawless exports. If your final videos look soft, noisy, or lack detail, that’s where Aiarty Video Enhancer steps in. It lets you batch upscale footage to 4K, reduce noise, and restore fine details—so your finished work looks polished and professional, even if your computer isn’t top of the line.
Download Aiarty Video Enhancer today to ensure your exports look as sharp and professional as they did in your edit.
 FAQs
FAQs
4K footage, especially H.264/H.265 from cameras or phones, is heavily compressed. Resolve has to decode every frame in real time, which is very demanding on your GPU. Using proxy media or transcoding into editing-friendly codecs like ProRes or DNxHR usually fixes the issue.
Yes. While Resolve can technically run on 16GB, you’ll notice big improvements with 32GB or more—especially if you use Fusion, color grading, or multiple high-resolution clips in one timeline. More RAM reduces crashes and smooths playback.
Both improve playback. Proxies are lighter and faster for editing, while optimized media offers a balance between speed and higher quality previews. Choose proxies if you want smoother editing, or optimized media if you prefer previews closer to the final look.
Yes, in many cases. By lowering playback resolution, creating proxy media, enabling hardware decoding, and updating your drivers, you can achieve smoother editing even on mid-range systems. However, if you’re editing 8K or heavy VFX, a hardware upgrade may eventually be necessary.
You May Also Like
This post was written by Brenda Peng who is a seasoned editor at Digiarty Software who loves turning ordinary photos into extraordinary works of art. With AI assistance for brainstorming and drafting, the post is reviewed for accuracy by our expert Abby Poole for her expertise in this field.