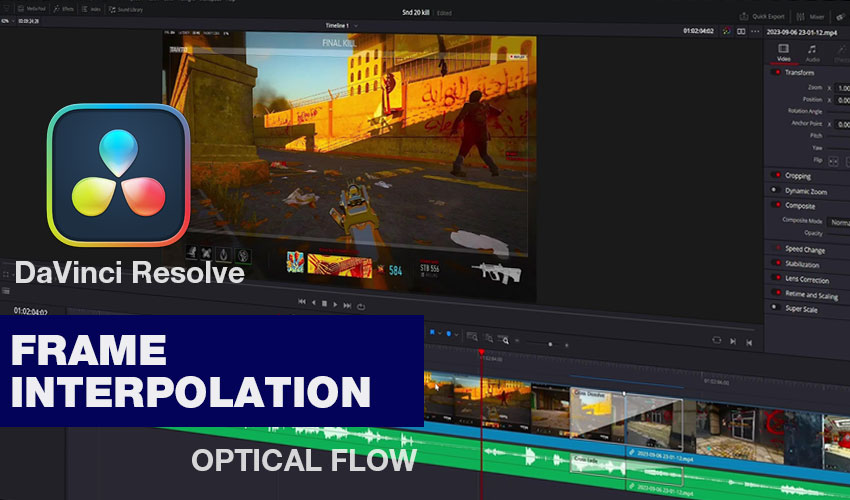
Summary: This guide walks you through DaVinci Resolve frame interpolation, showing how to make your videos smoother using Optical Flow and Frame Blending, and introduces Aiarty Video Enhancer as a powerful alternative for faster, cleaner results.
Have you ever watched a slow-motion clip that looked choppy, almost like it skipped frames? Or maybe you’ve tried turning old 24fps footage into smoother 60fps, only to end up with ghosting and weird warping effects. That’s where frame interpolation in DaVinci Resolve comes in. It’s a powerful tool for creating extra frames between existing ones so motion looks smoother—but it’s not always perfect.
In this guide, I’ll walk you through everything you need to know about DaVinci Resolve frame interpolation—including Optical Flow, Frame Blending, and slow-motion tricks. Then I’ll share why many creators eventually switch to DaVinci Resolve alternatives like Aiarty Video Enhancer for faster, smoother results.
- Select your clip on the timeline.
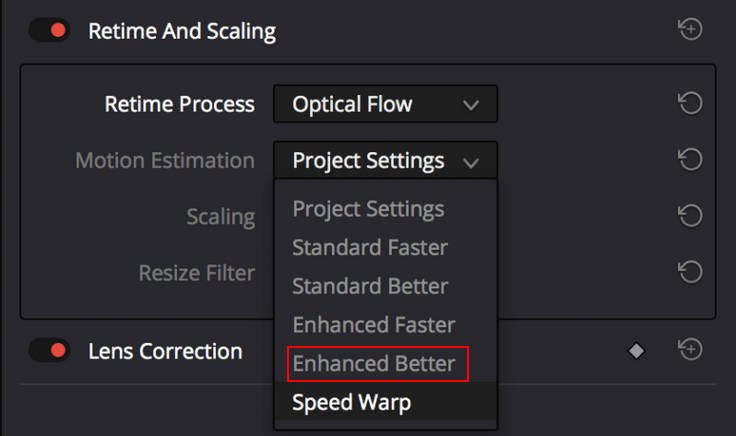
- Go to Inspector → Retime and Scaling.
- Change Retime Process to Optical Flow.
- Under Motion Estimation, pick Enhanced or AI for smoother motion.
That's it - You've done frame interpolation in DaVinci Resolve with Optical Flow. The catch? DaVinci Resolve Optical Flow can introduce visual artifacts, especially with fast action or complex backgrounds. It also takes a lot of GPU power, and rendering can be painfully slow.
If you want one-click frame interpolation without ghosting, try Aiarty Video Enhancer. It uses AI to create natural-looking in-between frames, can boost videos from 24fps to 60fps or even 120fps, and runs much faster with GPU acceleration.
Try Aiarty Video Enhancer to boost FPS & smooth motion instantly!
How DaVinci Resolve Interpolates Frames: 4 Ways
When you dive into frame interpolation in DaVinci Resolve, you’ll discover several techniques the software uses to smooth motion, each with its own strengths and potential drawbacks.
1. Nearest
The most basic method, Nearest simply repeats existing frames. It’s extremely fast and light on system resources, making it suitable for minor speed adjustments. However, because it doesn’t create new motion data, the result can appear stuttery or choppy, especially in fast-moving scenes.
2. Frame Blending
If you want to fix slightly laggy video to smoother effect without heavy computation, Frame Blending merges adjacent frames to create transitional motion. This can improve fluidity in moderate movement, but it may produce ghosting or blurry trails when objects move quickly or unpredictably.
3. Optical Flow
For more advanced smoothing, Optical Flow analyzes how pixels move between frames and generates entirely new frames to fill the gaps. It works especially well for slow-motion clips or converting lower frame rates to higher ones. That said, it can struggle with very rapid motion, overlapping objects, or complex textures, sometimes resulting in artifacts.
4. AI Mode (Studio version only)
The most sophisticated option is AI Mode, which builds on Optical Flow with machine learning to predict motion even more accurately. It produces cleaner, high-quality results with minimal artifacts, but it requires a powerful GPU and longer rendering times.
How to Use DaVinci Resolve Frame Interpolation to Smooth Frames
Now that you understand the different frame interpolation methods in DaVinci Resolve and their strengths and limitations, it’s time to see how to apply them in practice. The following step-by-step guide will walk you through enabling frame interpolation on your clips, adjusting the settings for optimal results, and ensuring your videos play as smoothly as possible.
Step 1. Open DaVinci Resolve and Import Your Video
Launch the software, open an existing project or create a new one, then import your video into the Media Pool and drag it onto the timeline.
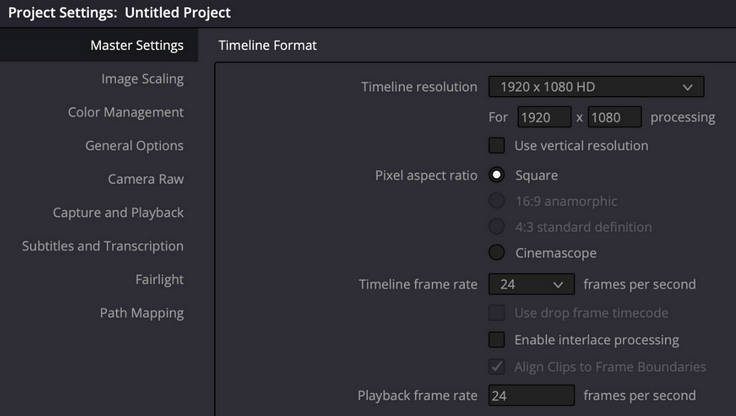
Step 2. Check and Adjust Project Settings
Go to File → Project Settings → Master Settings to confirm your timeline frame rate. Adjust if necessary to match your desired output.
Step 3. Adjust Clip Frame Rate (Optional)
Right-click the clip → Clip Attributes, and change the clip frame rate if you want to convert, for example, 24fps footage to 60fps. Click OK.
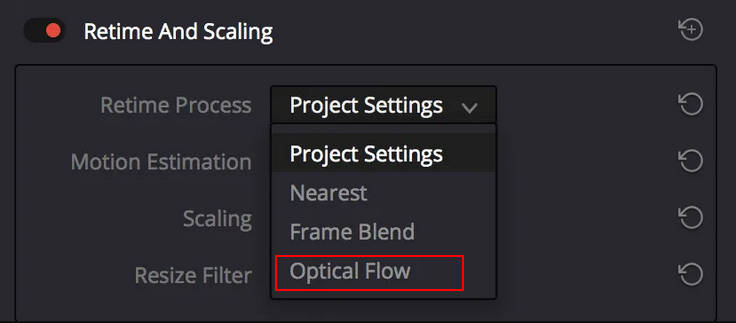
Step 4. Enable Frame Interpolation
Open the Inspector, scroll to Retime and Scaling, and set Retime Process to Optical Flow to generate intermediate frames.
Go Further with DaVinci Resolve Slow Motion Optical Flow for Ultra-Smooth Clips
If you want to create slow-motion effects, simply right-click your clip and select Retime Controls. Then drag the speed handles to reduce the playback speed. With Optical Flow enabled, DaVinci Resolve will automatically generate the extra frames needed to keep your motion smooth, even at slower speeds.
Step 5. Enhance Motion Estimation
For smoother results, choose Enhanced Better under Motion Estimation, or AI Mode if you have the Studio version. Preview the clip to check for artifacts.
Step 6. Render and Export
Switch to the Deliver workspace, set your export settings (format, resolution, frame rate), add the clip to the render queue, and click Start Render.
Important Tips:
- Fast-moving subjects or complex overlapping objects may produce artifacts even with Optical Flow.
- Rendering at higher Motion Estimation settings will take longer but improves frame quality.
- Consider splitting long clips into smaller segments for easier adjustment and faster rendering.
It works well for many situations and can make motion appear much smoother, but you may notice glitches or artifacts when there’s fast movement, intricate details, or overlapping objects in the frame. These issues are more likely in action-packed scenes, crowded environments, or clips with complex textures.
Smarter Alternative for DaVinci Resolve Frame Interpolation
Don’t get me wrong—DaVinci Resolve frame interpolation is great when it works. It’s free, built-in, and fits right into your workflow. But it has some drawbacks: ghosting, tearing, or warping artifacts can appear, rendering times are long, especially with DaVinci Resolve slow motion Optical Flow, AI mode is Studio-only, and a powerful GPU is needed for smooth performance.
That’s why so many creators are turning to alternatives like Aiarty Video Enhancer.
Aiarty’s AI-powered frame interpolation lets anyone generate ultra-smooth, high-frame-rate videos without digging through complex menus. Just drop in your footage, and it automatically boosts FPS, smooths motion, and eliminates artifacts.
The key benefits of this frame rate converter include:
- AI Frame Interpolation: Effortlessly convert footage from 24fps to 60fps or 120fps while minimizing ghosting, tearing, and warping artifacts, delivering ultra-smooth, professional-looking motion without any manual tweaking.
- Batch Processing: Process multiple videos at once, saving time and keeping large projects organized.
- GPU Acceleration: Leverages up to 95% of your GPU power, ensuring faster processing and smoother previews.
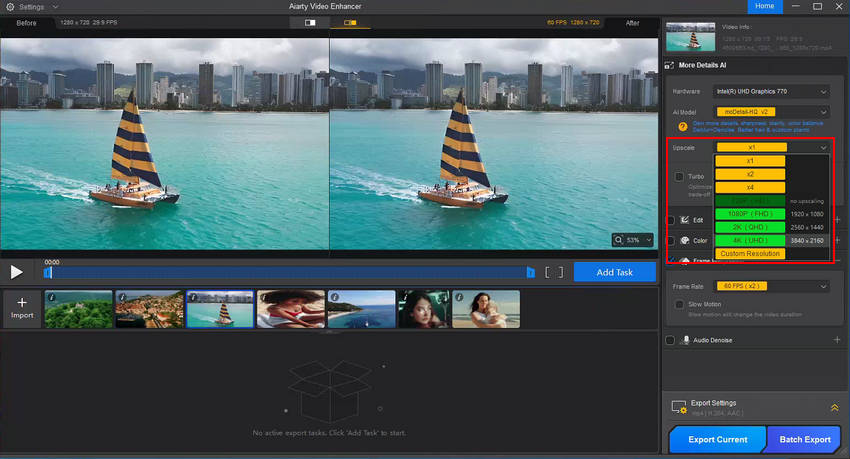
- AI Video Upscaling: Includes advanced features like video upscaling (e.g., 720p to 4K), deblurring, and noise reduction, giving your videos an overall quality boost.
- Audio Denoising: Remove all kinds of audio noises, like wind, traffic, hum, echo, and more, to make your footage sound crystal clear.
Download Aiarty Video Enhancer today and enjoy buttery-smooth frame interpolation with upgraded video quality!
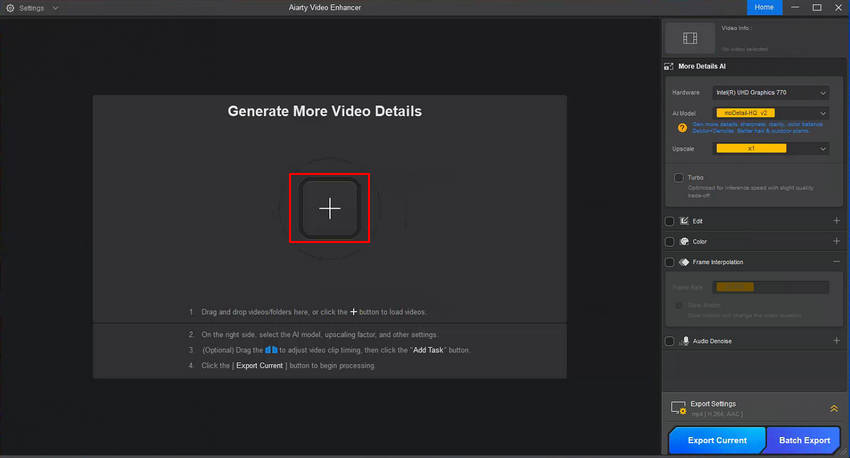
Step 1.Import choppy video to Aiarty Video Enhancer
Launch Aiarty Video Enhancer on your computer. And then import your choppy video clips into it.
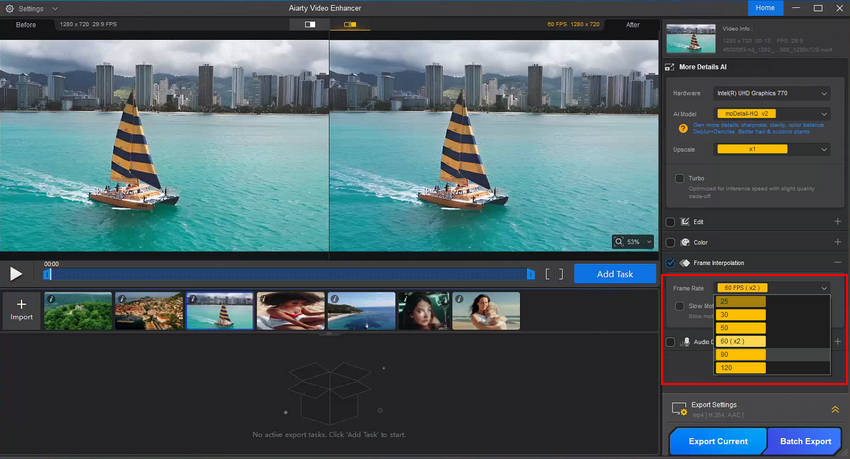
Step 2. Enable the Frame Interpolation option
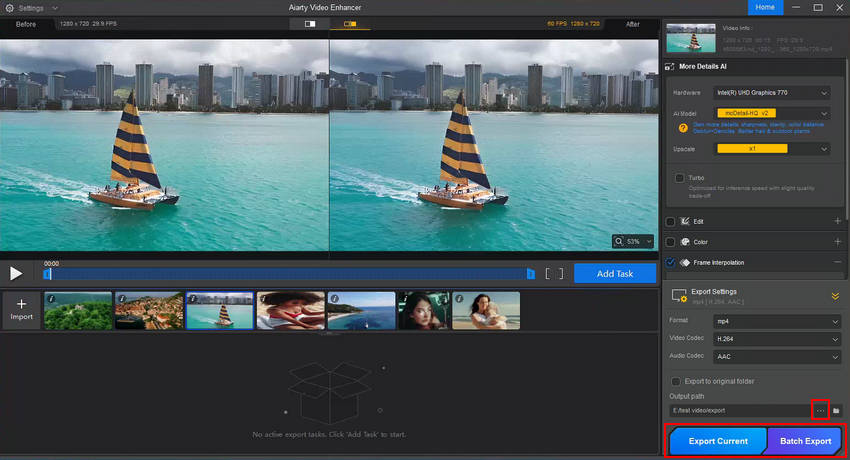
Select the video that you want to change frame rate, then go to the right panel. If you just want to boost the frame rate without changing the video resolution, set the Upscale option to x1 and then tick on the Frame Interpolation box.
Step 3.Choose the target frame rate you prefer
From the frame rate dropdown menu, select your desired frame rate, such as x2, 60fps, 90fps, or even 120fps.
Step 4. Export FPS boosted video.
Once your settings are ready, pick an output folder in the Export Settings. Then click Export Current for a single video or Batch Export for multiple files. The AI frame rate converter will then process your clips and adjust the FPS automatically.
Final Thoughts
DaVinci Resolve frame interpolation is a solid tool for making playback smoother, especially with options like Optical Flow and Frame Blending. But let’s be real—it isn’t perfect. You’ll run into artifacts, heavy GPU usage, and a bit of a learning curve.
If you’re an experienced editor, Resolve’s features will give you plenty of control. But if you’d rather skip the tweaking and get silky-smooth, natural-looking motion in just a few clicks, Aiarty Video Enhancer is the smarter choice. Fast, simple, and reliable—it does the hard work so you can focus on creating.
 FAQ about DaVinci Resolve Frame Interpolation
Yes, you can use basic frame interpolation in the free version of DaVinci Resolve. However, the advanced AI mode is only available in the Studio (paid) version.
Optical Flow usually delivers smoother motion by generating new frames, but it can introduce artifacts with fast or complex movement. Frame Blending is safer and less intensive, but it often results in blurry trails or ghosting.
Yes! That’s exactly what DaVinci Resolve slow motion Optical Flow is designed for—turning normal-speed footage into smooth slow-motion playback by creating additional frames.
Flowframes is a standalone AI interpolation tool that can work alongside Resolve. It’s effective, but many editors prefer Aiarty Video Enhancer for its stability, user-friendly workflow, and added features like upscaling and noise reduction.
Yes—Aiarty Video Enhancer supports batch processing, so you can handle multiple clips at once. This makes it much faster and more convenient than DaVinci Resolve for large projects.
You May Also Like
This post was written by Ashley Brown, a videographer turned AI explorer. As an associate writer at Digiarty Software, she dives into the latest AI-powered tools for video enhancement and content creation, offering practical insights and unbiased commentary. Accuracy confirmed by Abby Poole.