How to Denoise Videos in DaVinci Resolve
Whether you were shooting in low light or had to crank up your camera's ISO, noise can make professional footage look amateur. DaVinci Resolve has a set of tools to clean it up.
But let's be honest, the noise reduction davinci resolve panel can look intimidating with its array of sliders and settings. This guide is here to break down the process into a seamless workflow to denoise video and enhance for modern clarity.
One crucial thing to know upfront: The high-quality noise reduction tools we'll be covering are exclusive to the paid DaVinci Resolve Studio version, and require a steep learning curve. If you need an alternative way to automatically denoise video for Davinci Resolve and any video editing, you can jump to Part 5 for AI-driven solutions.
Tips: From DaVinci Resolve V21 and onwards, Blackmagic Design added a dedicated Photo page and more AI features, including image noise reduction in its ecosystem. Following the workflows below for videos, you can transfer that skill for photo editing also.
Part 1: Understanding Video Noise and Resolve's Tools
Before we start clicking buttons, it helps to know what we're fighting against. The answer to "How to Denoise Footage in DaVinci Resolve?" lies in understanding the two types of noise and the specific tools designed to fix them.
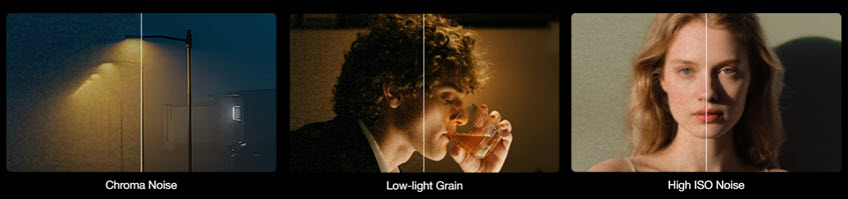
Video noise comes in two main aspects in DaVinci Resolve:
- Luminance Noise: This is the classic "film grain" look. It's a texture of black, white, and grey speckles that affects the brightness levels of your image.
- Chroma Noise: These are the ugly, colorful splotches, often appearing as random red, green, and blue blotches in the darker areas of your footage. This type of noise is usually the most distracting.
To combat these, DaVinci Resolve gives us two powerful methods to denoise footage, both found in the Motion Effects panel:
- Temporal Noise Reduction (Temporal NR): This clever method analyzes frames over time. It looks at the frames before and after the current one to intelligently separate the consistent details of your shot from the random, flickering noise. It's fantastic for cleaning up static areas of an image without destroying detail.
- Spatial Noise Reduction (Spatial NR): This method works by analyzing neighboring pixels within a single frame. It smooths out noisy regions to create a cleaner image. It's a great all-around tool but can soften your image if you push it too far.
Part 2: The Best Workflow for DaVinci Resolve Noise Reduction
Ready to clean up your clip? Follow these steps for a nice result in general practice. We'll be working in the Color Page.
Create a Dedicated Node
Before you do anything else, create a new serial node and label it "NR" or "Denoise." It's best practice to make this the first or second node in your node tree. Why? Because color grading and contrast adjustments can amplify existing noise, making it harder to remove later. By placing your davinci resolve denoise node first, you're cleaning the image before you start grading.
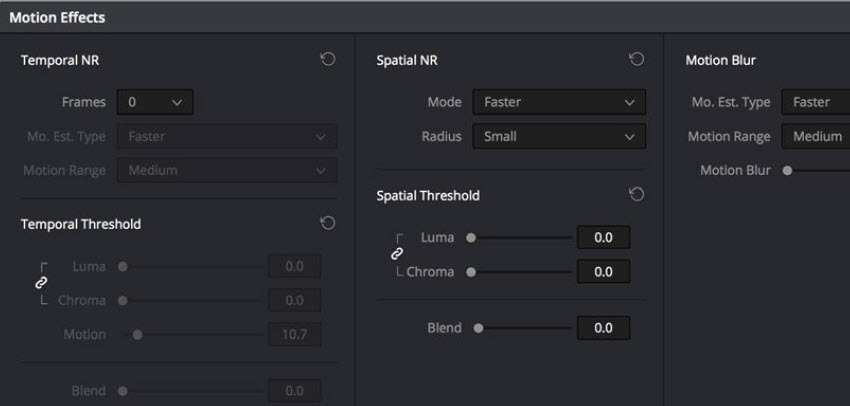
Step 1: Navigate to the Motion Effects Panel
With your NR node selected, look to the bottom right of the center palettes and click on the icon that looks like a film strip in motion. This is the Motion Effects panel.
Step 2: Apply Temporal NR — The First Pass
Temporal NR is our first line of defense. It's excellent at removing noise without sacrificing too much detail.
- Frames: Set this between 2 and 3. This tells Resolve how many frames to analyze. More frames can give a better result but are much harder on your computer.
- Mo. Est. Type: Change this from Faster to Better. This uses a more advanced algorithm to detect motion, which helps prevent ghosting or motion artifacts.
- Luma and Chroma Thresholds: With the chain icon linked, slowly drag the Luma slider to the right. Watch the static, non-moving parts of your image. Stop when the noise disappears. A good starting point is usually between 5 and 15.
Step 3: Apply Spatial NR for the clean up.
If you still see noise, especially chroma blotches or noise in moving areas, it's time for Spatial NR.
- Mode: Switch this to Better. Just like with Temporal NR, this prioritizes quality over real-time performance.
- The key process: Click the chain icon to unlink Luma and Chroma.
- Chroma Threshold: Increase this slider to specifically target the colorful blotches. You can often be quite aggressive with this setting (e.g., 10-25) without negatively impacting image sharpness.
- Luma Threshold: Adjust this slider very carefully. This setting affects image sharpness and can quickly make your footage look soft and plastic-like. Often, a small value like 2 to 8 is all you need to smooth out the remaining grain.
Step 4: Fine-Tune for Motion
If your clip has fast-moving subjects and you notice strange "ghosting" artifacts, go back to the Temporal NR section. Adjust the Motion Threshold slider. Lowering it excludes more motion from the noise reduction, while raising it includes more.
Step 5: Review Your Work
Toggle your NR node on and off (Ctrl+D or Cmd+D) to see the before and after. Zoom in to check that you haven't softened important details like skin texture or fine lines. The goal is to reduce distracting noise, not eliminate all texture from the image.
Part 3: Pro Tips for Cleaner Footage
Once you've mastered the basic workflow, you can use these advanced techniques to get even better results and solve common problems.
Tip 1: Node Order Matters: Start vs. End
We recommended placing your denoise node at the beginning of your node tree, and that's excellent advice for a clean, smooth result. However, the order of operations can change the look of your footage.
- Noise Reduction at the Start: This cleans the image before you add contrast or saturation. The result is generally smoother, but can sometimes feel a bit softer because you're removing texture early on.
- Noise Reduction at the End: If you apply noise reduction as the very last node, you are cleaning up the image after all your color adjustments. This can sometimes result in a sharper-looking image, as the NR tool is working on the final, more detailed picture.
There's no single "right" answer. Experiment with both to see which you prefer for your shot.
Tip 2: Use Power Windows for Precision
You don't always need to apply noise reduction to the entire image. Often, noise is most visible in the shadows or on a flat, underexposed background. On your NR node, create a Power Window and use it to select only the dark, noisy areas of your shot. Apply your noise reduction davinci resolve settings just within this window.
This is a game-changing technique because it preserves the sharpness and detail in your subject and well-lit areas, giving you the best of both worlds: a clean background and a sharp subject.
Tip 3: The OpenFX Alternative
You can also find the Noise Reduction tool in your OpenFX Library on the Color and Edit pages. Under the Effects panel, look for ResolveFX Revival and drag Noise Reduction onto a clip or a node.
It contains the exact same Temporal and Spatial controls but can be a convenient way to apply the effect, especially if you want to quickly add it to a clip on the Edit Page without switching workspaces.
Part 4: DaVinci Resolve Free vs. Studio for Noise Reduction
This is one of the most common points of confusion, and it's important to set the right expectations based on which version of the software you're using.
DaVinci Resolve Studio
The paid version includes the powerful, GPU-accelerated Temporal and Spatial Noise Reduction tools detailed in this guide. For serious video enhancement, this feature alone is often worth the upgrade.
DaVinci Resolve (Free Version)
The free version does not have a functional built-in video noise reduction tool. If you are on the Color Page in the free version, you can still see the Motion Effects panel, and the sliders for Temporal and Spatial Noise Reduction are visible. However, they are disabled and will display a DaVinci Resolve Studio watermark on your footage if you try to use them.
To effectively denoise footage in the free version, you can rely on third-party OpenFX (OFX) plugins. Some free and paid plugins can be installed from the OpenFX panel on the Color Page.
Part 5: Denoise Videos with AI Efficiently
DaVinci Resolve's noise reduction is fantastic, but it's not always the perfect solution for every situation. As we've discussed, it's a Studio-only feature and can be incredibly demanding on your computer's resources, slowing your workflow to a crawl, and require practice and technical know-hows.
What if you have extremely grainy low-light footage that Resolve's tools are struggling to clean up without making it look overly soft?
This is where a dedicated, standalone AI tool can be a lifesaver. Using a program like Aiarty Video Enhancer as a companion to DaVinci Resolve allows you to pre-process your footage, ensuring you're working with the cleanest possible clips from the start, all with AI analyzing and processing automatically.
When to Use a Dedicated AI Enhancer
- For Extreme Low-Light & Challenging Noise: Aiarty uses advanced AI models specifically trained to tackle the toughest noise problems—like high-ISO grain and murky concert footage—often restoring details you thought were lost forever.
- For a Simpler, Faster Workflow: Editing is already demanding on your PC. Running heavy noise reduction inside Resolve can slow everything down. A tool like Aiarty does the heavy lifting separately. Its "Turbo" mode is optimized for speed, processing clips much faster than many internal plugins.
- To Denoise and Upscale Simultaneously: If your goal is to not only clean up noise but also restore old videos and upscale low-resolution footage to 4K, Aiarty can do both in one step, intelligently generating new details for a crisp final image.
How to Denoise Videos for DaVinci Using Aiarty Video Enhancer
The process is simple with auto AI inference, and you can get a decent result without pro skills.
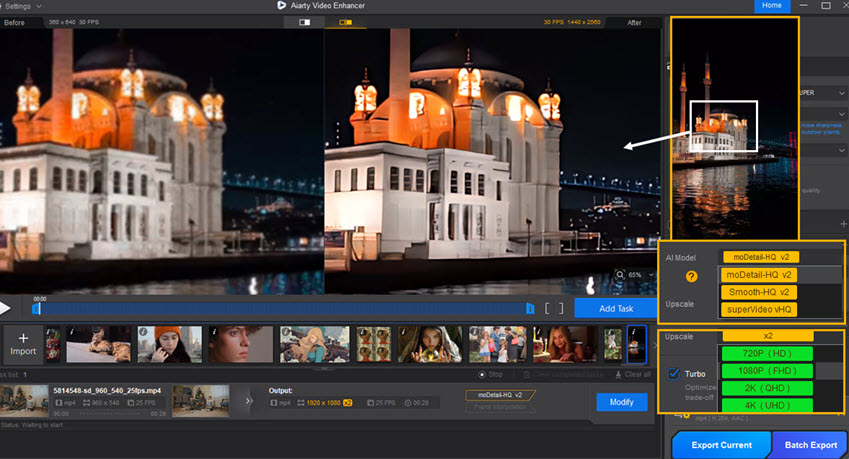
Step 1: Install and Import Your Footage
Download and install Aiarty Video Enhancer, then launch it and batch add flawed videos into the working panel.
Step 2: Choose the Right AI Model and Settings
Aiarty offers several AI models for different scenarios. For noise reduction, your best options are:
- moDetail-HQ v2: Best for general footage where you want to reduce noise while enhancing fine textures like hair, skin, and landscapes.
- superVideo vHQ: Choose this for the most challenging clips. It's specifically designed for extreme low-light scenes and heavy grain.
You can then select the desired output resolution, for instance x1 to keep original or select UHD resolution to upscale to 4K videos.
Step 3: Preview and Export
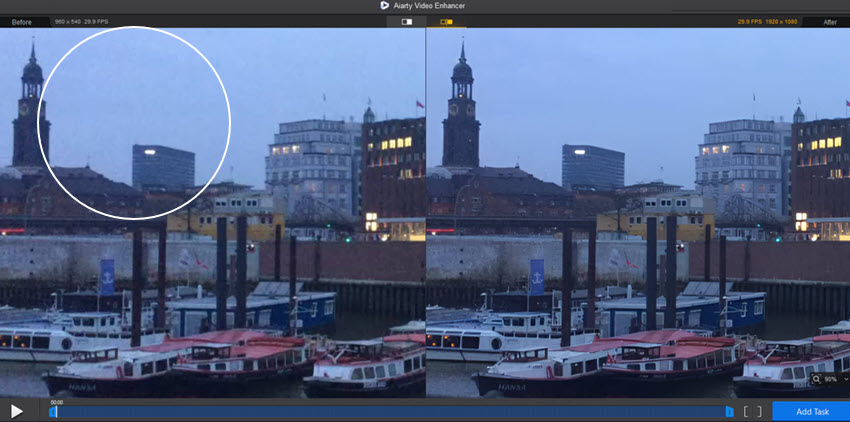
Use the preview window to see a real-time before-and-after comparison. Once you're happy with the result, hit the "Export" button. The software will process your video, and you'll have a clean, high-quality file ready to import into DaVinci Resolve for editing.
 FAQs
FAQs
Noise reduction is one of the most processor-intensive tasks in video editing. The "Better" modes and higher frame counts require significant GPU power. To improve performance, you can turn off the NR node while editing and only turn it back on for the final render. Alternatively, right-click your clip and select "Render Cache Color Output."
This is almost always caused by pushing the Spatial NR Luma Threshold too high. Lower that value first. If that's not enough, use a Power Window (as mentioned in our pro tips) to apply noise reduction only to the areas that truly need it, leaving the rest of your image sharp.
In simple terms: Temporal NR looks at multiple frames over time to find noise. Spatial NR looks at pixels within one frame in space to find noise. Temporal is great for static shots, while Spatial cleans up everything else. Using them together gives you the best of both worlds.
You May Also Like
This post was written by Ashley Brown, a videographer turned AI explorer. As an associate writer at Digiarty Software, she dives into the latest AI-powered tools for video enhancement and content creation, offering practical insights and unbiased commentary. Accuracy confirmed by Abby Poole.