


Best AI Frame Interpolation Software for 60FPS and 120FPS Video



AI frame interpolation can make 24fps or 30fps footage look smoother, create slow motion from ordinary recordings, and reduce the stutter often seen in animation, gameplay, sports clips, and AI-generated video. The difficult part is not increasing the FPS number. It is generating believable intermediate frames without introducing ghosting, warped edges, unstable textures, or incorrect blends across scene cuts.
This guide compares six practical frame interpolation tools for different workflows. Aiarty Video Enhancer is the most convenient choice when the source also needs denoising, deblurring, detail restoration, or upscaling. Topaz Video offers more interpolation-model control, Flowframes is a flexible free option for Windows users, and professional editors may prefer DaVinci Resolve Studio or Adobe Premiere Pro because interpolation stays inside the editing timeline.
Quick answer: There is no universal winner for every clip. Start by matching the software to your workflow, then export a short test containing fast motion, fine edges, overlapping subjects, and at least one scene cut before processing the complete video.
Best Frame Interpolation Software at a Glance
This article focuses on which frame interpolation software to choose and how to judge its output quality. For a broader explanation of FPS standards and conversion methods, see our guide to video frame rate converters.
How We Compare Frame Interpolation Software
Frame interpolation quality is highly dependent on the source. A tool that performs well on a slow camera pan may fail when a hand passes in front of a face or when a player crosses a detailed background. Instead of treating a single marketing sample as proof, compare software using the following practical questions:
A useful test set includes a 24fps portrait or cinematic clip, a 30fps sports or action clip, and an animated or AI-generated clip. Test 60fps before jumping to 120fps: generating more frames increases processing time and gives the model more opportunities to make incorrect motion predictions.
6 Best AI Frame Interpolation Software Options
1. Aiarty Video Enhancer — Best for Enhancement and Frame Interpolation Together
Aiarty Video Enhancer is the most practical option here when low frame rate is only one of several source problems. It can generate intermediate frames while also addressing blur, compression noise, weak detail, low resolution, color, and audio noise in the same desktop workflow. This is useful for old footage, low-quality downloads, animation, AI-generated video, and action clips that need both cleaner frames and smoother motion.
The Frame Interpolation panel includes standard output choices such as 25fps, 30fps, 50fps, 60fps, 90fps, and 120fps. You can uncheck Video Super-Resolution when you want to keep the source resolution and perform only frame interpolation, color adjustment, or audio denoising. The separate Skip Scene Sensitivity control helps reduce unwanted interpolation across hard cuts by changing how sensitively the software detects scene transitions.
Aiarty is easier to configure than a full nonlinear editor and does not require users to choose among several interpolation networks. That simplicity is an advantage for routine conversions, but it also means advanced users receive less model-level control than they do in Topaz Video or an open framework such as Flowframes.
Pros:
- Frame interpolation and video restoration in one application.
- Common output options up to 120fps.
- Can interpolate frames without increasing resolution.
- Adjustable scene-change sensitivity.
- Local GPU processing, segment previews, and batch task management.
Cons:
- Fewer interpolation model choices than specialist AI software.
- Processing time still increases with resolution, output FPS, and source duration.
- Complex motion should be tested before a full export.
Best for: Creators who want to smooth motion while also restoring blurry, noisy, low-resolution, animated, or AI-generated footage.
2. Topaz Video — Best for Advanced AI Model Control
Topaz Video is a strong choice for users who want to select different AI models for frame-rate conversion and slow motion. Its interpolation options include Chronos, Chronos Fast, Apollo Fast, and Aion, while built-in presets provide starting points for 60fps conversion and higher slow-motion multipliers.
That flexibility is useful when one model does not suit a particular motion pattern. Chronos Fast is positioned as a practical default for standard FPS conversion, while other models can be tested for slower playback or more difficult movement. The tradeoff is time: comparing models and rendering previews can make the workflow slower, and high-resolution processing requires capable hardware.
Pros:
- Multiple interpolation models and presets.
- Detailed control for frame-rate conversion and slow motion.
- Can combine interpolation with other AI video filters.
Cons:
- High GPU and processing demands.
- More model testing is often needed to find the best result.
- A more expensive and complex option for occasional users.
Best for: Professional users who value model selection and are willing to trade render time for additional control.
3. Flowframes — Best Free AI Frame Interpolation Software for Windows
Flowframes is a Windows GUI for AI video interpolation that supports RIFE, DAIN, and FLAVR implementations. It is open-source donationware, and older free builds are distributed through itch.io while newer builds may appear first through early access. RIFE-NCNN can run on modern Vulkan-capable GPUs, which makes Flowframes more hardware-flexible than older CUDA-only interpolation workflows.
Flowframes is attractive because it exposes model choice, interpolation multipliers, frame extraction, and encoding options without requiring users to build a command-line pipeline from scratch. However, it remains more technical than commercial software. Build versions, dependencies, codecs, source frame duplication, and GPU compatibility can affect the experience, so it is not always the fastest route for a beginner who needs one predictable export.
Pros:
- Free or donation-supported options.
- Supports several well-known AI interpolation implementations.
- Good level of control for enthusiasts and anime workflows.
Cons:
- Windows-focused workflow.
- Less polished support and update experience than commercial tools.
- Users may need to troubleshoot dependencies, codecs, or model behavior.
Best for: Windows users who want a free, configurable AI frame interpolation tool and do not mind technical setup.
4. DaVinci Resolve Studio — Best for Professional Editing and Speed Ramps
DaVinci Resolve provides nearest-frame, frame-blending, and optical-flow methods for retimed footage. The paid Studio edition adds Speed Warp, a Neural Engine feature designed for higher-quality retiming. Its biggest advantage is not one-click conversion; it is integration. Editors can build speed ramps, cut around problematic frames, adjust timing, grade the result, repair audio, and export without moving the clip between separate applications.
Resolve makes the most sense for users already working in a professional timeline. For a creator who only wants to convert a few clips from 30fps to 60fps, the software's project structure and controls may be unnecessarily complex. Speed Warp can also be computationally demanding, particularly on high-resolution or long clips.
Pros:
- Advanced retiming inside a full post-production suite.
- Precise speed ramps and timeline control.
- Editing, color, effects, and audio stay in one project.
Cons:
- Speed Warp requires DaVinci Resolve Studio.
- Steeper learning curve than dedicated enhancers.
- Slow processing on demanding footage or weaker systems.
Best for: Editors creating slow motion, speed ramps, or retimed sequences as part of a larger professional project.
Learn more: How to Use DaVinci Resolve Frame Interpolation for Smoother Video.
5. Adobe Premiere Pro — Best for Existing Adobe Workflows
Premiere Pro offers Frame Sampling, Frame Blending, and Optical Flow when the export frame rate differs from the source or when a clip is retimed. Frame Sampling duplicates or removes frames, Frame Blending mixes neighboring frames, and Optical Flow estimates pixel motion to create new intermediate frames.
Optical Flow usually produces the smoothest of Premiere's three methods, but Adobe also warns that artifacts can appear when neighboring frames differ significantly. Fast camera movement, object crossings, moving text, and scene changes therefore need careful timeline review. Premiere remains convenient for Adobe users because the interpolation can be applied without leaving the project, but it does not offer the same restoration-first workflow as a dedicated AI video enhancer.
Pros:
- Built into a widely used professional editing timeline.
- Simple comparison between sampling, blending, and optical flow.
- Useful for slow motion, retiming, and export frame-rate changes.
Cons:
- Optical-flow artifacts can appear in complex motion.
- Often requires rendering before smooth timeline preview.
- Subscription cost is difficult to justify for interpolation alone.
Best for: Editors who already use Premiere Pro and need frame interpolation inside an existing sequence.
Learn more: Premiere Pro Time Interpolation Explained.
6. SmoothVideo Project — Best for Real-Time Playback
SmoothVideo Project (SVP) approaches interpolation from a different direction. It is designed primarily to convert video to 60fps, 120fps, or higher in real time inside supported players. It supports Windows, macOS, and Linux workflows, and its feature set includes player integration, RIFE-based interpolation options, and a separate converter for saving high-frame-rate files.
SVP is useful when the goal is smoother viewing rather than cleaning and remastering a source file. It can be particularly appealing for movies and animation, but viewers who prefer the original 24fps cadence may dislike the more immediate, video-like appearance commonly called the soap opera effect.
Pros:
- Real-time interpolation in supported players.
- Cross-platform desktop availability.
- Supports high target frame rates and video conversion.
Cons:
- Primarily optimized for viewing rather than restoration.
- Player integration and settings can require configuration.
- High-frame-rate playback may alter the intended cinematic look.
Best for: Users who want smoother movie or anime playback without running every clip through a conventional enhancement workflow.
What Is Frame Interpolation?
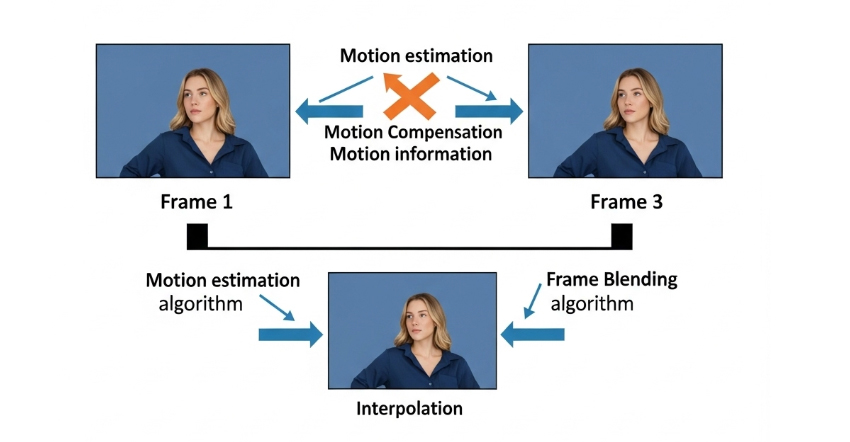
Frame interpolation is a video-processing technique that creates new frames between existing frames to increase temporal resolution. Converting a 30fps clip to 60fps, for example, generally requires the software to generate an intermediate image between each pair of original frames. The goal is smoother motion, not sharper individual frames.
This distinction matters. Interpolation cannot recover a moment that the camera never recorded with complete certainty. Each generated frame is an estimate based on surrounding frames, detected movement, object boundaries, and the model's assumptions about what should exist at the intermediate point in time.
How Does AI Frame Interpolation Work?
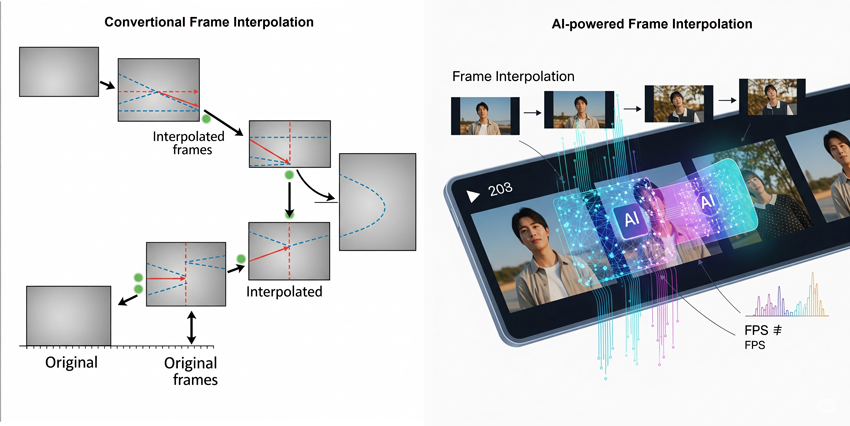
Traditional motion interpolation commonly relies on optical flow, which estimates how pixels or image features move from one frame to the next. The software then warps information from both frames toward an intermediate time and blends or synthesizes the result.
Modern AI models can use additional spatial and temporal context to estimate motion, handle occlusion, and reconstruct regions that are visible in one frame but hidden in another. This can improve difficult areas, but it does not remove the fundamental uncertainty. When movement is very fast, an object changes shape, a foreground subject crosses the background, or the shot changes completely, the model may still create incorrect structures.
Frame Interpolation vs. Frame Blending vs. Frame Sampling
Common Frame Interpolation Artifacts and How to Reduce Them
Higher FPS does not automatically mean a better-looking video. Check the following problems at normal speed and frame by frame before exporting a long clip.
Ghosting or Double Edges
Ghosting appears when the software cannot cleanly separate a moving subject from the background. It is common around arms, legs, vehicles, balls, and objects crossing one another. Try a different model where available, reduce the interpolation multiplier, or cut the problematic section and use frame sampling for a few frames.
Warped Hands, Hair, Text, or Thin Objects
Fine structures can bend, merge, or briefly disappear because their position changes too much between source frames. Preview hands, hair, subtitles, wires, rackets, fences, and spokes at full resolution. A cleaner source, less aggressive slow motion, or a different model may produce a more stable result.
Interpolation Across a Scene Cut
When software mistakes a hard cut for continuous motion, it may create a hybrid frame containing elements from both shots. Increase scene-change sensitivity when the tool provides that control, split the clip at cuts, or disable interpolation for transition frames. Aiarty's Skip Scene Sensitivity is designed specifically to help manage this failure case.
Texture Flicker and Unstable Faces
Generated frames may not preserve the same skin texture, clothing pattern, or background detail from one moment to the next. This is especially noticeable in compressed footage and AI-generated video. Denoising or restoring the source before interpolation can help, but excessive enhancement may also change details, so compare a short sample with and without restoration.
The Soap Opera Effect
Converting 24fps films to 60fps can make camera movement look more immediate and video-like. Some viewers prefer the smoothness; others feel it removes the intended cinematic cadence. Use interpolation selectively rather than assuming every movie, animation, or narrative clip should be converted to the highest available FPS.
Practical rule: Export a 5- to 10-second sample containing the most difficult motion in the video. A successful preview of a static talking head does not prove that the same settings will handle a fast pan, crowd scene, splash, or scene transition.
How to Interpolate Video Frames with Aiarty Video Enhancer
The following workflow lets you convert a low-frame-rate clip to 60fps, 90fps, or 120fps while deciding whether the video also needs enhancement.
Step 1. Import the Video
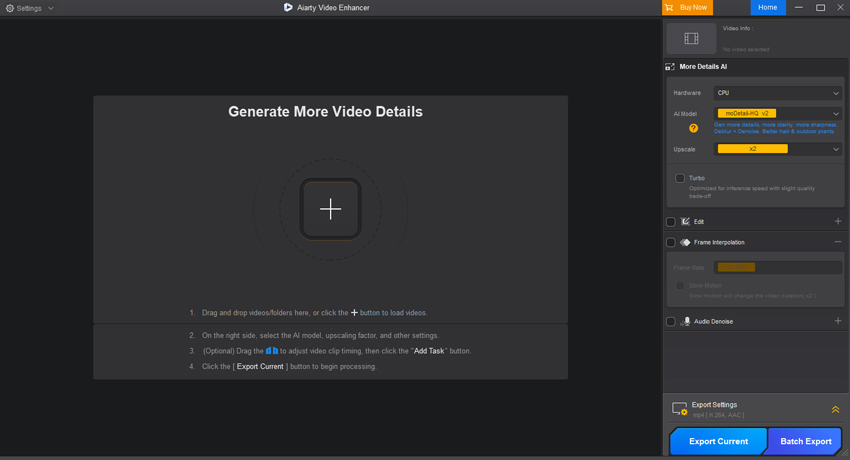
Download and install Aiarty Video Enhancer, then drag one video, multiple files, or an entire folder into the workspace. Select the clip you want to process so that its resolution, duration, and original frame rate appear in the Properties panel.
Step 2. Decide Whether to Enhance the Image
Leave Video Super-Resolution enabled when the footage also needs denoising, deblurring, detail reconstruction, or upscaling. Uncheck it when you want to keep the source resolution and perform only frame interpolation, color adjustment, or audio denoising.
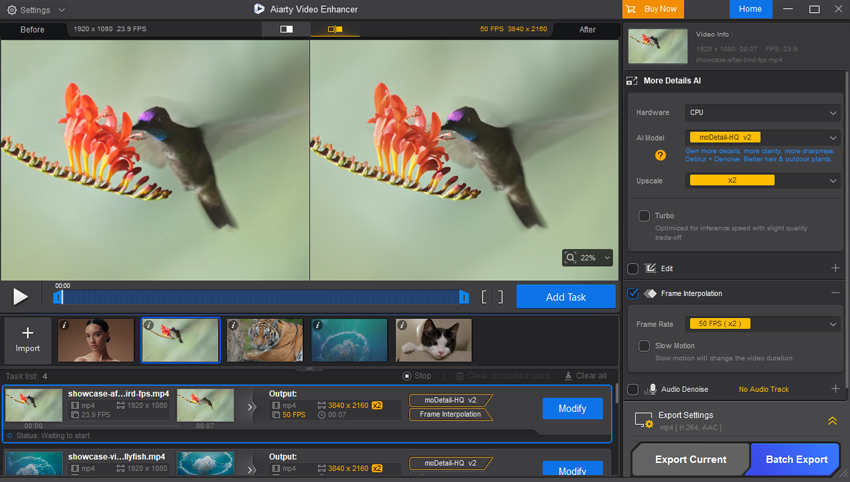
Step 3. Enable Frame Interpolation
Turn on Frame Interpolation and select the target rate. Common choices include 50fps or 60fps for smoother playback and 90fps or 120fps for high-frame-rate delivery or slow-motion workflows. Do not automatically choose the highest setting; compare 60fps and 120fps on the same difficult segment.
Step 4. Check Scene Changes and Preview Difficult Motion
Use Skip Scene Sensitivity to control how the program responds to cuts. Preview or export a short segment containing fast movement, occlusion, fine edges, and a transition. Inspect the result at normal speed and pause on generated frames if anything looks unstable.
Step 5. Select Export Settings
Choose the output format, codec, bitrate, quality, and save location. H.264 is the safest option for broad compatibility. H.265 can deliver smaller files at similar quality when the playback device supports it, while AV1 offers efficient compression but requires newer hardware and software support.
Step 6. Export the Video
Click Export Current to process the selected clip or use the batch workflow for multiple videos. Check the finished file on the actual display or platform where it will be used, since playback compatibility and refresh rate also affect how smooth the result appears.
 FAQs
FAQs
The best option depends on the workflow. Aiarty Video Enhancer is well suited to users who need interpolation plus denoising, deblurring, restoration, or upscaling. Topaz Video offers more AI model choices, Flowframes is a strong free Windows option, DaVinci Resolve Studio is best for professional retiming, and SVP focuses on real-time playback.
Yes. AI or motion-based interpolation can create approximately one intermediate frame between each pair of original 30fps frames. The output will be encoded at 60fps, but the quality of the generated frames depends on motion complexity, compression, blur, scene cuts, and the interpolation model.
No. 60fps can improve sports, gameplay, camera movement, and slow motion, but it may change the intended look of film or animation. Generated frames may also introduce artifacts. Choose the target frame rate based on the content and viewing goal rather than assuming a larger number is always better.
It improves motion smoothness, not necessarily the sharpness or authenticity of each frame. A blurry 30fps video can become a smoother blurry 60fps video unless it is also denoised, deblurred, restored, or upscaled.
Interpolation models must estimate where objects should appear between recorded frames. Fast motion, occlusion, thin structures, heavy motion blur, compression artifacts, and scene changes can make that estimate ambiguous, producing double edges, bending, smearing, or unstable textures.
Frame blending mixes adjacent frames, which may create transparent-looking trails. Frame interpolation estimates motion and synthesizes a new frame at an intermediate time. Interpolation can look smoother, but it is also more computationally demanding and can create geometric artifacts when motion estimation fails.
Yes. The software can generate additional frames and then play them back at a lower speed, creating smoother slow motion than simple frame duplication. The more aggressively the clip is slowed, however, the more generated frames are required and the more visible errors may become.
It can reduce choppy motion, but it may also distort line art, intentional held frames, repeated animation frames, or unstable AI-generated details. Remove duplicate frames when appropriate and test difficult line work, faces, hands, and camera movement before converting the entire video.
Normal frame-rate conversion keeps the duration unchanged and displays more frames each second. Slow-motion mode changes playback speed and therefore increases the duration of the exported clip.
Yes. Uncheck Video Super-Resolution and enable Frame Interpolation. This keeps the original resolution while allowing you to select a higher output frame rate.
You May Also Like


This post was written by Brenda Peng, a seasoned editor at Digiarty Software who specializes in practical photo and video workflows. With AI assistance for brainstorming and drafting, the post is reviewed for accuracy by our expert Abby Poole.
