When you’re crafting cinematic slow motion, fine-tuning a speed-ramped action shot, or simply adjusting clip duration to match your soundtrack, time interpolation in Premiere Pro is what makes those motion transitions look smooth and natural. Without it, slowed-down footage can appear choppy or stuttery, breaking immersion. Premiere Pro’s time interpolation intelligently fills in missing frames or blends existing ones to maintain fluid motion in a vlog, a sports reel, or a short film.
But which is the right interpolation method, Frame Sampling, Frame Blending, or Optical Flow? In this article, we will deeply explore the three core Time Interpolation methods offered by Premiere Pro and their applications.
What Is Time Interpolation in Premiere Pro?
Time Interpolation in Premiere Pro refers to how the software creates or adjusts frames when you change the playback speed of a video clip. For example, when you shoot a video at 30 frames per second (fps) and reduce its speed to 50% (i.e., slow motion), the clip now requires 60 frames to play 1 second, but your source file only has 30 frames. The software must generate 30 brand-new frames. This process of generating new frames in Premiere Pro is called Time Interpolation.
Premiere Pro offers 3 Time Interpolation algorithms to handle this frame generation, each with significant differences in computational intensity and final visual results:
1. Frame Sampling
This is Premiere Pro's default Time Interpolation setting. Frame Sampling matches the new playback speed by simply repeating or skipping existing frames. It repeats certain frames (e.g., playing frame A twice) to slow down a clip and directly skips certain frames (e.g., skipping frame B) to speed up a video.
This time interpolation method offers the fastest rendering speed, requiring minimal CPU load. But the motion can appear stutter or choppy in a slow-down video. It’s best for accelerated footage (fast motion), clips where speed variation quality is not critical, or when your source material already has a very high frame rate (e.g., 120fps).
2. Frame Blending
Frame Blending attempts to create the illusion of motion by blending the pixels of adjacent frames. Instead of generating a brand-new image, it performs a dissolving overlap of existing frames. When a new frame is needed, Premiere Pro composites the preceding and following real frames with semi-transparency.
The motion appears slightly smoother than Frame Sampling but not as smooth as Optical Flow. It can also introduce noiticeable motion blur and ghosting/double-image effect. It’s best for mild slow motion (speeds between 70%−90%), or when your goal is to deliberately create a blurred, dreamy effect.
3. Optical Flow
Optical Flow is the best time interpolation method in Premiere Pro for achieving the highest quality slow motion. It uses complex algorithms to analyze the movement direction and rate of pixels within the scene. Instead of blending or repeating frames, it predicts where objects should be at the missing time point, thereby generating an entirely new transition frame that did not exist in the source material.
Therefore, compared to the other two Premiere Pro time interpolation methods, Optical Flow can transform low frame-rate material (e.g., 24fps or 30fps) into smooth, cinematic slow motion with virtually no stutter. However, this also needs longer rendering time and higher computing resources. In fast, complex movements or near the edges of the frame, Optical Flow can sometimes fail, leading to screen distortion such as warping or the "jello effect."
Also learn: how to adjust clip speed with Rate Stretch in Premiere Pro
Here is a youtube video that shows the differences clearly:
FYI: Premiere Pro Optical Flow VS Frame Blending
As both Optical Flow and Frame Blending can create frames, some users may have trouble identifying the differences between the two time interpolation methods in Premiere Pro. Here is a simple breakdown of how they work and when you should choose one over the other:
Frame Blending
Frame Blending works by merging existing frames together to create intermediate ones. It’s a quick and easy method that doesn’t require much processing power, making it ideal for simple edits or moderate slow-motion effects. However, because it blends frames rather than generating new ones, it can sometimes produce ghosting effects — where two images overlap slightly — especially when the subject or camera is moving fast.
Optical Flow
Optical Flow takes a more advanced approach. It analyzes the motion in your footage and uses that data to generate entirely new frames, resulting in ultra-smooth slow motion. This technique delivers more natural movement and fewer visible artifacts, especially for high-quality or cinematic results. The trade-off is that Optical Flow requires more time to render and may create warping or distortion in complex scenes with fast-moving or overlapping objects.
In short:
- Frame Blending – Faster and lighter; best for quick edits and subtle speed changes.
- Optical Flow – Slower but more accurate; perfect for professional, smooth slow-motion effects.
How to Apply Time Interpolation in Premiere Pro
Now that you understand what Time Interpolation is and how each method (Frame Sampling, Frame Blending, and Optical Flow) works, let’s look at how to actually apply it in Premiere Pro. Just follow the step-by-step guide on how to apply time interpolation in Premiere Pro below.
Step 1. Import Your Footage
Open Premiere Pro and click New Project. In the Project section, right-click on the empty area to import the source video. Then drag the video onto the timeline.
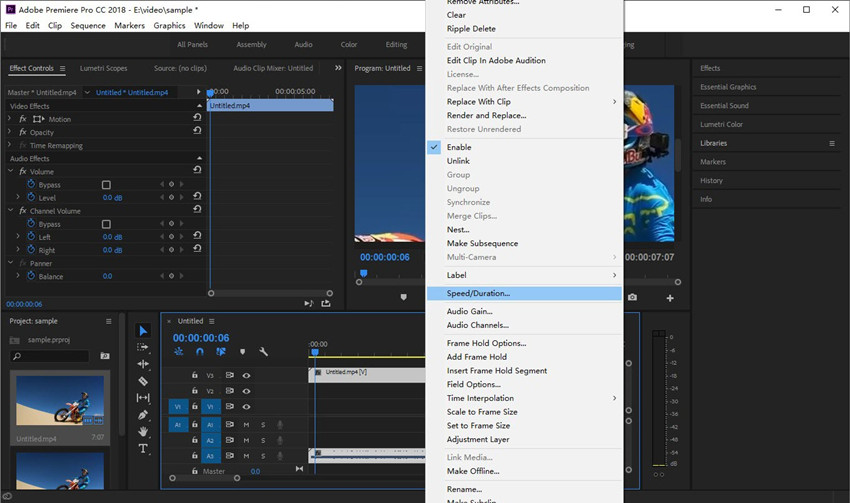
Step 2. Open Time Interpolation in Premiere Pro
With the video in the timeline, right click on the footage in the timeline. From the menu list, find and click Speed/Duration.
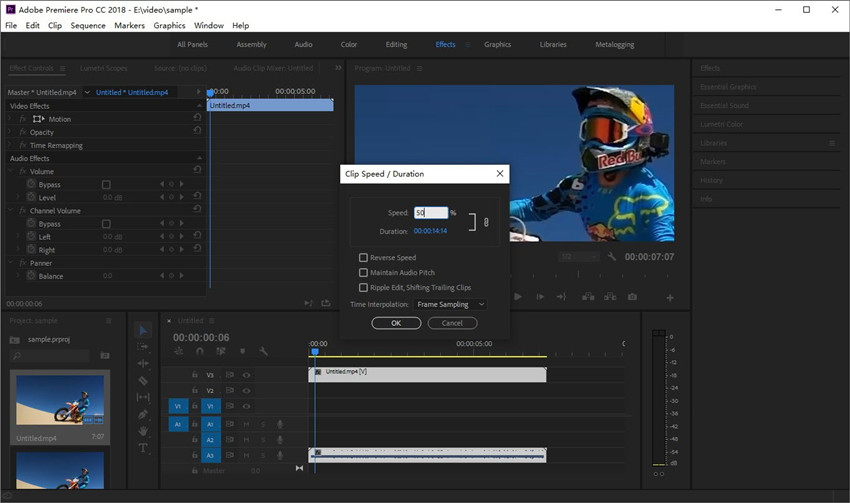
Step 3. Adjust Speed with Speed/Duration
A window will pop up showing the speed settings. First, set the speed percentage value at which you want the video to playback. For example, reduce the speed to around 50% for a balanced slow-motion effect — smooth but still natural. You can experiment with different values depending on your footage.
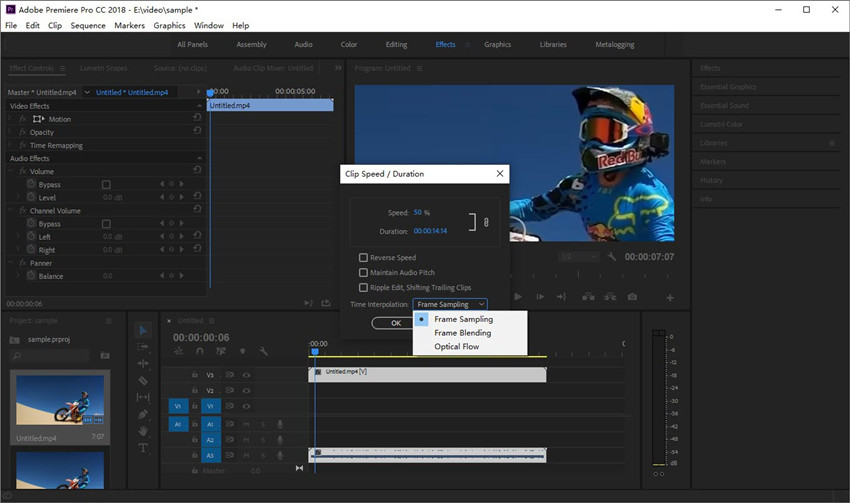
Step 4. Apply Time Interpolation in Premiere Pro
Click the Time Interpolation drop-menu and choose a method. As you can see, there are three time interpolation methods in Premiere Pro:
- Frame Sampling
- Frame Blending
- Optical Flow
To achieve the best slow-motion effect, we choose Optical Flow.
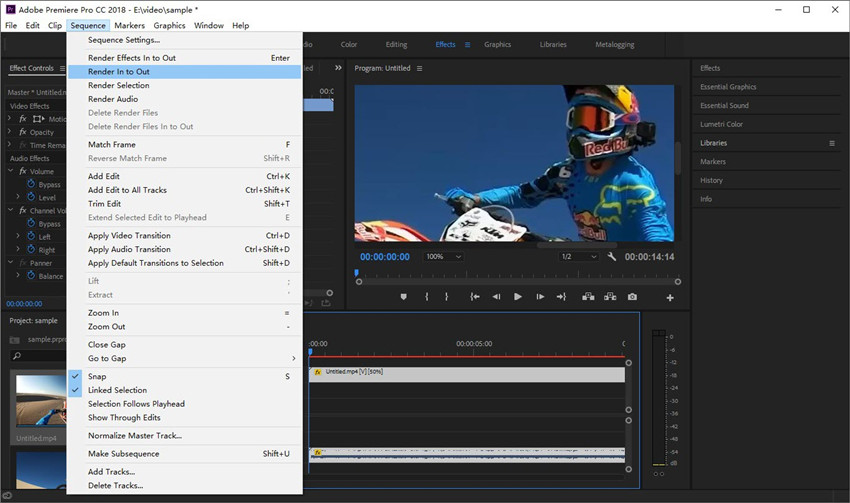
After applying it, your preview might look choppy — don’t panic! This happens because Premiere needs to render the clip to display the interpolated frames. Simply press Enter on your keyboard, or go to the top menu > Clip > Render In to Out. Once rendered, your footage will play back with beautifully smooth, natural motion — no more jerky frames!
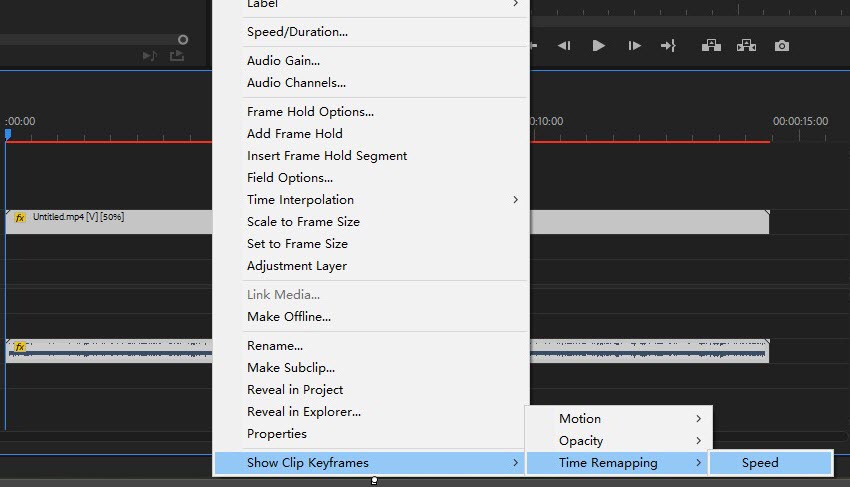
Step 5. Fine-Tune with Time Remapping
If you want more control over where and how speed changes occur, time remapping gives you that flexibility. It works perfectly in combination with time interpolation. Right-click your clip in the timeline. Hover over Show Clip Keyframes >Time Remapping, and click Speed. Then you’ll now see a speed line running across your clip.
To change speed in specific areas, simply hold Ctrl (Windows) or Cmd (Mac), and click to add keyframes on the line. Then drag the line up to speed up, or down to slow down.
Create Even Smoother Slow Motion with AI Interpolation
While Premiere Pro’s built-in time interpolation tools can do a solid job for moderate slow-motion effects, they often struggle when the footage involves complex motion, fast-moving subjects, or overlapping objects. In these cases, you might notice frame warping, distorted motion trails, or ghosting, which can break the realism of your video.
Aiarty Video Enhancer comes to help. Compared to Premiere Pro's time interpolation, Aiarty uses advanced AI to analyze motion patterns and intelligently generate new frames, resulting in ultra-smooth slow motion that looks completely natural:
- Generate new frames to achieve smoother motion transitions for 60fps, 90fps, or even 120fps.
- Eliminate motion artifacts, ghosting, tearing, and other issues caused by traditional interpolation methods.
- Leverages up to 95% of your GPU power, ensuring faster processing and smoother previews.
- Upscale videos to HD/4K, remove noise, blur, pixelated artifacts, enhance details, maintain sharpeness.
Whether you’re creating cinematic slow-motion scenes, restoring old footage, or preparing content for high-frame-rate displays, Aiarty Video Enhancer ensures your motion remains fluid, realistic, and artifact-free.
How to Create Smooth Slow Motion with Premiere Pro's Alternative
Step 1. Open Aiarty Video Enhancer on your computer, and import your choppy or low-FPS video clips into this PR alternative. The program supports all popular formats, so you can easily drag and drop your footage.
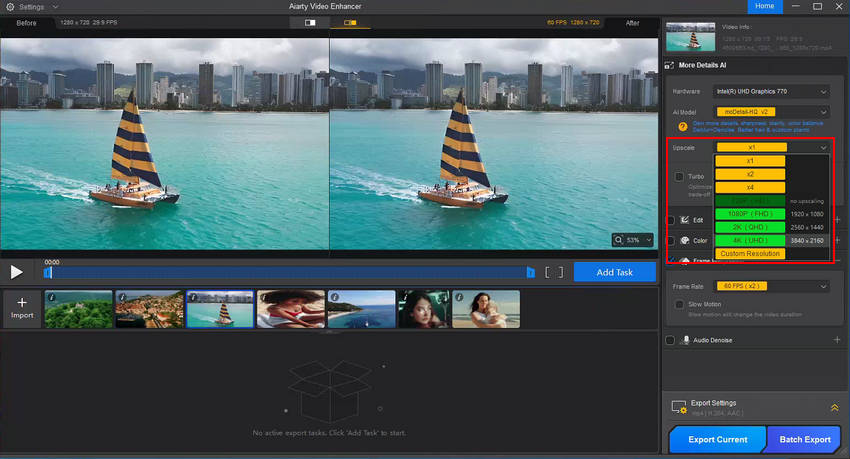
Step 2. Head to the right-side settings panel. If you only want to boost the frame rate without changing the resolution, set the Upscale option to x1 and check the Frame Interpolation box. This activates Aiarty’s intelligent motion analysis engine, an AI-driven alternative to Premiere Pro’s time interpolation feature.
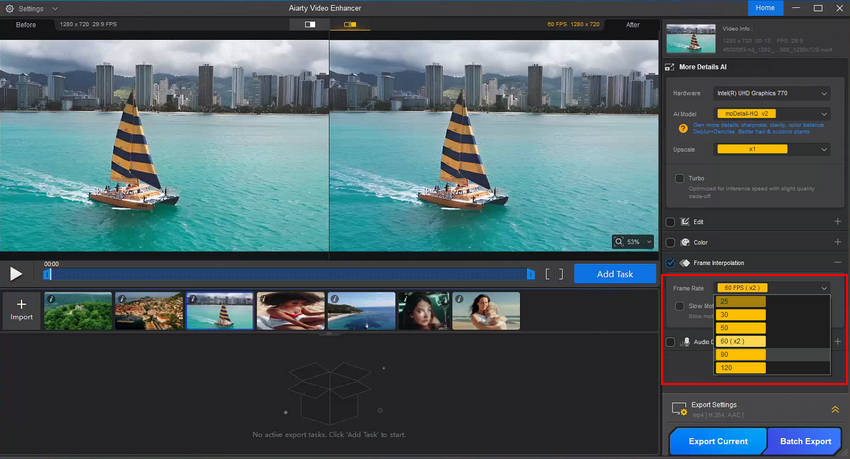
Step 3. Open the Frame Rate dropdown menu and select your desired output, such as x2, 60fps, 90fps, or even 120fps. Aiarty will analyze motion between frames and create new ones for perfectly fluid playback.
Step 4. Once your settings are configured, choose an output folder in the Export Settings. Then click Export Current for a single video, or Batch Export if you’re processing multiple files. Aiarty’s AI interpolation engine will automatically generate new frames and enhance your video’s motion in one go.
Final Thoughts
Mastering Time Interpolation in Premiere Pro is one of the simplest yet most powerful ways to elevate your video editing skills. Whether you’re crafting dramatic slow motion or smoothing out jittery footage, understanding how Frame Sampling, Frame Blending, and Optical Flow work will help you choose the best method for every scene.
However, even with Premiere Pro’s advanced tools, complex motion or low-frame-rate footage can still produce artifacts or ghosting. That’s where AI interpolation tools like Aiarty Video Enhancer shine — generating new frames intelligently for ultra-smooth, lifelike motion up to 120fps, with none of the warping or distortion.
In short, Premiere Pro Time Interpolation gives you creative control, while AI-powered solutions take your slow-motion work to the next level. Combine both, and you’ll be able to produce cinematic, fluid, and visually stunning results that truly stand out.
Besides smooth slow motion, if you also need scene detection, caption generation, auto-editing, and more AI-powered solutions, explore these best AI plugins for Premiere Pro.
 FAQ about Premiere Pro Time Interpolation
It depends on the look you’re after. Frame Blending works by overlapping existing frames to create smoother motion — it’s fast and simple but can sometimes produce a “ghosting” effect when objects move quickly. Optical Flow, on the other hand, uses motion estimation to generate new frames, resulting in much smoother and more natural slow motion. However, it can cause warping or artifacts in scenes with complex movement or fast camera motion.
Among the three options — Frame Sampling, Frame Blending, and Optical Flow — the best choice often depends on your footage and project goals. In short, if your priority is realism and smooth motion, Optical Flow is generally considered the best Time Interpolation method in Premiere Pro.
If Time Remapping isn’t working properly, it’s often due to missing Time Interpolation settings or unrendered effects. Here’s what to check:
- Ensure Time Interpolation is set to Optical Flow or Frame Blending (not Frame Sampling).
- After applying changes, press Enter to render the sequence, so Premiere can properly generate new frames.
- Verify that the speed keyframes are correctly placed and the clip isn’t nested or locked.
If playback still looks choppy, consider exporting the clip or trying an AI-based alternative like Aiarty Video Enhancer, which can automatically interpolate frames up to 120fps with smoother, artifact-free results.
To apply Premiere Pro Time Interpolation, follow these steps:
- Import your video into Premiere Pro and drag it onto the timeline.
- Right-click the clip and choose Speed/Duration.
- Adjust the Speed (%) value to slow down or speed up your clip.
- At the bottom of the dialog box, open the Time Interpolation dropdown.
- Select one of the options — Frame Sampling, Frame Blending, or Optical Flow.
- Click OK, then render your sequence to preview the result.
This method ensures smooth motion transitions when adjusting playback speed. For even more natural motion or extreme frame-rate boosts, you can use AI frame interpolation tools like Aiarty Video Enhancer as a Premiere Pro Time Interpolation alternative.
You May Also Like
This post was written by Ashley Brown, a videographer turned AI explorer. As an associate writer at Digiarty Software, she dives into the latest AI-powered tools for video enhancement and content creation, offering practical insights and unbiased commentary. Accuracy confirmed by Abby Poole.