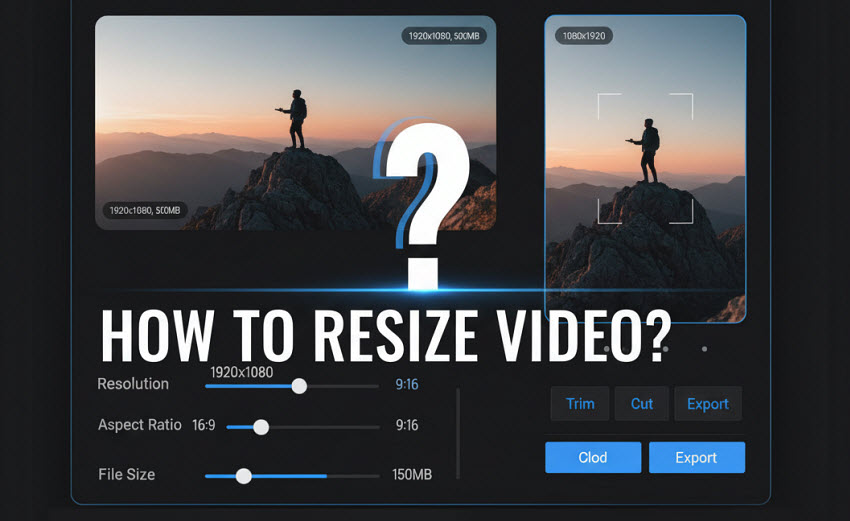
Today, a video is rarely ever "one size fits all." Whether you're fitting footage into TikTok’s 9:16 vertical frame, shrinking bulky iPhone 4K clips so they don’t eat storage or break upload limits, or reframing a widescreen shot for Instagram without awkward black bars or important subjects getting cropped out, you'll inevitably face the need to resize your video. By resizing a video, you can change the video size and dimension, resolution (quality), or file size.
However, how to resize videos without losing quality is the biggest challenge. No worries. In this guide, we are offering a clear, step-by-step breakdown on how to change the size of a video using popular tools.
What Does It Mean to Resize a Video?
When people talk about how to resize video, they usually mean one of two things:
- Changing Video Dimensions: Altering the width and height of the video frame. For instance, converting a widescreen 16:9 clip into a 1:1 square for Instagram or 9:16 vertical for TikTok.
- Changing Video File Size: Reducing how much storage space a video takes up without necessarily changing its dimensions — for uploading to websites with file size limits, saving storage, or faster sharing.
Video Resizing Fundamentals
Before learning how to resize videos, check some key concepts that shape the video resizing process:
- Resolution: The pixel dimensions of your video frame (e.g., 1280x720 for 720p, 1920x1080 for Full HD, 3840x2160 for 4K). Resizing directly manipulates this.
- Aspect Ratio: The proportional relationship between width and height (e.g., 16:9 widescreen, 9:16 portrait, 1:1 square). Resizing videos for social media often means changing the video’s aspect ratio.
- Upscaling vs. Downscaling: Downscaling reduces video file size, and usually keeps good quality. Upscaling enlarges resolution. Without AI-based tools, this often causes blurriness or pixelation.
So we cover all the tips to resize video without losing quality using AI, Premiere Pro, CapCut, or even iPhone.
How to Resize Video without Quality Loss using AI?
Aiarty Video Enhancer is a powerful AI tool that specializes in enhancing and resizing videos with a focus on quality. It's based on advanced AI algorithms to effortlessly change video size and dimensions, scaling your footage to popular resolutions like 720p, 1080p, 2K, and 4K without any quality loss.
Whether you need to fit a video for Instagram, TikTok, YouTube, or any other social destination, Aiarty allows you to easily change video dimensions to standard aspect ratios such as 1:1, 9:16, 16:9, and more. Additionally, it allows you to trim your video clips and reduce the final video for a smaller size by saving in highly efficient codecs like H.265, AV1, and H.264.
How to Resize a Video in Aiarty Video Enhancer
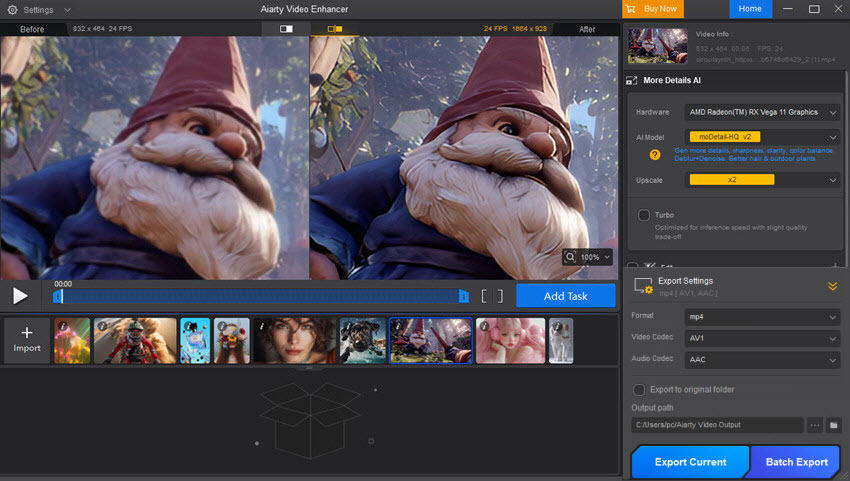
Step 1. Download, install, and open this AI video resizer. Click the Add Video button or simply drag and drop your video file into the program.
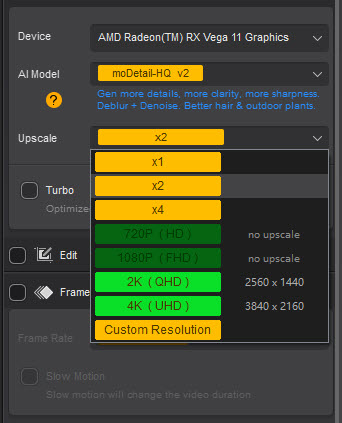
Step 2. Choose an AI model based on the source footage. By default, it chooses the moDetail model, which delivers the best quality for most videos.
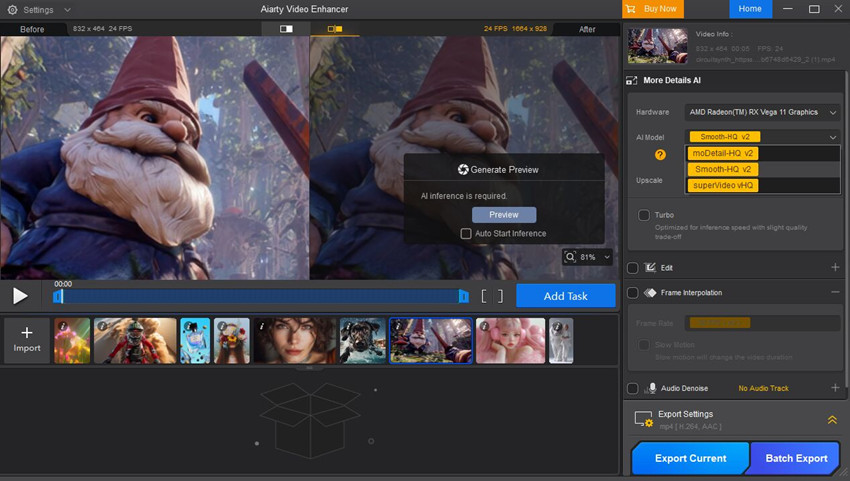
In the Upscale section below, choose if you’d like to resize the video resolution to a higher quality, like 2x or 4x to 4K quality. If you don’t want to resize the video resolution, just choose x1.
Step 3. Next, enable the Edit box and click Adjust Crop. From the Crop dropdown menu, you can change the video dimensions to 1:1, 4:3, 16:9, 9:16, or a custom ratio. You can also stick with the original ratio and change the size of the video to smaller by dragging the selection box on the preview video screen.
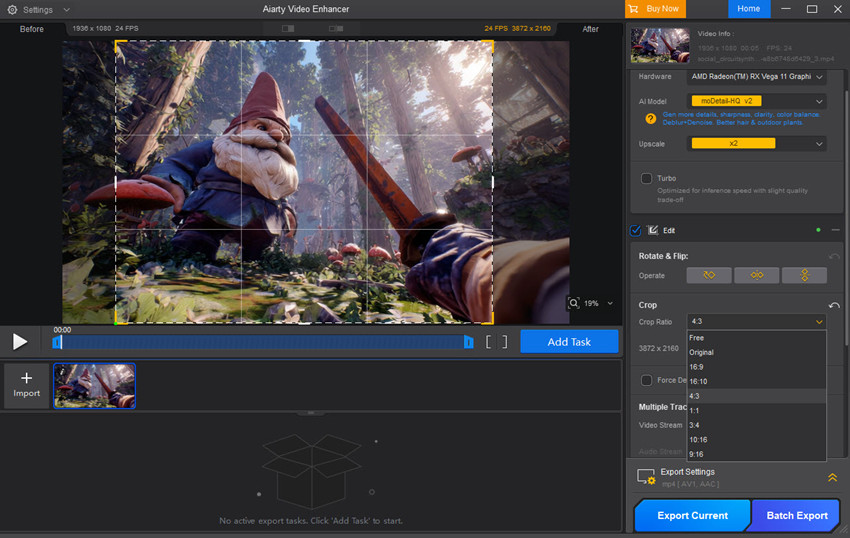
Step 4. You can also reduce the file size by trimming the video. Simply drag the start and end markers to cut out unwanted sections.

Step 5. In the Export Settings, choose to save the output video in a more efficient codec like H.265 or AV1 to further reduce the video size. Then click Export Current or Batch Export. The software will use your GPU to process the video for fast speed. Once complete, you will have a high-quality video with the new dimensions.
How to Resize a Video in Premiere Pro in Different Ways?
Premiere Pro remains one of the most powerful tools for video resizing without losing quality. Whether you want to change the size of the video, adjust the video dimensions for Instagram, YouTube, TikTok, resize the resolutions, or reduce the file size, Premiere Pro has a solution for you. It offers precise control over both aspect ratio and resolution settings. Just follow the guide below:
Method 1: Changing the Sequence Dimensions
This is the most common way to change the size of a video in Premiere Pro. It involves setting the dimensions for your entire project.
Step 1. With your sequence active, go to Sequence in the top menu and select Sequence Settings.
Step 2. In the dialog box, find the Frame Size section. Here, you can change the width and height to your desired dimensions. For example, change video size from 1920 x 1080 to 1080 x 1920 for a vertical video.
Step 3. Click OK. Premiere Pro will warn you that this action cannot be undone. Click OK again. Your timeline will now have the new dimensions, and your video clips will be resized to fit.

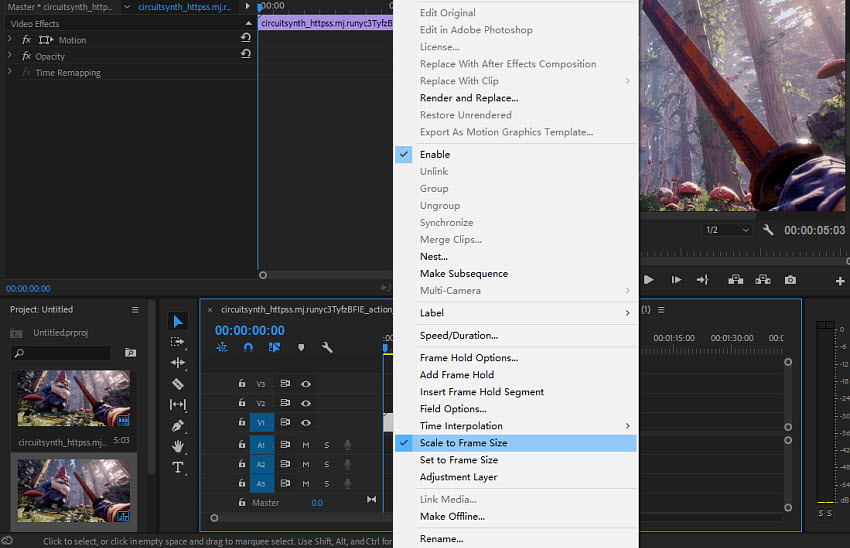
Method 2: Scaling a Video Clip
If your sequence dimensions are already set and you just need to resize a single video clip to fit, you can use the Scale property.
Step 1. Click on the video clip in your timeline that you want to resize.
Step 2. Right-click on the video in the timeline. Then choose Set to Frame Size or Scale to Frame Size to resize the video.
Step 3. You can also manually scale by clicking the Effect Controls panel (Window > Effect Controls). Under the Motion section, find the Scale property.
Method 3: Change Videos to New Dimensions
You can also change video dimensions during the final export. This is useful for creating multiple versions of a video from a single project file.
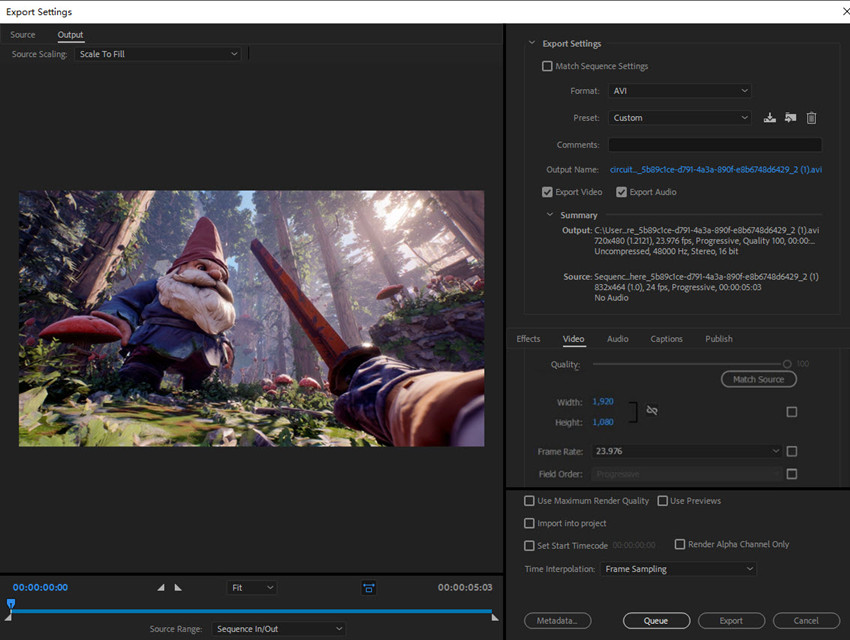
Step 1. With your sequence active, go to File > Export > Media.
Step 2. In the Export Settings window, click on the Source tab to see your original video and the Output tab to see your final render. Under the Video tab, find the Basic Video Settings and uncheck the box next to Match Source. You can now manually enter the new width and height.
Step 3. Select your format and preset, then click Export.
How to Resize Video in CapCut for Free?
If you prefer editing on mobile or need a fast, social-media-ready workflow, CapCut is one of the best free video resizer for creators. It’s especially popular among TikTok and Instagram users thanks to its built-in aspect ratio presets, quick export options, and easy drag-and-drop timeline. Learning how to resize video free in CapCut is straightforward — whether you want to crop, change resolution, or reframe for vertical, square, or widescreen formats, CapCut provides ready-made tools to get it done in just a few taps.
Related: how to resize an MP4 video without quality loss
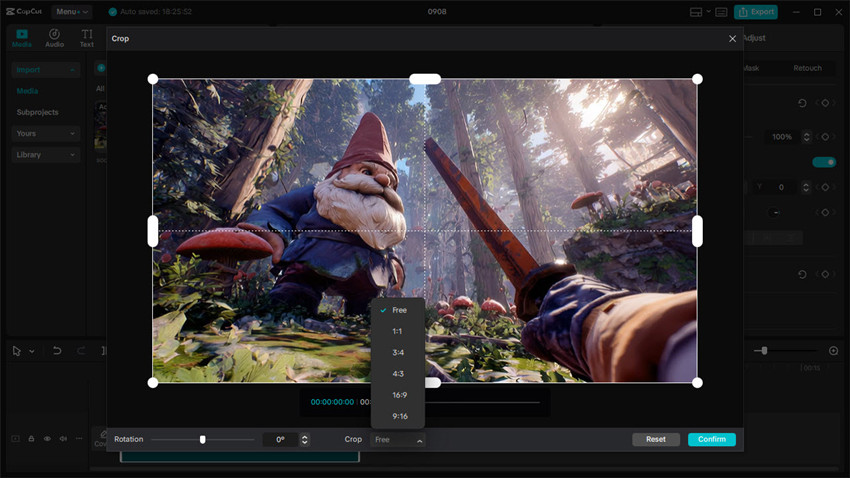
Step 1. Open CapCut on iPhone, Android, or your desktop. Load in your source video. Then drag the video to the timeline.
Step 2. Click the Crop button on the menu bar on the top of the timeline, it will then open a window to let you change the video dimensions. You can choose an aspect ratio and drag the selection box to resize the video. Once finished, click Confirm.
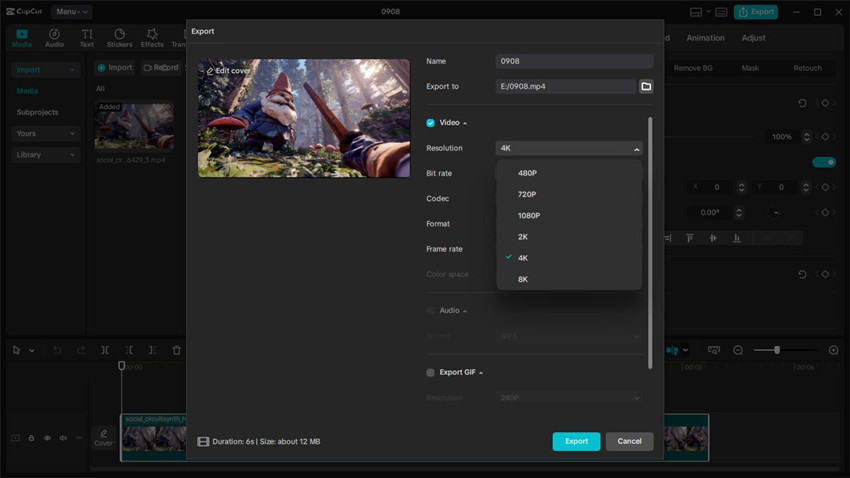
Step 3. Next, click Export. In the output settings, you can resize video resolution free to HD, 2K, 4K, and 8K. Note that the Capcut video upscaler doesn't use AI so if you resize your video to a very high resolution, it may result in artifacts. Or you can choose a lower resolution here, it can also help resize the video file size to smaller.
How to Resize a Video on iPhone/Android Easily?
Sometimes you just need to resize a couple of videos on your iPhone/Android and don't want to transfer them to desktop. How do I resize a video on my iPhone? Here are different ways to resize videos directly on your iPhone/Android. Check methods below:
Method 1: Using iMovie (Free on iPhone)
For a more robust and professional approach to video resizing on iPhone, use Apple's pre-installed iMovie. This app is more than just a quick editor; it allows you to change the video size/dimensions, and reduce the video size on iPhone.
Step 1. Open the iMovie app on your iPhone.
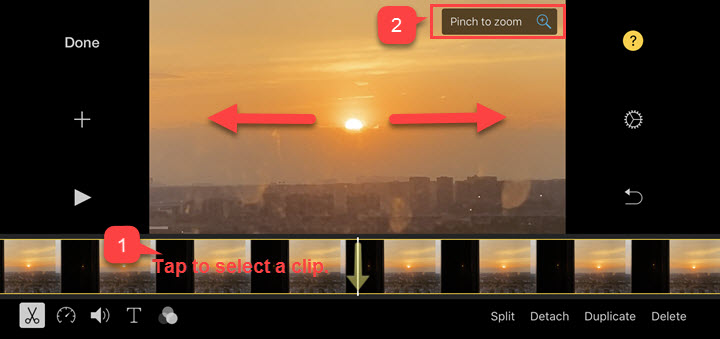
Step 2. Tap Create Project > Movie. From your camera roll, select the video you wish to resize and tap Create Movie at the bottom of the screen.
Step 3. Pinch and zoom the video clip on the preview screen to adjust its size. Since iMovie doesn't have a direct "aspect ratio" button, this is your main way to resize the video frame to fit a vertical or square format.
Step 4. You can also trim the video to reduce the video size on iPhone. Then, tap the share icon at the bottom of the screen and choose Save Video to export. You can now select your preferred export resolution, such as 720p, 1080p, or even 4K.
Method 2: Using Photos App (Quick Resize)
Sometimes, you don't need a full-blown video editor. If all you need is a quick and simple way to change your video's dimensions, the built-in Photos app is the most efficient method. It’s perfect for basic cropping to prepare a video for social media without having to download a separate app.
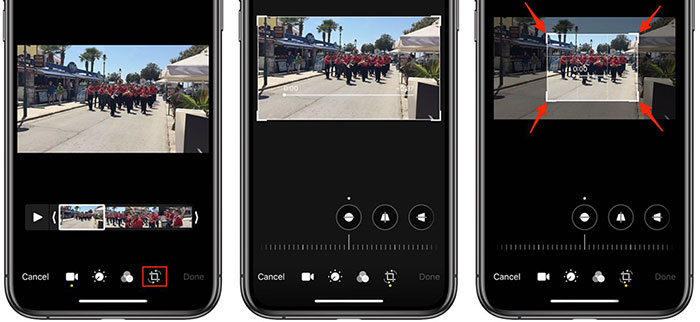
Step 1. Open the video you want to resize in the Photos app. Tap Edit at the top of the screen.
Step 2. In the editing menu, tap the Crop & Rotate tool at the bottom (the icon with a box and arrows).
Step 3. Tap the aspect ratio icon in the top right corner. You can now resize video to 16:9, 9:16, or 1:1 as you need. You can also drag the corners of the frame manually change the video dimensions.
Step 4. When you're happy with the result, tap Done. Then, tap Save Video to overwrite the original, or Save Video as New Clip to keep both versions.
Method 3: Using Third-Party Apps
If you need to resize videos on iPhone/Android for Instagram Stories, TikTok, or Snapchat, the Photos app alone may not be enough. Apps like Video Compress, InShot, or CapCut allow resizing with more flexibility, including changing resolution and aspect ratio.
How to Resize Video Online Free without Watermarks?
Among other ways to resize videos, there are also various online video resizers available for free. These free video resizers online are perfect for quick, simple tasks without needing to download any software. They allow you to easily change a video's dimensions, aspect ratio, resolution, and even its file size. Popular options include Adobe Express, Clideo, Canva, Kapwing, Ezgif, and more. Below we will show you how to resize videos free online without wattermarks using Adobe Express'ls free video resizer.
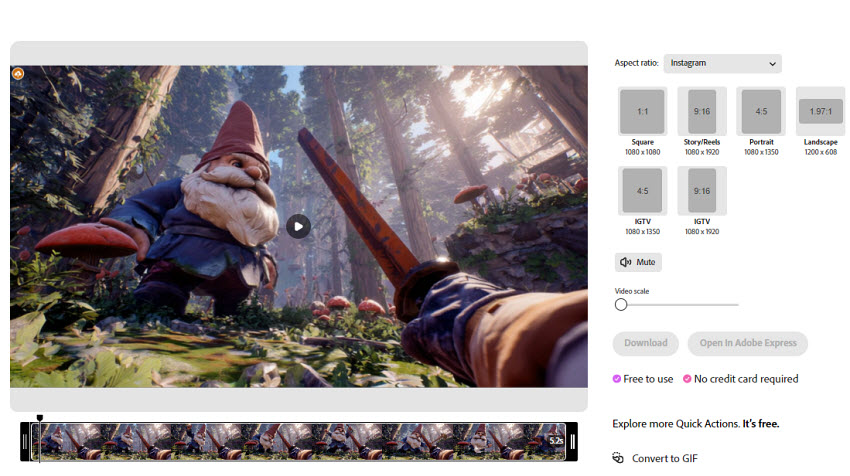
Step 1. Open the size and click Upload your video.
Step 2. In the browser, you'll be given options to choose a new aspect ratio (e.g., from 16:9 to 9:16 for a vertical video) and select presets for social media platforms like TikTok, Instagram, or YouTube.
Step 3. It also lets you to trim the video length to reduce the video size. Then click Download to save the resized video to your local computer.
Final Thoughts
Resizing videos doesn’t have to be complicated — the key is choosing the right method for your needs. If your goal is to resize videos without losing quality, AI-powered tools like Aiarty Video Enhancer provide intelligent upscaling and downscaling that preserve sharpness and detail. For professional workflows, Premiere Pro gives you precise control over resolution, aspect ratio, and export settings. If you’re editing on the go, apps like CapCut and the iPhone Photos/iMovie tools make resizing fast and beginner-friendly, while online free video editors are perfect for quick, no-install adjustments.
No matter if you’re preparing content for TikTok, Instagram, YouTube, or cloud storage, understanding the difference between changing dimensions and compressing file size ensures you always get the best results. With the step-by-step methods in this guide, you now have multiple ways to resize videos easily — whether you’re a casual user or a professional creator.
 FAQs
FAQs
The two main ways to change a video's file size are by changing its resolution or by compressing it. You can reduce the resolution (e.g., from 4K to 1080p) or use more efficient video codecs like H.265 or AV1 to reduce the file size without changing the dimensions.
Yes. If you need to change a video's aspect ratio without cutting anything out, you can resize the frame and add a background to fill the empty space. This is often done by adding black bars or a blurred background on a new canvas.
To reduce a large video file, you should either downscale its resolution (e.g., from 1080p to 720p) or re-export it with a lower bitrate or a more efficient compression format.
You can resize a video on an iPhone using a few methods. For simple adjustments, the Photos app allows you to crop and change the aspect ratio. For more control, you can use the free iMovie app to manually adjust the video's size and export at a different resolution.
On Android, you can use the built-in Google Photos app for basic editing like cropping. For more versatile resizing and a full range of aspect ratios, a free app like CapCut is a popular and effective choice.
You May Also Like
This post was written by Ashley Brown, a videographer turned AI explorer. As an associate writer at Digiarty Software, she dives into the latest AI-powered tools for video enhancement and content creation, offering practical insights and unbiased commentary. Accuracy confirmed by Abby Poole.