

How to Fix Blurry Face in A Photo with Natural, Faithful Details



A blurry face doesn't always mean a photo is beyond saving. Whether the blur comes from missed focus, motion, low resolution, heavy compression, or an old photo scan, AI can help restore clearer, more natural-looking facial details.
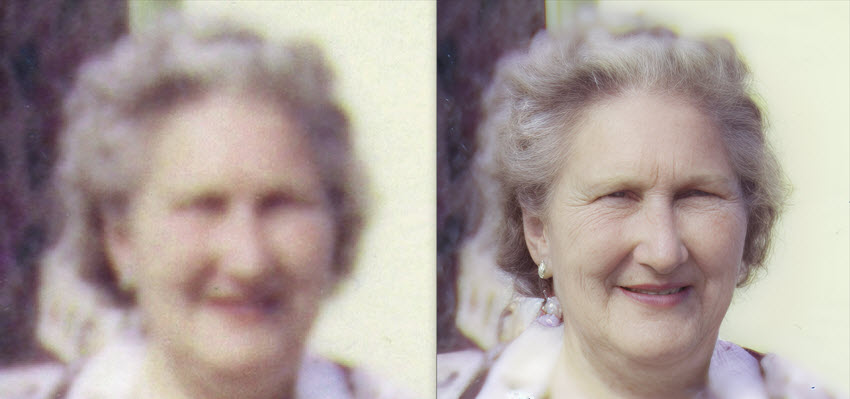
Fixing a blurry face isn't simply about adding sharpness. Traditional sharpening can make edges look harder without actually restoring lost facial details. AI face restoration takes a different approach by analyzing facial features and image information to reconstruct details around the eyes, eyebrows, skin, hair, and facial contours while preserving the original appearance.
Here we'll show you how to fix a blurry face in a photo with AI using Aiarty Image Enhancer's Face Restoration feature. We'll include details steps and real examples to show you how to restore natural and crisp faces in pictures easily.
Aiarty Image Enhancer Fixes Blurry Faces in Photos Naturally
Aiarty Image Enhancer combines AI Face Restoration, upscaling, denoising, and color correction to help fix a blurry face in a photo while preserving natural-looking facial details.
Its Face Restoration is the key feature for fixing blurry faces in photos. It identifies facial areas and enhances details around the eyes, eyebrows, lips, hair, and facial contours. Instead of simply sharpening the entire image, Aiarty focuses on facial details to make a blurry face in a photo clearer while keeping the person recognizable and natural-looking.
You can also adjust the restoration strength to control how much detail is added. Start with a moderate setting, compare the result with the original, and fine-tune the strength to achieve clearer facial details without over-processing the face.
Other features that help fix blurry faces in pictures:
- When a blurry face is caused by low resolution or heavy cropping, AI upscaling can increase image size while recovering more visible facial detail. Aiarty supports up to 8× upscaling to 32K.
- For noisy or low-light photos, AI Denoising can reduce grain and color noise, making facial details clearer. Color Correction can also improve faded, dark, or low-contrast portraits so restored details are easier to see.
- For old or damaged photographs, AI Eraser can also remove dust, scratches, stains, and other unwanted elements for cleaner results.
How to Fix a Blurry Face in a Photo with Aiarty
Fixing a blurry face in a picture with Aiarty is simple and straightforward. Follow these steps to restore clearer, more natural-looking facial details.
Step 1. Import the Blurry Photo
Launch Aiarty Image Enhancer on your Windows or Mac computer and import the photos that contain the blurry faces you want to fix. You can work with common image formats as well as supported RAW file.
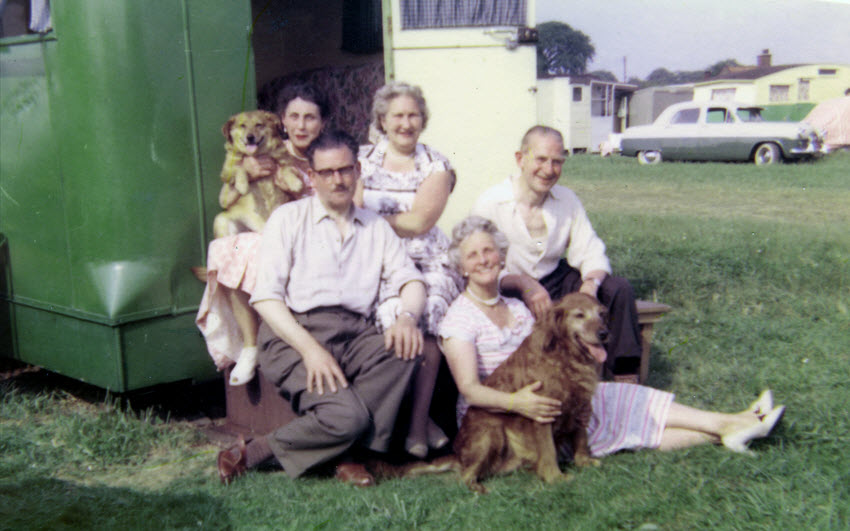
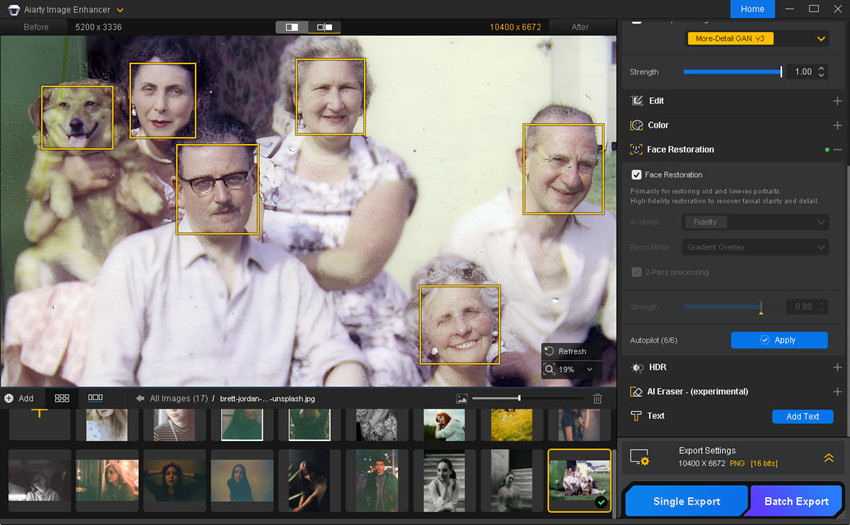
For this example, we're using a 5,200 × 3,336 scanned old photo. As you can see, all the faces are blurry, making their facial features and details difficult to distinguish. We'll use Aiarty to restore the faces and see how much facial detail we can recover.
Step 2. Choose an AI Model
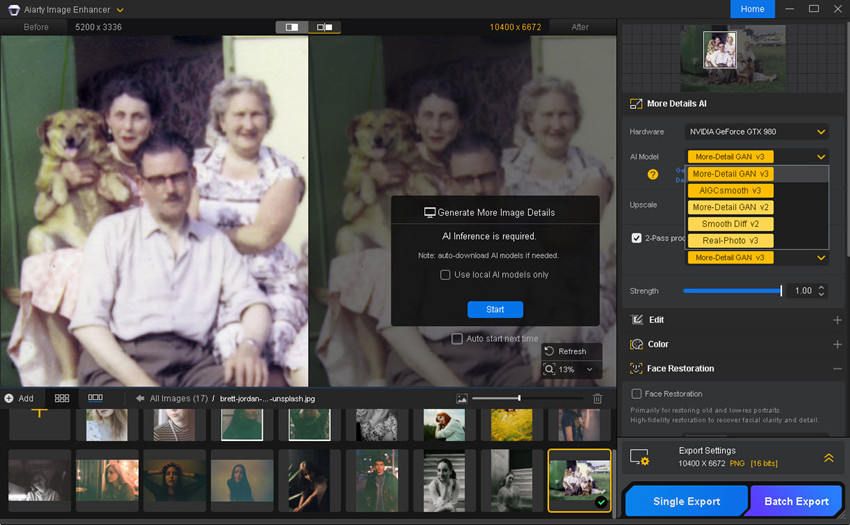
Select an AI model based on the type of image you're working with. For most portraits where you want to restore blurry faces and recover fine details, More-Detail GAN v3 is a useful model to try. You can also compare it with Real-Photo when you want to see whether a more photographic-looking result works better for your particular image.
There isn't one universally correct model. The best choice depends on how blurry, noisy, compressed, or detailed the original image is.
Step 3. Choose an Upscaling Option
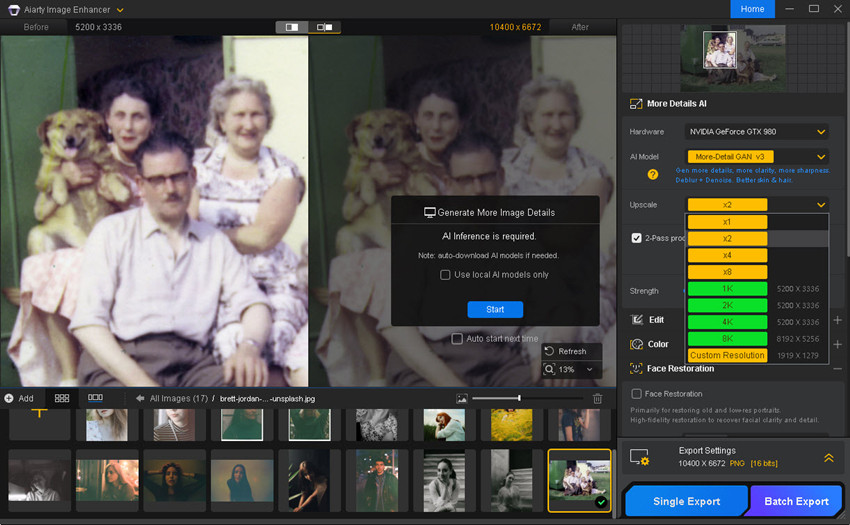
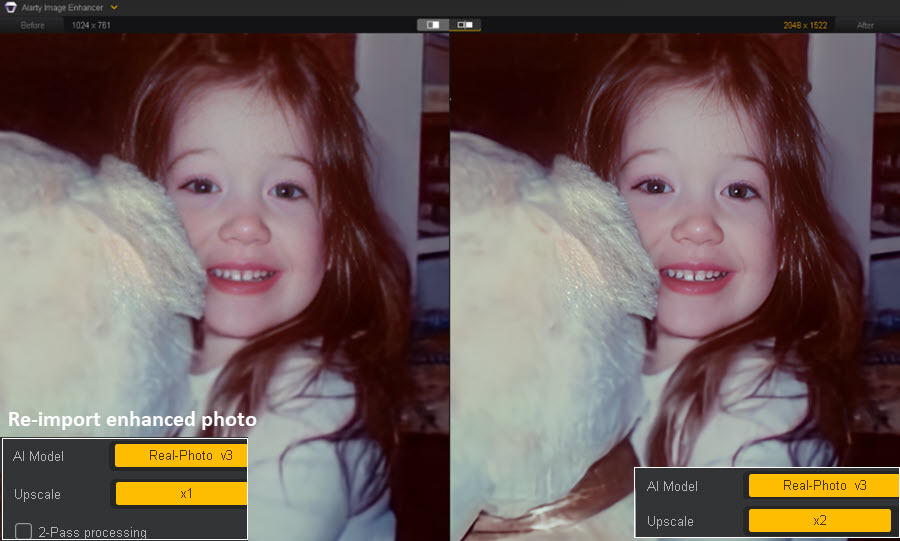
If the photo is small or heavily cropped, choose an appropriate enlargement level to help make the blurry face clearer. 2× is a good starting point for many portraits. If you only need to fix the blurry face in a photo without changing the resolution, just choose 1× upscaling.
If you need a much larger image, consider exporting the first result and performing another 2× enlargement rather than immediately pushing the image to the maximum scale.
Step 4. Enable Face Restoration
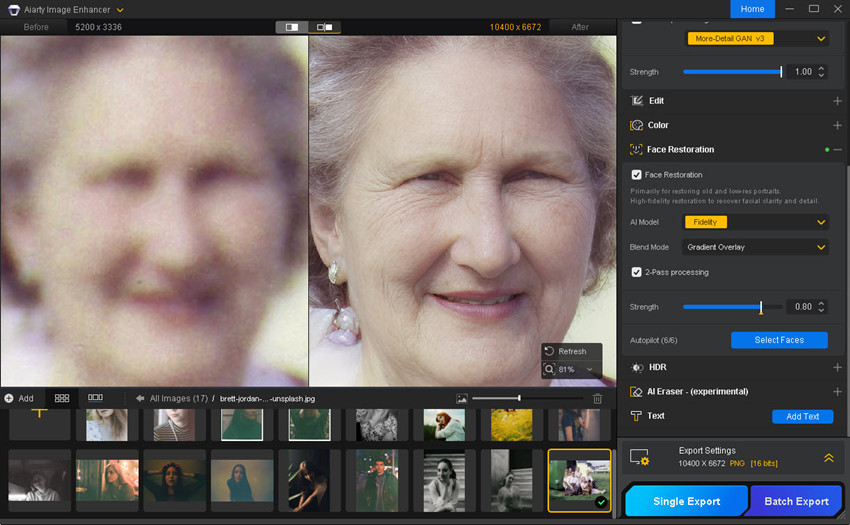
Turn on Face Restoration. This is the most important step when your goal is to fix a blurry face in photograph. You can adjust the following settings (or just leave them as default):
- To keep fixed faces closer to the person's original appearance, select the Fidelity model.
- Don't automatically choose the strongest setting. Start around 0.7–0.8 and compare the result with the original. If the face still looks too soft, gradually increase the strength.
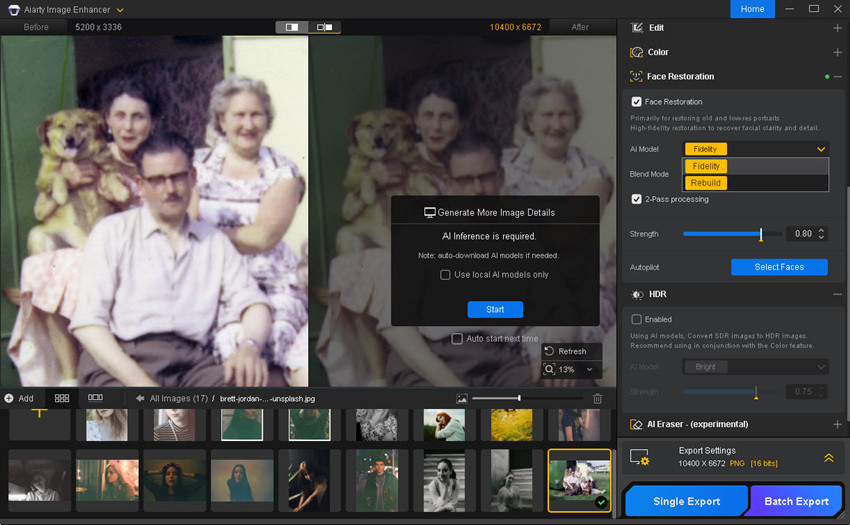
If the photo contains multiple faces and you just want to fix a single blurry face, you can choose which face to enhance separately. Enable Select Faces and select the face you want to restore, giving you more precise control and helping achieve natural-looking results in group photos.
Step 5. Apply Additional Enhancements
After restoring the faces, make any additional adjustments needed to improve the face. For an old blurry photo, use Color Correction to restore faded colors and improve brightness or contrast. You can also use AI Eraser to remove scratches, dust, spots, and other marks from the old photograph.
For portraits with minor facial imperfections, such as blemishes or unwanted spots, AI Eraser can also help clean up the face while keeping the restored details natural.
Step 6. Preview at 100% and Export
Before exporting, inspect the restored face at 100% zoom. Check the eyes, eyebrows, skin, hair, and facial contours to make sure the details look clear and natural.
When you're satisfied with the result, export the enhanced photo. If you plan to print the restored photo, you can also choose the appropriate DPI setting during export to prepare the image for printing.
You have now completed the basic workflow for how to fix a blurry face in a photo and restore clearer, more natural facial details.
Recommended Settings for Fixing Blurry Faces
The best settings depend on why the face looks blurry and the condition of the original photo. Use these recommendations as a starting point and adjust them based on the result:
- For a typical blurry portrait: Start with More-Detail GAN v3 + Face Restoration + Fidelity Model, with Strength around 0.7–0.8.
- For a small or heavily cropped photo: Use 2× Upscaling together with Face Restoration to increase resolution and recover more visible facial detail.
- For a very small image: Consider processing it at 2× first and then 2× again if you need a larger output, rather than applying the maximum enlargement in one step.
- For an old blurry photo: Use Color Correction to improve faded colors and contrast, and AI Eraser to remove scratches, dust, spots, and other damage.
- For a group photo: Use Select Faces to restore only the faces that need enhancement instead of applying Face Restoration equally to everyone.
If the restored face looks too strong or differs noticeably from the original, reduce the Strength and compare the result again at 100% zoom. The goal is to recover clearer facial details while keeping the person's appearance natural and recognizable.
Before and After: Real Examples of Fixing Blurry Faces
The best way to see how AI face restoration works is to compare the original and enhanced images at 100% zoom. These examples show how Aiarty Image Enhancer can fix blurry faces in different photos while preserving natural facial details.
Example 1. Fixing a Soft and Blurry Face
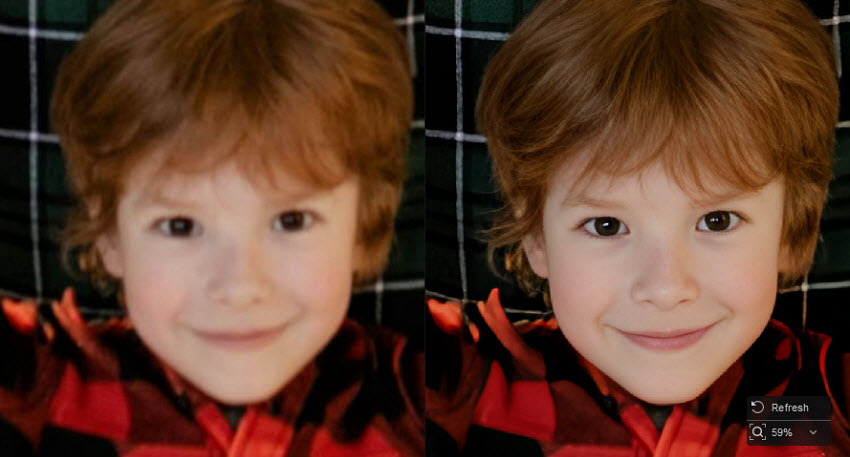
This is a 3,087 × 4,630 high-resolution photo, but the boy's face looks soft and blurry when viewed up close, with fine facial details becoming difficult to see.
To fix the blurry face in the photo , we applied 2× upscaling and Face Restoration using the Real-Photo model. The result makes the boy's facial features and hair noticeably clearer and more defined, helping restore lost facial details while keeping his overall appearance natural.
- Before: The boy's face looks soft and blurry when zoomed in, with limited visible facial detail.
- After: Clearer facial features and crisp hair details, with a natural-looking result that preserves the person's original appearance.
Example 2. Fixing a Blurry Face in a Low-Resolution Photo
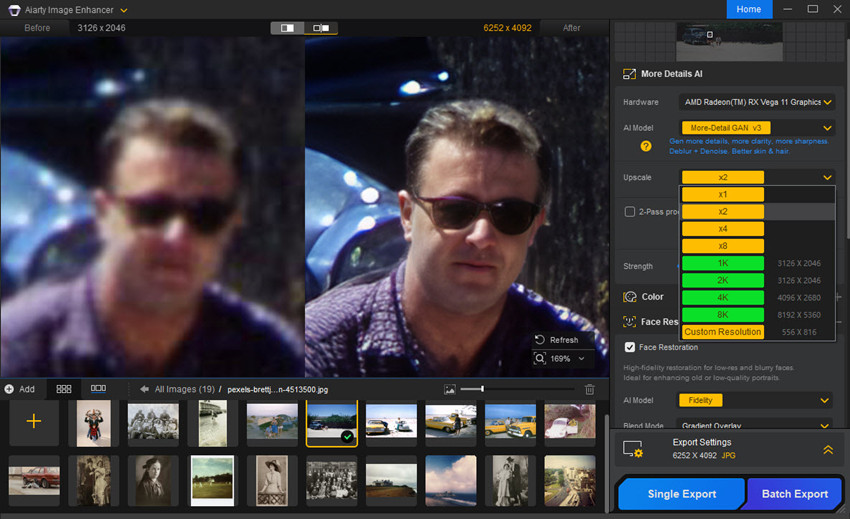
This is a 3,126 × 2,046 old photo in which the people appear relatively small. When zoomed in, their faces are extremely blurry, with facial features and details barely visible.
To restore the blurry faces in this picture, we used 2× upscaling, More-Detail GAN v3, and Face Restoration. The result makes the faces noticeably clearer and brings back more visible facial features while maintaining a natural appearance that stays close to the original characteristics of the people.
Also learn: how to restore old photos >>
- Before: Small subjects with severely blurry faces and barely distinguishable facial features.
- After: Clearer facial features with restored details and a natural result that remains close to the people's original appearance.
Example 3. Restoring a Blurry Face in a Noisy Photo
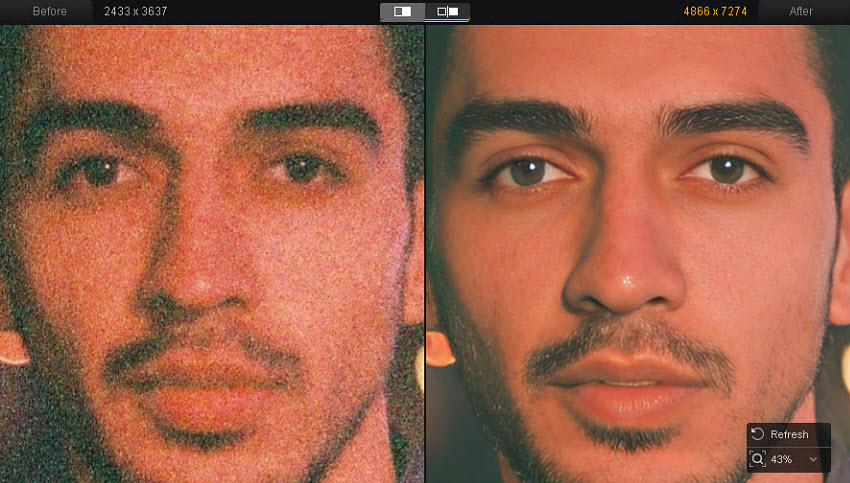
In this example, severe image noise makes the faces look blurry and obscures many of the original facial details. The challenge is not only to make the blurry faces clearer, but also to preserve the natural details that are still present in the original image.
After applying Aiarty's AI enhancement and Face Restoration, the faces become noticeably clearer while retaining important details such as individual hairs and natural facial texture. The result restores facial clarity without unnecessarily removing or altering the details that make the person look like themselves.
- Before: Severe noise makes the faces blurry and obscures fine details such as hair and facial texture.
- After: Clearer facial features with natural hair and facial texture preserved, while maintaining the person's original appearance.
Final Words
Fixing a blurry face in a photo is not just about making the image sharper. The goal is to restore facial details while keeping the person recognizable and the result natural.
As the examples above show, the right approach depends on what caused the blur. Face Restoration can help recover facial features, while AI upscaling is useful for small or low-resolution faces, and denoising and color correction can further improve clarity when noise, poor lighting, or fading are involved. Using a moderate restoration strength and checking the result at 100% can help avoid over-processing.
If you're looking for a simple way to fix a blurry face in a photo, restore lost facial details, or make an old or low-resolution portrait clearer, Aiarty Image Enhancer gives you the tools to enhance faces while preserving a natural, recognizable appearance.
 FAQ
FAQ
It can help preserve the person's original appearance, but no AI restoration can guarantee that every reconstructed detail is exactly the same as the original. The more information the original photo retains, the easier it is for the model to stay close to the person's actual features. For heavily blurred faces, compare the restored eyes, nose, mouth, face shape, and other distinctive features with the original and avoid overly aggressive restoration.
Avoid relying on aggressive sharpening or maximum restoration strength. Use a face restoration model with a moderate strength, compare the result with the original, and inspect the face at 100% zoom. The goal should be to recover clearer facial details while retaining natural skin texture, hair, and facial proportions rather than creating an unnaturally perfect face.
Yes, AI can make many blurry faces clearer by restoring or reconstructing visible facial details. It works particularly well when the original image still contains some information about the eyes, eyebrows, hair, skin, and facial contours. However, if a face is extremely blurred, heavily compressed, or only a few pixels in size, some details may need to be reconstructed rather than truly recovered.
Yes. If the face is small because the original photo has low resolution or has been heavily cropped, AI upscaling can increase the image size and provide more pixels for facial restoration. A moderate 2× upscale is a good starting point for many photos. However, upscaling cannot recover information that was completely lost, so extremely small or severely degraded faces may still have limited detail.
When important facial details are missing, AI has to estimate what those details might look like. This can sometimes change the eyes, facial shape, skin texture, expression, or other identity-related features. This is why a result can look sharper while still being less faithful to the original person. For important portraits, compare the restored image with the original and choose the least aggressive result that provides the clarity you need.
You May Also Like


This post was written by Brenda Peng who is a seasoned editor at Digiarty Software who loves turning ordinary photos into extraordinary works of art. With AI assistance for brainstorming and drafting, the post is reviewed for accuracy by our expert Abby Poole for her expertise in this field.
