


Skin smoothing in Photoshop is not simply about blurring away wrinkles, pores, and blemishes. Done too aggressively, it can flatten the skin's natural texture and make a portrait look artificial. The goal is to reduce distracting imperfections while keeping pores, fine texture, highlights, shadows, and facial contours intact when editing portraits with Photoshop.
In this guide, we'll walk through ways to smooth skin in Photoshop, from quick and simple approaches to more controlled, non-destructive techniques.
For the quick way, go to the Discover Panel (Cmd/Ctrl + F) in Photoshop, and find Browse > Quick Actions > Smooth skin. Depending on your Photoshop version, you may find it as Skin Smoothing filters, or your program may not support this feature.
For manual steps, follow the detail instructions below.
High Pass Frequency-Based Skin Smoothing in Photoshop
This method creates a frequency-based skin-smoothing effect. Instead of simply blurring the skin, the technique separates the fine texture from the broader tones of the image and softens the unwanted texture while preserving the underlying facial structure.
The basic idea is to invert the duplicated layer and blend it with the original using Vivid Light, then use High Pass and Gaussian Blur to control the scale and amount of detail being smoothed. A black layer mask is then used to hide the effect initially, allowing you to paint the smoothing selectively onto areas of skin while keeping important details such as the eyes, lips, hair, and facial contours sharp.
Step 1. Prepare the layer for non-destructive editing.
Select your background layer and duplicate it by pressing Ctrl/Cmd + J.
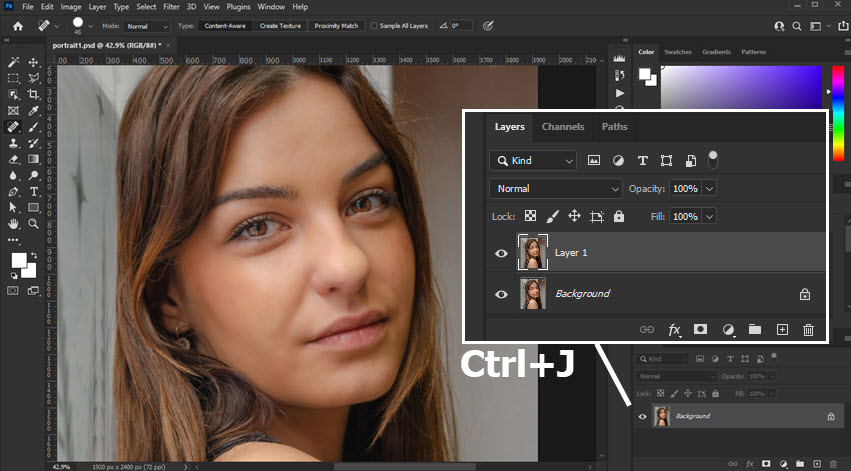
Step 2. Invert the duplicated layer.
While the duplicated layer is selected by default, now press Ctrl+I to invert the layer.
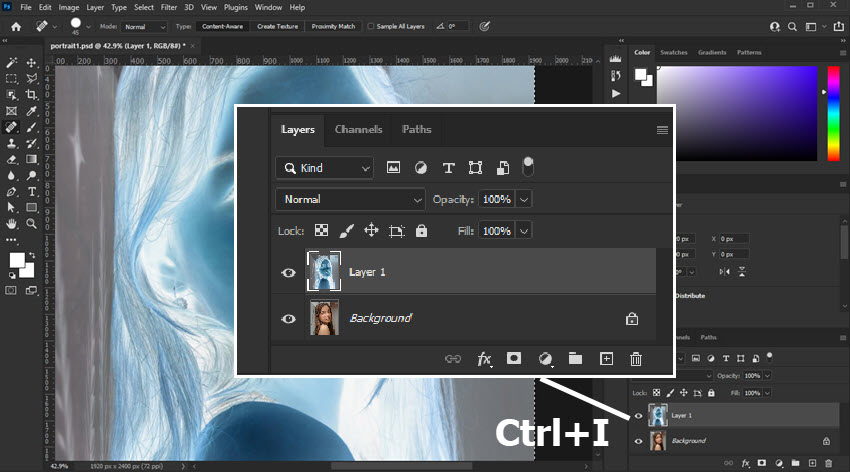
Step 3. Conver to smart object.
Right click on the thumbnail of the layer, and choose "Convert to Smart Object" in the context menu.
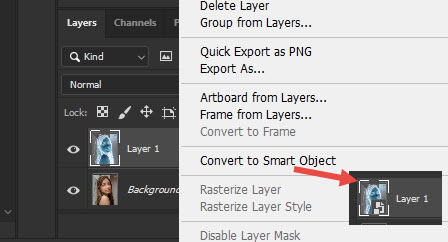
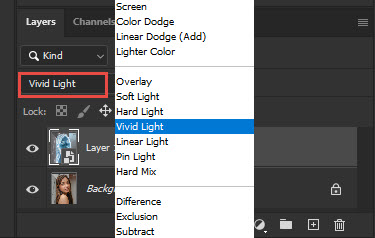
Step 4. Change blend mode.
Change the blend mode from Normal to Vivid Light as shown in the screenshot below.
If you don't see the blend mode option, you can also double-click on the thumbnail to go inside layer settings.
Step 5. Set High Pass filter.
Go to Menu > Filter > Other, and choose the High Pass option.
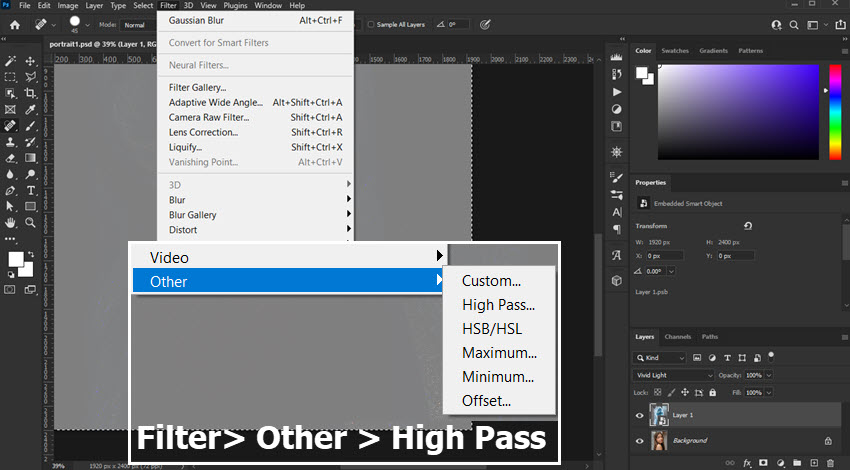
Adjust the radius value depending on your specific image. The goal is to nudge it to the point that just hide the skin imperfections.
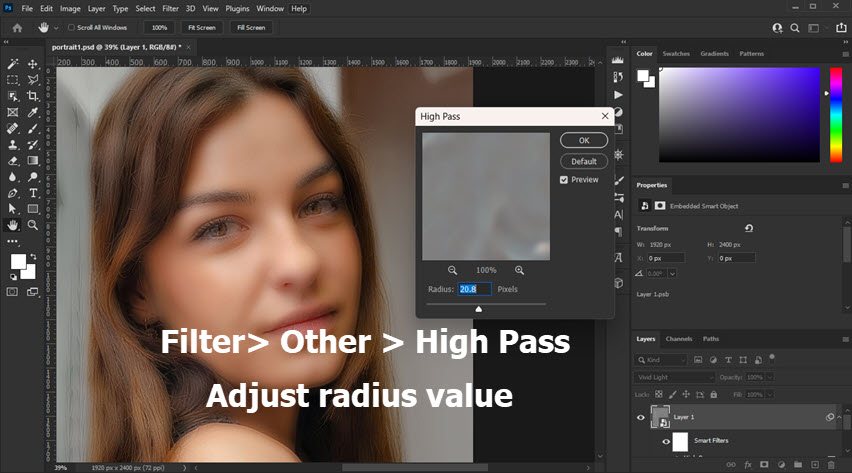
Step 6. Add Gaussian Blur effect.
Go to Filter > Blur > Gaussian Blur, and set the radius around 4-6px initially. You can adjust it according to your specific image.
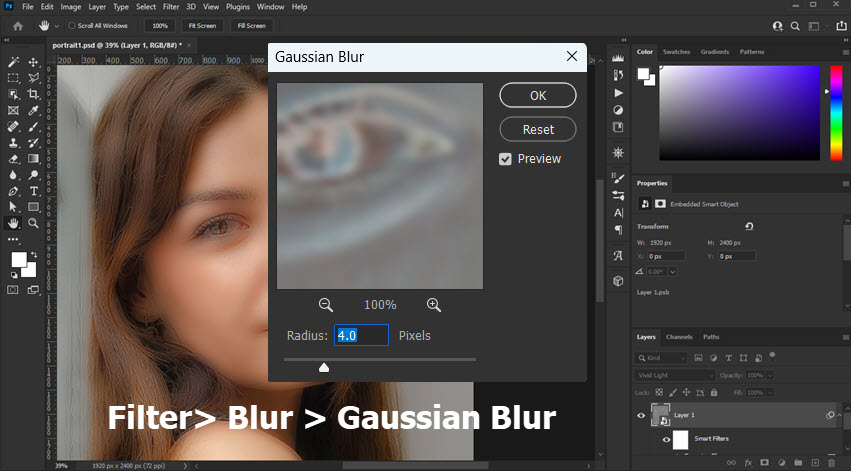
Click on the photo and check the corresponding close-up in the Gaussian Blur dialogue box. The goal is to remove distracting small imperfections while retaining enough texture that pores remain realistic and natural.
Tips: If the skin becomes unnaturally flat, the radius value is too high. Aim for the point where blemishes are softened, but pores and texture remain.
Step 7. Add the inverted layer mask.
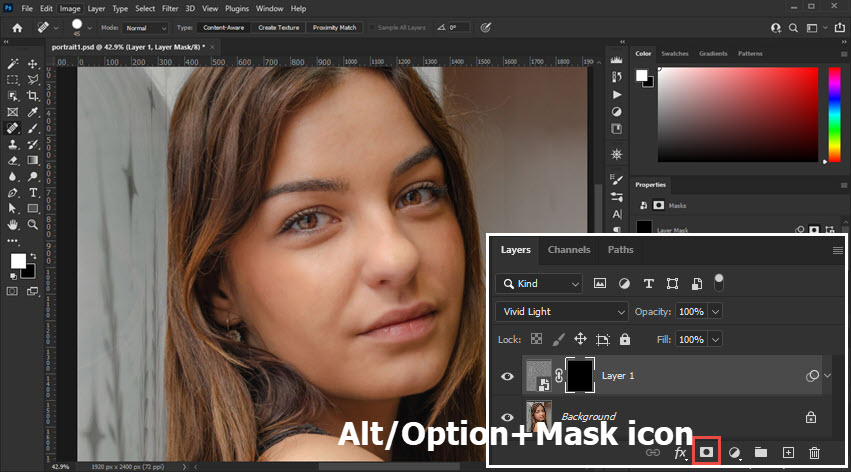
Hold Alt/Option and click the Add Layer Mask button as shown in the screenshot below.
The entire smoothing effect will disappear. This is intentional: in the next steps, you'll paint white on the mask only where you want the smoothing effect to appear, rather than applying it to the entire photo.
Step 8. Use the brush tool
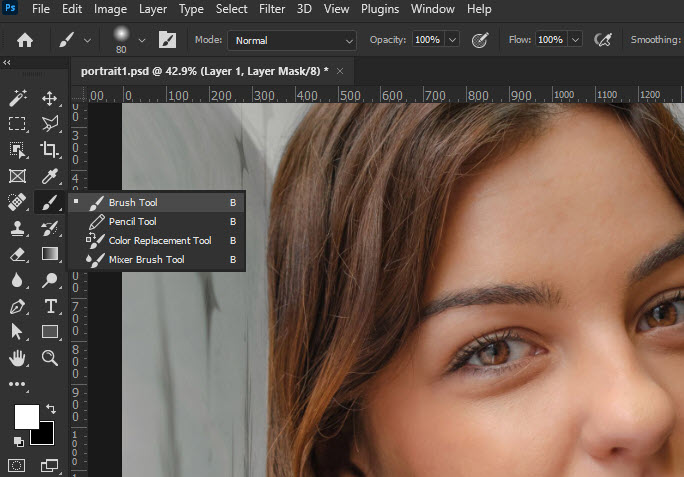
Use the brush tool on the left panel. If you selected the pencil tool previously, you can right click on the brush icon and select the Brush Tool this time. If you don't see any brush tool, click the three-dotted icon to bring back the brush tool.
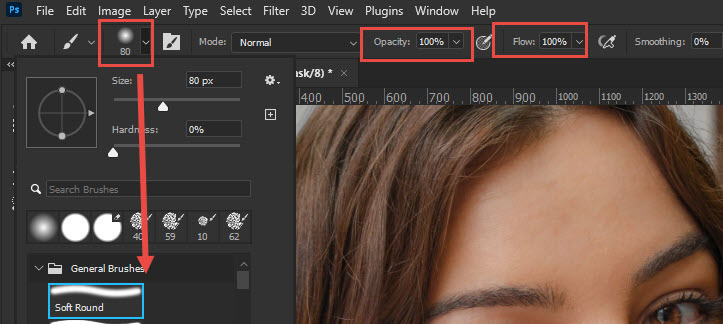
Make sure you are using the soft round brush, which ensures the transition between smoothed and original areas is gradual.
Tips:
- In the recently used brush types, Photoshop may also group eraser brushes here. Make sure you are using the soft round brush, instead of the eraser brush. Otherwise, you may see no effect in next steps.
- As Photoshop may apply previous brush settings, make sure this time the blend mode is Normal, brush opacity remains 100%, and Flow is 100%.
Step 9. Paint the smoothing onto the skin.
Now brush over skin where you need the smoothening.
Focus on areas such as cheeks, forehead, chin, and be careful round eyebrows, nostrils, and facial contours.
Use these shortcut keys to inspect the image:
- Press Alt/Option + mouse scroll to zoom in.
- Press Ctrl/Cmd + mouse scroll to pan left and right.
- Press the Space key + drag to move the image.
- Press Ctrl/Cmd + Z to undo, or Ctrl/Cmd+Shift+Z to redo.
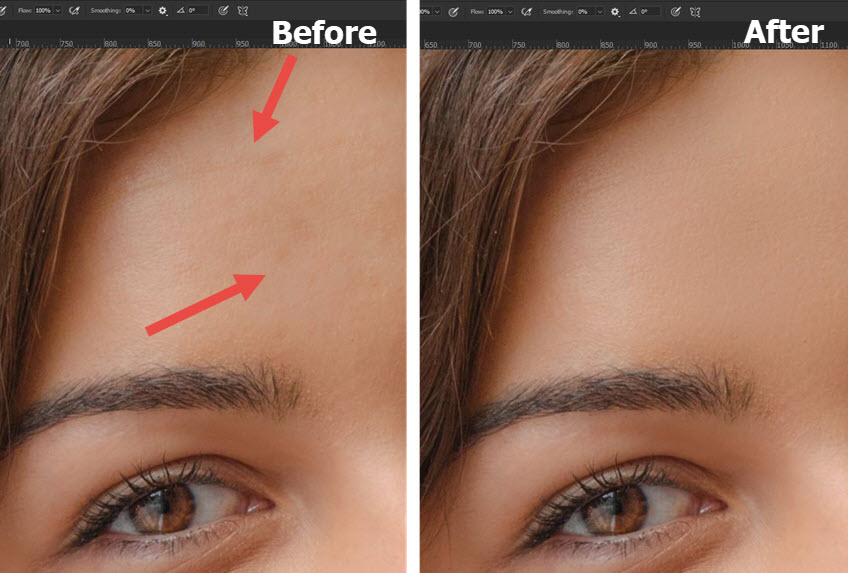
During the smoothing process, you can adjust the brush size by pressing the [ and ] keys. If these shortcuts aren't working, make sure Caps Lock is off and your keyboard is set to the default English layout.
Step 10. Optionally touch up the photo.
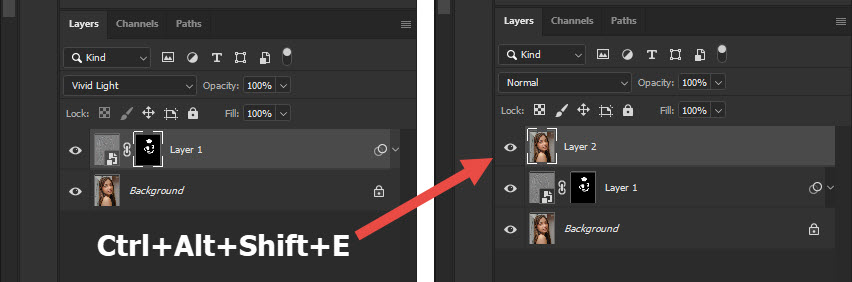
Press Ctrl + Alt + Shift + E to create a new layer containing a merged copy of everything currently visible.
Since this method helps keeping all your original layers intact, it is commonly used for retouching and finishing.
You can now apply things like sharpening, generative upscale, or color grading without destroying the underlying layers.
If you have ChatGPT subscription, you can also use ChatGPT with Photoshop to retouch portrait and enhance photo quality.
Tips to stay natural while smoothing skin in Photoshop
Natural faces contain sharp and soft information simultaneously. When brush over the faces, it is usually safe to smooth cheeks, forehead, temples, chin, and larger areas of skin.
If you smooth the eyes and lips along with the skin, the image starts looking like a plastic mannequin.
The High Pass and Gaussian Blur radius values also have a major impact on the result. There is no single setting that works for every image.
Finally, check the image at both 100% and a normal viewing size. Skin that looks perfect when heavily zoomed in can easily become too smooth when viewed as a whole. If the face starts to look waxy or plastic, reduce the smoothing effect rather than trying to eliminate every remaining imperfection.
Seamless Workflow to Enhance Portraits with Photoshop and Image Enhancer
Before or after retouching portrait photos in Photoshop, you may need to clean up images, remove blemishes, reduce blockiness, and upscale images to 2K, 4K, or higher resolutions with enhanced details. In a modern workflow, photographers and designers often combine multiple tools to improve image quality with better efficiency.
For instance, you can use Aiarty Image Enhancer for photo quality enhancement and noise reduction, with deep learning models designed to keep results natural and batch processing capabilities to improve efficiency. It can prepare your assets with a better base before importing them into Photoshop for retouching. Alternatively, after exporting from Photoshop, you can batch upscale and enhance your images with Aiarty.
Below is a quick demonstration of a hands-on test.
Step 1. Import photos into Aiarty Image Enhancer.
Step 2. Use auto analysis to enhance photo quality.
Step 3. Enable AI Eraser and brush over blemishes to smooth skin.
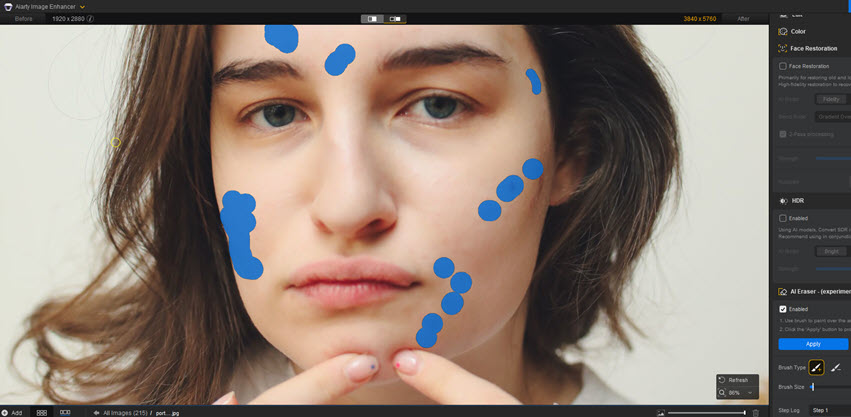
Step 4. Apply the changes and export photos.
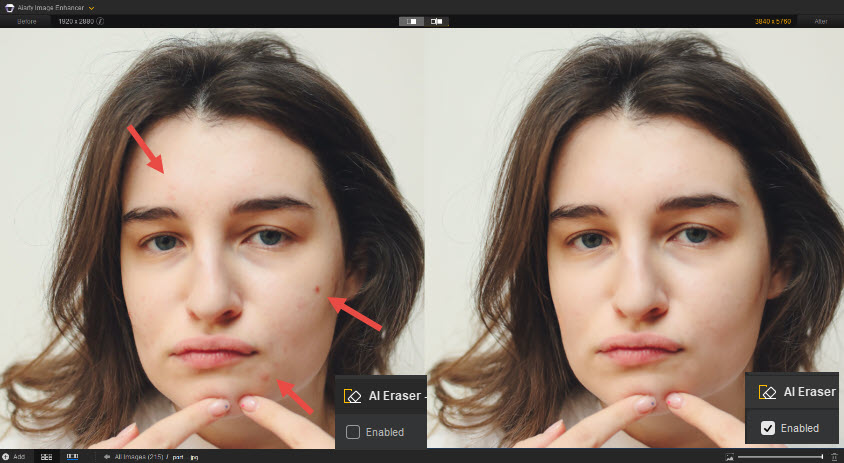
As you can see from the before and after comparison below, the skin is enhanced while keeping natural details.
Besides smoothing skin, explore more tips and tricks to enhance photo quality in Photoshop in this complete tutorial.
You May Also Like


This post was written by Brenda Peng who is a seasoned editor at Digiarty Software who loves turning ordinary photos into extraordinary works of art. With AI assistance for brainstorming and drafting, the post is reviewed for accuracy by our expert Abby Poole for her expertise in this field.
