How to Fix Overexposed Photos (Detailed Guide)
Updated on
Struggling with overexposed photos that lack the vibrant colors and details you intended to capture? Whether it's a bright summer day or harsh indoor lighting, overexposure can easily ruin what could have been a stunning shot. Fortunately, fixing overexposed photos is easier than you think! With a few simple adjustments, you can restore balance to your images, bringing back the depth and richness they deserve. In this guide, we'll walk you through the most effective methods to fix overexposed photos on both your phone and PC. Follow along and breathe new life into your photos and make them truly stand out!
Hot search: How to fix lazy eye in pictures >>
Aiarty Image Enhancer redefines highlight recovery through its intelligent detail reconstruction, powered by specialized GAN models that identify overexposed areas and generate realistic textures to bring "dead" pixels back to life. While traditional methods often introduce image artifacts or noise when pulling detail out of bright zones, Aiarty’s built-in AI denoiser and deblurer work seamlessly in the background to ensure every output remains crisp and crystal clear.
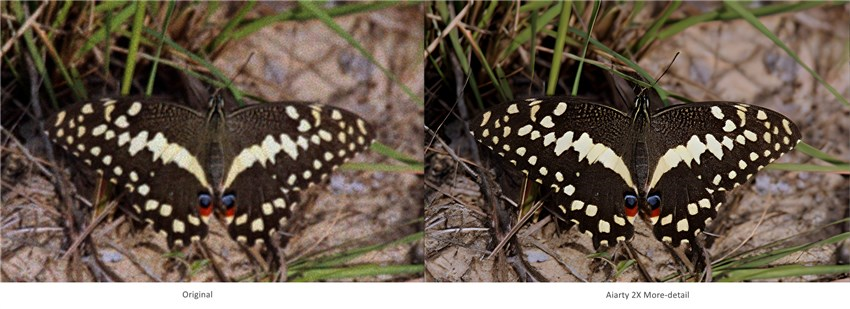
Beyond mere correction, Aiarty allows you to perfect your images by upscaling them to stunning 16K or 32K Hollywood-level resolution, ensuring every detail is enhanced to a professional standard without any quality loss. This sophisticated process requires no complex curves or manual masking; its user-friendly interface delivers pro-level results with zero learning curve, allowing both beginners and experts to transform ruined shots into high-resolution masterpieces in just a few clicks.
How to Fix Overexposed Photos in Photoshop
Photoshop is one of the most powerful tools for professional photo editing, especially when it comes to fixing overexposed images. With its precise control over exposure, highlights, and shadows, you can recover details that might seem lost in overly bright photos. Whether you're working with RAW files or JPEGs, Photoshop enables you to restore depth and balance with just a few adjustments.
To fix overexposed photos in Adobe Photoshop, you can utilize several adjustment tools for precise corrections. Here's a step-by-step guide to effectively correcting overexposure:
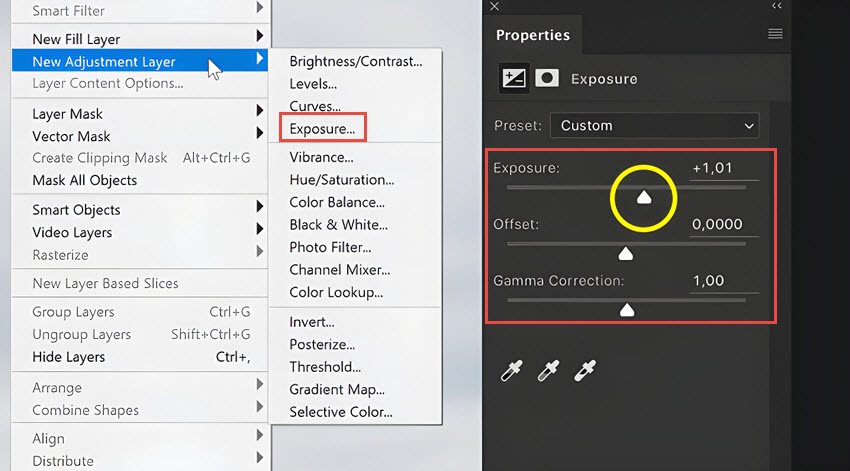
Method 1. Use the Exposure Adjustment Layer
Step 1. Go to the Layers panel and click on the "Create new adjustment layer" icon. Select Exposure from the list.
Step 2. In the Exposure adjustment window, slide the Exposure slider to the left to darken the image. Adjust the Offset and Gamma sliders if necessary to fine-tune shadows and midtones.
Step 3. Click OK to apply your settings. This method allows you to adjust exposure non-destructively.
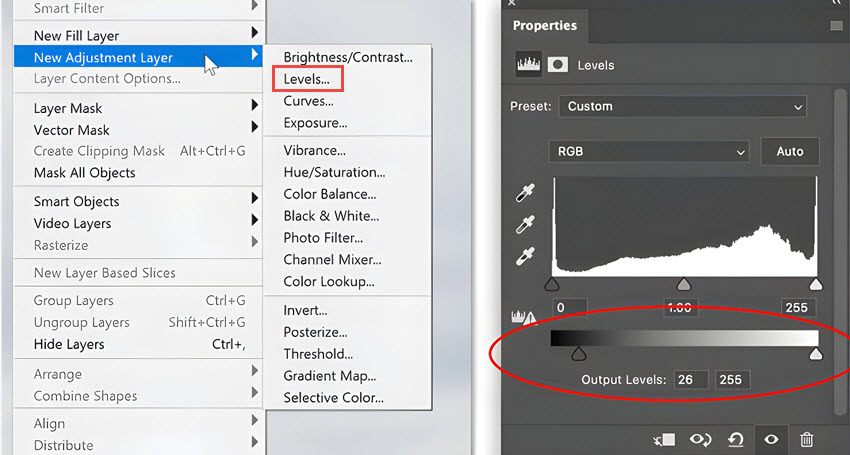
Method 2. Use Levels Adjustment Layer
Step 1. Click on the "Create new adjustment layer" icon and select Levels.
Step 2. Check the histogram on the right. The histogram will show the distribution of tones in your image. If most data is pushed to the right, your image is overexposed.
Step 3. Move the white slider (highlights) slightly to the left to recover details in bright areas. Adjust the grey slider (midtones) for overall brightness. Use the Output Levels sliders at the bottom to set black and white points, which can help tone down overly bright areas without losing detail.
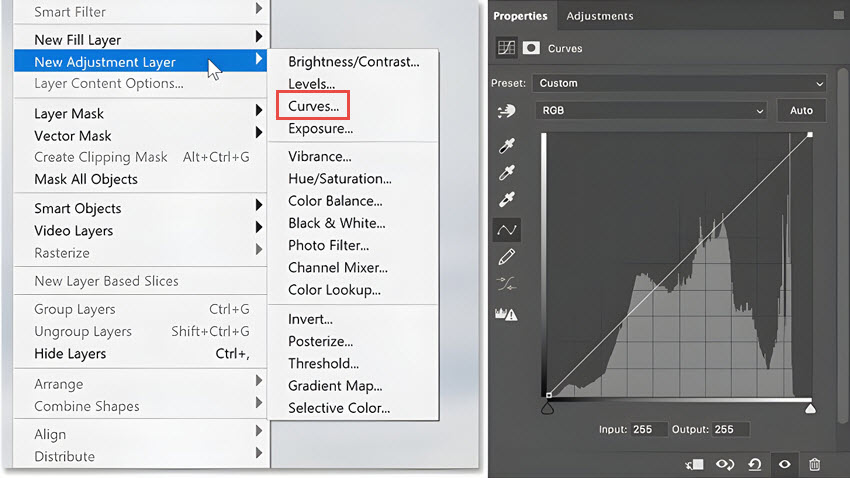
Method 3. Use Curves Adjustment Layer
Step 1. Again, click on the "Create new adjustment layer" icon and choose Curves.
Step 2. Click on the curve line to create anchor points.
Step 3. Drag down in the upper portion of the curve to reduce highlights and recover details in overexposed areas. Adjust midtones by manipulating points in the middle of the curve for better overall exposure balance.
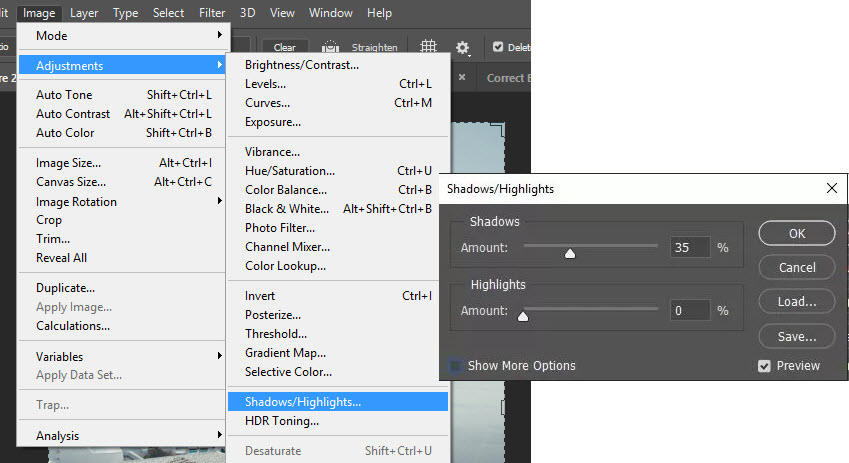
Method 4. Use Shadows/Highlights Adjustment
Step 1. Go to Image > Adjustments > Shadows/Highlights.
Step 2. Increase the Highlights slider to recover details in overexposed areas while adjusting Shadows for balance.
Step 3. Use the preview option to compare before and after adjustments, ensuring you achieve a natural look.
By using these methods, you can effectively recover details from overexposed photos and enhance their overall appearance in Photoshop
How to Fix Overexposed Photos in Lightroom
Lightroom is another excellent option for fixing overexposed photos, especially for photographers who want a streamlined editing process. Here is how to fix overexposed photos in Lightroom:
Step 1. Use the Exposure Slider
In the Develop module, find the Basic panel on the right side.Move the Exposure slider to the left to decrease brightness. This slider allows adjustments of up to five stops of light, so for heavily overexposed images, you may need to move it significantly to the left to recover details in bright areas
Step 2. Adjust Highlights and Shadows
- Use the Highlights slider to target areas that are too bright. Moving this slider to the left will help recover lost detail in the highlights without affecting midtones and shadows significantly.
- If your image has dark areas that need brightening, adjust the Shadows slider to lighten those regions. This can help balance out the overall exposure.
Step 3. Fine-tune Whites and Blacks
- Adjust the Whites slider to set the white point of your image. Moving it left can help prevent clipped highlights.
- Similarly, adjust the Blacks slider to define your black point, which can enhance contrast and depth in your image
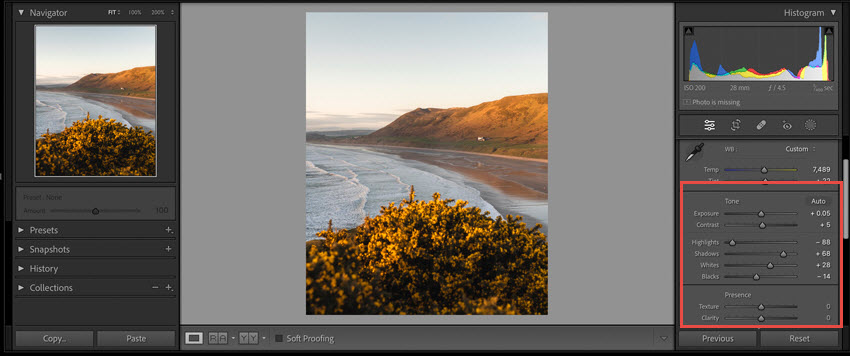
Tips: To avoid losing detail during adjustments, enable clipping indicators by clicking on the small triangles in the histogram area. The left triangle indicates shadow clipping (blue) and the right triangle indicates highlight clipping (red). This feature helps you monitor when adjustments cause loss of detail.
By following these steps, you can effectively correct overexposed photos in Lightroom, restoring detail and improving overall image quality.
How to Fix Overexposed Photos on iPhone/Android
Before jumping into the steps, it's good to know that fixing overexposed photos on your iPhone or Android is easier than ever. Thanks to built-in editing tools and apps, you don't need to be a pro to bring back the details and colors that seemed lost. With just a few tweaks, like adjusting brightness, highlights, and shadows, you can transform an overly bright photo into something stunning.
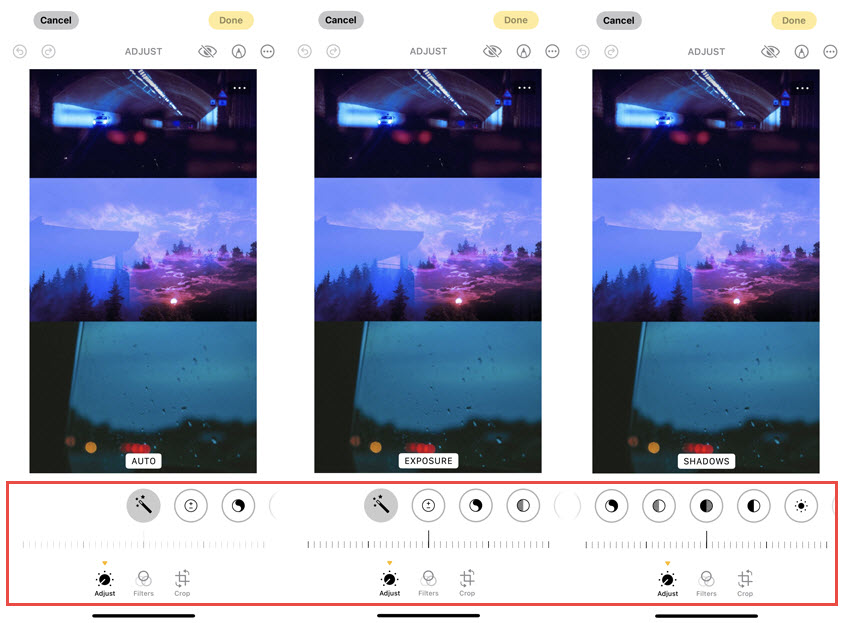
Step 1. Go to the Photos app on your phone, and find the overexposed photo.
Step 2. Tap Edit to open the built-in photo editor.
- Use the Exposure slider to reduce the overall brightness and lighten the image.
- Adjust the Highlights slider to recover details in the brightest areas.
- Fine-tune the Shadows and Blacks sliders if needed to add more contrast.
Step 3. Tap Done to save the edited photos.
The Photos app (iOS) and Google Photos app (Android) also come with an auto enhance feature that can automatically fix exposure and other issues. Just tap the magic wand icon after opening Edit mode.
While the built-in editor is convenient, it has limited capabilities compared to dedicated photo editing apps like Snapseed or Lightroom Mobile. These offer more advanced tools like selective adjustments, curves, and layers for precise control over exposure.
What Causes Overexposed Images
An overexposed image occurs when your camera sensor (or film) receives an excessive amount of light, resulting in a photo that is "washed out." In technical terms, this leads to "blown-out highlights"—areas of pure white where all image data is lost. This is usually the result of a misconfiguration within the Exposure Triangle: Aperture, Shutter Speed, and ISO.
Here are the main causes of overexposed images:
1. The Exposure Triangle Misalignment:
- Aperture Too Wide (Low f-stop): Using a wide aperture (like f/1.4 or f/2.8) in broad daylight opens the lens too far, flooding the sensor with light.
- Shutter Speed Too Slow: If the shutter stays open too long (e.g., 1/30s in sunlight), the sensor collects light for an extended duration, leading to a forced brightness.
- ISO Too High: High sensitivity (ISO 800+) is great for dark rooms, but in bright environments, it makes the sensor "over-sensitive," resulting in overexposure and unwanted digital noise.
2. Metering Failures & Human Error:
- Incorrect Metering Modes: If your camera is set to Spot Metering on a dark shadow, it will over-compensate by brightening the entire scene, causing the highlights to disappear.
- Forgotten Exposure Compensation: It’s easy to leave your exposure compensation dial at +1 or +2 EV from a previous shoot, which forces the camera to overexpose every subsequent shot.
- Flash Overpower: Using a powerful flash at a close distance often "blows out" the subject's features, especially skin tones, making them appear unnaturally white.
3. High-Contrast Lighting Environments:
Sometimes the environment is simply too challenging. Shooting in harsh midday sun or capturing scenes with highly reflective surfaces (like snow, water, or white sand) can exceed the dynamic range of your sensor.
The AI Advantage: While traditional editing can only do so much to "darken" these bright spots, Aiarty Image Enhancer goes a step further. It uses deep learning to reconstruct the textures lost in these overexposed areas, turning a ruined "blown-out" shot into a professional-grade image with 16K/32K clarity.
Pro Tips: How to Avoid Overexposed Images
Prevention is always better than cure. By mastering your camera’s tools and understanding light, you can capture perfectly balanced shots even in challenging conditions. Here are the most effective ways to stay in control:
1. Master the Exposure Triangle
In bright environments, your goal is to restrict the amount of light reaching the sensor:
- Faster Shutter Speed: Boost your shutter speed to 1/500s or higher to "freeze" the light.
- Narrower Aperture: Use a higher f-stop (like f/11 or f/16) to physically reduce the lens opening.
- Lowest ISO: Stick to ISO 100 or 200 to minimize light sensitivity and ensure the cleanest possible image.
2. Use Intelligent Camera Tools
- Exposure Compensation: Don't let Auto Mode decide everything. Manually dial down to -0.7 or -1.0 EV to protect your highlights from "clipping."
- Manual Mode & Spot Metering: For ultimate precision, switch to Manual. Use Spot Metering to expose specifically for the brightest part of your subject, ensuring those details aren't lost to pure white.
- HDR Mode: For high-contrast landscapes, HDR captures multiple exposure levels and blends them, effectively balancing the brightest skies with the darkest shadows.
3. Work With (Not Against) the Light
- The Golden Hour Rule: Avoid the harsh, vertical light of midday. Shoot during the Golden Hour (early morning or late afternoon) for soft, diffused lighting that naturally prevents blown-out highlights.
- Shape the Light: Use diffusers to soften harsh sunlight or seek natural shade to reduce the dynamic range of your scene.
4. Always Shoot in RAW
If there is one "safety net" every photographer needs, it’s RAW format. Unlike JPEGs, RAW files preserve the maximum amount of sensor data. This gives you the overhead needed to recover subtle highlight details during the editing process.
Conclusion
In conclusion, overexposed photos can be frustrating, but with the right tools and techniques, they are easily fixable whether you're editing on your phone, using Photoshop, or working in Lightroom. Also, understanding the causes of overexposure and learning how to prevent it with proper camera settings, filters, and exposure adjustments can save you time and effort in post-processing.
You May Also Like
Brenda Peng is a seasoned editor at Digiarty Software who loves turning ordinary photos into extraordinary works of art. With years of experience behind the lens and in front of the computer, Brenda shares her passion for photography, image enhancement, and editing through easy-to-follow tutorials.