How to Fix Lazy Eye in Photos (Photoshop, AI & Free Online Tools)
Updated on
Quick Answer: To fix lazy eyes in photos, you can use AI photo editors to improve facial balance, adjust eye alignment manually with tools like Photoshop (Liquify or Warp), or make quick corrections using online editors and mobile apps. The key is to apply subtle edits that reduce uneven eyes while keeping the portrait natural.
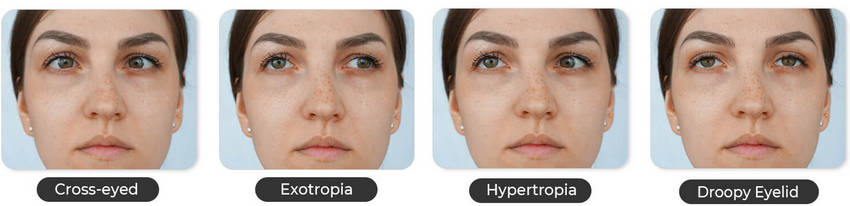
A lazy eye (or uneven eye alignment) can sometimes show up in photos due to camera angle, blinking, slight facial asymmetry, or natural conditions like strabismus. Common issues include eyes not aligning properly, subtle head tilts, or squinting to compensate for vision differences. Fortunately, you don't need advanced retouching skills to correct it.
In this guide, you'll learn several easy ways to fix lazy eye in photos, including AI photo editors, Photoshop techniques, free online tools, and mobile apps. Whether you want a quick automatic fix or precise manual editing, these methods can help you improve eye alignment and create a more natural-looking portrait.
Quick Fix: Correct Lazy Eye in Photos with AI
AI photo editors offer a quick way to reduce eye asymmetry in portraits. Instead of manually adjusting facial features, modern AI models analyze the face and enhance details that affect visual balance. By improving eye clarity, refining facial proportions, and restoring portrait details, these tools can help reduce the appearance of uneven eyes while keeping the photo natural, especially when the imbalance is caused by camera angle, blinking, or lighting.
One tool that works well for this purpose is Aiarty Image Enhancer, an AI-powered photo enhancement software designed to improve portrait clarity and restore facial details. While it is not a facial manipulation tool, its AI models can enhance eye sharpness, reduce blur, and improve overall facial balance, which can make uneven eyes appear less noticeable in photos.
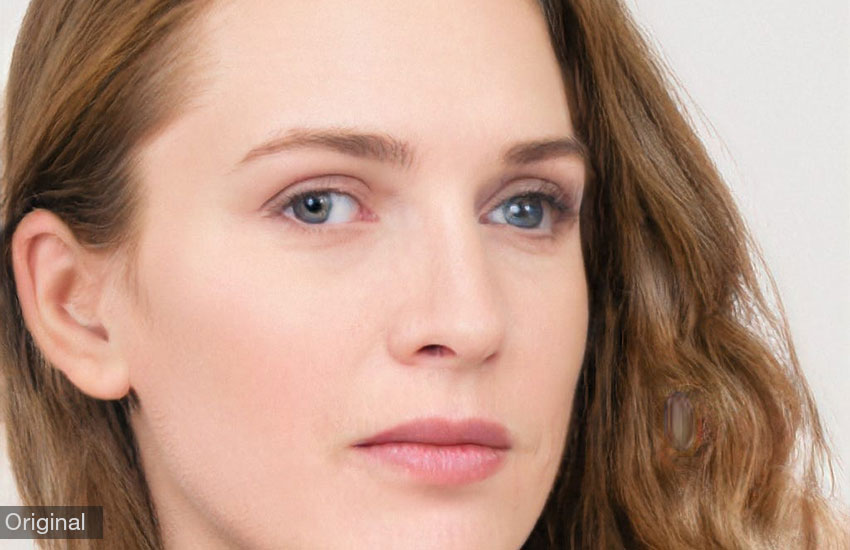
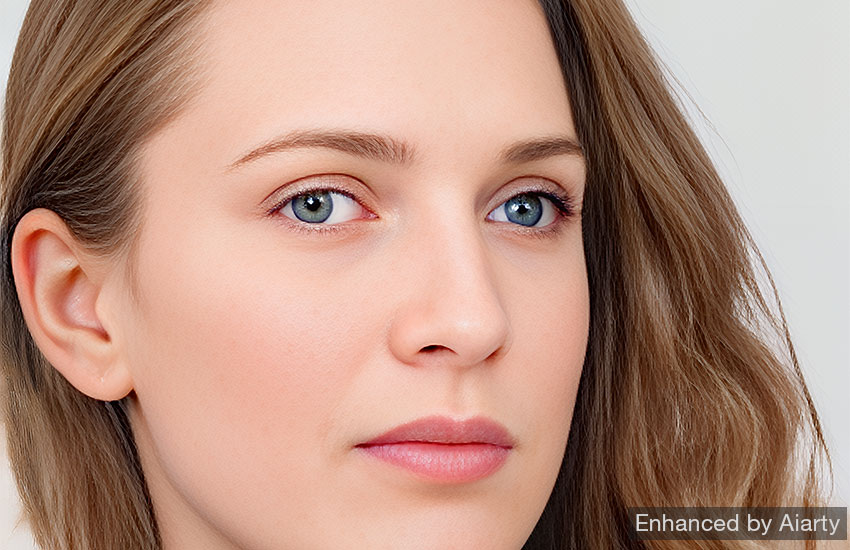
Notice how the portrait looks more balanced? Download Aiarty Image Enhancer and enhance your photos in seconds.
Tutorial on Fixing Lazy Eyes with Aiarty Image Enhancer in One Click
Step 1. Import your photo.
Free download the AI image enhancer, install and launch it. Load the pictures that have lazy eyes issue.
Step 2. Choose an AI model.
Select a portrait-friendly model such as More-Detail GAN or Real-Photo to enhance facial details and eye clarity.
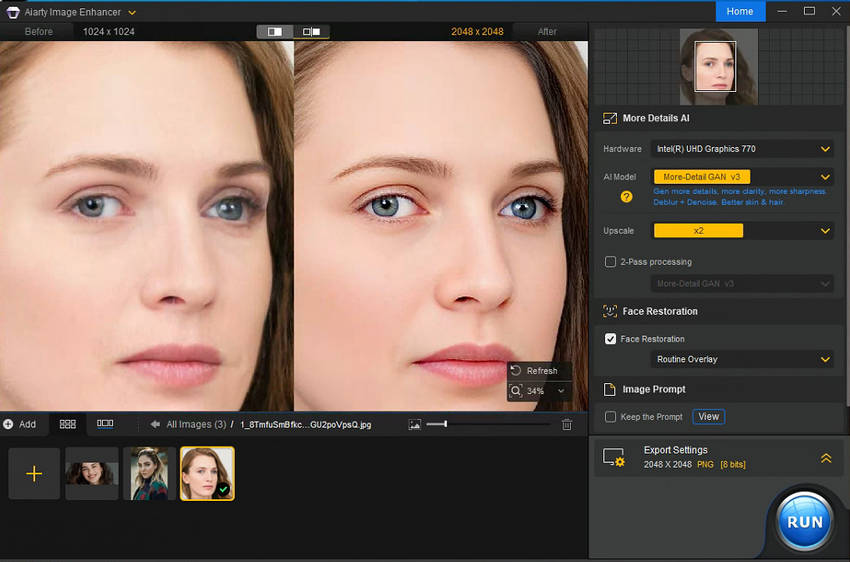
Step 3. Enable Face Restoration.
Tick the the Face Restoration option, and select Fidelity or Rebuild model as it needed to improve the eye balance.
Step 4. Preview the Result & Export.
Compare the enhanced image with the original to ensure the eyes look natural and facial proportions remain realistic. Then expand the Export Settings, set the output format, quality and folder path. Tap the RUN button to export the fixed pictures.
Fix Lazy Eye in Photoshop
Adobe Photoshop remains one of the most reliable tools for photo editing for eyes. With features like Liquify and Clone Stamp, you can correct strabismus in photos and perform advanced portrait retouching for natural results.
By mastering these techniques, you can effectively eliminate the distractions caused by lazy eyes, resulting in more visually appealing and professional images. Let's delve into the step-by-step process of correcting lazy eyes in Photoshop.
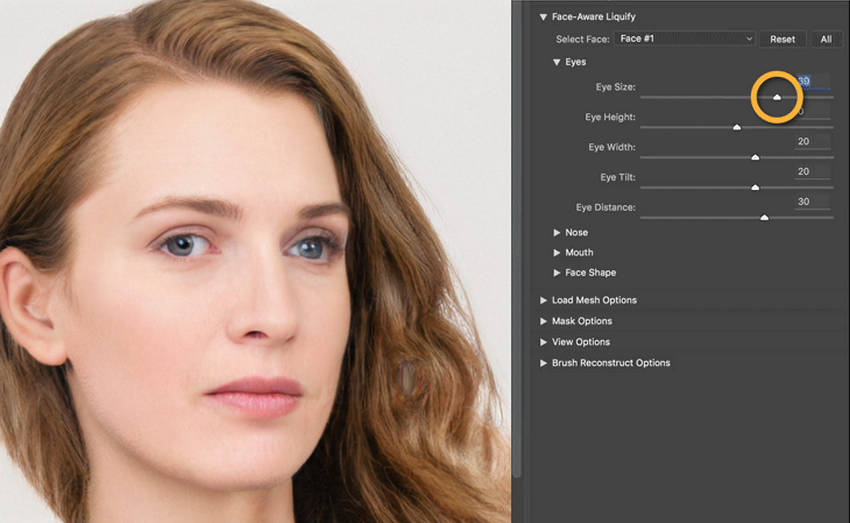
1. Fix Lazy Eye with Liquify Tool
Step 1. Open your image in Photoshop, ensure the image is high-resolution and well-lit for optimal results.
Step 2. Select the Liquify tool in the Filter menu or by pressing Shift+Ctrl+X.
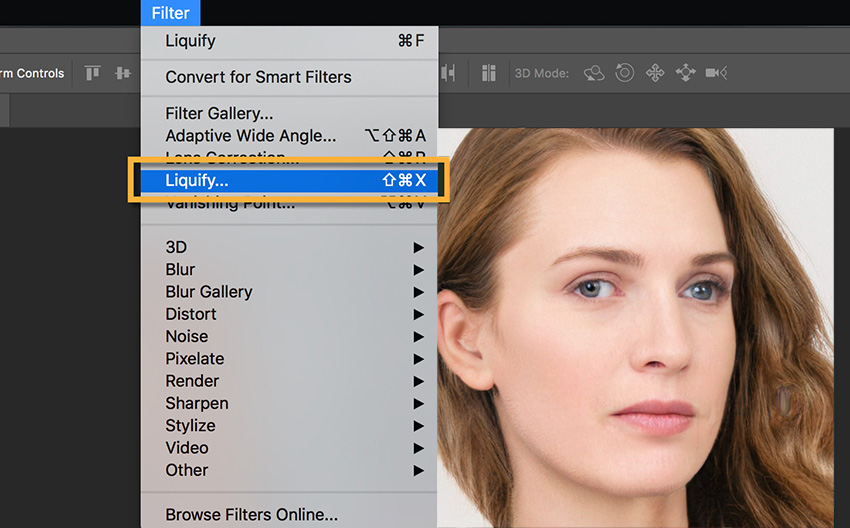
Step 3. Choose a brush size that is appropriate for the size of the eye and the desired level of correction.
Step 4. Determine which eye is more affected by amblyopia. Then make small adjustments to the eye's shape, position, size and more until you're satisfied.
Step 5. Regularly preview your changes and make adjustments as needed to achieve a natural-looking result.
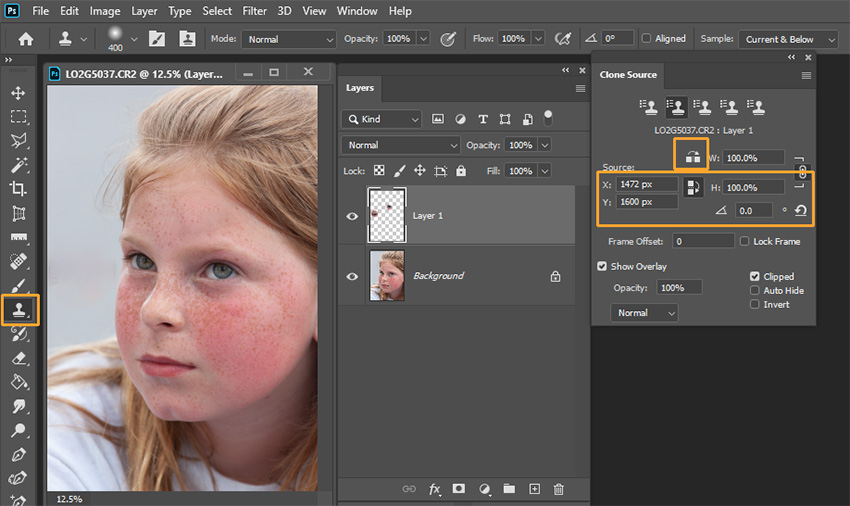
2. Fix Lazy Eye with Clone Stamp Tool
Step 1. Open your image with lazy eye issue in PhotoShop.
Step 2. Select "Clone Source" from the Window on the toolbar.
Step 3. Click on the "Horizontal flip" next to Width.
Step 4. Choose the "Clone Stamp Tool" on the side toolbar. Adjust the stamp size, then sucking out the eye you're trying to clone while holding on the Alt on the keyboard.
Step 5. Adjust the source position, and angle to correct the lazy eye in picture.
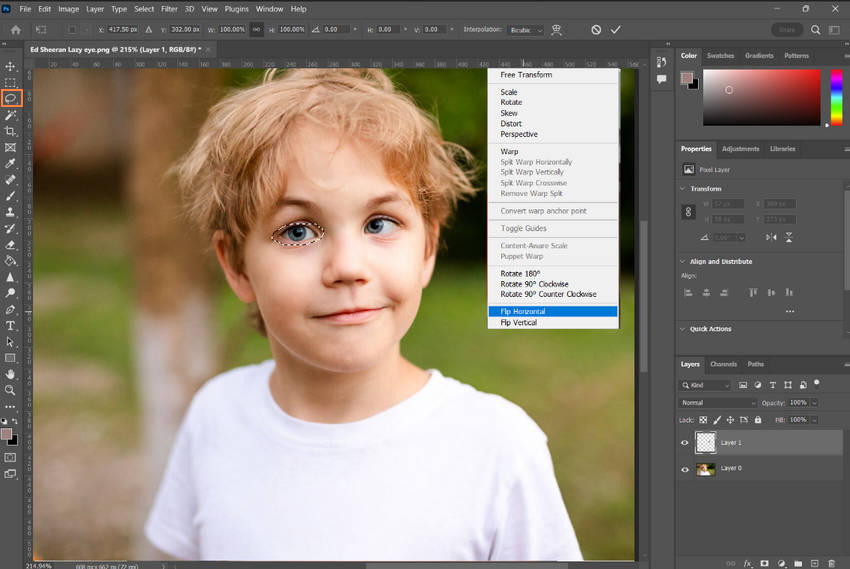
3. Clone One Eye to Fix Lazy Eyes (Lasso Tool)
Step 1. Open your image in Adobe Photoshop.
Step 2. Select the area around the subject's eye using the Lasso tool. Duplicate this selected area onto a new layer by pressing Ctrl+J (Windows) or Command+J (Mac).
Step 3. Use the Move tool to adjust the position of the selected eye. Make sure the distance between the pupil and the edge of the eye is consistent in both eyes.
Step 4. Create a mask for the selected eye layer. Use the Brush tool to blend the edges of the mask to match the background. Make sure black is the foreground color when using the brush.
Step 5. To finalize the image, correct the eye color of the lazy eye. Review the final image and save it if you're satisfied with the results.
By following these techniques, you can successfully remove the visual distractions caused by lazy eyes in Photoshop, creating images that are more aesthetically pleasing and professional.
Related search: How to Remove Glare from Glasses in Photoshop >>
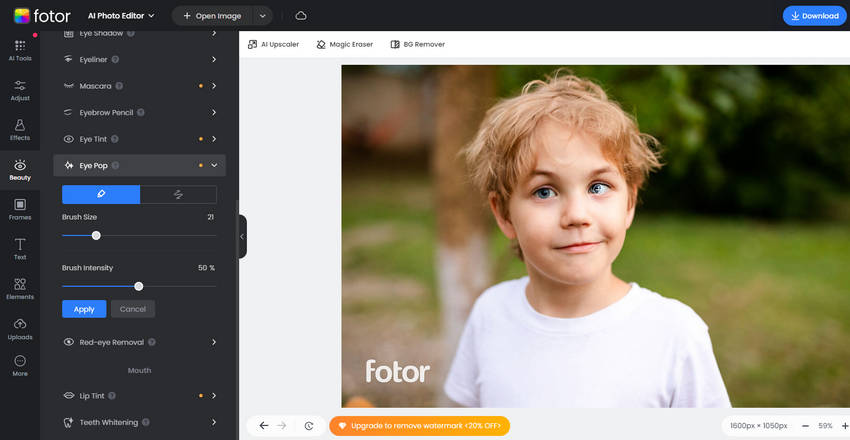
Fix Lazy Eye in Photos Online Free
If you prefer an online tool for a quick lazy eye photo fix, Fotor is a simple yet effective choice. While it may not offer the same depth as Photoshop, it works well for basic eye alignment correction and beginner-friendly portrait retouching.
When it comes to fixing lazy eyes in photos, Fotor can be a valuable tool. Its user-friendly interface and intuitive tools make it easy to manipulate and adjust the eye area. Features like the Blemish Fix tool, Clone tool, and adjustment on eye shadow, eyeliner, eye pop etc. can be used to address various eye imperfections and create a more visually appealing result.
Step 1. Navigate to Fotor editing page and upload your photo which has lazy eye.
Step 2. Click on the "Beauty" on the side toolbar.
Step 3. Apply the Blemish Fix feature for removing blemishes, but it can also be helpful for making subtle adjustments to the eyes.
Step 4. Use the "Clone" tool to clone areas of the image to correct imperfections, such as misaligned eyes.
Step 5. Carefully adjust the eye area for better matched eye shadow, eyeliner, eye pop and tint etc. until you're satisfied.
Step 6. Tap the "Download" button to save the lazy eye fixed photo after you've done.
While Fotor may not have the same level of precision as dedicated photo editing software, it can be a great starting point, especially for those who are new to photo editing or simply need a quick and easy solution. For more complex adjustments or advanced features, you might consider transitioning to more specialized software.
Besides Fotor, other online editors like Pixlr and Canva can also help improve eye balance in photos. While they don't offer dedicated eye-correction tools, their portrait retouching features, such as reshape, adjust, or subtle facial edits, can be used to refine eye alignment and reduce the appearance of uneven eyes. These browser-based editors are convenient if you want a quick adjustment without installing additional software.
Fix Lazy Eye on iPhone or Android
Mobile photo editing apps provide a convenient way to improve eye balance directly on your phone. Many portrait retouching apps include tools like reshape, face adjust, or symmetry sliders, which allow you to subtly refine facial proportions and reduce the appearance of uneven eyes without complex editing.
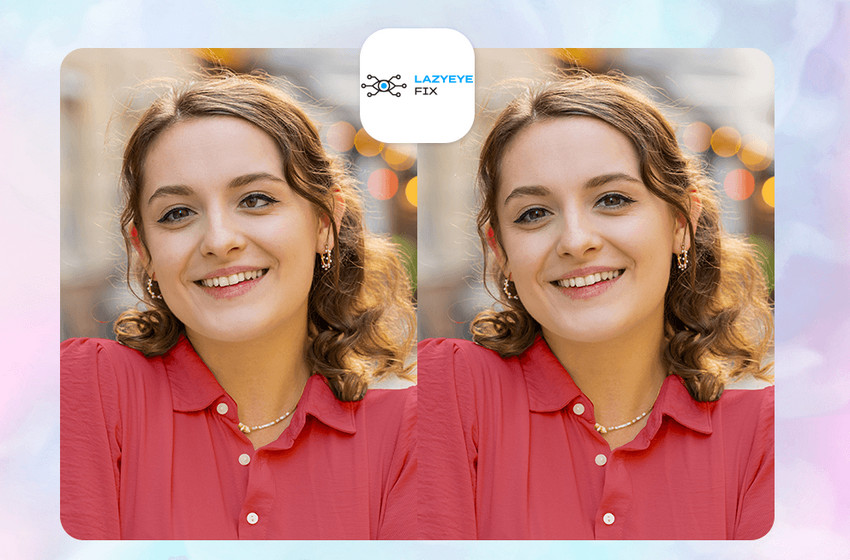
Apps such as Lazyeyefix, Facetune, Airbrush, and YouCam Makeup are popular options for quick portrait corrections. These apps offer intuitive controls that let you slightly adjust eye position, enhance eye clarity, or balance facial features with simple touch gestures. Because everything is done on a mobile device, they are ideal for quick fixes before sharing photos on social media.
To fix uneven eyes using a mobile app, simply import your photo, open the face or reshape tools, and make small adjustments around the eye area until the portrait looks more balanced. The key is to apply subtle edits so the final result still looks natural.
Tips & Common Mistakes When Fixing Lazy Eyes
When correcting uneven eyes in photos, subtle adjustments usually produce the most natural results. Here are some tips and common mistakes to avoid:
- Use editing tools carefully: Tools like Liquify, Warp, or cloning can refine eye alignment, but overusing them may distort the face. Always check overall proportions.
- Pay attention to lighting and reflections: Catchlights and eye reflections should remain consistent; mismatched lighting can make edits obvious.
- Avoid over-sharpening: Excessive sharpening or contrast adjustments can make the eyes look artificial. Subtle edits look more realistic.
- Check facial symmetry: Correcting only the eyes without considering brows, nose, or glasses frames can still make the face look off. Balance the entire face.
- Less is more: Aim for natural eye alignment rather than perfect symmetry to maintain a realistic and natural portrait.
To quickly improve eye clarity and facial balance in your photos, AI-powered tools can make subtle corrections much faster than manual editing. Aiarty Image Enhancer is perfect for enhancing portraits, refining uneven eyes, and keeping edits natural.
Conclusion: Best Way to Fix Lazy Eyes in Pictures
Fixing lazy eyes in photos can dramatically improve their visual appeal. By employing the strategies and tools outlined in this article, you can effectively address this common photographic challenge. Not only does correcting lazy eyes enhance the overall aesthetic of your images, but it also contributes to a more balanced and harmonious composition. By understanding and implementing these techniques, you'll be able to create photos that are more engaging, professional, and visually satisfying.
If your photo precisely has lazy eye, just fix it following this article. Can't wait to hear your success stories!
 FAQ about Fixing Lazy Eyes in Photos
Not always. If the misalignment is subtle, editing tools or AI enhancers can correct it effectively. But in extreme cases, heavy corrections may look unnatural. Choosing the right angle and lighting during the shoot helps ensure better editing results later.
Yes. Several mobile photo editing apps can help reduce the appearance of lazy eyes in pictures. Apps like Facetune, Airbrush, and YouCam Makeup offer portrait retouching tools that allow you to subtly adjust eye position, refine facial symmetry, and enhance eye clarity with simple sliders or touch controls.
For quick fixes, beginner-friendly tools like Fotor or Canva work well. If you need more precise control, Photoshop offers advanced options. AI-based tools such as Aiarty Image Enhancer can also simplify the process by automating corrections.
Photographers typically correct uneven eyes using professional editing tools such as Photoshop. Techniques like the Liquify tool, clone tool, or subtle reshape adjustments can help refine eye alignment while maintaining natural facial proportions. The goal is to make small edits that improve balance without making the portrait look over-edited.
AI photo editors can help reduce the appearance of uneven eyes by improving facial balance, enhancing eye clarity, and refining portrait details. While AI tools don't physically move facial features like manual editing, they can make slight misalignment less noticeable and improve the overall look of the photo.
You May Also Like
Brenda Peng is a seasoned editor at Digiarty Software who loves turning ordinary photos into extraordinary works of art. With years of experience behind the lens and in front of the computer, Brenda shares her passion for photography, image enhancement, and editing through easy-to-follow tutorials.