


Exposure plays a critical role in photography. Even with a great composition and perfect timing, incorrect exposure settings can make a photo look too dark or too bright. These two common problems are known as underexposure and overexposure.
An underexposed photo does not receive enough light, causing dark shadows and missing details. An overexposed photo receives too much light, resulting in washed-out highlights and lost textures. While both issues can affect image quality, they impact photos in different ways and require different recovery methods.
So, is it better to underexpose or overexpose a photo? And can you fix an image after exposure mistakes happen? In this guide, we will explain the difference between underexposed vs overexposed photos, discuss which exposure approach is safer, and show how to recover details from problematic images.
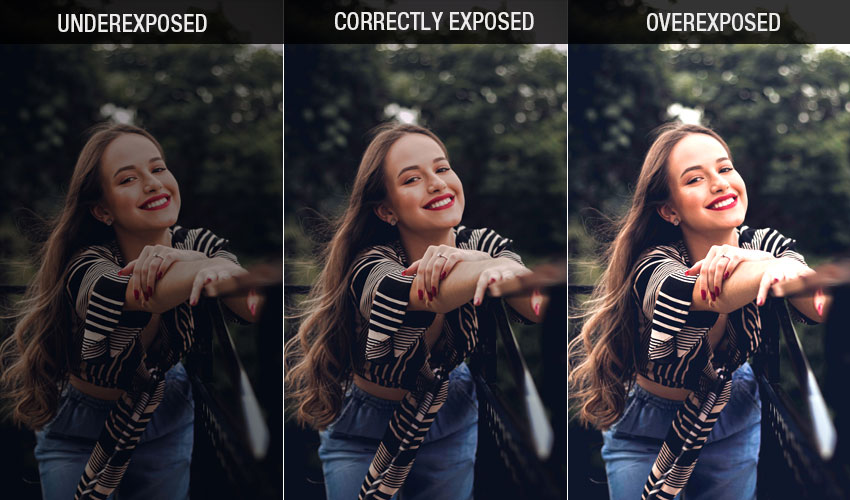
Underexposed vs Overexposed Photos: What's the Difference?
Underexposure and overexposure describe whether a camera sensor receives too little or too much light when capturing an image. Both problems are related to the exposure triangle: shutter speed, aperture, and ISO.
The main difference is where image details are lost. Underexposed photos usually lose information in dark areas (shadows), while overexposed photos often lose information in bright areas (highlights).
What Is an Underexposed Photo?
An underexposed photo is captured when the camera sensor does not receive enough light. As a result, the overall image appears darker than intended, especially in shadow areas.
Underexposure commonly happens when shooting in low-light environments or when camera settings are not adjusted properly. For example, using a very fast shutter speed may freeze motion but allow less light to enter the camera.
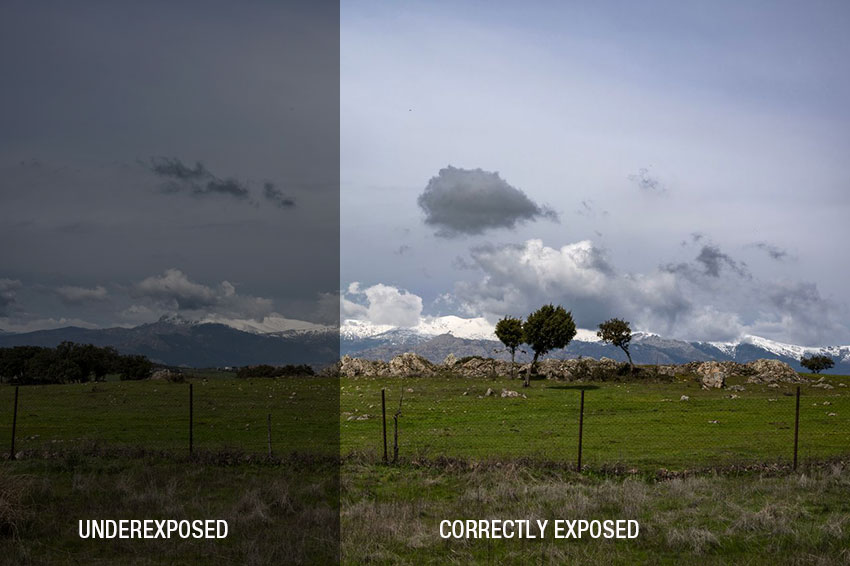
Common causes of underexposed photos include:
- Using a shutter speed that is too fast.
- Setting ISO too low for the lighting condition.
- Using a narrow aperture that limits incoming light.
- Shooting against a bright background without exposure compensation.
- Taking photos in dark environments without additional lighting.
Typical signs of an underexposed image include dark faces in portraits, unclear details in shadows, and a generally dull appearance. When you brighten a dark photo during editing, noise and grain may become more noticeable because the original image contains less light information.
What Is an Overexposed Photo?
An overexposed photo is captured when too much light reaches the camera sensor. The image appears brighter than intended, and bright areas may lose their original details.
Unlike underexposed images where details may still exist in shadow areas, severely overexposed photos can suffer from highlight clipping. Once an area becomes completely white, the original texture and information may no longer be available.
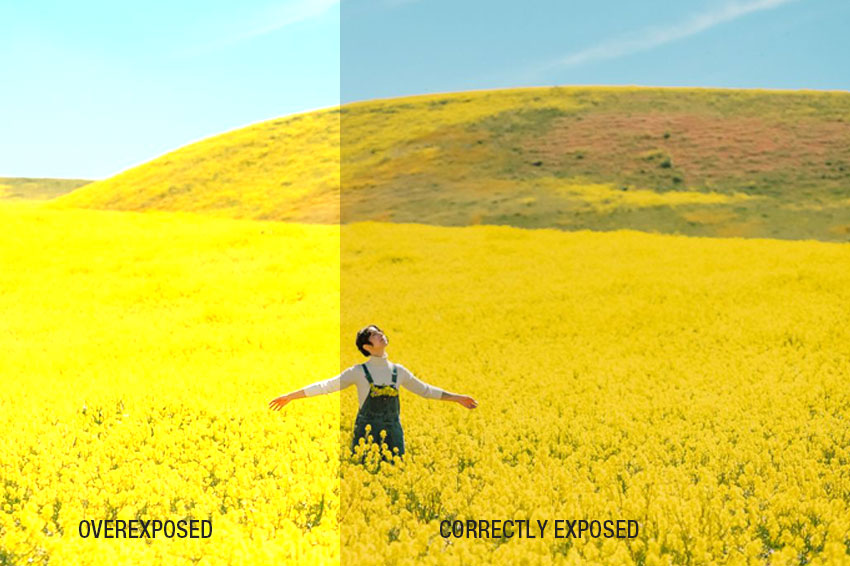
Common causes of overexposed photos include:
- Using a shutter speed that is too slow in bright conditions.
- Increasing exposure compensation too much.
- Shooting under strong sunlight without proper settings.
- Incorrect camera metering in high-contrast scenes.
Overexposure is common in outdoor photography, especially when photographing bright skies, snow, reflective surfaces, or white clothing. For example, a wedding dress may appear completely white without visible fabric texture if highlights are severely clipped.
Is It Better to Underexpose or Overexpose a Photo?
When photographers need to choose between a slightly underexposed and slightly overexposed image, slight underexposure is usually considered safer in digital photography.
The reason is that shadow details can often be recovered during post-processing, especially when shooting RAW files. However, once highlights become completely clipped, the missing details in those bright areas are much harder or even impossible to restore.
However, this does not mean you should intentionally underexpose every photo. Severe underexposure can introduce excessive noise, inaccurate colors, and lower image quality after brightening.
Why Slight Underexposure Is Usually Safer
A slightly darker photo often keeps more highlight information, giving you more flexibility during editing. With RAW files, photographers can usually recover some shadow details while maintaining acceptable image quality.
- Protects important highlight details.
- RAW files provide more flexibility for shadow recovery.
- Brightness and shadow adjustments can restore darker areas.
Why Severe Overexposure Is Harder to Recover
Overexposure becomes difficult to fix when bright areas are completely clipped. Once a highlight area turns pure white, the original texture and color information may no longer exist in the image file.
- Clipped highlights contain little or no recoverable information.
- Bright areas such as skies and white objects may lose texture permanently.
- Recovery depends on how much detail remains in the original photo.
What About Exposure To The Right (ETTR)?
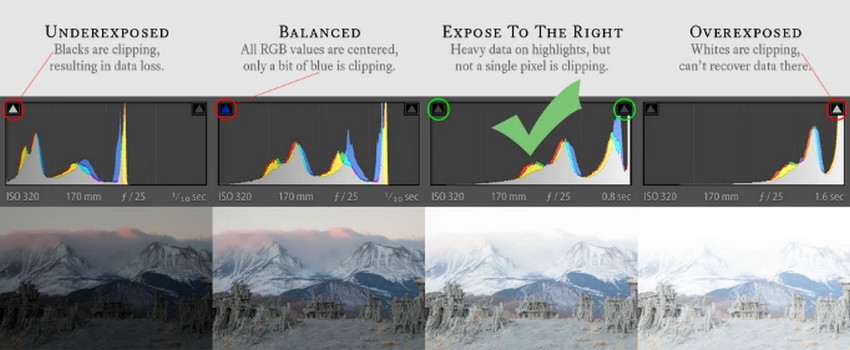
While slight underexposure is often safer, some photographers use a technique called Exposure To The Right (ETTR) to capture more image data. ETTR means increasing exposure slightly while keeping the histogram toward the right side without clipping highlights.
ETTR works mainly for RAW photography because brighter exposures can preserve more shadow information and reduce noise during post-processing. However, it is not the same as creating an overexposed photo. The goal is to maximize image data while protecting highlight details.
Remember:
- ETTR is not intentional overexposure.
- It helps capture cleaner shadow details in RAW files.
- Always monitor the histogram to avoid clipped highlights.
Can Underexposed and Overexposed Photos Be Fixed?
The good news is that many exposure problems can be corrected with photo editing tools. However, the recovery results depend on how much image information remains in the original file.
In general, RAW photos provide more flexibility because they store more exposure information than compressed JPEG files. This gives you more room to recover shadow details or adjust highlights during editing.
However, editing cannot fully recreate details that were never captured. For example, a severely overexposed area with completely clipped highlights may not be recoverable, while a slightly dark shadow area may still contain useful information.
How to Recover Underexposed and Overexposed Photos
Exposure mistakes do not always mean a photo is unusable. Many underexposed and overexposed images can be improved with photo editing tools, especially when the original file contains enough image information.
However, the recovery process is different for each problem. Underexposed photos usually need brightness and shadow recovery, while overexposed photos require highlight correction and detail preservation.
A practical recovery workflow is:
- Identify whether the image is underexposed or overexposed.
- Correct exposure using photo editing tools.
- Reduce noise or recover remaining details.
- Enhance image quality with AI tools if needed.
Step 1: Identify the Exposure Problem Before Editing
Before adjusting settings, check which areas of the image are damaged. The editing approach depends on whether details are missing from shadows or highlights.
- Underexposed photos: Look too dark, with hidden shadow details and possible noise after brightening.
- Overexposed photos: Look washed out, with overly bright areas and possible highlight clipping.
Checking the histogram can also help. A histogram pushed too far left usually indicates underexposure, while a histogram pushed too far right may indicate lost highlight details.
Step 2: Fix Underexposed Photos by Recovering Shadow Details
Fixing an underexposed photo starts with increasing brightness while keeping the image natural. The main challenge is that brightening dark areas can also reveal noise, color shifts, and missing details.
In most photo editors, you can adjust:
- Exposure: Increase overall brightness to make the image clearer.
- Shadows: Recover hidden details in darker areas.
- Blacks: Restore contrast after lifting shadows.
- Curves: Fine-tune brightness in specific tonal ranges.
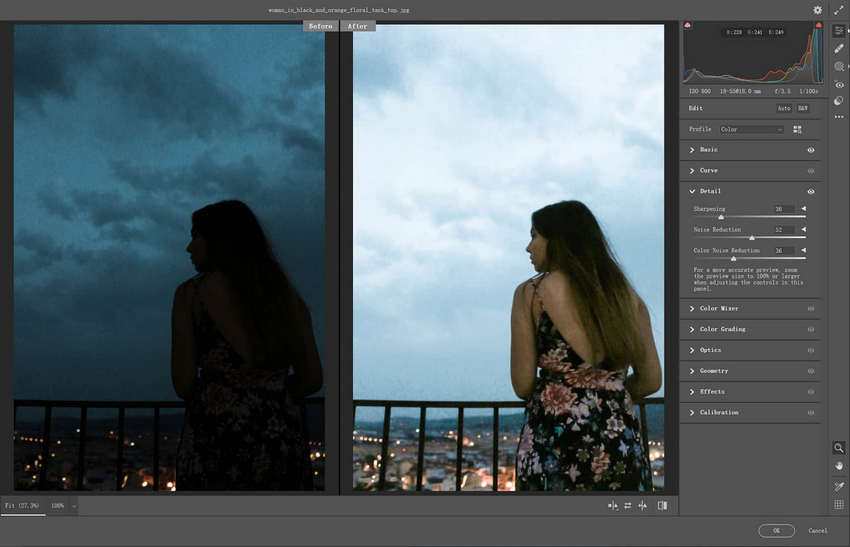
These adjustments work well for mildly underexposed images. However, pushing exposure too far can make photos look unnatural and amplify sensor noise, especially when the original image was captured in very low light. For severely underexposed photos, additional noise reduction and AI enhancement may be needed to restore cleaner details.
Why Brightening Underexposed Photos Creates Noise
One common issue when fixing underexposed photos is increased noise. When you brighten a dark image, you are not only revealing hidden details but also amplifying sensor noise captured during shooting.
The typical process looks like this:
- A photo is captured with insufficient light.
- Exposure or shadow settings are increased during editing.
- Hidden noise becomes more visible in darker areas.
- Noise reduction or detail enhancement is needed to improve quality.
Traditional noise reduction can reduce grain, but aggressive adjustments may also soften important details. AI enhancement can help reduce noise while preserving clearer textures and details.
Step 3: Fix Overexposed Photos by Recovering Highlight Details
Recovering an overexposed photo requires reducing excessive brightness while preserving as much highlight information as possible. The first step is determining whether the bright areas still contain details.
- Mild overexposure: Highlights are bright but textures and colors are still visible.
- Severe overexposure: Highlights become pure white, meaning original details may be permanently lost.
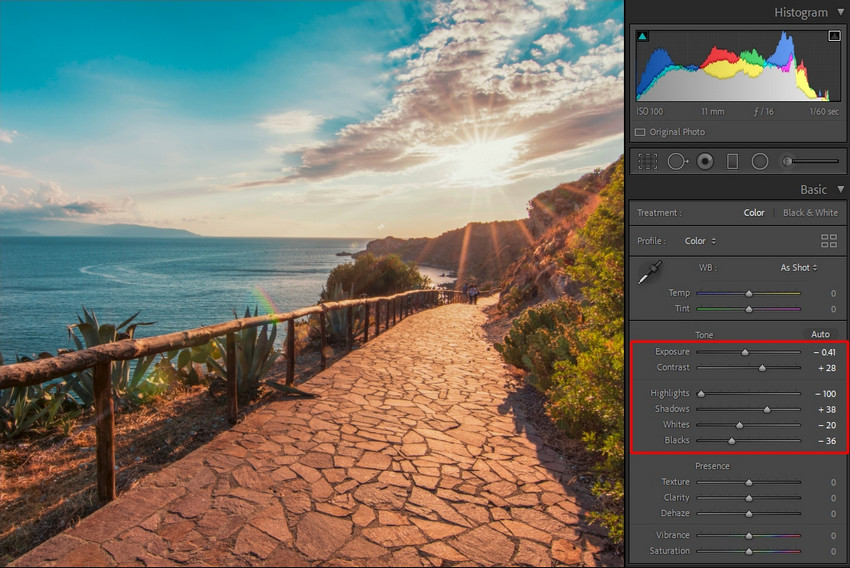
Photo editors can help correct overexposure by adjusting:
- Highlights: Reduce brightness in bright areas and recover visible details.
- Whites: Control extremely bright tones.
- Exposure: Balance the overall brightness.
- Curves: Improve contrast and restore a more natural look.
RAW files usually provide better highlight recovery because they contain more original sensor information. JPEG images have less flexibility because some highlight data may already be compressed or discarded.
For a more detailed guide, see our article on how to fix overexposed photos.
Step 4: Enhance Image Quality After Exposure Correction
Correcting exposure is only the first step. After brightening an underexposed photo or reducing brightness in an overexposed image, some quality issues may remain, such as noise, softness, or missing fine details.
A practical workflow is to fix exposure first, then enhance image quality:
- Correct exposure: Adjust brightness, shadows, highlights, and contrast using photo editors.
- Reduce noise: Clean up grain and artifacts caused by exposure adjustments.
- Enhance details with AI: Improve sharpness, restore natural textures, and increase overall clarity.
- Upscale and export: Create a higher-resolution image for printing, sharing, or professional use.
If exposure correction leaves the photo noisy, soft, or lacking in detail, Aiarty Image Enhancer can handle the quality-enhancement stage in the same workflow. It combines basic image adjustments with AI-powered denoising, deblurring, detail enhancement, and upscaling.
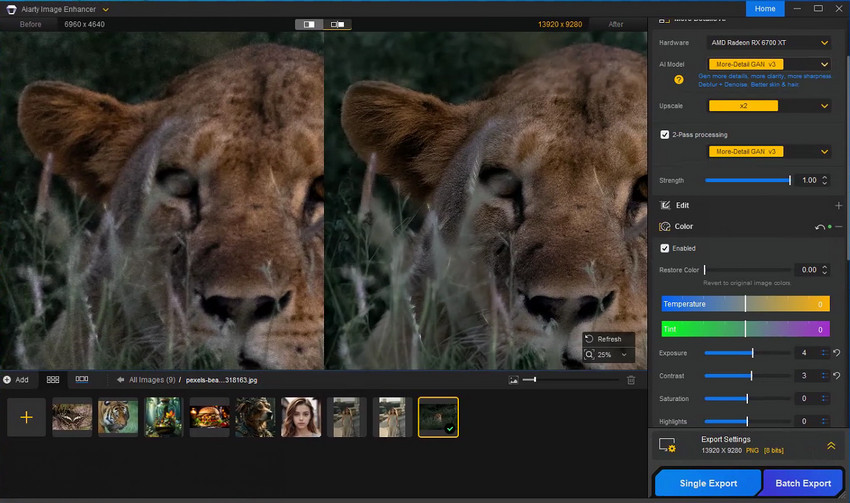
For exposure-damaged photos, Aiarty can be particularly useful for:
- Noise reduction: Clean up grain that becomes visible after brightening underexposed images.
- Detail restoration: Improve soft or unclear details without relying entirely on manual sharpening.
- Deblurring: Improve clarity when exposure correction makes existing softness more noticeable.
- Upscaling: Increase image resolution when the recovered photo needs to be enlarged for printing or other uses.
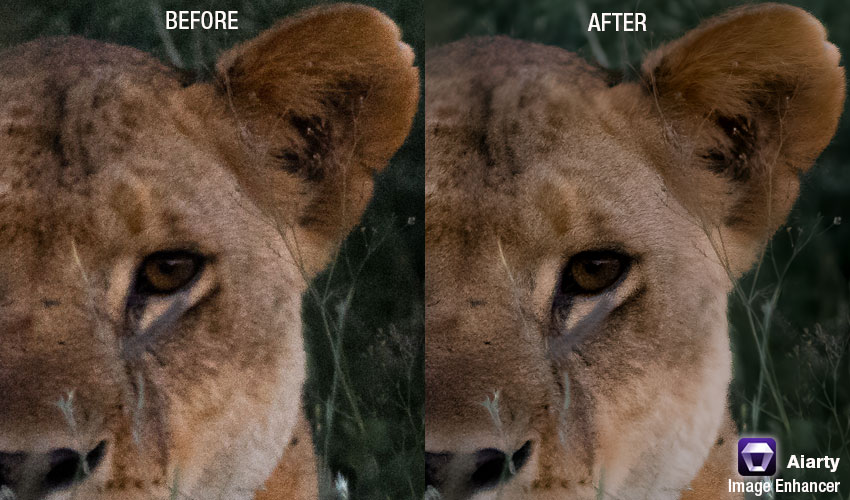
For example, after brightening an underexposed portrait, Aiarty Image Enhancer can help reduce visible noise, improve facial details, and create a cleaner final image.
How to Prevent Underexposure and Overexposure When Shooting
Although editing tools can help recover many exposure problems, capturing a properly exposed image from the beginning will always produce better results. A few shooting techniques can help reduce the chance of underexposed or overexposed photos.
1. Shoot RAW Instead of JPEG
RAW files preserve more image information than JPEG files, giving photographers more flexibility when adjusting exposure during post-processing.
With RAW files, you have more room to:
- Recover darker shadow areas.
- Adjust highlights more effectively.
- Fine-tune brightness and colors without damaging image quality.
2. Check the Histogram Before Taking Photos
The histogram is one of the most useful tools for judging exposure. It shows how brightness levels are distributed across an image.
- A histogram pushed too far left may indicate underexposure.
- A histogram pushed too far right may indicate highlight clipping.
- A balanced histogram helps preserve details in both shadows and highlights.
3. Use Exposure Compensation
Exposure compensation allows you to manually adjust the brightness recommended by your camera.
- Use negative exposure compensation (-EV) to protect highlights in very bright scenes.
- Use positive exposure compensation (+EV) to brighten dark subjects.
4. Use HDR or Exposure Bracketing for High-Contrast Scenes
Some scenes contain both extremely bright and dark areas, making it difficult for a single exposure to capture all details. Examples include landscapes with bright skies and dark foregrounds.
HDR photography and exposure bracketing solve this problem by combining multiple exposures to preserve more details across the entire dynamic range.
Final Thoughts: Fix Exposure Problems Without Losing Photo Quality
Underexposed and overexposed photos happen to almost every photographer. Understanding the difference between them helps you choose the right editing approach and avoid losing important details.
Slight underexposure is often easier to recover than severe overexposure because shadow information is usually more flexible than clipped highlights. However, the best results come from combining proper shooting techniques with an effective editing workflow.
A practical approach is to correct exposure first, then improve image quality with AI enhancement. By reducing noise, restoring details, and enhancing clarity, AI tools can help turn challenging exposure mistakes into better-looking photos.
Try Aiarty Image Enhancer to enhance your corrected photos and restore cleaner, sharper details.
 FAQs
FAQs
In most digital photography situations, slight underexposure is usually safer because shadow details can often be recovered, while clipped highlights from overexposure are much harder to restore. However, severe underexposure can introduce noise and reduce image quality.
Yes. An underexposed photo can often be improved by adjusting exposure, shadows, and contrast. However, brightening a dark image may reveal noise and reduce clarity, so additional noise reduction and AI enhancement can help restore better image quality.
It depends on the severity of the overexposure. Slightly overexposed photos can usually be corrected by lowering highlights, adjusting exposure, and recovering details. If highlights are completely clipped, the original information may be permanently lost.
Increasing exposure on an underexposed photo can reveal hidden sensor noise in darker areas. Brightening the image amplifies both useful details and unwanted grain, which is why noise reduction is often needed after exposure correction.
AI enhancement can help improve exposure-corrected photos by reducing noise, sharpening details, and restoring natural-looking textures. However, AI cannot fully recover information that was never captured, such as completely clipped highlights.


This post was written by Brenda Peng who is a seasoned editor at Digiarty Software who loves turning ordinary photos into extraordinary works of art. With AI assistance for brainstorming and drafting, the post is reviewed for accuracy by our expert Abby Poole for her expertise in this field.
