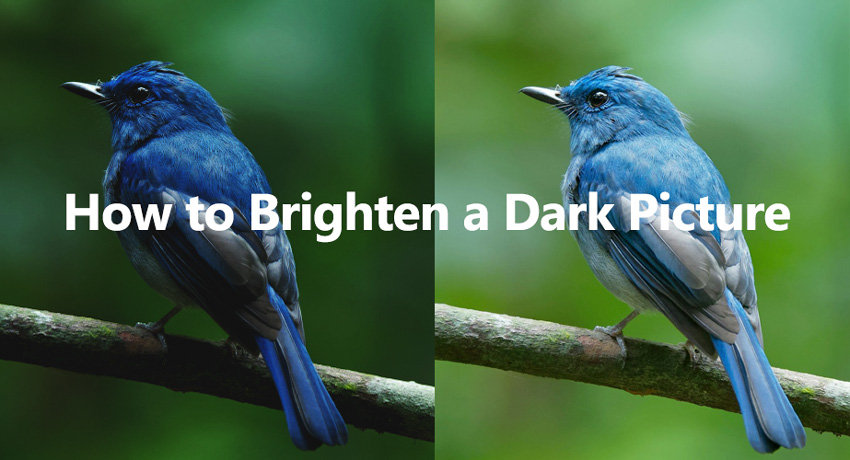
A dark picture isn’t always just “too dim.” In many cases, it’s actually an underexposed photo, meaning the image didn’t capture enough light at the moment it was taken. That’s why simply increasing brightness often leads to flat colors, blown highlights, or heavy noise in the shadows.
Underexposed photos are especially common in low-light scenes, indoor shots, night photography, or images taken with fast shutter speeds. While brightness sliders can make a dark photo lighter, they don’t truly fix underexposure. Instead, they amplify weak light signals, which is why dark areas quickly turn grainy or muddy.
In this guide, you’ll learn how to fix underexposed photos properly from manual exposure adjustments to a smarter AI-based approach that restores exposure, color, and clarity together. Whether you want to fix a dark picture for social media, e-commerce, or printing, this article will show you how to brighten dark photos without sacrificing image quality.
Brightening underexposed photos often reveals new problems. As exposure increases, shadow noise becomes more visible, details look soft, and colors may shift or fade.
![]() Recommended Solution:
Fix Underexposed Photos with Aiarty Image Enhancer
Recommended Solution:
Fix Underexposed Photos with Aiarty Image Enhancer
Aiarty Image Enhancer solves these issues in a single, integrated workflow. It combines exposure improvement with AI-powered denoising, deblurring, upscaling, and detail enhancement—so dark photos become brighter without turning noisy or blurry.
Unlike fully automatic tools, Aiarty also gives you control. You can manually fine-tune exposure, contrast, highlights, shadows, temperature, tint, and saturation, or use sliders to partially restore original colors for a more natural result.
What Is an Underexposed Photo (And Why Brightening Often Fails)
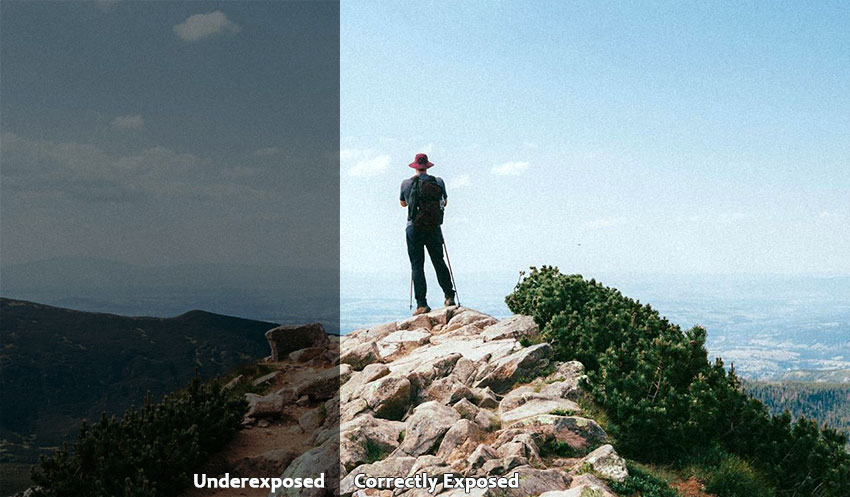
An underexposed photo is an image that didn’t capture enough light at the time of shooting. Although it may look similar to a dark picture, underexposure is a data problem, not just low brightness. Many dark or underexposed images contain weak shadow information that cannot be fully recovered by simple brightening.
This is why underexposed doesn’t mean just dark. When you increase brightness or exposure, you amplify weak light signals instead of restoring real detail. As a result, shadow areas often become noisy, flat, or muddy.
Underexposed photos also tend to suffer from color and contrast issues. After brightening, colors may look dull or distorted, highlights can wash out, and the image loses natural depth — even if it appears lighter overall.
Why Photos Look Dark or Underexposed
Ever taken a photo and wondered, "Why does it look so dark?" Often, this isn’t just low brightness – it’s underexposure, meaning your camera didn’t capture enough light. Here are the main reasons this happens:
- Insufficient lighting: Dim rooms, overcast days, or weak indoor lights don’t provide enough photons to properly illuminate your sensor.
- Wrong exposure settings: Aperture, shutter speed, and ISO control how much light reaches your camera. Using the wrong combination can easily make photos too dark.
- Metering errors: Cameras try to guess the correct exposure, but tricky lighting or uneven scenes can fool them, leaving your image underexposed.
- High contrast scenes: Bright highlights alongside deep shadows can confuse your camera, causing it to favor the highlights and darken the rest of the photo.
These situations often result in underexposed photos rather than just images that are slightly dim. Knowing these causes helps you take control and brighten your shots effectively.
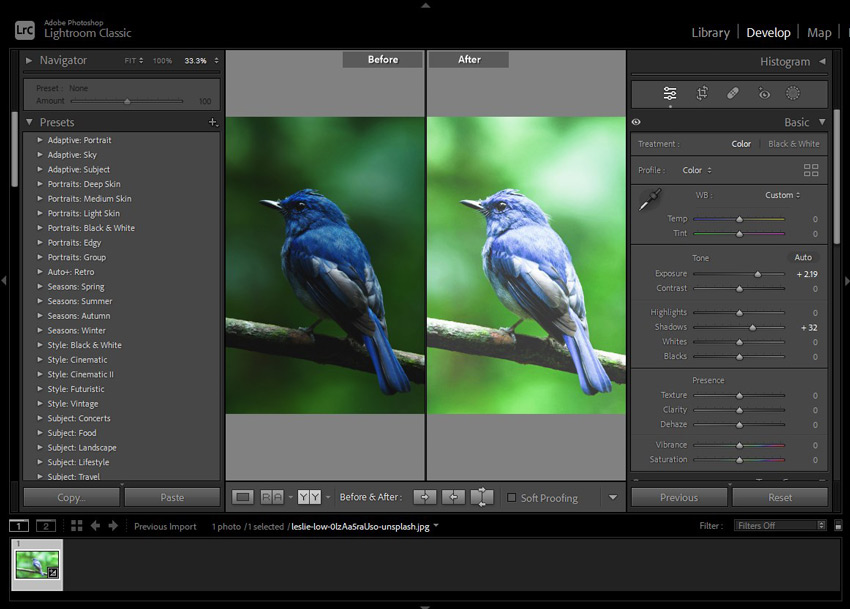
How to Brighten an Underexposed Dark Picture Manually in Lightroom
Lightroom has easy-to-use tools specifically for brightening underexposed images, and it breaks down complex adjustments into simple sliders and controls. Let's take a look at some of the key brightening tools Lightroom offers, and you'll see how easy it is to use.
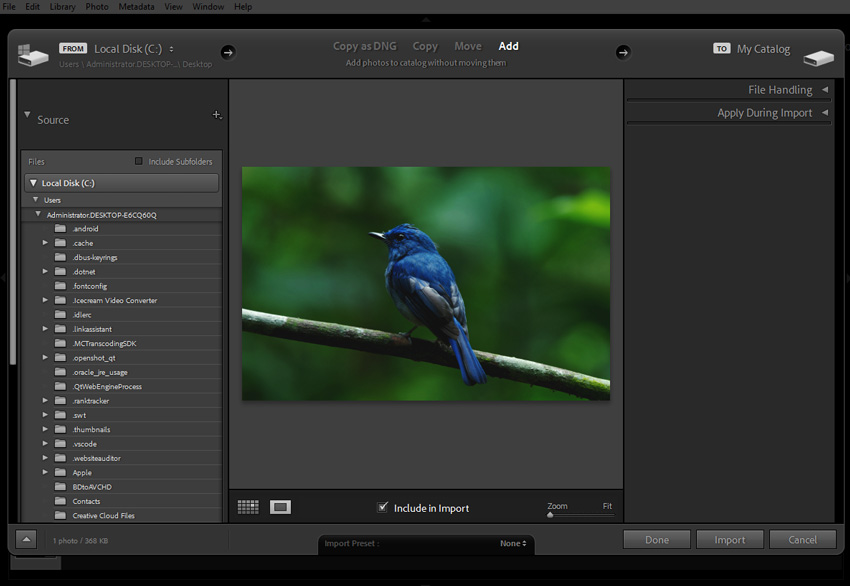
Step 1. Import your dark photo into Lightroom.
First, get your image into Lightroom. Drag and drop it into the Lightroom interface or use the Import function to add it to your library.
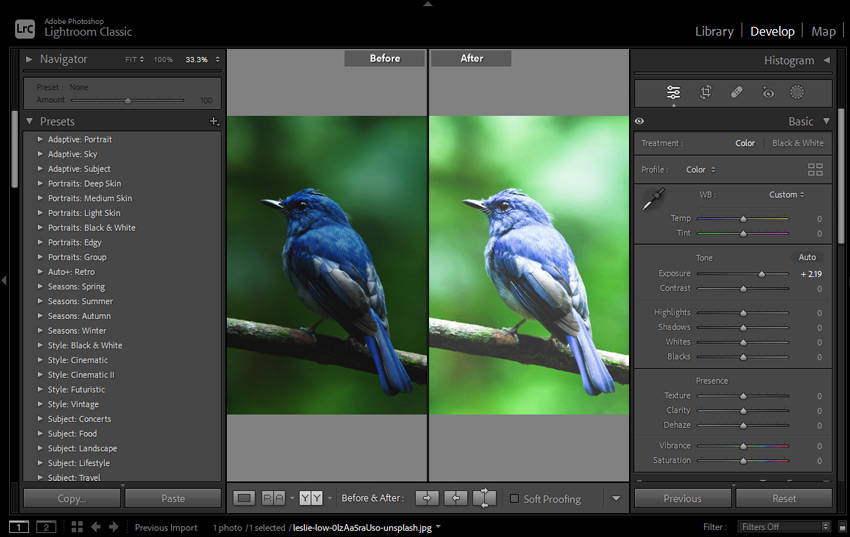
Step 2. Adjust the overall brightness.
Click Develop and locate the Exposure slider in the Basic panel. Drag it slowly to the right. As you move the slider, you'll see your entire photo get brighter.
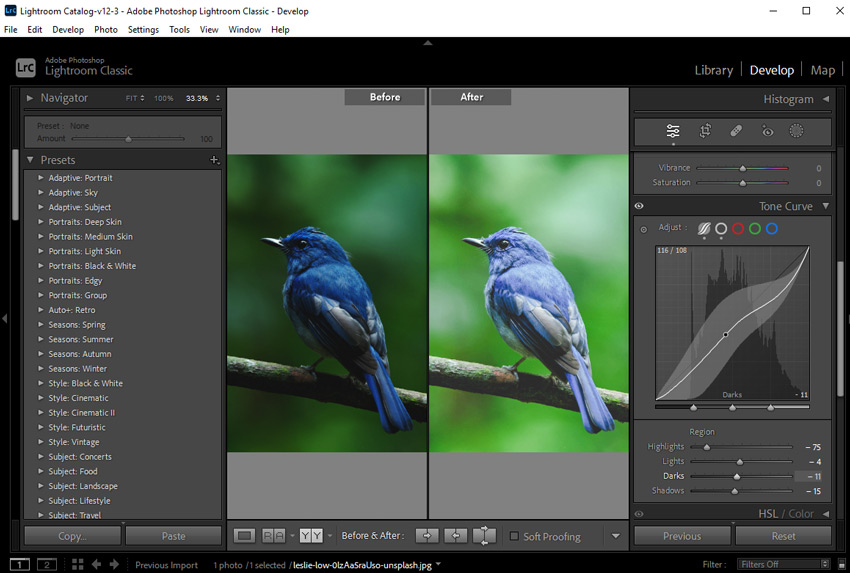
Step 3. Recover detail in dark areas.
Now, focus on the dark areas of your photo – the shadows. Often, dark photos hide details in these shadowy regions. Find and drag the Shadows slider to the right.
Step 4. Control bright area.
Check the bright areas of your photo – the highlights. Sometimes, when you brighten a dark photo, the bright areas can become too bright, losing their own detail and appearing washed out or pure white.
Step 5. Fine-tune contrast and brightness.
For even more refined adjustments, especially if you want to tweak the contrast or brightness in specific tonal ranges, explore the Tone Curve. It lets you precisely control the brightness of shadows, midtones, and highlights.
Step 6. Export your brightened image.
Go to File > Export, choose your desired settings (JPEG is a good general-purpose format), and export your newly brightened photo.
Learn more: Lightroom Classic vs Lightroom CC, which is better for raw editing
Limits of Manually Brighten Dark Photos
Brightening photos in Lightroom gives you full control, but it has its challenges:
- Adjust exposure & shadows: Brighten the overall image and lift dark areas, but it’s easy to overdo it and lose detail.
- Control highlights: Reduce highlights to avoid blown-out areas, which can make the photo look flat.
- Color looks flat: Manual adjustments often wash out natural colors, requiring extra tweaking.
- Noise appears: Lifting dark areas increases grain, especially in photos taken at high ISO.
Manual brightening works, but underexposed photos often look noisy or washed out after editing.
The Smarter Way to Fix Underexposed Photos: Aiarty Image Enhancer
Brightening a dark photo isn’t just about adding light. Underexposed images often suffer from low exposure, color distortion, and shadow noise. Traditional editors tackle these separately, which is why brightened photos often look unnatural. A smarter approach fixes underexposure all at once.
Aiarty Image Enhancer is built for dark or underexposed photos that lose detail, color, and clarity. Using AI trained on real low-light images, it restores brightness, shadows, and colors in one step, minimizes noise, preserves natural tones, and keeps details crisp, turning underexposed shots into vibrant, professional-looking photos with just a few clicks.
Here’s how Aiarty enhances underexposed photos:
- Smart brightness & detail recovery: Aiarty brightens shadows and midtones while restoring lost details, making dark photos clear without overexposing highlights.
- Color correction for low-light images: Adjust temperature, tint, exposure, contrast, saturation, highlights, and shadows to bring back natural, realistic colors in underexposed areas.
- AI-powered denoising & deblurring: Lightening dark photos often introduces noise or blur; Aiarty removes noise and sharpens edges while preserving textures.
- One-step workflow with manual fine-tuning: Instead of separate edits, Aiarty combines enhancement, noise reduction, and deblurring in one workflow, with sliders available for enhancement level.
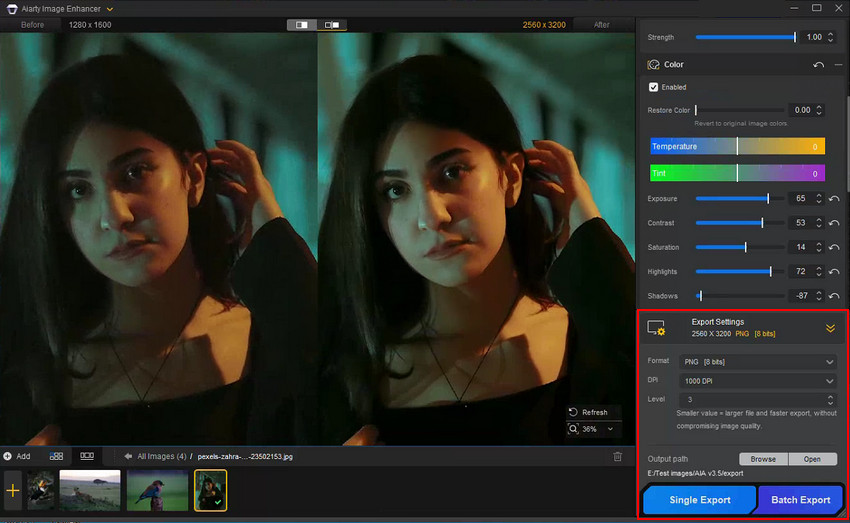
How to Fix a Dark Photo Using Aiarty Image Enhancer
Step 1. Import your dark photo(s). Download, install, and run Aiarty Image Enhancer. Add your grainy, brightened image(s) by drag-and-drop.
Step 2. Choose an AI model and Upscaling factor. Select an AI model like More-Detail GAN v3 or Real-Photo v3 for detail preservation and noise reduction. If you want your image even bigger and clearer, you can drop down the Upscale list to choose x2, x4, x8, or 4K, 8K, etc. To keep the original size, just choose x1.
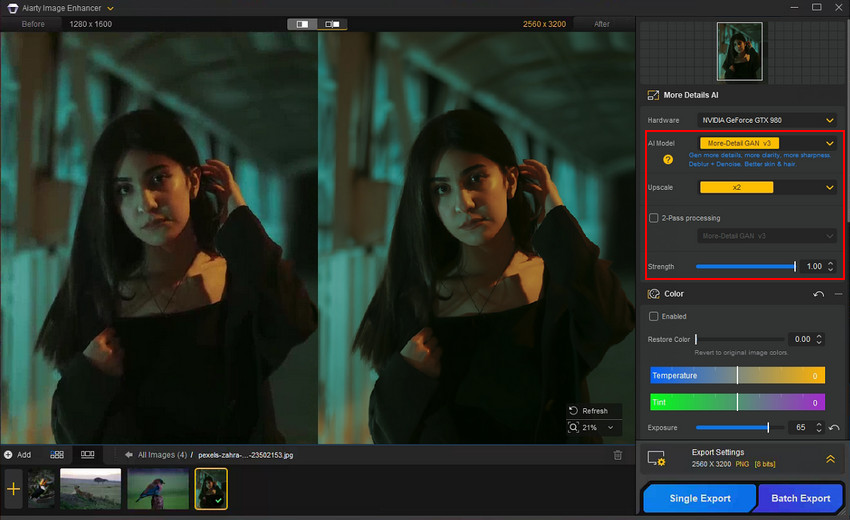
Step 3. Fine-tune color and exposure. Enable the Color option. Here, you can adjust the exposure to fix the underexposed photos, or fix dark pictures by fine-tuning the highlight, shadow, tint, contrast and more.
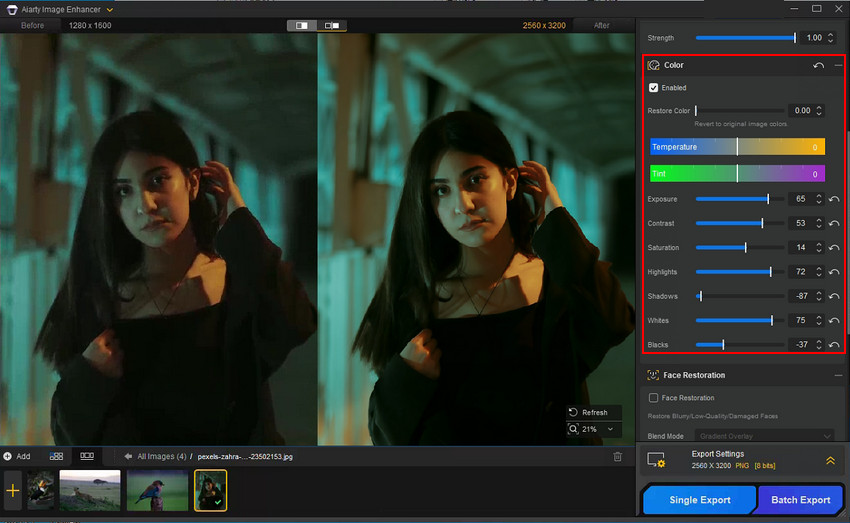
Step 4. Preview & export. At the right Preview window, you can see the real-time before and after results at zoom. When you've done, click Single Export to export your brightened photo individually or Batch Export to save them in bulk.
How to Avoid Dark Pictures (Shoot Brighter Photos)
We've talked a lot about brightening dark photos and tools to help. But you know what's even better than fixing a dark photo? Not taking a dark photo in the first place! Think about it: spending less time editing and more time actually taking photos sounds pretty good, right? Plus, starting with a well-exposed image often just gives you a better-quality result overall. Less noise, more detail to work with – it's a win-win. So, here are a few pro tips to help you shoot brighter, better-exposed photos right from the start.
Tip 1. Get Friendly with Your Camera's Metering
Your camera has a built-in light meter, and it's usually pretty clever. It tries to guess the "right" exposure for a scene. However, it's easily fooled, especially by scenes with a lot of bright or dark areas. Imagine you're photographing a person against a bright sky. Your camera might see all that brightness and think, "Whoa, too much light!" and then underexpose your subject, making them too dark. The metering system is aiming for an average brightness, and sometimes "average" isn't what you want.
Tip 2. Expose for the Highlights
This sounds a bit technical, but it's pretty simple. Highlights are the brightest parts of your image – like that bright sky we just mentioned, or a shiny white car. Digital cameras are generally better at capturing detail in shadows than in highlights. If your highlights are completely blown out, you can't get that detail back. But you can usually brighten shadows later without too much trouble (as we've discussed!).
So, in tricky lighting, it's often better to slightly underexpose to make sure you don't lose detail in the brightest parts. You can always brighten the darker areas later. Many cameras have an "exposure compensation" dial or setting. Use this to quickly tell your camera to make the picture a bit brighter or darker than what the meter suggests.
Tip 3. Become a Natural Light Detective
Pay attention to the light around you. Is it the harsh midday sun that's creating deep shadows? Or is it soft, golden hour light? Often, simply moving your subject or yourself can make a huge difference. Shooting in open shade (like in the shadow of a building, but not directly in sunlight) can give you beautiful, even light. And everyone knows golden hour (sunrise and sunset) is magic for warm, flattering light. Observe how the light is falling and use it to your advantage.
Tip 4. Dare to Dip Your Toes into Manual Mode
Okay, manual mode can sound scary, but it's not a monster! It just means you get to decide the aperture, shutter speed, and ISO, instead of the camera guessing for you. You don't have to jump into full manual all at once. Start by understanding aperture and ISO. A wider aperture (lower f-number like f/2.8) lets in more light. A higher ISO makes your camera more sensitive to light (but can also increase noise, as we talked about). Experiment with these settings in manual mode to see how they affect your exposure. You might be surprised how quickly you get the hang of it.
Tip 5. Check Your Histogram
photo. Ideally, you want the graph to be spread out nicely, not crammed up against the left side (which means underexposed/too dark) or the right side (overexposed/too bright). It's not about getting a "perfect" histogram every time, but it's a really useful tool for quickly checking if your exposure is in the ballpark, right there on the back of your camera. >> How to fix overexposed photos
Mastering exposure in the camera takes practice, for sure. But even just being aware of these tips can make a big difference. And the less time you spend battling dark photos in editing, the more time you have for the fun part –taking more pictures!
Final Thought
Dark photos can hide precious details and suffer from noise, especially when brightened. But don't discard them! You now know techniques to fix dark pictures, and for truly restoring clarity and eliminating noise in those challenging images, Aiarty Image Enhancer is your solution. It excels at intelligent denoising and enhancing details, rescuing your photos from grain and mushiness. Instead of being limited by low light or noisy shadows, use Aiarty Image Enhancer to reveal the hidden potential in your photos, achieving crisp, clear results even from seemingly unusable dark shots.
You May Also Like
This post was written by Brenda Peng who is a seasoned editor at Digiarty Software who loves turning ordinary photos into extraordinary works of art. With AI assistance for brainstorming and drafting, the post is reviewed for accuracy by our expert Abby Poole for her expertise in this field.