Sometimes you hit record, thinking everything looks okay, but later the footage turns out way darker than expected. Maybe it was indoors with poor lighting, or you filmed at night without realizing how dim it actually was. Phones don't always handle low light well — and unless you adjust exposure manually, you might not notice the problem until it's too late.
Dark videos are frustrating. You can barely see faces, backgrounds disappear into shadows, and if there's any movement, things get grainy fast. But don't rush to delete it. There are still ways to brighten a dark video — or at least make it a lot more watchable. Whether you've already filmed it, plan to shoot another, or just want to make a video easier to see while watching — each case has its own trick.
💡 Tips: If your video looks bright enough but still appears grainy, soft, or with color issues, you can try Aiarty Video Enhancer. This AI-powered tool not only denoises and sharpens footage, but also provides advanced color correction controls. It can help with:
- Removing noise and grain from low-light footage
- Fixing blurry or soft video
- Cleaning up compression artifacts
- Sharpening important details
- Upscaling resolution to 1080p/4K without ruining quality
- Adjusting color temperature and tint for natural tones
- Fine-tuning exposure, contrast, and saturation
- Balancing highlights, shadows, whites, and blacks
Free Download Aiarty Video Enhancer to have a try:
How to Brighten a Video Before or While Recording
If you're constantly ending up with dark, barely usable videos, the easiest fix is to deal with it before you hit record. Most phones today actually give you a fair bit of control — it's just that many people don't bother to tweak a few simple settings. Here's what you can do to get brighter footage right from the start, without relying too much on editing later.
Adjust the Exposure — Don't Let the Phone Decide Everything
Your phone usually picks exposure automatically, and it's not always smart about it. Indoors, at night, or when there’s a bright light behind you, the camera might darken everything — including your face.
- On iPhone: Tap to focus on your subject, then slide your finger up to increase exposure. It's easy to miss, but that little sun icon next to the focus box? That's your brightness control.
- On Android: Most camera apps work similarly — tap to focus, then look for a brightness slider, usually marked by a sun icon or exposure symbol (+/-).
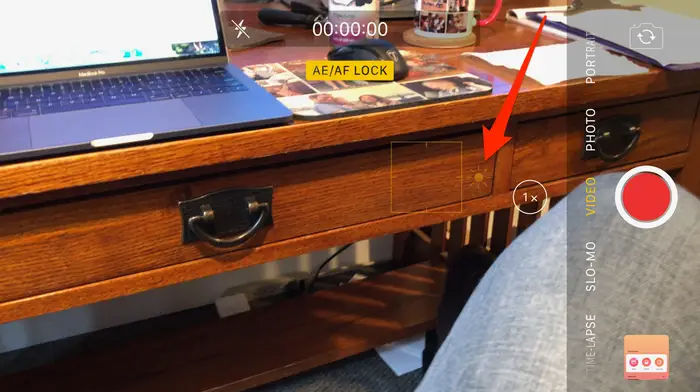
Even a small bump in exposure can make a huge difference. Just watch out for overexposing — if the background turns pure white, you've gone too far.
Use Camera Modes That Are Actually Meant for Low Light
Default "Photo" or "Video" mode isn’t always your friend in dark settings. If you're filming at night or indoors, switch things up:
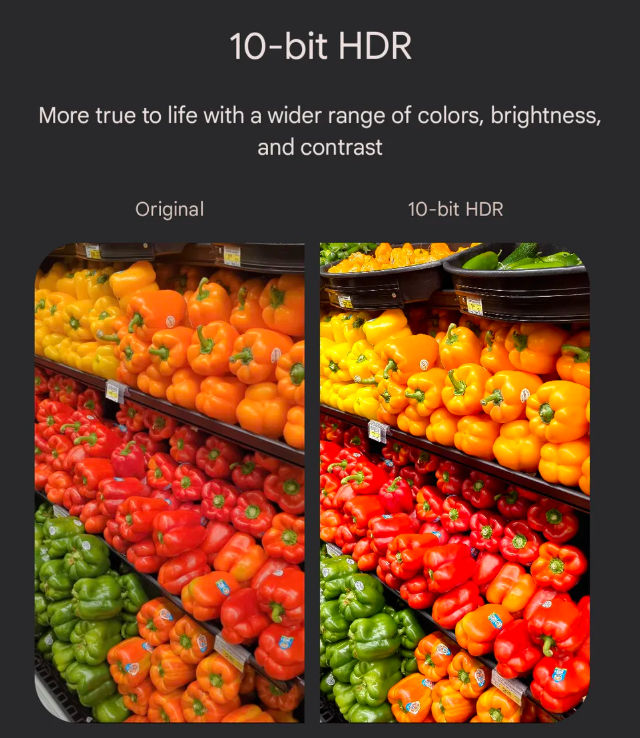
- HDR (High Dynamic Range): Helps balance bright and dark areas, especially useful in tricky lighting like backlit scenes.
- Night mode: Some phones apply it to photos only, but a few newer models (like iPhone 14+ or Pixel phones) also enhance video brightness in low light.
- Pro Mode (Android): This is where things get interesting. You can adjust ISO (sensitivity to light), shutter speed, and white balance — giving you much more control over how bright or dark your video looks. Just don’t crank ISO too high, or you’ll get noisy, grainy footage.
A Few Extra Tricks That Actually Work
- Use a light source — even your friend's flashlight bounced off a wall helps more than you'd think.
- Avoid strong backlighting — like windows or the sun behind your subject.
- Frame your shot around the light — face your subject toward the light instead of away from it.
If you can get the video bright and clear during recording, you're already saving yourself a ton of work later. And bonus — your footage will look cleaner, with less noise and fewer artifacts.
How to Brighten a Dark Video After Recording
So the video's already done, but it looks like it was filmed in a cave. Yeah, we've all been there. Sometimes you don’t realize how bad the lighting was until you play it back — and suddenly your face is missing, the background’s pitch black, and everything feels a little… useless.
But don’t worry — it's not beyond saving. You've got a few options here, depending on how far you want to go and how much control you need.
Method 1. Brighten a Dark Video Using CapCut (Free Mobile App)
CapCut is one of the easiest tools for quick video edits on your phone — and yes, that includes fixing videos that turned out too dark. It's free, beginner-friendly, and works on both iPhone and Android. You don't need any editing experience to use it, which makes it perfect for fast fixes.
Now let's check how to brighten a video with CapCut.
Step 1: Open CapCut and tap New Project. Then, choose the dark video you want to fix from your gallery.
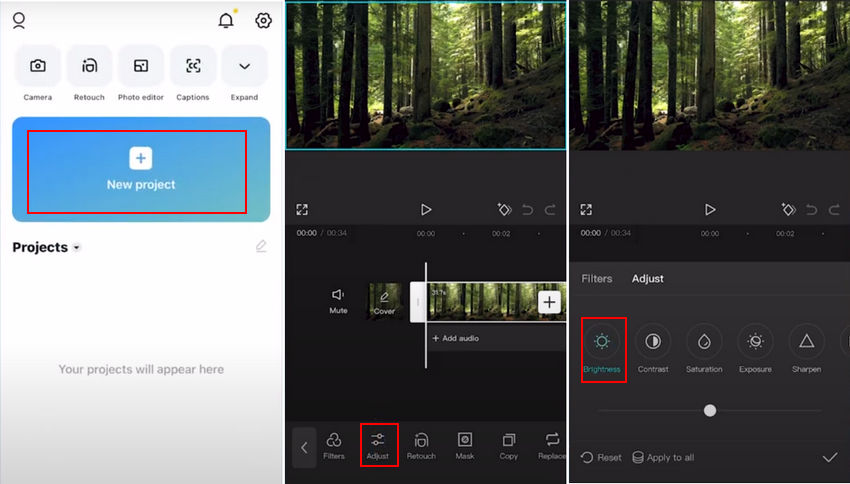
Step 2: Once the video loads, scroll through the bottom toolbar and tap Adjust.
Step 3: Inside the adjustment menu, you'll see a bunch of sliders:
- Tap on Brightness and slide it to the right to brighten the video.
- Try adjusting Contrast and Exposure too — sometimes just raising brightness makes things look flat, but adding a bit of contrast can bring depth back.
- Optional: Use Sharpen or Saturation slightly if the image looks dull after brightening.
Step 4: Preview your changes. If it looks good, tap the √ button.
Step 5: Tap export (usually in the top-right corner), and you're done.
Tips:
- Don't max out the brightness slider — it'll make your video look washed out and unnatural.
- Watch out for extra noise (grainy areas) appearing after you brighten — if you notice that, consider running the brightened video through an AI tool like Aiarty Video Enhancer to clean it up.
Method 2. Brighten a Dark Video Using Clipchamp (Free on Windows 11)
If you're using a Windows 11 computer, you already have a free tool that can help — Clipchamp. It’s built-in, easy to use, and doesn't require downloading anything else.
Step 1: Open Clipchamp, click Import media button to open your dark video, then drop it onto the timeline.
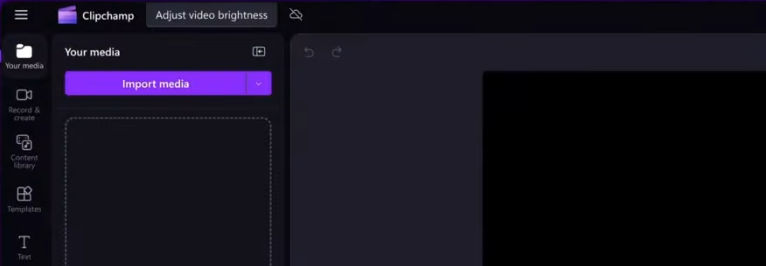
Step 2: Click on the video in the timeline to bring up the editing menu on the right side and then click Adjust colors.

Step 3: In the "Adjust colors" panel, drag the Exposure slider to the right to make it brighter.
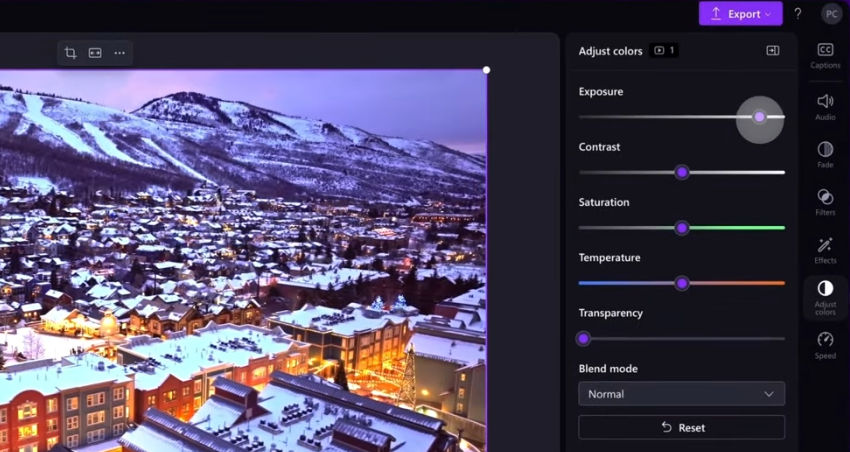
Step 4: Play the video and check how it looks. You can fine-tune the settings as needed — no need to get it perfect on the first try.
Step 5: Once you're happy with it, click the Export button at the top right to save the final video.
Method 3. Brighten a Dark Video Using iMovie (Free on Mac)
If you're on a Mac, iMovie is a solid choice for basic editing. It's free, already installed on most macOS systems, and works well for quick adjustments like fixing brightness.
Step 1: Open iMovie and create a new project. Import your video, then drag it down into the timeline.
Step 2: Click on the video clip in the timeline to select it.
Step 3: Just above the preview window, click the color correction icon — it looks like a palette with sliders.

Step 4: Use the Brightness slider (the gray slider) to increase overall lightness. You can also try:
- Shadow slider: Helps bring out details in the dark areas without making everything too bright.
- Contrast: A slight boost here can keep the image from looking washed out.

Step 5: Hit play and see how it looks. Tweak the sliders if needed, then export the video once you’re satisfied.
Tips:
- If your video starts looking flat after increasing brightness, balance it with shadows and contrast instead of just pushing brightness alone.
- iMovie doesn't have built-in noise reduction, so if the video gets grainy after editing, consider using Aiarty Video Enhancer to clean it up and sharpen the result.
Check more video editors for Mac >>
Method 4. Brighten a Dark Video Using Clideo (Online Tool)
If you don't want to install anything, Clideo is a quick way to brighten a video directly in your browser. It works on both desktop and mobile, and supports most common formats.
Step 1: Go to clideo.com/adjust-video and upload your video. You can drag the file in or select it from your device.
Step 2: Once the video finishes uploading, you'll see a few sliders. Move the Brightness slider to the right to lighten the image.
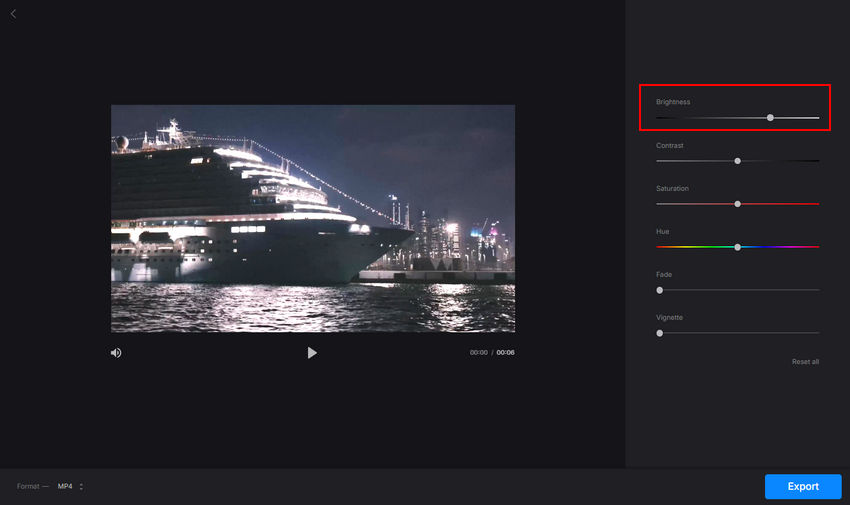
Step 3: If the video looks flat or faded, adjust Contrast to bring back some sharpness. You can also test Saturation if colors appear dull after brightening.
Step 4: When you're happy with the preview, click "Export." Clideo will process the video and give you a download link.
Tips:
- The free version adds a watermark — to remove it, you’ll need a paid plan.
- Large files take longer to upload and export, especially on slower connections.
Method 5. Brighten a Dark Video Using Premiere Pro (Pro-Level Editor)
If you're dealing with an important video — maybe for YouTube, work, or a client — and you want full control over brightness without messing up the image, Premiere Pro is a solid choice. It takes a bit more time to learn, but it gives you much more precision than mobile apps or online tools.
Step 1: Import your video into Premiere Pro and drag it onto the timeline.
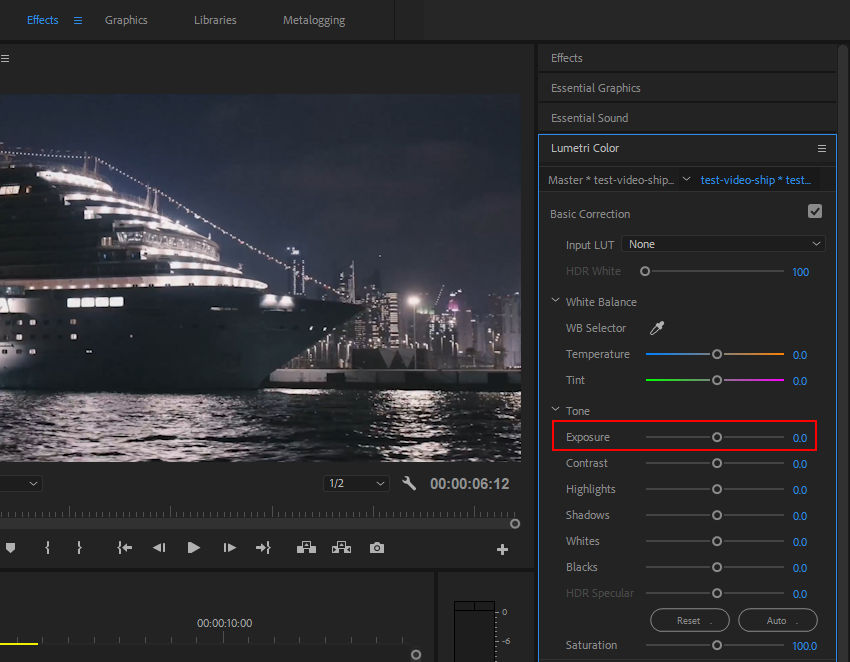
Step 2: Open the Lumetri Color panel. If you dont see it, go to Window > Lumetri Color to enable it.
Step 3: Under the Basic Correction section, increase Exposure to brighten the entire image. You can also:
- Adjust Shadows to lighten darker areas without overexposing the highlights.
- Use Contrast to add depth if the video starts looking too soft.
- Tweak Whites and Blacks to fine-tune overall balance.
Step 4: Play the video back in the preview window to check the result. It's often helpful to make small adjustments, watch a bit, then adjust again — rather than trying to fix everything at once.
Step 5: Once it looks good, export the video using your preferred settings.
Why Brightening a Video Leads to Grain and Artifacts
You adjust the brightness, the video finally looks clear enough to see what's going on — and then, out of nowhere, it's covered in grain. The dark areas turn noisy, faces look fuzzy, and there's that weird pixel shimmer or blocky distortion that wasn't obvious before.
This is super common. When you raise brightness (or exposure), you're not just making the image lighter — you're also revealing what was hiding in the shadows. And in low-light footage, what's hiding there usually isn't detail — it's noise and compression artifacts. Phones and even DSLRs struggle to capture clean footage in the dark, especially at low bitrates, so when you push those darker zones, the sensor noise and compression damage get dragged out with it.
Artifacts often show up as blocky patches, strange color blotches, or ghosting around motion. They’re usually baked into the video during recording or compression — and brightening just makes them more visible.
So What Can You Do About It?
First, check if the editing tool you're using has any kind of noise or artifact reduction. Some apps — like Premiere Pro or DaVinci — include basic denoise effects. They help a bit, but usually at the cost of softening the whole image. And when it comes to compression artifacts, most basic editors don’t really have a way to fix them at all.
Related article: How to Denoise Grainy Video Footage in Premiere Pro (2025 Guide)
If that doesn't cut it, or your tool doesn't support proper cleanup, this is where something like Aiarty Video Enhancer makes a real difference.
Unlike standard denoise filters that blur everything just to hide the grain, Aiarty goes a different route. Its SuperVideo vHQ model is built specifically for extreme low-light cleanup. It uses a combo of Diffusion and GAN techniques, which sounds technical, but what it actually does is impressive:
- It removes noise without killing sharpness
- It reduces visible artifacts from heavy compression
- It brings back real texture in scenes that are nearly black
- It works especially well on things like night skies, city lights, or dim indoor clips
Yes, it takes a bit longer to process — this model isn't built for speed, it’s built for quality. But if your top priority is getting a clean, clear result from footage that’s basically unusable otherwise, it’s worth it. SuperVideo vHQ is available with 2x scaling, so you also get an instant resolution boost along with the cleanup.
How to Use Aiarty Video Enhancer to Remove Grains and Artifacts
If you've already brightened your video and now it looks worse — full of grain, fuzz, or weird digital blotches — here's how to clean it up using Aiarty Video Enhancer.
Step 1: Download and install Aiarty Video Enhancer on your computer.
Step 2: Open the software and click the "+" icon to import your footage. Most formats are supported, so no need to convert beforehand.
Step 3: Open the AI Model dropdown and choose an AI model.

Step 4: Choose your upscale option — leave it at x1 to keep the original resolution or go 2x if you want to upscale while denoising.
Step 5: Click Preview to see how it looks. If you're happy with the result, click Add Task, then hit Export Current to process the whole video.
That's it — no need for manual masking, stacked effects, or trying to balance sharpness vs blur. Aiarty takes care of the cleanup, so you can actually use the footage you nearly gave up on.
Don't Want to Edit? Here's How to Make a Video Brighter During Playback
Sometimes you don't need to edit a video — you just want to see it better while watching. Maybe it's a movie that's too dark, a vlog shot at night, or just a clip someone sent you that looks way too dim. In these cases, you can tweak brightness during playback without touching the original file.
On Desktop: Use a Video Player That Lets You Control Brightness
The easiest way is to use VLC Media Player. It's free, lightweight, and lets you adjust brightness, contrast, gamma, and more — in real time.
Step 1: Open your video with VLC.
Step 2: Go to Tools > Effects and Filters.
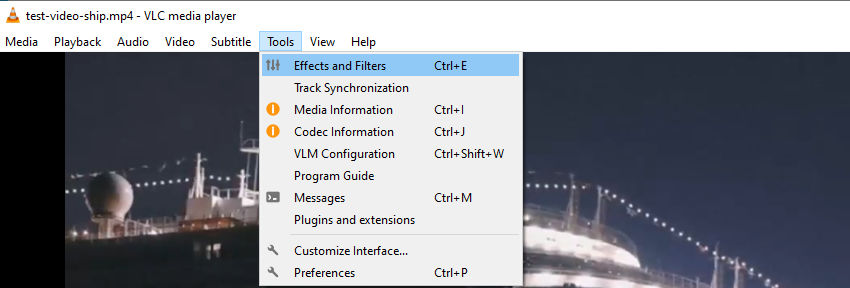
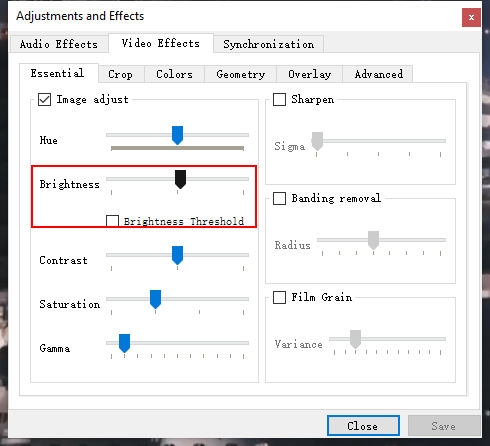
Step 3: Under the Video Effects tab, click on Essential (or Adjustments, depending on version).
Step 4: Check the Image adjust box, then drag the Brightness slider until the video looks clearer. You can also tweak Gamma or Contrast if needed.
That's it. You'll see the changes instantly, and they won't affect the original file.
Some other players like PotPlayer or KMPlayer offer similar features — worth trying if VLC feels clunky or outdated to you.
On Mobile: Rely on Your Phone's Brightness and Playback App Settings
If you're watching on a phone, your options are a bit more limited, but still workable.
- Manual screen brightness: Obvious but effective — crank your phone's brightness to max.
- Video enhancer mode: Some Android phones (like Samsung) come with built-in "video enhancer" or "video brightness" settings that auto-boost playback brightness in supported apps.
- Third-party players: Apps like MX Player let you swipe up/down on the screen to adjust brightness in real time while watching.
These tweaks won't magically bring back lost detail, but they can make a too-dark video more watchable on the fly — no editing, exporting, or re-processing needed.
Final Thoughts
No one sets out to shoot a dark, unusable video — but it happens. The good news is, there's more than one way to fix it. You can brighten things up before recording, tweak it after, or just make it watchable during playback. It doesn't have to be perfect — but if you care about clarity, reducing that noisy mess is what really makes the difference.
Most apps can boost brightness, but not many clean up the side effects. That's where something like Aiarty Video Enhancer earns its spot — not by adding filters, but by actually recovering detail you thought was lost. Especially when things are borderline unusable, a solid denoise and upscale can bring your footage back to life.
You May Also Like
This post was written by Ashley Brown, a videographer turned AI explorer. As an associate writer at Digiarty Software, she dives into the latest AI-powered tools for video enhancement and content creation, offering practical insights and unbiased commentary. Accuracy confirmed by Abby Poole.