Premiere Pro is designed as timeline-based video editing software, with a main focus on creative projects instead of being a simple video converter or quick editor.
If you are learning Premiere Pro, and try to rotate a video as part of your video editing on the timeline, follow the detailed steps with screenshots below.
If you get used to the quick way of rotating a video, just as how we do that on mobile: open video > edit > rotate > save, then you can jump to the bottom part for an easy solution, with support for batch tasks.
How to Rotate a Video in Premiere in 1 Minute
For absolute beginners needing guide to properly place the video to the timeline before you can edit and rotate a video in Premiere Pro, please refer to the more detailed tutorial in the next part below.
For others already familiar with Premiere Pro, here's a quick guide on how to rotate a video:
1. Create a new project and import you video.
2. Drag the video to the timeline and select it.
3. Click Effect Controls > Rotation.
You can input any value to rotate the video, such as 90 degree, 180 degree, etc.
4. Edit timeline resolution to the desired output resolution and export the video.
These are the essential steps to rotate a video. Likewise, you can flip a video by adding the flip effects to the clip. Still, all the steps below can be over-simplified for total beginners, with pitfalls and special instructions needed.
How to Rotate Videos in Premiere - Detailed Beginners Guide
Unlike quick editors that simply open your video and adjust it, video editing software like Premiere Pro are project based. Here are detailed steps to rotate videos in Premiere Pro, from project creation to timeline resolution settings and export.
Step 1. Create a new project in Premiere Pro.
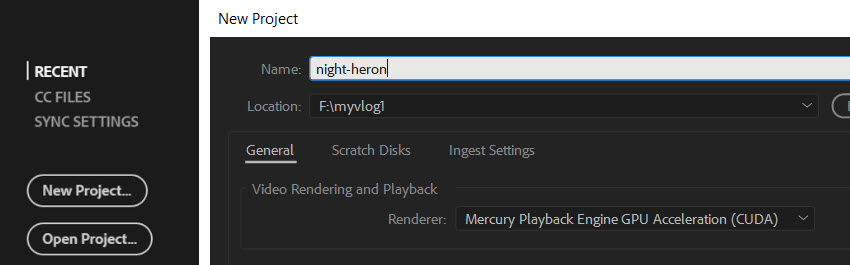
Hit the New Project button, input a custom project name and define the path of the project.
Step 2. Import a video.
From the menu, hit File > Import (Ctrl+I).
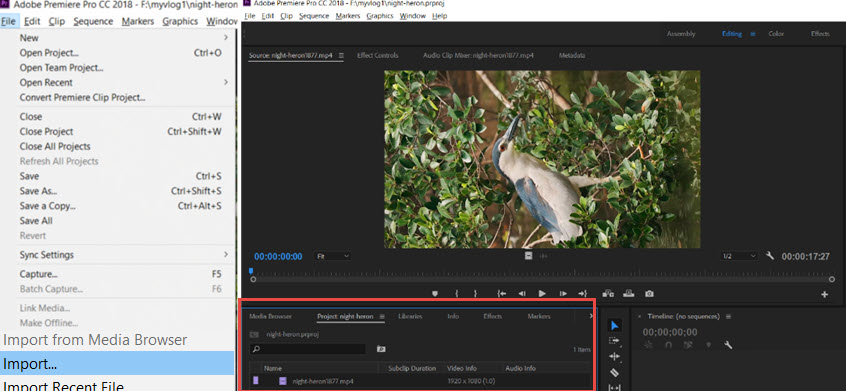
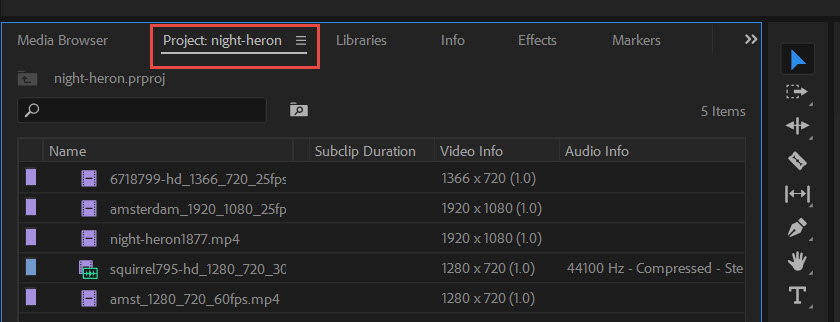
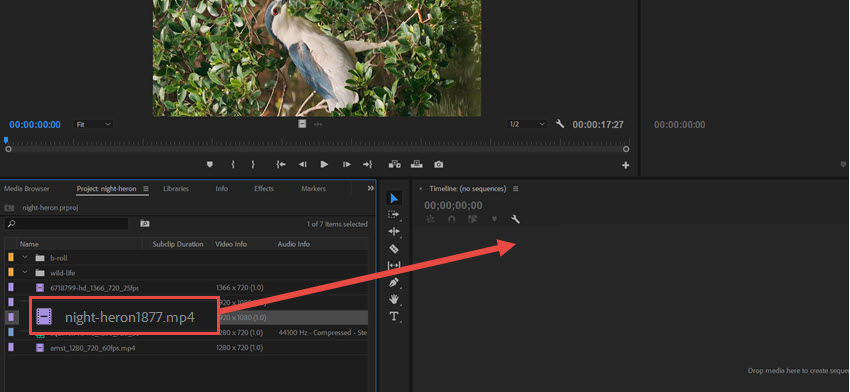
The imported video will be added to the bottom left panel of your workspace. If you don't see it, make sure the Project tab is selected.
Sometimes, you might accidentally click on another tab, such as Info, Effects, or Markers.
Step 3. Drag the video to the timeline.
Click on the imported video, drag it to the timeline (on the right side) and release your mouse.
<
This will create a sequence for your video, with sequence settings default to the dimensions of your video.
For instance, if your source video is 1920x1080, the sequence will be of the same resolution. If you continue dragging another smaller video (such as 1280x720) to this sequence, there will either be black bars around it, or you need to resize it to fit the screen.
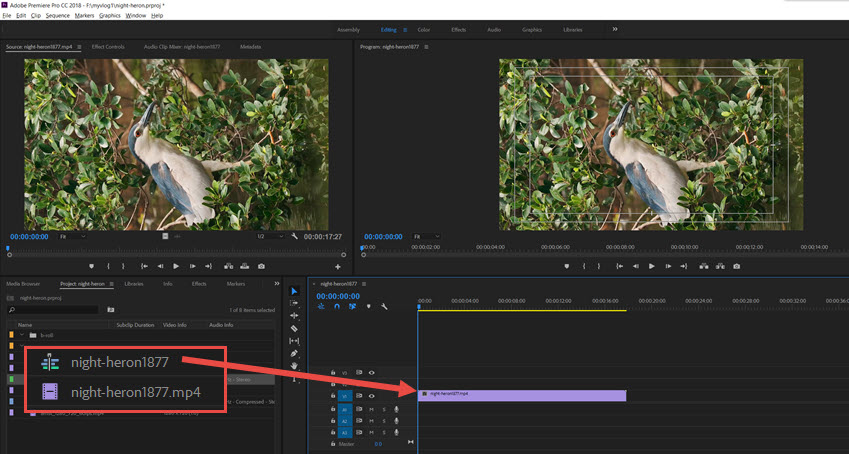
As shown in the screenshot above, the filmstrip icon represents your source video, while the Sequence icon represents the newly created sequence based on that video.
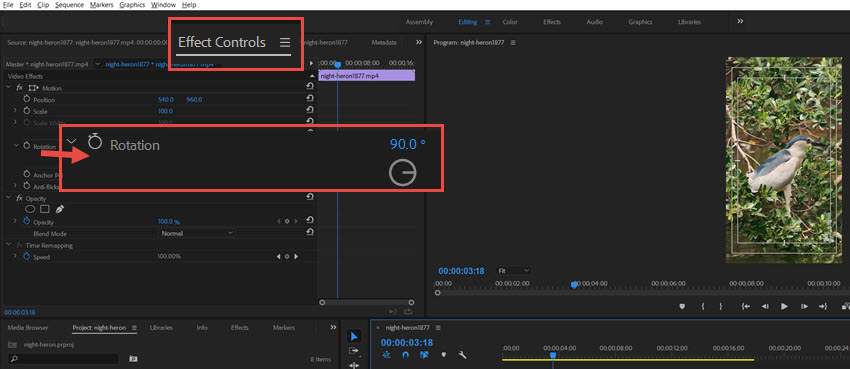
Step 4. Find Effect Controls in Premiere Pro.
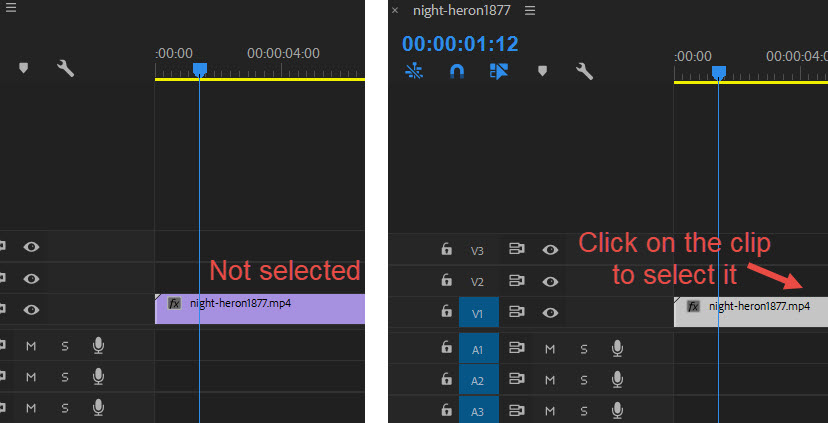
At the bottom panel of the timeline, click on the video clip. Then head to the top left panel, and hit the Effect Controls tab.
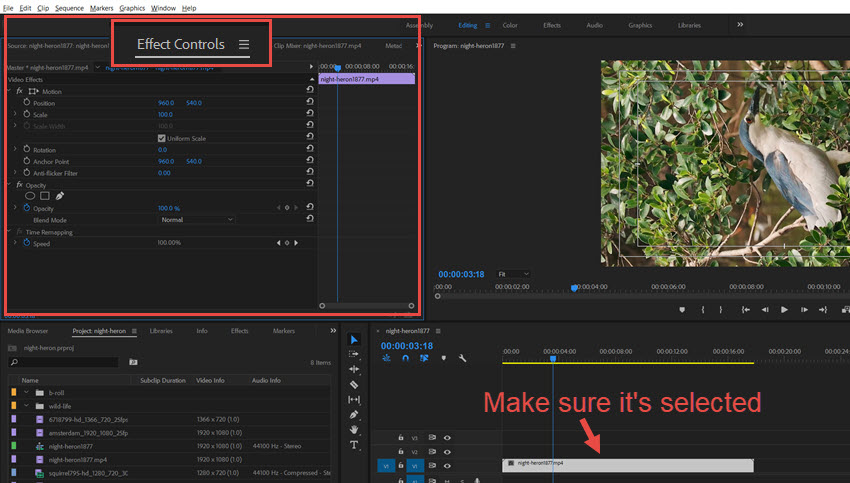
If you don't see parameters under the Effect Controls value, it is most likely that you haven't selected the clip yet.
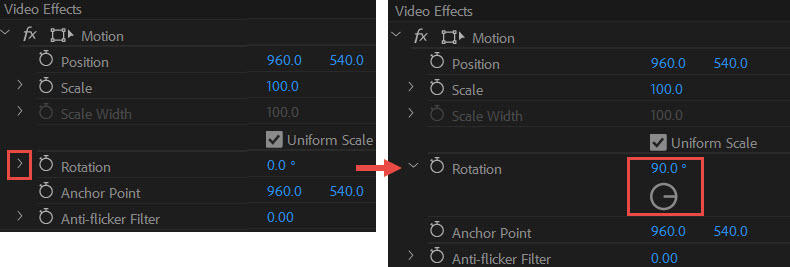
Step 5. Rotate the video in Premiere.
Under the Effect Controls panel, you shall find the Rotation effect. You can adjust the value to rotate a video, or drag that line around the ring for the rotation.
You can click the arrow to expand the parameter settings.
Note:
Do not click the clock icon next to Rotation unless you want to create an animation. The clock enables keyframes, which animate the Rotation value over time. If keyframes are enabled and you change the Rotation value at different points in the timeline, the video will rotate as it plays.
Step 6. Adjust sequence resolutions.
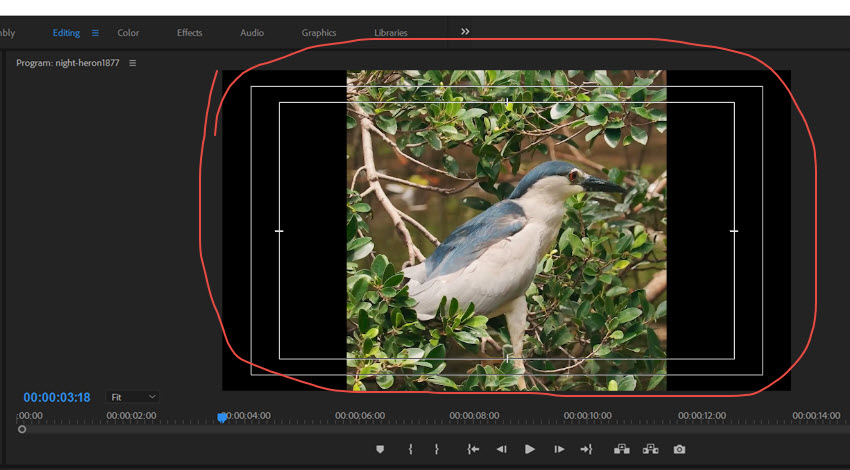
For a 180 degree rotation, the video stays unchanged as 1920x1080. For a 90 degree rotation, however, since your video changes from horizontal to vertical, you can either stick to the horizontal resolution, or changing sequence settings to fit the new vertical dimension.
To illustrate, the 90-degree rotated night heron video is shown in the screenshot below. If you directly export the video, it will still be a horizontal 1920x1080, meaning there will be black bars around the vertical video.
If you prefer to make it a truly vertical 1080x1920 video, follow the instructions below.
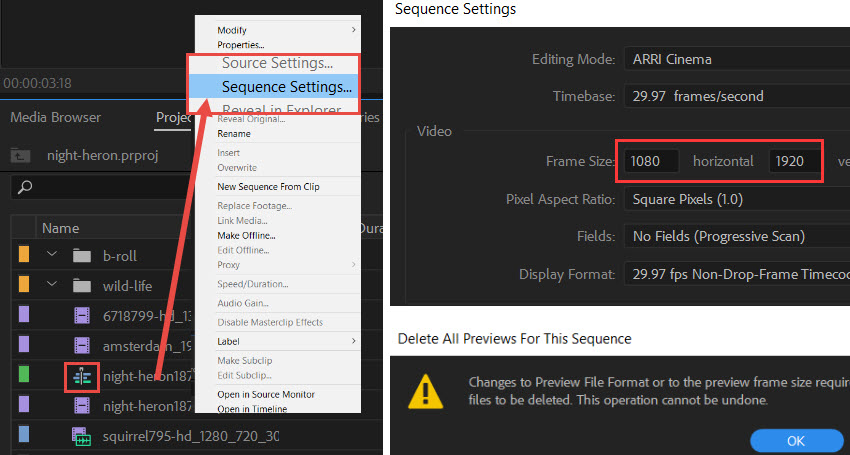
Right-click the sequence for the night heron video, then select Sequence Settings. Change Frame Size from 1920x1080 to 1080x1920.
Note: Be sure to right-click the sequence, not the video clip. They use different icons, as shown in the screenshot above.
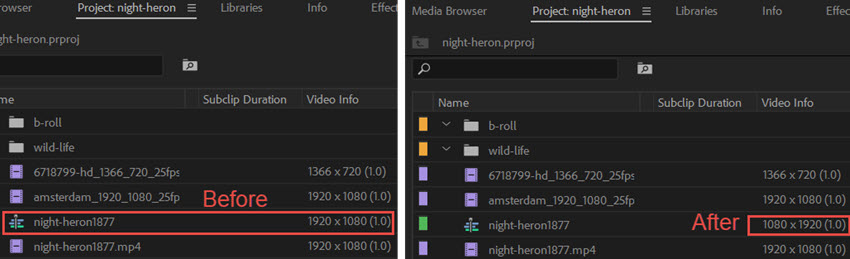
After the revision, the rotated video will be in the vertical format without black bars.

Step 7. Export the video.
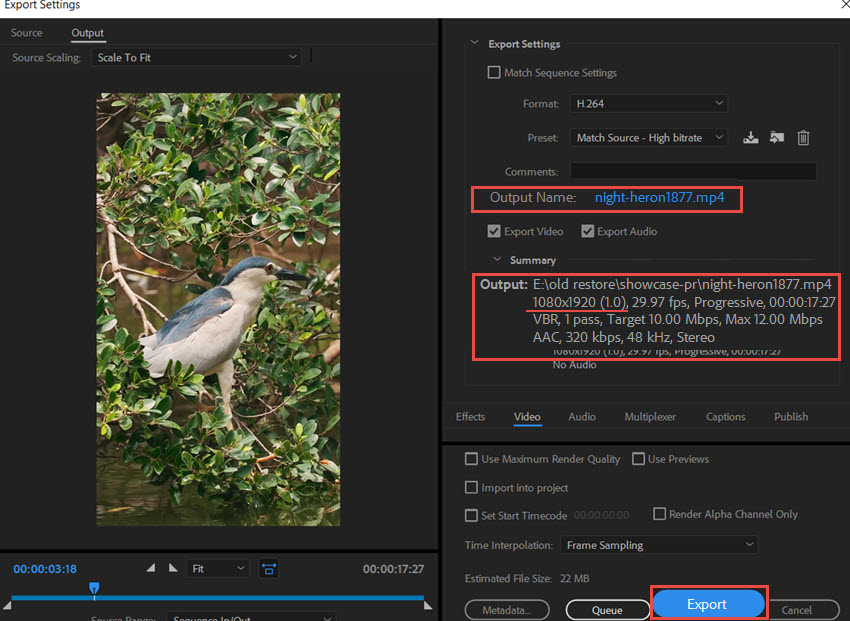
Go to File > Export > Media (Ctrl+M). In the Output info section, you can check the final output resolution.
If you want to change the export path of the video, click on the Output Name section, where you can change both the name and the folder location.
How to Flip a Video in Premiere Pro
Now that you are familiar with how to rotate a video in Premiere Pro, you can also flip a video or adding other effects.
To Flip the video, simply search for the Flip effect under the Effects panel.
Drag the flip effect to the video clip to apply that effect. You can flip it horizontally, vertically, or apply both.
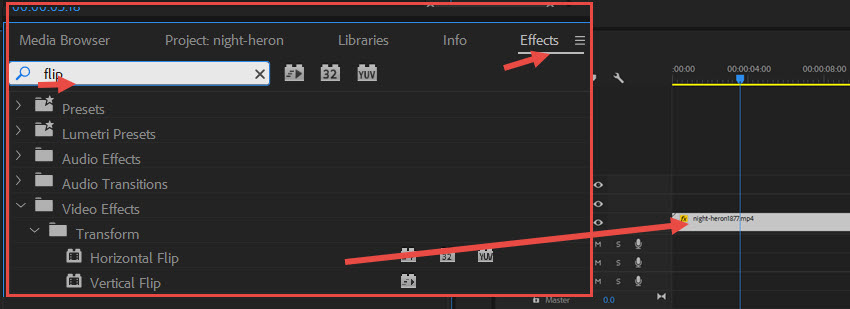
Once you applied the Flip effect, it will also show up in the Effect Controls Panel just as how we deal with the Rotate Effect.
Tips When Editing in Premiere Pro
In the previous steps, we demonstrated how to import and edit a single video in Premiere Pro. But what if you want to rotate or flip multiple videos?
To edit multiple videos independently, make sure each video has its own sequence. After editing, export each sequence separately by adding it to the export queue.
If you drag multiple video clips to the same sequence, Premiere Pro will assemble them as one video. In other words, those clips will be combined into one final video when you export the sequence.
Batch Rotate Videos and Enhance Video Quality and Workflow
Before or after video editing in Premiere Pro or any other timeline-based video editors, it will be more efficient to process videos to the desired quality and format in batch. When you are not in creative projects, you can also use the tool as a standalone app for video rotation, upscaling, quality restoration, or color editing.
For these scenarios and beyond, Aiarty Video Enhancer is popular among videographers, content creators, YouTubers, and general family usage.
How to Rotate a Video in Aiarty:
Step 1. Free download and install Aiarty Video Enhancer for Windows or Mac.
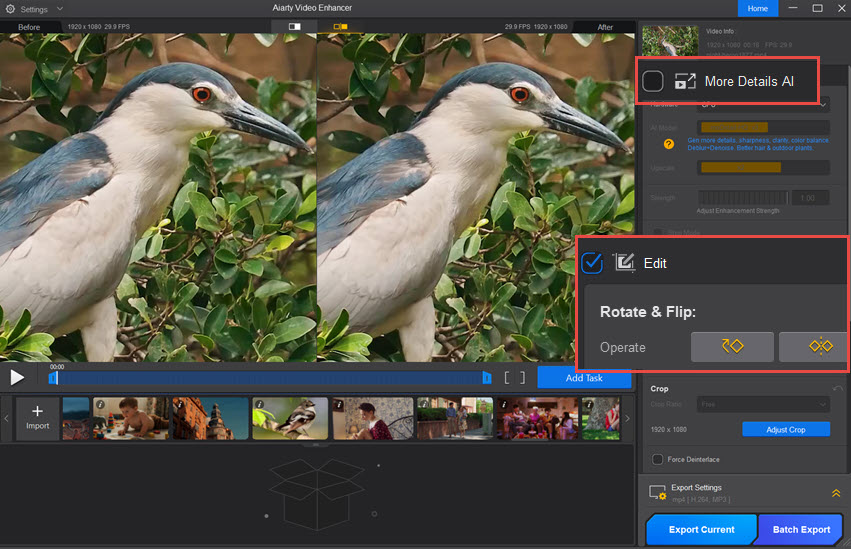
Step 2. Add the video, enable Edit, and hit Rotate.
Step 3. Export the video.
You can import multiple videos and batch rotate them easily.
If you don't need AI-driven video quality enhancement and upscaling, simply uncheck the box before "More Details AI". Though, this deep-learning quality enhancer is quite handy for Premiere Pro workflows or as a standalone video quality enhancement solution.
Here's how it helps when enabled:
Test 1. Upscale and reduce video noise
Before creative video editing, preparing video assets at the best quality and unify to a target resolution can speed up the workflow.
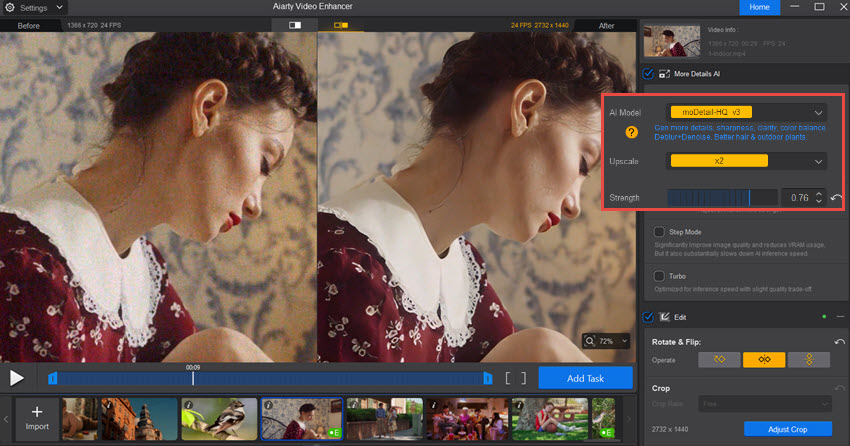
For low-light grainy videos, the deep-learning models in Aiarty Video Enhancer will auto analyze video quality problems and fix it. You can keep the original resolution, or upscale by x1.5, x2, x4, or set custom 4K resolutions, which will increase video resolution while restoring natural details.
The strength slider controls how strongly the neural network enhances the video quality. A value around 0.75-0.8 for this portrait video works naturally.
You can compare it with video noise reduction in Premiere Pro.
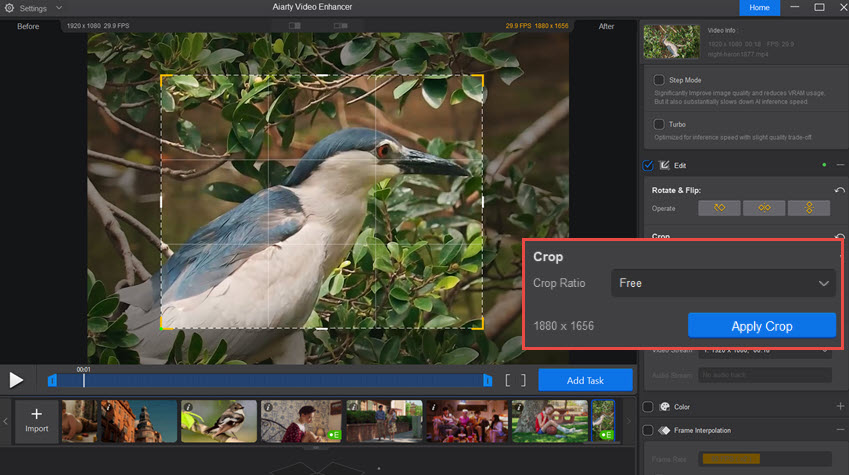
Test 2. Crop and Upscale videos.
For scenarios when you need to put the far away subject in frame, such as wildlife videos, cropping will result in smaller resolution. When fitting the footage to full screen in Premiere Pro or any other video editors, the video look soft and blurry.
With Aiarty Video Enhancer, you can crop video, upscale it, and optionally restore details with deep-learning algorithms.
Wrap Up
The next time you want to rotate a video, simply remember this: all the effects such as rotation, flipping, and scaling are adjustable under the Effect Controls panel.
If you don't see a certain effect, search for it in the effects library and drag it to the video clip.
For a series of basic Premiere Pro tutorial, we also cover these topics with easy guide:
- How to change resolution in Premiere Pro
- How to change aspect ratio in Premiere Pro
- How to change frame rate in Premiere Pro
- How to speed up video in Premiere Pro
You May Also Like
This post was written by Ashley Brown, a videographer turned AI explorer. As an associate writer at Digiarty Software, she dives into the latest AI-powered tools for video enhancement and content creation, offering practical insights and unbiased commentary. Accuracy confirmed by Abby Poole.