How to Improve Video Quality in Premiere Pro
While Premiere Pro can't perform video restoration on a truly terrible clip, it contains a powerful suite of tools designed to fix common issues and enhance video quality. This isn't only about applying a cheap filter; it's about making precise, professional adjustments.
This guide will walk you through a complete workflow to improve video quality in Premiere Pro. We'll cover the essential techniques for sharpening, color correction, noise reduction, stabilization, how to export your project without losing all your hard work, and crucially, we offer tips on utilizing AI tools to improve video quality effectively.
Three Things to Do Before Increasing Video Quality
Before you even think about editing, getting your project's technical foundation right will save you from headaches and performance issues down the line.
1. Match Your Sequence Settings
When you drag your very first clip onto an empty timeline, Premiere Pro will ask if you want to change the sequence settings to match the clip. Click "Change sequence settings." ensures your project's resolution (like 1920x1080) and frame rate (like 24 or 30 fps) are aligned with your video, preventing quality loss from the start.
If your sequence setting is a 4K timeline, you'd better pre-process your 1080p video to 4K before importing into Premiere Pro. If your hardware cannot handle 4K rendering, you can use proxy settings.
2. Use an Adjustment Layer: The Pro Workflow
Instead of applying effects directly to each video clip, use Adjustment Layers for non-destructive experiments. Any effect you apply to this layer will affect all the clips beneath it. You can think of it as a transparent video clip laying over your main video clip.
3. Decide whether you need to upscale video inside Premiere Pro or pre-processing.
Since Premiere Pro is not a dedicated AI video upscaler, and rendering huge resolutions with other effects can be a resource hog, you need a seamless workflow to sort out your footage. For more details, learn about upscaling video in Premiere Pro.
Technique 1: Sharpen Video with the Unsharp Mask
One of the most common complaints about digital video is that it can look "soft." It lacks that crisp pop that makes an image feel high-quality. While it can't fix a completely out-of-focus shot, sharpening can trick your eyes to "see" some details in surface textures and landscapes.
You might be tempted to search for the "Sharpen" effect in Premiere Pro, but we're going to skip that one. For more control and better results, the commonly used feature is Unsharp Mask for enhancing edge detail.
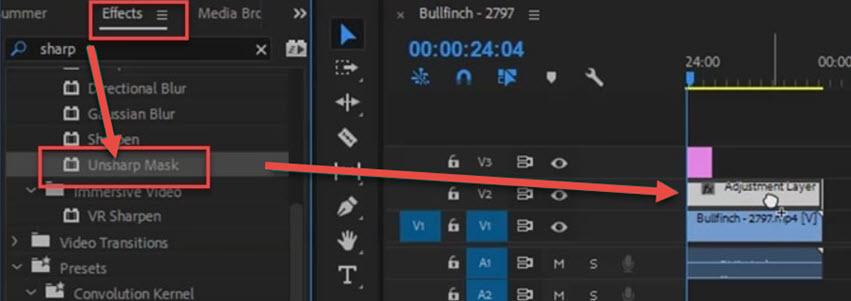
Step 1: Select the Adjustment Layer you placed over your clips on the timeline. All our work will happen here.
Step 2: Go to the Effects panel. In the search bar, type Unsharp Mask.
If you don't see it, go to Window > Effects to layout the effects panel.
Step 3: Drag the Unsharp Mask effect from the Effects panel and drop it directly onto your Adjustment Layer in the timeline.
Also see: How to Change Resolution in Premiere Pro Step by Step
Step 4: With the Adjustment Layer still selected, go to the Effect Controls panel. You will now see Unsharp Mask listed with its three sliders.
The default layout for the Effects Controls panel is usually in the top-left.
Note: You can click the little "fx" icon next to the Unsharp Mask title. This toggles the effect on and off. It’s the best way to see a quick before-and-after and decide if your changes genuinely enhance video quality
Step 5: Adjust the parameters.
There is no single "perfect" setting, as it depends entirely on your footage. However, we usually use the following as a starting point: Amount: 75, Radius: 1.5, Threshold: 3.
- Amount: Intensity of the sharpening. A higher number means a more aggressive sharpening effect.
- Radius: This defines how large of an area around an "edge" will be sharpened. A larger radius creates thicker, more pronounced edges. You generally want to keep this value low.
- Threshold: This slider tells Premiere Pro to ignore sharpening in areas that don't have much detail, like a clear blue sky or a smooth wall. It helps you sharpen your subject without adding noise to the rest of the image.
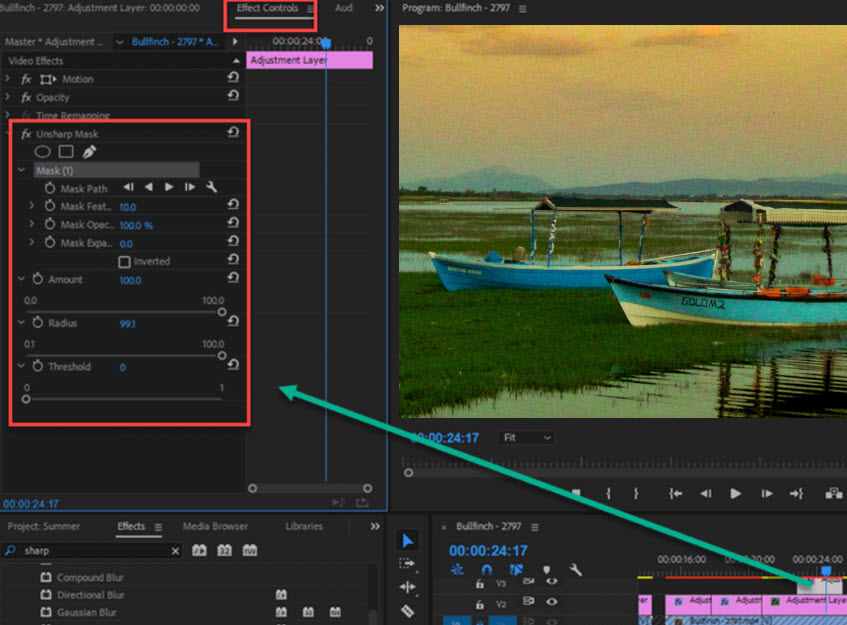
Pro Tip: To really see what you're doing, change the Program Monitor's zoom level from "Fit" to 100% or 150%. This lets you see the actual pixels so you can judge if you're over-sharpening. You want to enhance detail, not create weird, glowing halos around your subjects.
Technique 2: Use Lumetri Color Panel
Sharpening adds clarity, but color gives your video its soul. If your footage looks dull, washed-out, or the colors just feel "off," this is where you can make the biggest impact. Besides basic brightness and contrast effects, let's head to all things color in Premiere Pro: the Lumetri Color panel.
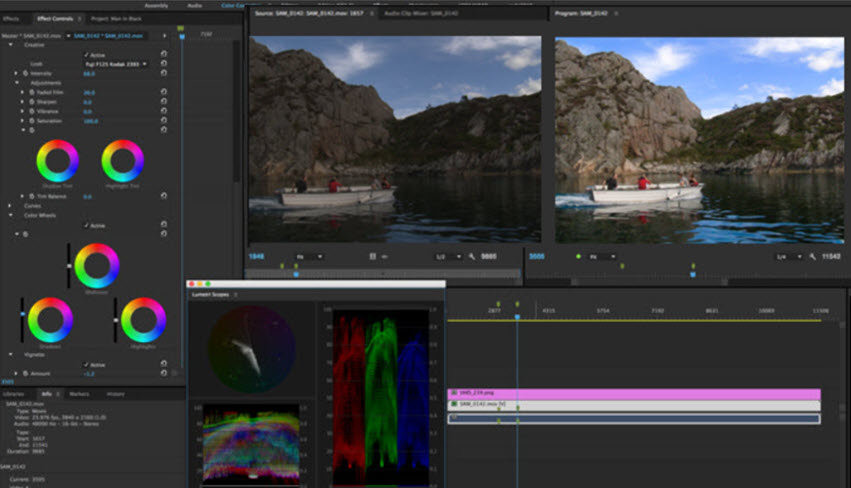
Step 1: To make things easier, switch to the dedicated Color workspace. Go to Window > Workspaces > Color. This will change the layout style and put the Lumetri Color panel center and front.
Step 2: Select a clip on your timeline (or your Adjustment Layer if you want to apply the grade to the entire sequence).
Step 3: In the Lumetri Color panel, go to the Creative tab. Click the thumbnail next to "Look" to browse the built-in presets. Find one that gets you close to the style you want.
Step 4: Now, go back to the Basic Correction tab to fine-tune the look.
If the preset look dark on the video clip, you can slowly dial up the Exposure slider. If it crush the details in the dark areas, try lifting the Shadows. You can also dial back Saturation if the colors are too intense to be natural.
In all, you are now using the preset as a base and customizing it to fit your specific clip.
Once you've dialed in a look you love, you can save it! In the Lumetri Color panel, click the three horizontal lines at the top and select "Save Preset." Give it a name, and you can now instantly apply this exact custom grade to any other clip in any project, ensuring a consistent style to enhance video quality.
Technique 3: Clean Up Grainy and Noisy Video
If you are using a legacy version of Premiere and can still accessing the Median effect, you can use it to denoise video.
The Median effect works by looking at a group of pixels and averaging them out, which smoothen over the random, speckled pattern of noise.
Though for most users, the problem is the Median effects are obsolete in certain versions. If that is your case, read the detailed guide on how to denoise videos in Premiere Pro.
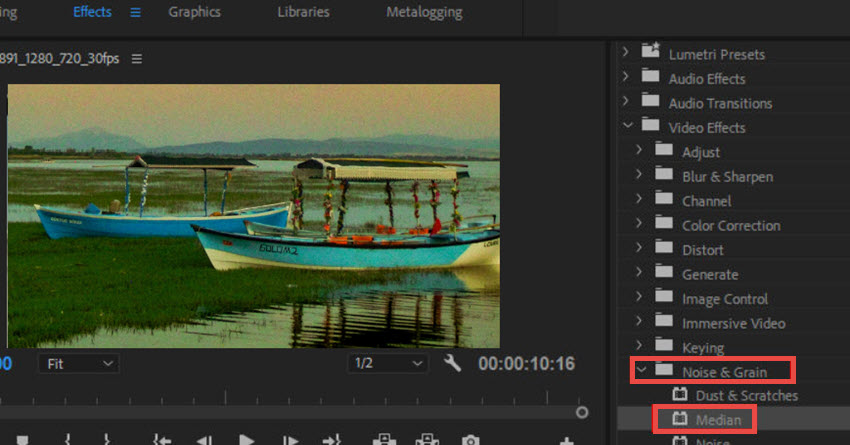
Step 1: In the Effects panel, search for Median.
In legacy versions, its under the Video Effects > Noise & Grain folder
Step 2: Drag the Median effect onto the specific noisy clip in your timeline.
Since noise levels can vary from shot to shot, you may need to drag it to the specific clip, or adding multiple adjustment layers, each corresponding to a clip below.
Step 3: Change the parameter for Median in Control Controls Panel.
You can adjust the radius slider to determine how large of an area the effect analyzes. A larger radius means a stronger, more aggressive smoothing effect. When dialing, it's better to move the slider slowly to increase the value. Watch your Program Monitor closely and avoid a heavy effect.
You can also combining it with the Unsharp Mask method above to improve video quality in Premiere Pro.
More Tips: How to Add Film Grain in Premiere Pro for Cinematic Look
Technique 4: Fix Stuttering Footage with Warp Stabilizer
Jittering and shaky visuals can make the footage low quality. To enhance video quality for smoother effect, you can apply the Warp Stabilizer in Premiere. It analyzes pixels in your footage, tracking movement frame by frame, and then warps, crops, and repositions the image to create a smooth, stable shot.
Step 1: Locate the shaky clip on your timeline.
Apply Warp Stabilizer directly to the clip itself, not via an adjustment layer.
Step 2: Go to the Effects panel and search for Warp Stabilizer.
Step 3: Drag the Warp Stabilizer effect directly onto the shaky video clip.
Step 4: Wait for the program to finish analyzing.
If you need more control, select the clip and go to the Effect Controls panel. You can lower this value to bring back some of the natural handheld motion, or increase the value for a smoother result.
Export the Video without Quality Loss
A bad export can re-introduce blocky artifacts and washed-out colors, completely undoing your efforts to increase video quality in Premiere Pro. You need to focus on a few key settings to ensure a high-quality result, especially for web platforms like YouTube or Vimeo.
Format: Choose H.264. It offers a great balance of quality and file size, and is widely compatible for streaming.
Preset: Click the dropdown and select Match Source - High Bitrate.
Bitrate Encoding: Change this to VBR, 2 Pass. Though it takes longer time for rendering and processing.
Target Bitrate (Mbps): Depending on the intended platform, you can search for each of their official document on recommended Bitrate, for different resolutions.
Bonus Tip: Upscale and Increase Video Quality with AI
Sometimes you have a clip that's beyond what Premiere's built-in tools can gracefully handle. It might be footage from an old phone, a video shot in near darkness with video grains, or a low-resolution clip you need to punch into a 4K timeline. When you push Premiere's parameters too hard on this kind of footage, you get "halo" artifacts or over sharpen visuals.
This is when you reach for a specialist AI tool. Instead of trying to fix the clip during your edit, you rescue it before you start. A great tool for this is Aiarty Video Enhancer.
How to Use It to Enhance Video Quality for Premiere Pro
Think of it as a repair shop for your problem clips. It uses dedicated AI models to rebuild video frame-by-frame, doing a much better job at video upscaling, denoising, and restoring details than a general-purpose editor can.
The workflow is simple: you fix your worst clips in Aiarty first, then bring the new, high-quality files into Premiere to edit, or you can post processing for the final finish.
Step 1: Install the AI video enhancer and load the video clip.
Click the buttons below to download the dedicated AI video quality enhancer from Aiarty. Drag and drop your problem video file (or multiple files) into the software.
Step 2: Set target resolution and AI model for specific videos.
Aiarty Video Enhancer allows you to upscale videos by 2X, 4X, or directly select a custom resolution of 1080p, UHD 4K, etc. Or you can stay with the original resolution, and enhance quality with AI inference.
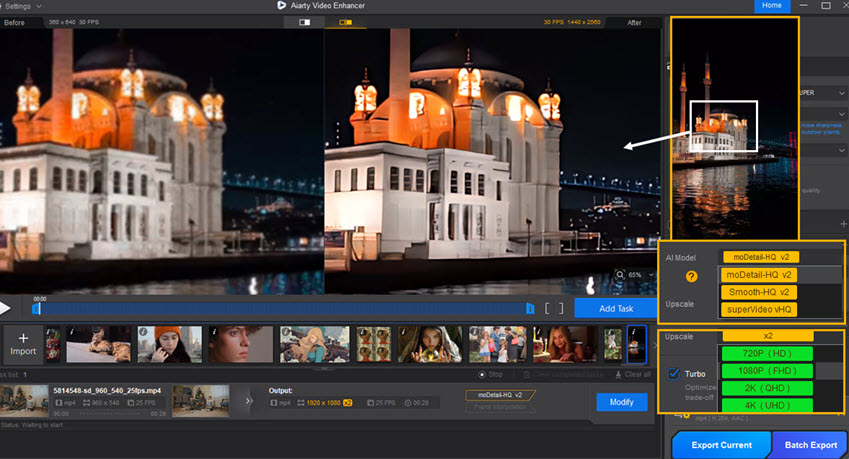
You can choose an AI model based on your video's problem, and fine tune how strongly AI enhances the video.
- For portraits or nature shots: Use moDetail-HQ. It's fantastic for bringing back lost texture in skin, hair, etc.
- For general cleanup: Smooth-HQ gives a balanced, natural enhancement for clips with moderate flaws.
- For extreme noise: Use superVideo-HQ. This is the powerhouse for rescuing grainy, murky, low-light footage.
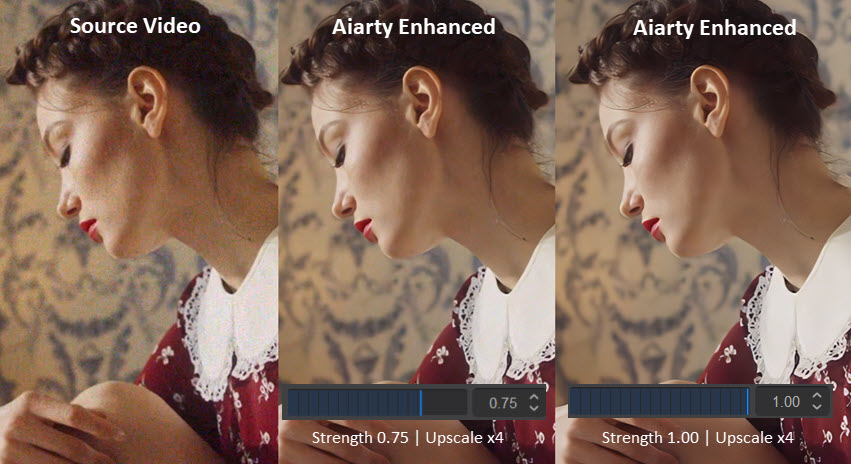
Each model supports Strength Control, meaning you can flexibly adjust how strongly the AI enhancement is applied to the footage. The benefits are more natural and realistic results, no matter you prefer to restore more details or keep the feel of the source clip.
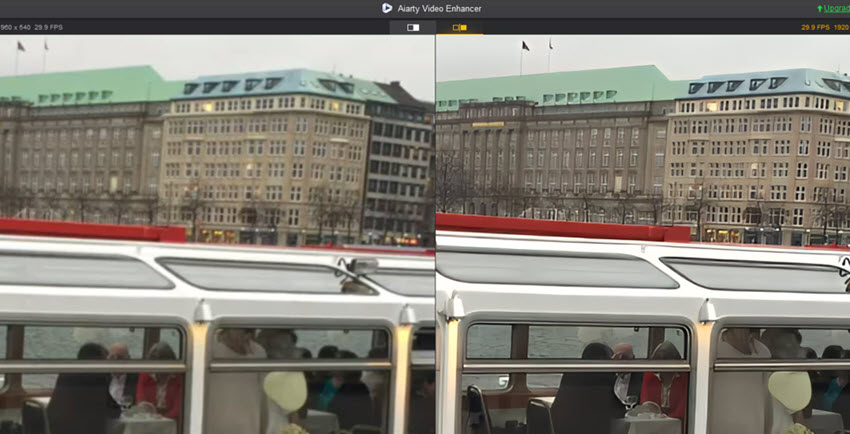
Using the real-time preview, you can pause the video and quickly compare the before-and-after effect, so you know what you're getting before you commit to a full export.
Step 3: Batch export the videos.
Once you're happy with the settings, hit the Export button. If you've loaded multiple clips, Aiarty will process them all in a batch, one after the other. It's fast, especially with "Turbo Mode" enabled.
Step 4: Edit in Premiere Pro.
When it's done, you'll have a new, dramatically improved video file. Import this back into your Premiere project and edit with it. The clip that was once unusable is now a clean, crisp part of your timeline.
You don't need to run your entire project through an AI enhancer. This workflow is most effective for the 1-3 clips in your timeline that are truly problematic. Isolate your worst offenders, give them the AI treatment, and then blend them back in with the rest of your footage in Premiere. This saves a ton of time and targets the problem to enhance video quality efficiently.
You May Also Like
This post was written by Ashley Brown, a videographer turned AI explorer. As an associate writer at Digiarty Software, she dives into the latest AI-powered tools for video enhancement and content creation, offering practical insights and unbiased commentary. Accuracy confirmed by Abby Poole.